

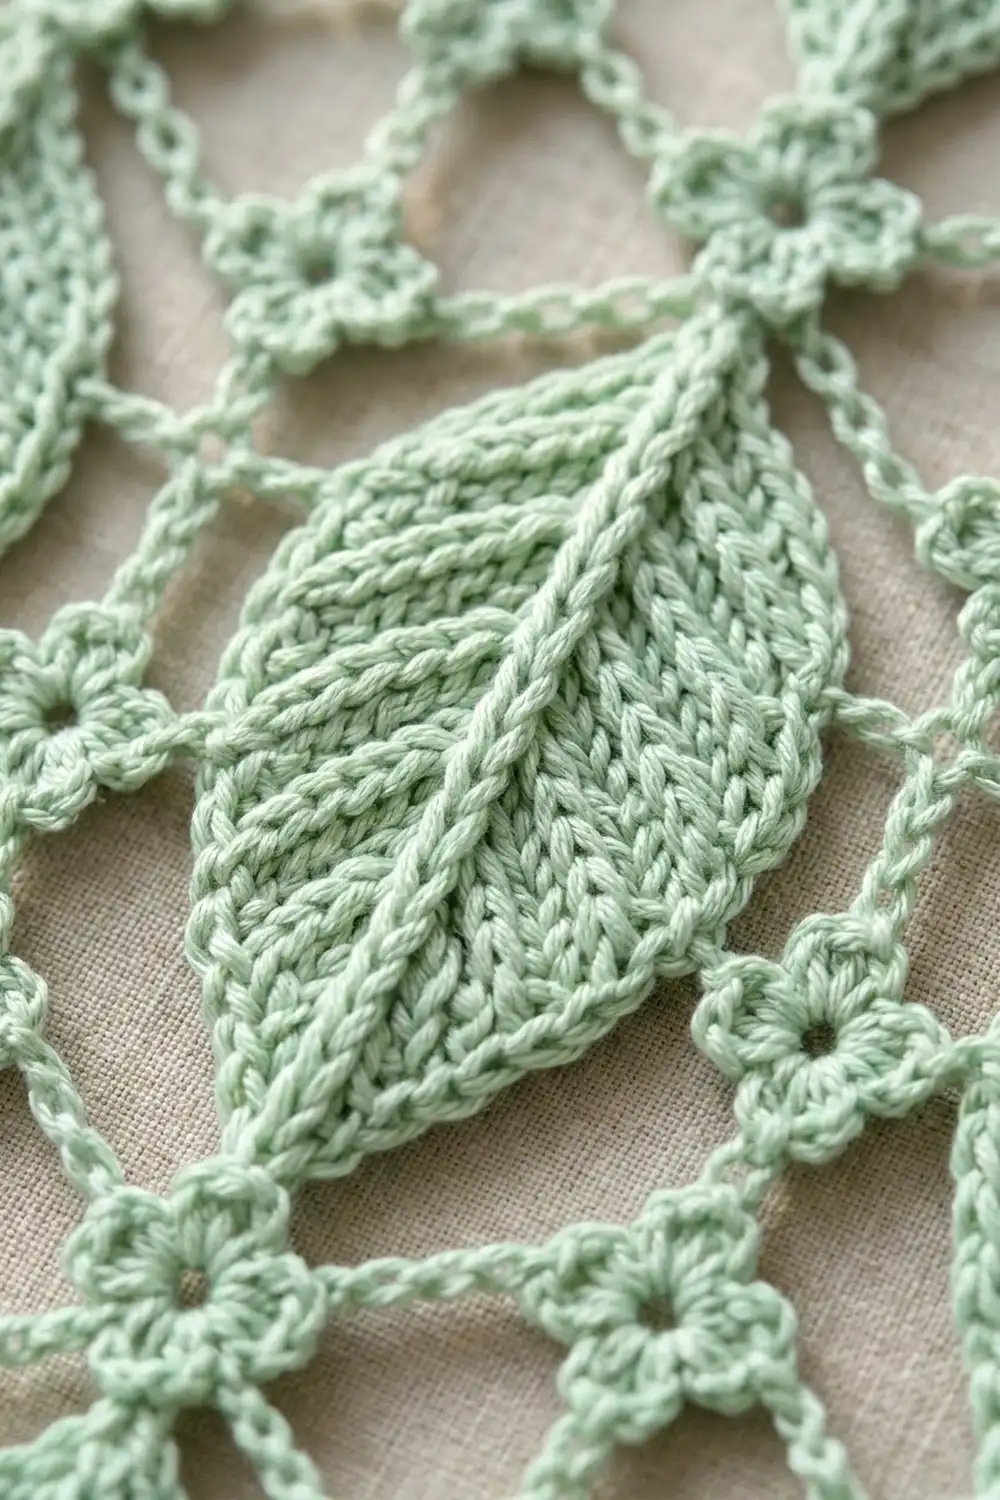
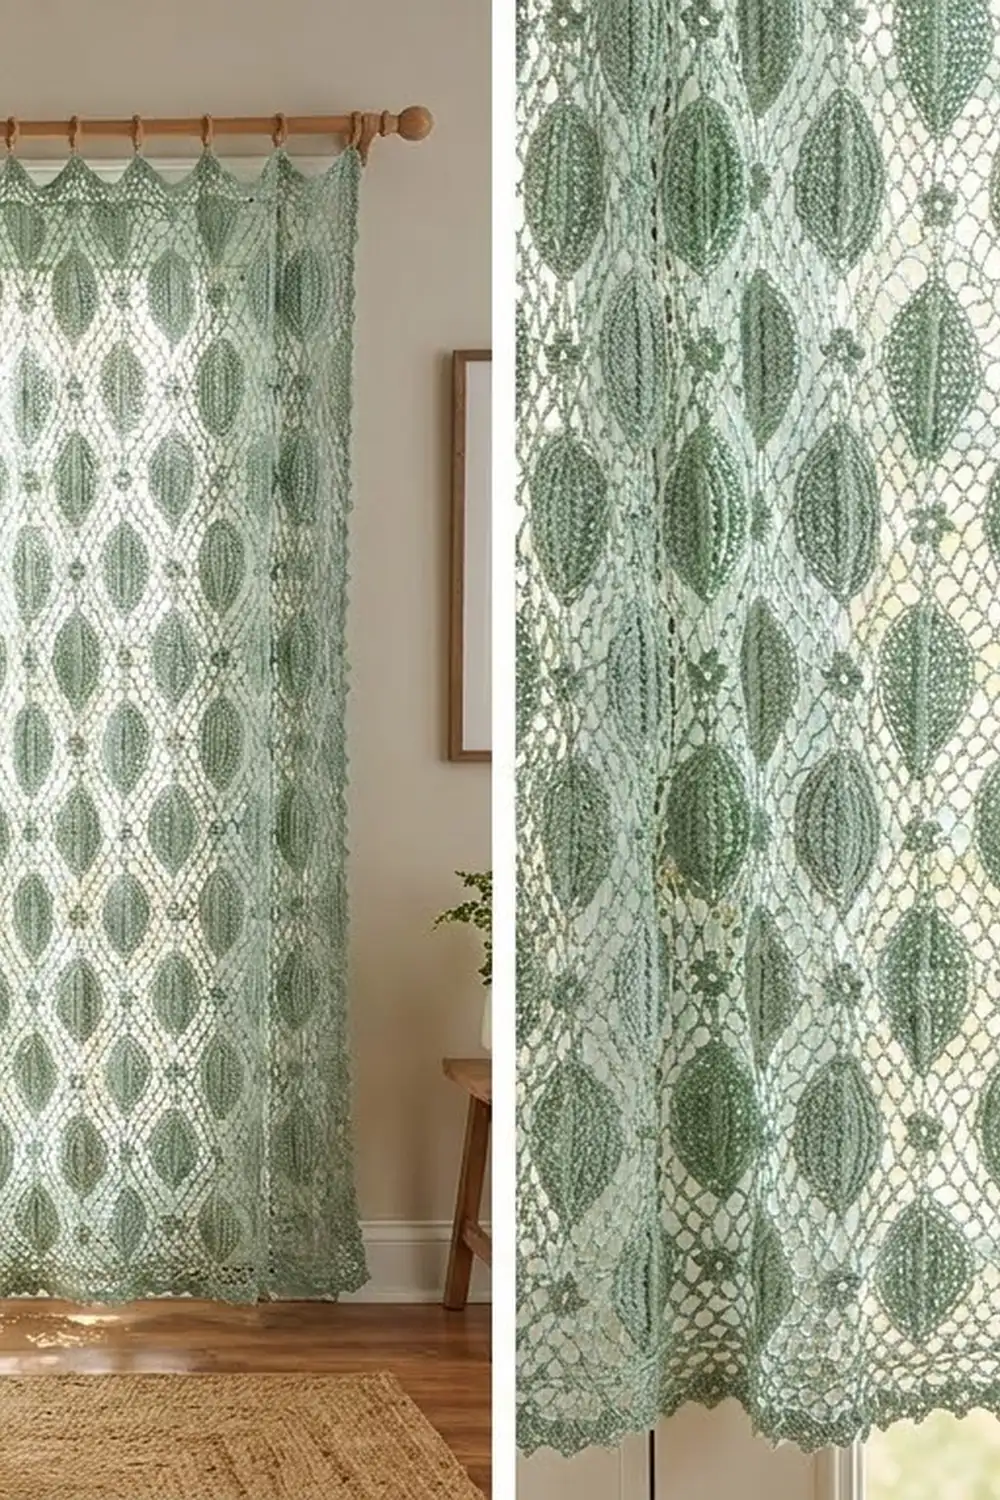
The Sage Trellis Leaf curtain is a light, airy lace panel that lets sunlight through. Columns of ribbed leaves climb an open chain trellis, and tiny four-petal flowers mark every crossing point. Neighboring columns are offset by half a leaf, so the leaves sit in a staggered pattern across the window.
The whole panel uses one color, a soft mint-sage green, which keeps the look calm and botanical. The leaves are worked in back loop single crochet, which gives them a raised center vein and slanted ribs. The lattice is made of chains and small picot flowers. This pattern uses US crochet terms.
One finished panel measures 24.5 in (62.2 cm) wide by 74 in (188.0 cm) long, not counting the hanging loops. To make the pair shown, make two identical panels.
Construction is simple and repetitive. First you work six vertical “spines”: chains with the leaves crocheted directly into them and a center flower between each leaf. Next you work seven vertical “rails” that link the spines with chain rungs and leaf spokes. Finally, you add a top band with hanging loops and a scalloped bottom edging.
Finished Size and Construction
- Finished size (one panel): 24.5 in x 74 in (62.2 cm x 188.0 cm), plus loops about 1 in (2.5 cm) tall
- Skill level: Intermediate
- Terminology: US
- Yarn weight: Sport (#2) mercerized cotton
- Hook: 3.5 mm (E-4)
- Number of pieces: 1 continuous piece per panel; the pair is 2 separate panels
- Layout: 6 leaf columns, alternating Column A (9 leaves) and Column B (8 leaves plus open half-cells at the top and bottom)
- Column width: 4 in (10.2 cm), measured from rail center to rail center
- Size before border: 24.5 in x 72.5 in (62.2 cm x 184.2 cm)
- Border depth: top band 0.5 in (1.3 cm); bottom edging 1 in (2.5 cm); no border on the sides
Materials
Choose a smooth mercerized cotton or cotton blend in sport weight. Cotton holds the leaf ribs crisply, blocks well, and doesn’t stretch much on a long drop.
- Sage green: 250 g / 750 m (820 yd) per panel; 500 g / 1,500 m (1,640 yd) for the pair
Tools:
- 3.5 mm (E-4) crochet hook
- Tapestry needle
- Locking stitch markers (at least 20)
- Rust-proof pins and a large blocking surface
- Measuring tape
- Curtain rod with 7 rings or clips per panel
The yarn amounts include a margin of about 10% for gauge differences and test pieces.
Abbreviations (US Terms)
- ch – chain
- sl st – slip stitch
- sc – single crochet
- dc – double crochet
- BLO – back loop only
- st(s) – stitch(es)
- sk – skip
- RS – right side
Special stitch – Flower (fl): [Ch 4, sl st in 4th ch from hook] 4 times, then sl st in the base of the first petal. This makes four petals around a tiny center, and your working loop ends at the base. When the work lies flat, arrange the petals at top, right, bottom, and left.
Special stitch – Spoke: Ch the number given, sl st into the target, then sl st back in each ch to return to the flower.
Gauge and Checkpoints
- Leaf fabric: 5 sc and 5 rows = 1 in (2.5 cm) in sc BLO
- Chains: 6 ch = 1 in (2.5 cm)
- Flower: 0.5 in (1.3 cm) across
Test piece first: Make a fl, ch 34, work one leaf (Rows 1–6 below), sl st to the base, ch 3, then make one more fl.
Checkpoints:
- Leaf: 2.5 in (6.4 cm) wide x 6.5 in (16.5 cm) long.
- Test segment: 8 in (20.3 cm) from the center of one flower to the center of the other.
- Rail interval (fl, ch 21, fl): 4 in (10.2 cm) center to center.
- Finished spine: 72 in (182.9 cm) from the first flower center to the last.
- Width after rails: 24.5 in (62.2 cm).
If your pieces are too big: Go down 0.25–0.5 mm in hook size. If only the chains run long, tighten your chain tension instead.
If they are too small: Go up 0.25–0.5 mm in hook size, or loosen your chains.
Don’t change the stitch counts. Every chain count in this pattern lines up with the flower positions.
Leaf (Worked Into the Spine)
Each leaf grows from a ch-34. The first 3 ch form the top spoke, and the other 31 ch form the leaf foundation. Every row starts and ends at the stem (bottom) end, so you finish each leaf ready to keep going down the spine.
Row 1: Sc in 2nd ch from hook and in next 28 ch (29 sc). Work 3 sc in the next ch (this is the tip; leave the 3 spoke ch unworked). Then, working in the free loops along the other side, sc in the next 26 ch, leaving the last 3 ch unworked. Turn. (58 sc)
Row 2: Ch 1. Sc BLO in each st to the center sc of the tip (27 sts). Work 3 sc in the center sc. Sc BLO in each st down the other side, leaving the last 3 sts unworked (27 sts). Turn. (57 sc)
Rows 3–6: Repeat Row 2. Each row has 1 st fewer than the row before. (Row 3: 56 sc; Row 4: 55 sc; Row 5: 54 sc; Row 6: 53 sc)
Finish: Ch 1 and sl st in the skipped first ch at the center of the leaf base.
The 3 sc at the tip make the upward point. The 3 sts left unworked at the end of each row taper the stem end. Working in the back loop builds the ribs and the center vein.
Spines
Lay out the spines in this order, left to right: A, B, A, B, A, B. Mark each center flower with its position number. The top is position 0 and the bottom is position 18. Each position is 4 in (10.2 cm) below the one before.
Spine A (make 3):
- Fl (position 0).
- [Ch 34, work the leaf, ch 3, fl] 9 times. The new flowers fall at positions 2, 4, 6, and so on down to 18.
- Fasten off.
Count: 10 flowers and 9 leaves. Length: 72 in (182.9 cm) from the first flower center to the last.
Spine B (make 3):
- Fl (position 0), ch 21, fl (position 1).
- [Ch 34, work the leaf, ch 3, fl] 8 times. The new flowers fall at positions 3, 5, 7, and so on down to 17.
- Ch 21, fl (position 18). Fasten off.
Count: 11 flowers and 8 leaves. Length: 72 in (182.9 cm).
The flower-to-flower length checks out. In Spine A, each leaf repeat measures 8 in (20.3 cm): the 3-ch top spoke is 0.5 in (1.3 cm), the leaf is 6.5 in (16.5 cm), the 3-ch bottom spoke is 0.5 in (1.3 cm), and two half flowers add 0.5 in (1.3 cm). Nine repeats = 72 in. In Spine B, the two 4 in (10.2 cm) half-cells plus eight 8 in leaf repeats also make 72 in. This offset of half a leaf is what creates the stagger.
Rails
There are 7 rails: R0 on the left edge, R1–R5 between the spines, and R6 on the right edge. Each rail has 19 flowers (positions 0–18) joined by 18 ch-21 segments.
What to work at each position, for each neighboring column:
- Rung, worked when that column has a center flower at this position: Spoke of ch 9, sl st into the facing side petal of the center flower.
- Column A has rungs at the even positions 0–18.
- Column B has rungs at positions 0 and 18 and at the odd positions 1–17.
- Leaf spoke, worked when a leaf’s widest point is at this position: Spoke of ch 3, sl st into the row-end st at the leaf’s widest point (halfway along its length).
- Column A has leaf spokes at the odd positions.
- Column B has leaf spokes at the even positions 2–16.
Working each rail (top to bottom):
- Fl (position 0).
- Work the left connection (skip this on R0), then the right connection (skip this on R6).
- Ch 21 and fl for the next position, then work its connections.
- Repeat Step 3 until position 18 is done. Fasten off.
Width check: A half-rung measures 0.25 in (0.6 cm) of flower + 1.5 in (3.8 cm) of chain + 0.25 in (0.6 cm) of flower = 2 in (5.1 cm). Two half-rungs make 4 in (10.2 cm) from rail to rail. A leaf spoke measures 0.25 in (0.6 cm) + 0.5 in (1.3 cm) + 1.25 in (3.2 cm) for half the leaf width, which is also 2 in (5.1 cm).
Six columns x 4 in = 24 in (61.0 cm) between the centers of the outer rails. Add 0.5 in (1.3 cm) for the outer half-flowers and the panel is 24.5 in (62.2 cm) wide.
Checkpoint: 24.5 in x 72.5 in (62.2 cm x 184.2 cm).
Border
Border gauge: 6 sc = 1 in (2.5 cm) along the edge; 5 sc rows = 1 in (2.5 cm).
The top and bottom edges have the same structure. Along the edge, each column has:
- 1 rail flower (3 sc into its outer petal)
- 1 half-rung (9 sc, 1 per ch)
- 1 center flower (3 sc into its outer petal)
- 1 half-rung (9 sc)
That is 24 sc per column. Six columns x 24 = 144 sc, plus 3 sc in the last rail flower = 147 sc. At 6 sc per inch, 147 sc = 24.5 in (62.2 cm), exactly the lattice width, so the edge stays flat. The side edges get 0 border stitches: the outer rails and their flowers are the finished edge.
Top Band (RS facing, across position 0)
Row 1: Ch 1 and work the 24-st sequence across each column, then 3 sc in the last rail flower. Turn. (147 sc)
Row 2 – Loops: Ch 1 and sc in each st across. On the rail stitches (sts 2, 26, 50, 74, 98, 122, and 146), work the sc, then ch 10 and sl st in the top of that sc. Turn. (147 sc + 7 ch-10 loops)
Row 3: Ch 1 and sl st in each sc across. Work 14 sc into each loop as you reach it. Fasten off. (147 sl st + 98 sc = 147 sts worked 1 per st + 98 loop sc)
The loops sit over the rails, so the panel hangs from its strongest vertical lines. The top edge dips gently between the rings, as shown.
Bottom Edging (RS facing, across position 18)
Row 1: Work the same as Top Band Row 1. Turn. (147 sc)
Row 2 – Shells: Ch 1. Sc in the first st, then [sk 2, 5 dc in next st, sk 2, sc in next st] 24 times. Sc in the last 2 sts. Turn. (24 shells; 27 sc + 120 dc = 147 sts)
Row 3 – Picots: Ch 1. Sc in each st across. In the center dc of each shell, work (sc, ch 3, sl st in 3rd ch from hook, sc) instead of a single sc. Fasten off. (147 sc worked 1 per st + 24 extra sc = 171 sc, + 24 picots)
The shell row works because 1 + (24 x 6) + 2 = 147, so the shells fit the edge exactly with no gathering. That gives 4 shells per column.
Final length: 72.5 in + 0.5 in + 1 in = 74 in (188.0 cm).
Final Blocking
- Weave in all ends along the chains or inside the leaves.
- Soak the panel in cool water, then roll it in towels to press out the water. Don’t wring it.
- Lay a sheet over the floor or a blocking surface. If you don’t have room for the full 74 in (188.0 cm), block one section at a time.
- Pin each rail straight first, keeping the rails 4 in (10.2 cm) apart from center to center.
- Pin the top and bottom bands so they measure 24.5 in (62.2 cm) across.
- Open each flower and pin the leaf tips so they point straight up.
- Let the panel dry completely before unpinning.
- Repeat for the second panel. Lay both panels side by side and check that they match.
Final Quality-Control Checklist
- Spine A has 10 flowers and 9 leaves; Spine B has 11 flowers and 8 leaves.
- Every leaf measures 2.5 in x 6.5 in (6.4 cm x 16.5 cm), and every leaf points up.
- Each rail has 19 flowers, and every ch-21 segment is complete.
- All rungs are 9 ch, and all leaf spokes are 3 ch.
- The top and bottom edges each start with 147 sc.
- There are 7 loops, all centered over the rails.
- The bottom edging has 24 shells and 24 picots.
- Each panel measures 24.5 in x 74 in (62.2 cm x 188.0 cm).
- The two panels match within 0.5 in (1.3 cm).
Troubleshooting
- Leaf cups or ruffles: Check that you worked only 3 sc in the center st, and that you left 3 sts unworked at the end of each row.
- Leaf is too narrow: Make sure you worked all 6 rows, working each stitch in the back loop only.
- Flowers don’t line up across the columns: Recount the ch-21 segments and the ch-34 leaf starts.
- Rails are wavy: Your chains are too tight. Loosen them, or make the chains with a hook 0.5 mm larger.
- Leaf pulls sideways: The spoke is too short or went into the wrong st. Redo it at the leaf’s widest point.
- Bottom edge flares: Recount the 147 sc. Use exactly 9 sc per half-rung.
- Top sags too much: Add a ring or clip at the midpoint between two loops.
Care
Hand wash in cool water with a mild detergent. Roll the panel in a towel to remove excess water, then lay it flat or hang it while damp so it dries straight.
Final Notes
Each measurement builds on the one before it:
- The leaf is 2.5 in x 6.5 in (6.4 cm x 16.5 cm).
- Each spine repeat is 8 in (20.3 cm), and each spine is 72 in (182.9 cm).
- The rails are 4 in (10.2 cm) apart, so the lattice is 24.5 in x 72.5 in (62.2 cm x 184.2 cm).
- The 147-st border keeps that width, and the finished panel is 24.5 in x 74 in (62.2 cm x 188.0 cm).
If you check gauge at each step, the second panel will match the first. Happy crocheting!