

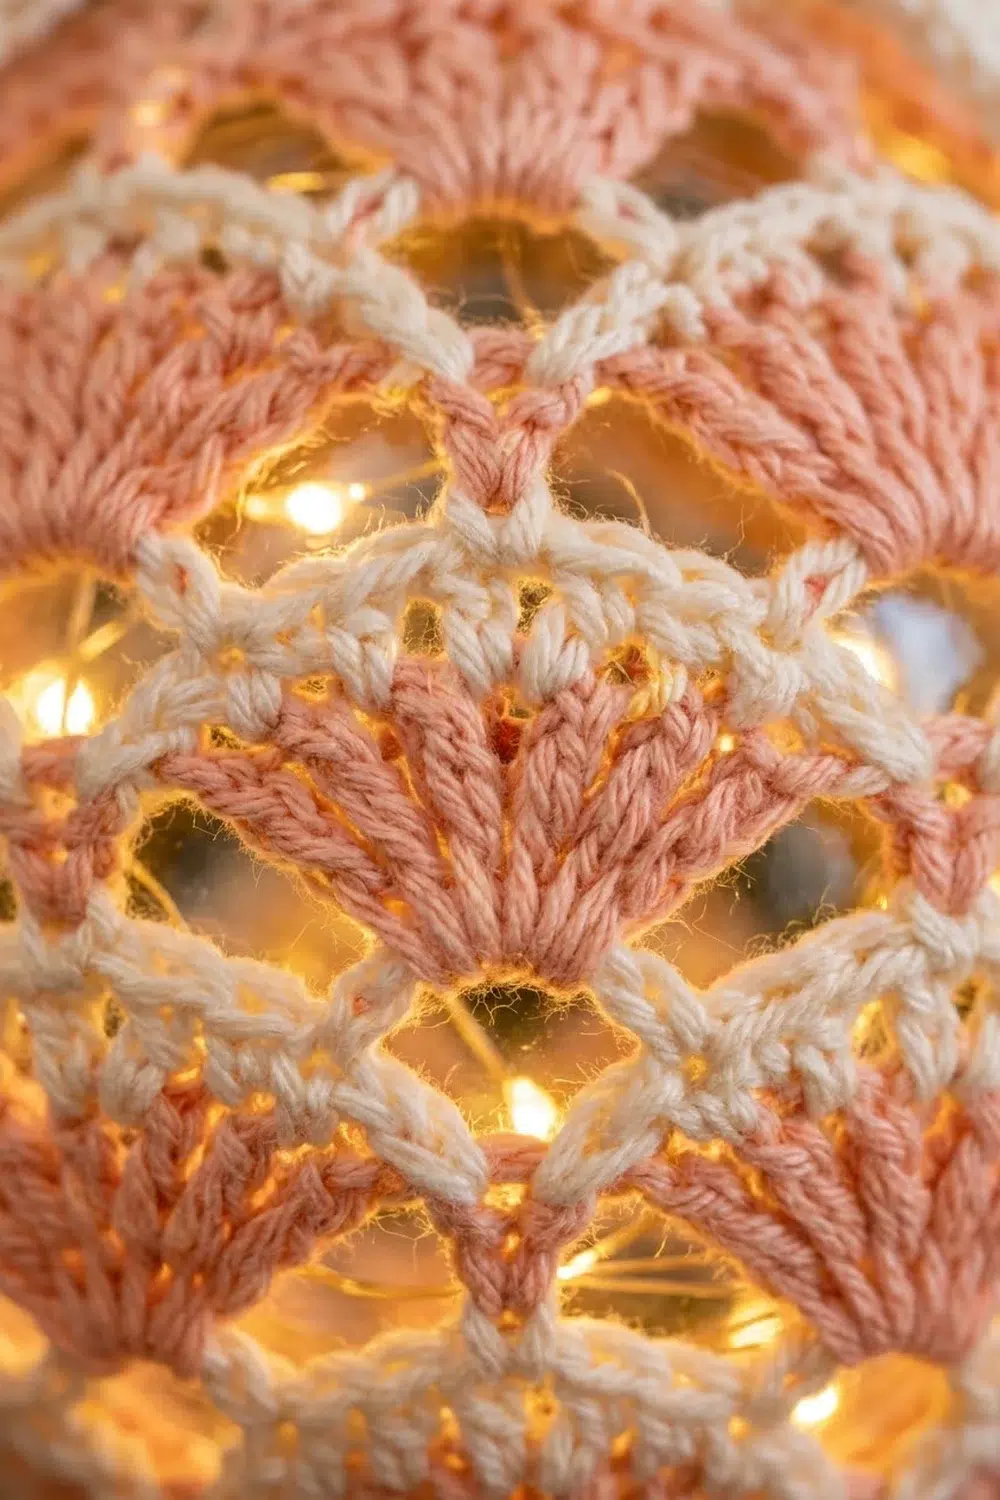
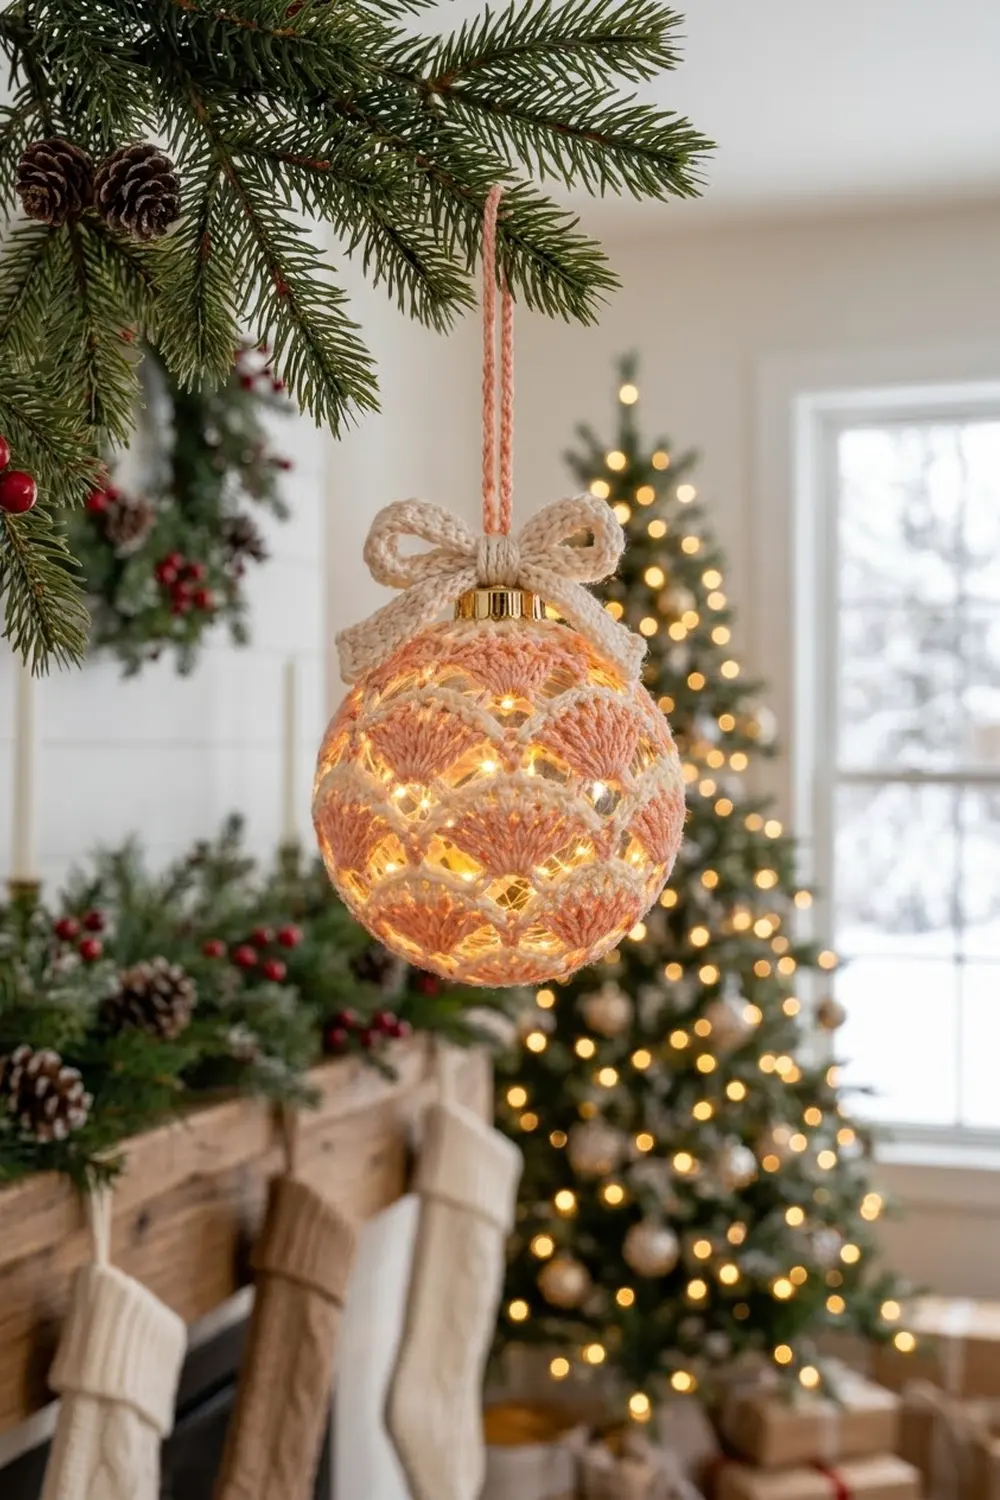
This cover turns a plain clear ornament into a glowing lace bauble. Fan-shaped peach shells and wavy cream bands wrap the whole ball. Put micro fairy lights inside and the light shines out through every gap between the shells.
The colors are soft and warm: peachy salmon for the shells and creamy off-white for the scalloped bands and the bow. It looks like vintage lace, but it’s simple to make. The pattern uses US crochet terms.
The cover fits a 4 in (10.2 cm) fillable ornament. On the ball it measures about 12.6 in (32.0 cm) around the widest point. Measured along the curve, it is about 5.4 in (13.7 cm) from the bottom center to the top edge.
You work the cover in one piece, in joined rounds from the bottom up. First you make a solid peach circle for the base. Then you alternate peach shell rounds with two-round cream bands. Once the cover reaches the widest point, you put the ornament inside and work the decreases around it. A peach neck band closes the top, and a cream bow and a peach cord finish the ornament.
Finished Size and Construction
- Finished size: fits a 4 in (10.2 cm) ornament; about 12.6 in (32.0 cm) around when stretched on the ball
- Skill level: Easy-intermediate
- Terminology: US
- Yarn weight: Sport (#2) cotton or cotton blend
- Hook: 3.0 mm (C/D)
- Number of pieces: 1 main cover, plus a 3-part bow and 1 hanging cord
- Layout: one seamless cover worked in rounds around a single ball
- Piece size: about 12.25 in (31.1 cm) around at Rnd 19 before stretching
- Size before border: the body (Rnds 1–24) is about 5 in (12.7 cm) along the curve
- Border depth: 3 rounds, about 0.4 in (1.0 cm)
Materials
Use a smooth sport-weight cotton. Cotton keeps the shells crisp and won’t stretch out on the ball. Fuzzy yarns blur the lace and dim the light.
- Color A, Peach: 20 g, about 62 m
- Color B, Cream: 15 g, about 47 m
These amounts assume a yarn with about 155 m per 50 g. They include a margin of about 25 percent for the gauge check and yarn tails.
Tools:
- 3.0 mm (C/D) crochet hook
- Clear fillable ornament, 4 in (10.2 cm), with a removable metal cap
- Coin-cell micro LED string small enough to fit inside the ornament
- Tapestry needle, stitch marker, scissors
- Small spray bottle and pins for blocking
Abbreviations (US Terms)
- ch – chain
- sc – single crochet
- dc – double crochet
- sl st – slip stitch
- sk – skip
- sp – space
- inc – 2 sc in the same stitch
- sc2tog – single crochet 2 together
- Rnd – round
Special stitches
- Standing sc: start with a slip knot on the hook, insert the hook into the stitch, and work a normal sc. This joins the new yarn without a ch 1.
- Shell: 7 dc or 9 dc (as stated), all worked into the same stitch, so the shell fans upward from one point.
Gauge and Checkpoints
Gauge: 13 sc and 14 rounds = 2 in (5.1 cm) in sc with a 3.0 mm hook.
Test piece first: work Rnds 1–8 and lay the circle flat. It should measure 2.25 in (5.7 cm) across. This circle becomes the base of your cover, so the swatch isn’t wasted.
Checkpoints:
- After Rnd 8: 48 sts; the flat circle is 2.25 in (5.7 cm) across.
- After Rnd 12: the cup covers the bottom of the ornament without gaping.
- After Rnd 19: the relaxed circumference is about 12.25 in (31.1 cm). It should stretch snugly to 12.6 in (32.0 cm) around the widest point of the ornament.
- After Rnd 24: the body is about 5 in (12.7 cm) along the curve.
- After Rnd 27: the neck band is about 3.7 in (9.4 cm) around and hugs the base of the cap.
If the circle is too big: switch to a 2.75 mm hook. A loose cover slides around and the shells sag.
If the circle is too small: switch to a 3.25 mm hook. A tight cover won’t stretch over the widest point of the ball.
Pattern: The Cover
Fasten off at each color change. Work over the tails as you go to save weaving.
Base (Color A, Peach)
Rnd 1: Magic ring, 6 sc in ring, join with sl st to first sc. (6 sts)
Rnd 2: Ch 1, inc in each st around, join. (12 sts)
Rnd 3: Ch 1, sc in next st, inc 6 times, join. (18 sts)
Rnd 4: Ch 1, sc in next 2 sts, inc 6 times, join. (24 sts)
Rnd 5: Ch 1, sc in next 3 sts, inc 6 times, join. (30 sts)
Rnd 6: Ch 1, sc in next 4 sts, inc 6 times, join. (36 sts)
Rnd 7: Ch 1, sc in next 5 sts, inc 6 times, join. (42 sts)
Rnd 8: Ch 1, sc in next 6 sts, inc 6 times, join. (48 sts)
Before you go on, check the circle against the 2.25 in (5.7 cm) target.
Rnd 9: Ch 1, sc in first st, ch 5, sk next 5 sts, sc in next st, ch 5, sk next 5 sts; rep from * 6 more times, join to first sc. (8 sc, 8 ch-5 sps)
Rnd 10 (first shells): Ch 3 (counts as dc), 6 dc in same sc, sc in next ch-5 sp, 7 dc in next sc, sc in next ch-5 sp; rep from * 6 more times, join to top of ch-3. Fasten off. (8 seven-dc shells + 8 sc = 64 sts)
Lace Body
Each cream band takes two rounds. The arch round chains from the center of one shell to the center of the next. The fill round packs each arch with sc to make a solid scallop. Each new peach shell is worked at the center of an arch, so it sits between two shells from the round below.
Rnd 11 (Color B, arches): Standing sc in 4th dc of any shell, ch 7, sc in 4th dc of next shell, ch 7; rep from * 6 more times, join to first sc. (8 sc, 8 ch-7 sps)
Rnd 12 (Color B): Ch 1, sc in sc, 7 sc in next ch-7 sp; rep from * 7 more times, join. Fasten off. (64 sts)
Rnd 13 (Color A, shells): Standing sc in any sc that sits over a shell. Sk 3 sts, 9 dc in next st, sk 3 sts, sc in next st; rep from * 7 more times, leaving out the final sc on the last repeat, then join to the first sc. Fasten off. (8 nine-dc shells + 8 sc = 80 sts)
Each repeat uses 1 + 3 + 1 + 3 = 8 sts, and 8 repeats use all 64.
Rnd 14 (Color B, arches): Standing sc in 5th dc of any shell, ch 9, sc in 5th dc of next shell, ch 9; rep from * 6 more times, join. (8 sc, 8 ch-9 sps)
Rnd 15 (Color B): Ch 1, sc in sc, 9 sc in next ch-9 sp; rep from * 7 more times, join. Fasten off. (80 sts)
Rnd 16 (Color A, shells): Standing sc in any sc that sits over a shell. Sk 4 sts, 9 dc in next st, sk 4 sts, sc in next st; rep from * 7 more times, leaving out the final sc on the last repeat, then join to the first sc. Fasten off. (80 sts)
Each repeat uses 1 + 4 + 1 + 4 = 10 sts, and 8 repeats use all 80.
Rnd 17: Repeat Rnd 14. (8 sc, 8 ch-9 sps)
Rnd 18: Repeat Rnd 15. (80 sts)
Rnd 19: Repeat Rnd 16. (80 sts)
Insert the ornament now. First, check that the cover measures 12.25 in (31.1 cm) around, relaxed. Put the LED string inside the ornament, test it, and replace the cap. Slide the ball into the cover with the cap pointing up. The top edge of Rnd 19 should sit just above the widest point.
Top Shaping (worked around the ornament)
Hold the ball in your palm with the cap up and turn it as you work.
Rnd 20 (Color B, arches): Standing sc in 5th dc of any shell, ch 7, sc in 5th dc of next shell, ch 7; rep from * 6 more times, join. (8 sc, 8 ch-7 sps)
Rnd 21 (Color B): Ch 1, sc in sc, 7 sc in next ch-7 sp; rep from * 7 more times, join. Fasten off. (64 sts)
Rnd 22 (Color A, shells): Standing sc in any sc that sits over a shell. Sk 3 sts, 7 dc in next st, sk 3 sts, sc in next st; rep from * 7 more times, leaving out the final sc on the last repeat, then join to the first sc. Fasten off. (8 seven-dc shells + 8 sc = 64 sts)
Rnd 23 (Color B, arches): Standing sc in 4th dc of any shell, ch 5, sc in 4th dc of next shell, ch 5; rep from * 6 more times, join. (8 sc, 8 ch-5 sps)
Rnd 24 (Color B): Ch 1, sc in sc, 5 sc in next ch-5 sp; rep from * 7 more times, join. Fasten off. (48 sts)
The top half mirrors the bottom: 80 sts at the widest point, then 64, then 48.
Bow (Color B)
Loop strip: Ch 40. Sc in 2nd ch from hook and in each ch across, turn. (39 sts) Work 2 more rows of 39 sc. Fasten off. The strip measures 6 in (15.2 cm). Sew the short ends together to make a ring. Flatten the ring with the seam at the center back to form two loops 3 in (7.6 cm) wide.
Tail strip: Ch 21. Sc in 2nd ch from hook and in each ch across, turn. (20 sts) Work 2 more rows of 20 sc. Fasten off. The strip measures 3 in (7.6 cm). Fold it into a shallow V and place it behind the loops.
Center wrap: Ch 9. Sc in 2nd ch from hook and in each ch across, turn. (8 sts) Work 1 more row of 8 sc. Fasten off, leaving a long tail. The wrap measures 1.25 in (3.2 cm). Pinch the loops and tails together at the center. Wrap the strip tightly around the pinch and sew its ends together at the back.
Hanging Cord (Color A)
Ch 60, then sl st in the back bump of each ch back to the start. This makes a firm cord about 10 in (25.4 cm) long. Thread it through the hanger on the cap, fold it in half, and knot the ends together.
Border: Neck Band (Color A)
The border is the band that closes the top. It uses the same gauge: 13 sc = 2 in (5.1 cm).
Rnd 25: Standing sc in any st, sc in next st, sc2tog, sc in next 2 sts, sc2tog; rep from * 10 more times, join. (36 sts)
Each of the 12 repeats uses 4 sts and makes 3, so 48 becomes 36.
Rnd 26: Ch 1, sc in next st, sc2tog 12 times, join. (24 sts)
Each of the 12 repeats uses 3 sts and makes 2, so 36 becomes 24.
Rnd 27: Ch 1, sc in each st around, join. Fasten off, leaving a 10 in (25.4 cm) tail. (24 sts)
Why the math works: At 6.5 sc per inch, 24 sts make a band 3.7 in (9.4 cm) around. The neck of a 4 in (10.2 cm) ornament is usually about 3.8 in (9.7 cm) around at the base of the cap. Because the band is slightly smaller, it grips the neck and keeps the cover from slipping. Each decrease round removes exactly 12 sts, spaced evenly, so the band pulls in without pleats. If the band is loose, weave the tail through Rnd 27 and pull gently to cinch it.
Sew the bow to the front of the band through Rnd 27, just below the cap.
Final Blocking
- Block the bow and cord first: spray them lightly, shape the loops, pin them flat, and let them dry.
- Switch off the lights or remove the battery.
- Mist the cover until it’s just damp.
- Nudge each shell so it stands straight up, centered between the two shells below it.
- Even out the cream bands so every scallop dips by the same amount.
- Let the cover dry with the cap pointing up, about 4 to 6 hours.
- Attach the bow once everything is dry.
Don’t use steam, because heat can warp a plastic ornament.
Final Quality-Control Checklist
- Rnd 8 has 48 sts and measures 2.25 in (5.7 cm) flat.
- Every shell round has 8 shells, each centered between two shells below.
- Rnds 13, 15, 16, 18, and 19 have 80 sts; Rnds 10, 12, 21, and 22 have 64; Rnd 24 has 48.
- The cover stretches snugly to 12.6 in (32.0 cm) at the widest point.
- The neck band has 24 sts and fits tightly under the cap.
- The bow loops are each 3 in (7.6 cm) wide, and all tails are hidden.
Troubleshooting
Shells lean to one side: recount the 8- or 10-stitch repeat in the round below.
The cover won’t stretch over the ball: your gauge is too tight. Remake it with a hook 0.25 mm larger.
The cover slides on the ball: your gauge is too loose. Cinch the neck band, or remake the cover with a smaller hook.
Gaps between bands and shells: work each arch sc into the center dc of the shell, not into the space beside it.
The bow flops forward: tack the back of the center wrap to Rnd 26.
Care
Take out the lights, then hand wash the cover in cool water and dry it flat. Store the ornament in a box so the shells don’t get crushed.
Final Notes
You can check the fit at each stage. The base circle is 2.25 in (5.7 cm) across with 48 sts. It grows through 64 and 80 sts to 12.25 in (31.1 cm) around, which stretches to 12.6 in (32.0 cm) on the ball. Then it decreases through 64 and 48 sts to a 24-st neck band 3.7 in (9.4 cm) around. If your base circle is the right size, the rest of the cover should fit too.
Happy crocheting!