

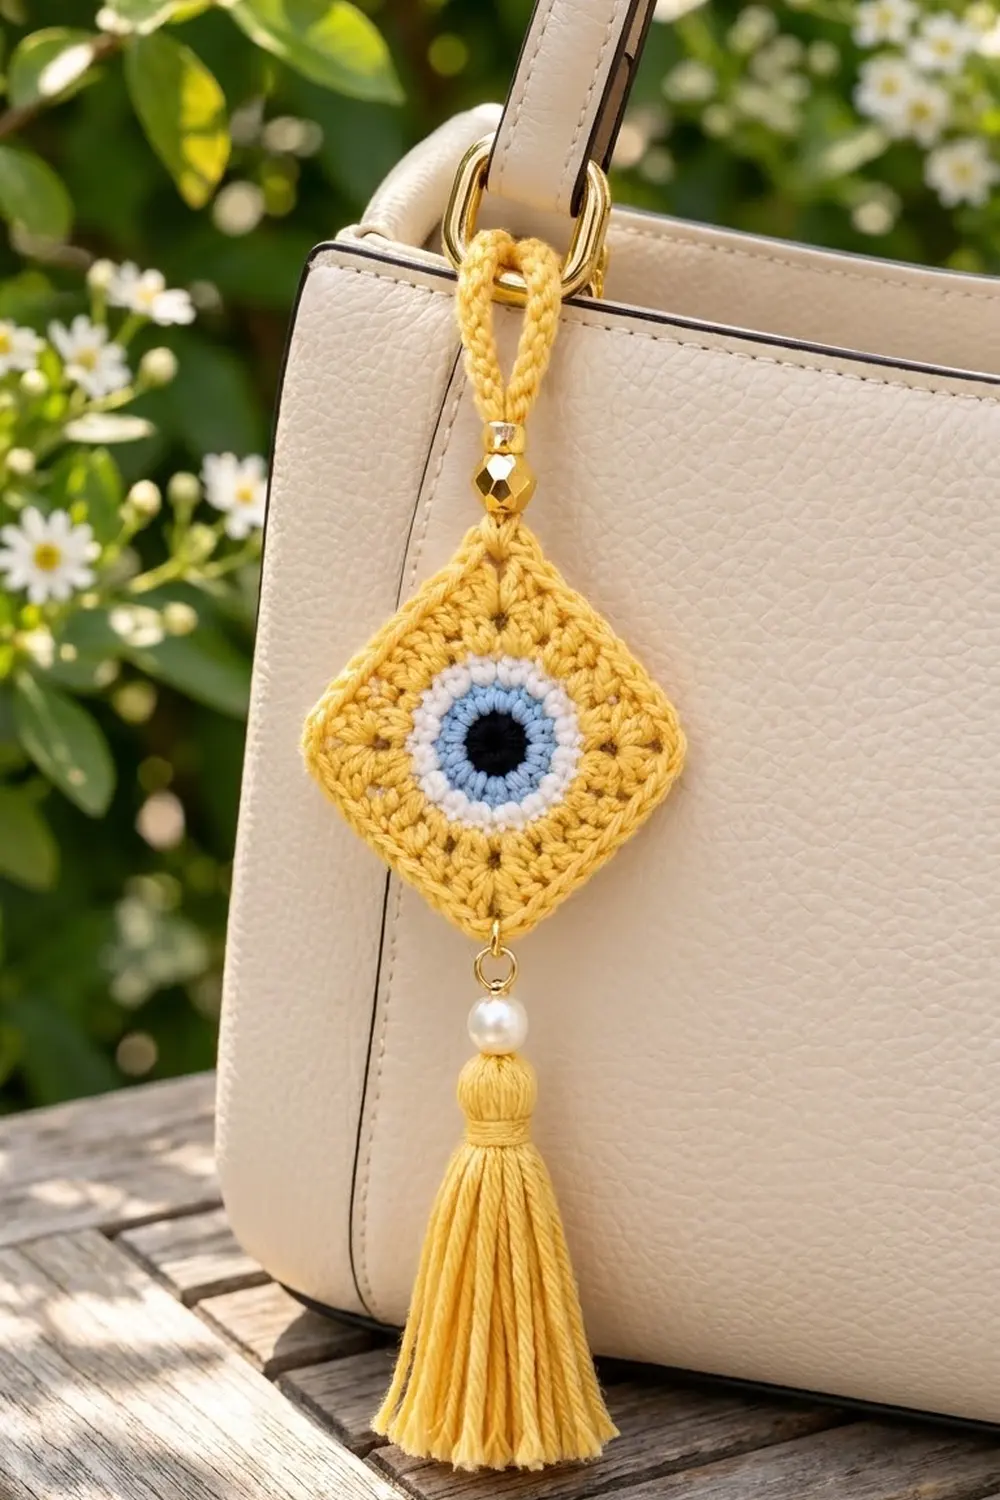
This little charm is a bright evil eye set inside a sunny yellow granny square. It hangs on point like a diamond, with a twisted cord loop at the top and a fluffy tassel at the bottom. Clip it to a handbag, tote, backpack or key ring.
The palette is simple: black for the pupil, soft light blue for the iris, crisp white for the eye’s outline, and warm golden yellow for the square, cord and tassel. A gold bead and a white pearl add a small jewelry touch.
The pattern uses US crochet terms. The finished square measures 2.75 in (7.0 cm) per side and about 3.9 in (9.9 cm) from point to point. With the loop and tassel attached, the charm hangs about 10 in (25.4 cm) long.
You’ll work the eye in the round in three colors. Then you’ll square it off in yellow with a conversion round, add one double crochet round and a single crochet border, and finish with the cord, the hardware and the tassel.
Finished Size and Construction
- Finished square: 2.75 in (7.0 cm) per side
- Point-to-point (diagonal): about 3.9 in (9.9 cm)
- Total hanging length: about 10 in (25.4 cm)
- Skill level: Easy
- Terminology: US crochet terms
- Yarn weight: DK / light worsted (#3) cotton
- Hook: 3.0 mm (US C/2–D/3)
- Number of pieces: 1 motif, plus 1 twisted cord and 1 tassel
- Layout: Single square hung on point (diamond)
- Size before border: 2.5 in (6.4 cm) per side after Round 5
- Border depth: 0.125 in (0.3 cm), one round of sc
Materials
Yarn: Use a smooth, mercerized DK cotton. It shows the stitch definition clearly, holds its shape on a bag, and makes a glossy tassel. Avoid fuzzy or very soft acrylics, because they blur the eye and pill when they rub against the bag.
- Black: 2 g / about 5 m
- Light blue: 2 g / about 5 m
- White: 2 g / about 5 m
- Golden yellow: 12 g / about 28 m (motif, cord and tassel)
These amounts include a safety margin of about 30%.
Tools and notions:
– 3.0 mm crochet hook
– Tapestry needle
– Scissors
– Stiff card, 3 in (7.6 cm) wide, for the tassel
– 1 faceted gold bead, 8–10 mm, with a hole wide enough for 4 strands of yarn
– 1 white pearl bead, 8 mm, with a 2 mm hole
– 1 gold jump ring, 8 mm
– 2 pairs of flat-nose pliers (or 1 pair and your fingers)
– Optional: lobster clasp, if you prefer clipping the charm on instead of looping it
Abbreviations (US Terms)
- ch: chain
- sl st: slip stitch
- sc: single crochet
- hdc: half double crochet
- dc: double crochet
- st(s): stitch(es)
- sp: space
- MR: magic ring
- rep: repeat
Corner group: (2 dc, ch 2, 2 dc) worked into the same stitch or space. Each corner group adds 4 dc and one ch-2 corner space.
The beginning ch 3 always counts as a dc. The beginning ch 1 never counts as a stitch.
Gauge and Checkpoints
The finished size depends on the eye, so the eye is your gauge swatch. Work Rounds 1–3, then measure before you continue.
- After Round 1: 0.75 in (1.9 cm) across
- After Round 2: 1.5 in (3.8 cm) across
- After Round 3: 1.75 in (4.4 cm) across
- After Round 4: 2 in (5.1 cm) per side
- After Round 5: 2.5 in (6.4 cm) per side
- After Round 6: 2.75 in (7.0 cm) per side
As a general guide, Round 5 should give about 6 dc per 1 in (2.5 cm).
If your eye is too big, go down to a 2.75 mm hook. If it’s too small, go up to a 3.25 mm hook. Being 0.125 in (0.3 cm) off is fine for a charm. If you’re more than 0.25 in (0.6 cm) off after Round 3, start again with the new hook.
The eye should also lie completely flat. If it ruffles, your dc are too loose. If it cups, the sc in Round 3 are too tight.
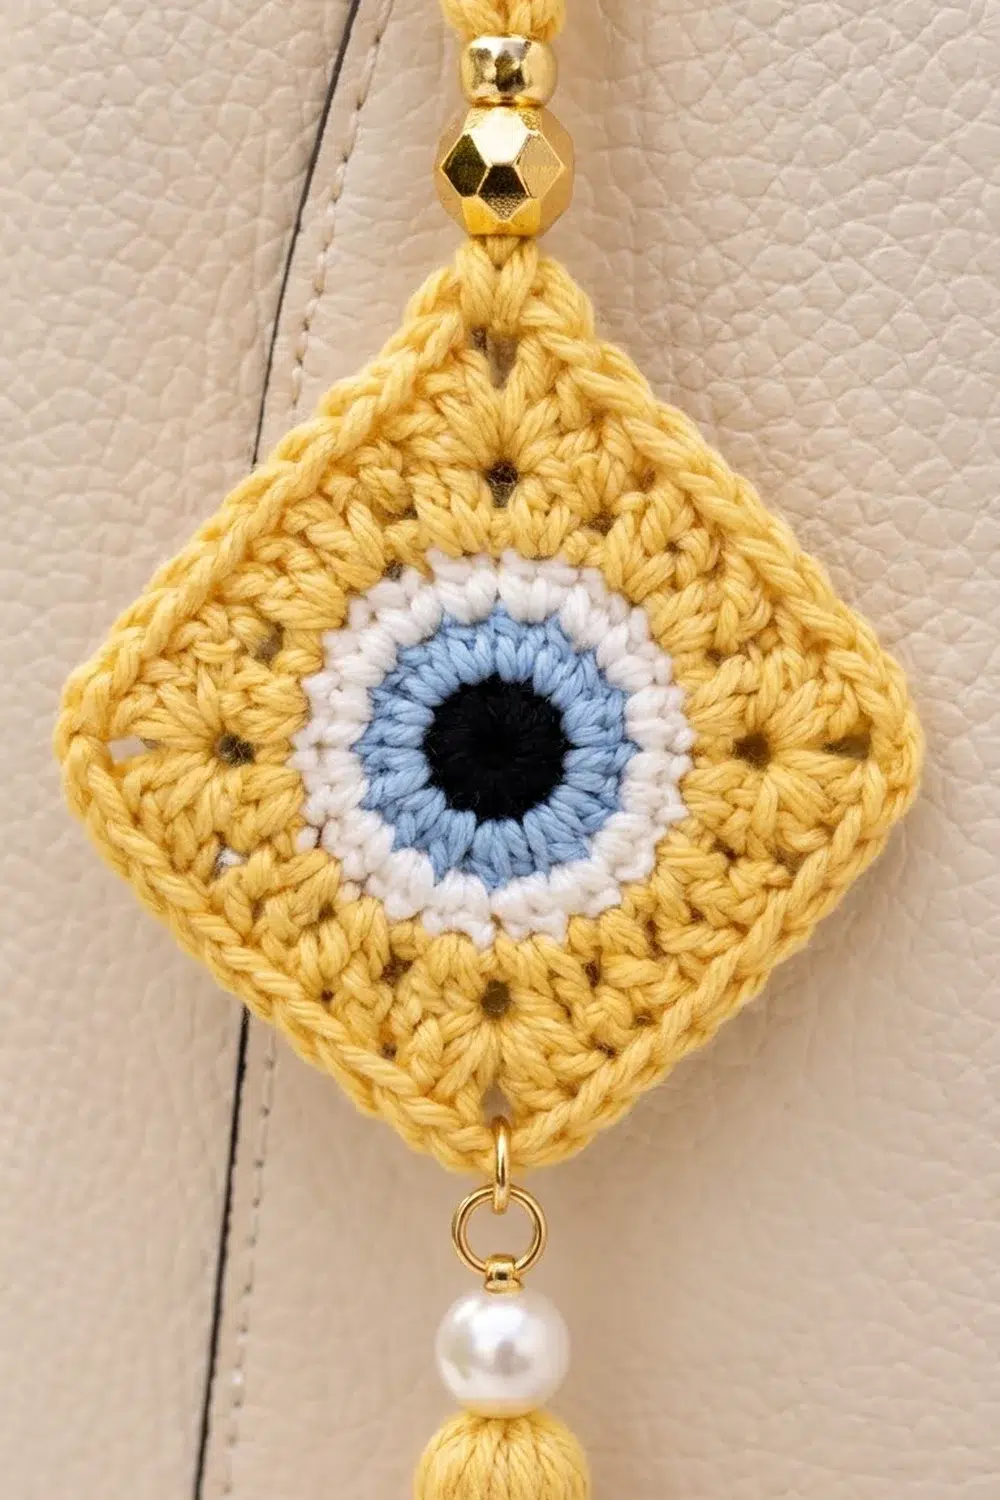
The Evil Eye (Rounds 1–3)
Round 1 (Black)
Make a MR. Ch 3 (counts as dc), then work 11 dc into the ring. Pull the ring closed tightly. Join with a sl st to the top of the beginning ch 3. (12 dc)
Fasten off and weave in the tail on the back.
Round 2 (Light Blue)
Join light blue with a sl st in any st. Ch 3 (counts as dc), then dc in the same st. Work 2 dc in each remaining st around. Join to the top of the beginning ch 3. (24 dc)
This is a growth round: all 12 stitches are doubled, so Round 2 has 24 dc. Fasten off.
Round 3 (White)
Join white with a sl st in any st. Ch 1. Work 2 sc in the next st, sc in each of the next 2 sts. Repeat from * to * 7 more times. Join to the first sc. (32 sc)
Count: 24 stitches worked once + 8 extra stitches = 32 sc. This white ring is low and tight, so it frames the blue like the white of an eye.
Fasten off. Checkpoint: 1.75 in (4.4 cm) across, flat, with 32 sts.
Squaring Off (Rounds 4–5)
Round 4 (Yellow, conversion round)
Join yellow with a sl st in any st. Ch 3 (counts as dc), then work (dc, ch 2, 2 dc) in the same st. That is your first corner group.
Then work dc in the next st, hdc in the next st, sc in each of the next 3 sts, hdc in the next st, dc in the next st, then a corner group in the next st. Repeat from * to * 2 more times.
To finish the round, work dc in the next st, hdc in the next st, sc in each of the next 3 sts, hdc in the next st, and dc in the next st. Join to the top of the beginning ch 3.
Count: 32 stitches worked once + 12 extra stitches (3 extra in each of the 4 corners) = 44 sts and 4 ch-2 corner spaces.
Per side between corner spaces: 2 dc + 7 side sts + 2 dc = 11 sts.
The stitches step down in height from dc to sc and back up. That pulls the circle into a straight-sided square. Don’t fasten off.
Checkpoint: 2 in (5.1 cm) per side.
Round 5 (Yellow)
Sl st in the next dc, then sl st into the ch-2 sp. Ch 3 (counts as dc), then work (dc, ch 2, 2 dc) in the same space.
Work dc in each of the next 11 sts, then a corner group in the next ch-2 sp. Repeat from * to * 2 more times.
Work dc in each of the next 11 sts. The last 2 of these are the ch 3 and the dc you slipped across at the start of the round. Join to the top of the beginning ch 3.
Count: 44 stitches worked once + 16 dc worked into the corner spaces = 60 dc.
Per side between corner spaces: 2 + 11 + 2 = 15 dc.
Don’t fasten off. Checkpoint: 2.5 in (6.4 cm) per side. The corner chain spaces should form the small open holes that give the piece its granny look.
Border
Border gauge: One sc round adds about 0.125 in (0.3 cm) to each edge, so each side grows by 0.25 in (0.6 cm). That takes the square from 2.5 in (6.4 cm) to 2.75 in (7.0 cm).
Round 6 (Yellow, trim round)
Ch 1. Sc in the same st as the join, then sc in the next st. Work 3 sc in the ch-2 corner space.
Work sc in each of the next 15 sts, then 3 sc in the next ch-2 space. Repeat from * to * 2 more times.
Sc in each of the next 13 sts. Join to the first sc.
Count: 60 stitches worked once + 12 sc worked into the corner spaces = 72 sc.
Per side: 1 corner sc + 1 sc + 15 sc + 1 sc + 1 corner sc = 17 sts. That includes the 2 corner (middle) stitches. Since each corner stitch is shared by two sides, 4 × 17 − 4 = 72. The count checks out.
On the first side, the 2 sc before the first corner plus the 13 sc at the end of the round make 15. That matches every other side.
Why the math works: Each of the 15 dc along a side gets exactly 1 sc, so the edge stays the same length and won’t flare or pucker. The 3 sc in each corner add the extra stitches needed to turn 90 degrees. The middle corner sc becomes the sharp point you’ll hang the charm from.
Fasten off, leaving a 6 in (15.2 cm) tail. Weave in all motif ends now, before blocking.
Assembly: Cord, Hardware and Tassel
Twisted Cord Loop
- Cut 2 strands of yellow, each 20 in (50.8 cm) long. Knot them together at both ends.
- Hook one end over a doorknob. Twist the other end clockwise until the strand kinks back on itself when you relax it.
- Fold the strand in half and let it twist around itself. Knot the loose ends. The cord should be about 8 in (20.3 cm) long.
- Fold the cord into a loop. Thread both ends through the gold bead.
- Push both ends from front to back through the stitch gap beside the top corner sc. Bring one end up through the gap on the other side of the corner sc and tie a tight square knot on the back.
- Slide the bead down so it sits snugly on the top point. Adjust the loop until it measures 2.5 in (6.4 cm) above the bead. Trim the excess to 0.375 in (1.0 cm) and dab the knot with clear glue if you like.
Tassel
- Wrap yellow 30 times around the 3 in (7.6 cm) card.
- Slide a 12 in (30.5 cm) strand under the wraps at the top edge. Tie it tightly, leaving both ends long. This is your hanging strand.
- Cut through the wraps along the bottom edge.
- Wrap a separate 12 in (30.5 cm) strand around the tassel 0.375 in (1.0 cm) below the top, about 6 times. Knot it, then thread the ends down into the tassel.
- Trim the bottom evenly. The tassel should finish at about 2.75 in (7.0 cm).
Bottom Hardware
- Open the jump ring with two pliers by twisting the ends sideways, never by pulling them apart.
- Pass it through the gap beside the bottom corner sc, then close it.
- Thread both ends of the tassel’s hanging strand up through the pearl bead. Tie them around the jump ring with a double knot, so the pearl sits between the ring and the tassel.
- Trim the ends and tuck them into the tassel head.
Final Blocking
Block the motif before you add the cord and tassel. If you’ve already attached them, keep the tassel dry.
- Pin the square flat on a foam board, right side up.
- Measure each side and pin it to 2.75 in (7.0 cm). Pin each corner to a sharp point.
- Check that both diagonals measure 3.9 in (9.9 cm), so the square isn’t skewed.
- Spray it evenly with water until it’s damp, not soaked.
- Gently press the eye flat with your fingertips, making sure the black center is centered.
- Let it dry completely, at least 4 hours.
- To straighten the tassel, hold it over steam for a few seconds, smooth it with your fingers, and trim it again if needed.
Final Quality-Control Checklist
- Round 1 has 12 dc, Round 2 has 24 dc, and Round 3 has 32 sc.
- Round 4 has 44 sts, with 11 sts between each pair of corner spaces.
- Round 5 has 60 dc, with 15 dc between each pair of corner spaces.
- Round 6 has 72 sc, with 17 sts per side including the corners.
- The square measures 2.75 in (7.0 cm) per side and 3.9 in (9.9 cm) on the diagonal.
- The eye lies flat and sits in the exact center.
- All ends are woven in and invisible from the front.
- The bead sits tight against the top point.
- The jump ring is fully closed with no gap.
- The tassel is 2.75 in (7.0 cm) long and trimmed evenly.
Troubleshooting
The magic ring loosens. Weave the black tail in a circle through the back of Round 1, then pull it tight again before weaving it in.
The blue round ruffles. Your dc are too tall. Tighten up, or use a hook 0.25 mm smaller for Round 2 only.
The square looks round. Check that Round 4 uses sc at the middle of each side and corner groups at the corners. Too many tall stitches along the sides keep the shape round.
The sides bow outward. Count 15 dc per side in Round 5. Extra stitches along a side cause bulging.
The corners are blunt. Work 3 sc into each corner space in Round 6, and pin the corners firmly when you block.
The color joins show. Join each new color in a different spot, and weave tails along their own color on the back.
The charm twists while it hangs. Center the cord exactly on the top corner sc and the jump ring exactly on the bottom one.
Care
Hand wash in cool water with mild soap, press out the water in a towel, and reshape the charm to dry flat. Remove it from the bag before you wash it, and protect the metal parts from long soaking.
Final Notes
The measurement chain is short and easy to check. The eye measures 1.75 in (4.4 cm) after Round 3. The square measures 2 in (5.1 cm) after Round 4, 2.5 in (6.4 cm) after Round 5, and 2.75 in (7.0 cm) after the border. The diagonal is 3.9 in (9.9 cm). Add the 2.5 in (6.4 cm) loop, the bead, the pearl and the 2.75 in (7.0 cm) tassel, and the charm hangs about 10 in (25.4 cm) long.
If you match the counts (12, 24, 32, 44, 60, 72) and the checkpoints, your charm will come out square, flat and ready to hang. Happy crocheting!