

These lacy curtain panels are made from a grid of heart-in-square blocks. Each block has a six-petal flower in the middle of a crocheted heart, with an open chain lattice around it. When light comes through the window, the hearts and the mesh between them show up clearly.
The design uses one color, a soft blush pink cotton, so the texture does the decorating: the padded center ring, the pointed petals, solid lobes and dc fans in each heart, then a mesh border, pointed fan scallops along the bottom, and sturdy tabs across the top.
This pattern uses US crochet terms. One finished panel measures 31.5 in (80.0 cm) wide by 68.25 in (173.4 cm) long without the tabs, and 70.25 in (178.4 cm) to the top of the folded tabs. The pattern makes a pair of panels.
For the construction, you crochet each heart block in rounds, then square it off with chain arches. Join the blocks into a grid of 5 across and 11 down, add a three-round border, then work scallops along the bottom edge and tabs along the top.
Finished Size and Construction
- Finished panel size: 31.5 in × 68.25 in (80.0 cm × 173.4 cm); 70.25 in (178.4 cm) including tabs
- Skill level: Intermediate
- Terminology: US
- Yarn weight: Sport (2), cotton
- Hook: 3.25 mm (US D/3)
- Number of pieces: 55 blocks per panel, 110 for the pair
- Layout: 5 blocks across × 11 blocks down per panel
- Block size: 6 in × 6 in (15.2 cm × 15.2 cm)
- Size before border: 30 in × 66 in (76.2 cm × 167.6 cm)
- Border depth: about 0.75 in (1.9 cm), plus 0.75 in (1.9 cm) of scallops at the bottom and 2 in (5.1 cm) folded tabs at the top
Materials
Choose a smooth mercerized or combed cotton in sport weight. Cotton holds the petal points and gives the mesh a crisp drape. Avoid fuzzy or very stretchy yarns, because they blur the lace and make long panels sag.
- Blush Pink: 1,250 g / 3,875 m (about 4,238 yd), which is about 25 balls of 50 g / 155 m (170 yd)
- 3.25 mm (US D/3) crochet hook
- Tapestry needle
- Locking stitch markers
- Rustproof pins and blocking mats
- Spray bottle
- Measuring tape
These quantities include about a 10% margin. One block uses about 9 g / 28 m (30.6 yd), and the border and tabs use about 60 g / 186 m (203.4 yd) per panel.
Abbreviations (US Terms)
- ch – chain
- sl st – slip stitch
- sc – single crochet
- hdc – half double crochet
- dc – double crochet
- tr – treble crochet
- dtr – double treble crochet (yo 3 times, then work off loops in pairs)
- sk – skip
- sp – space
- st(s) – stitch(es)
- RS / WS – right side / wrong side
Special stitch – standing dc: Begin with a slip knot on the hook. Yo, insert the hook into the stitch, pull up a loop, then complete the dc as normal.
Gauge and Checkpoints
Gauge: 20 sc and 22 rows = 4 in (10.2 cm).
Make one complete block, wet-block it, and measure it before you start the rest. Each stage should come out close to these sizes:
- After Round 1: center ring about 1 in (2.5 cm) across
- After Round 3: flower about 3.25 in (8.3 cm) across, from petal tip to petal tip
- After Round 5: heart about 4.5 in (11.4 cm) wide × 4.25 in (10.8 cm) tall
- After Round 7: block 6 in × 6 in (15.2 cm × 15.2 cm)
If your block is larger than 6 in (15.2 cm), go down a hook size. If it is smaller, go up one. A difference of 0.25 in (0.6 cm) per block adds up to 2.75 in (7.0 cm) over the 11 rows of a panel, so fix the size now.
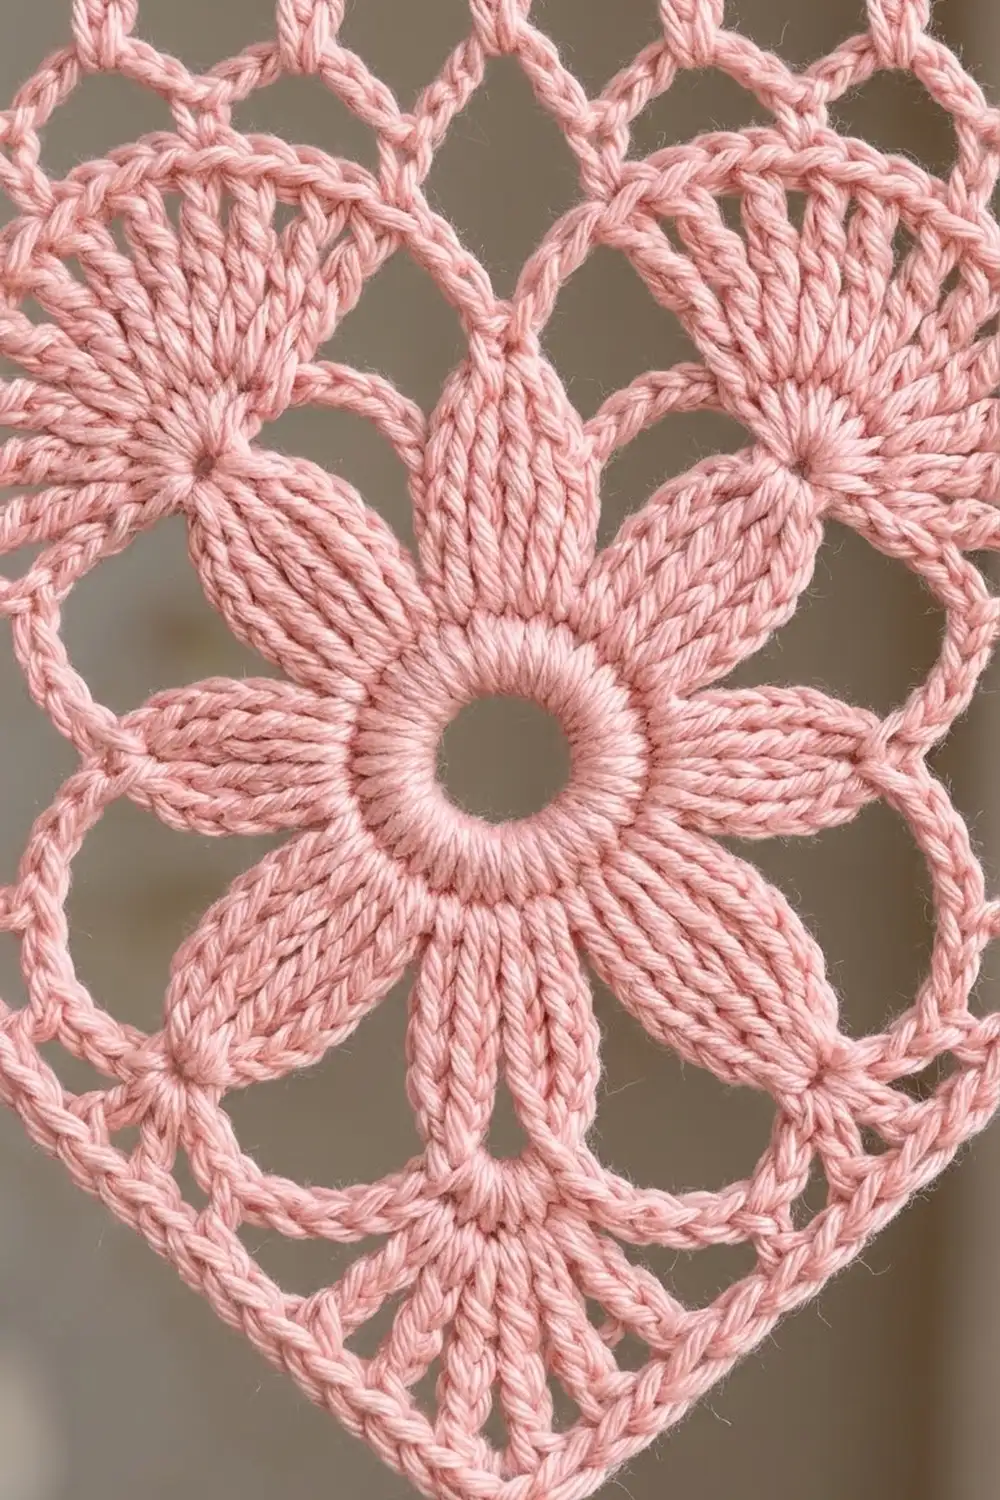
Heart Block (make 110)
The Flower
Round 1: Make a magic ring, ch 1, work 18 sc into the ring, then sl st to the first sc. (18 sts) Pull the ring tight. The dense sc give the center its padded look.
Round 2: Ch 1, sc in the first st, ch 5, sk 2, sc in next st, ch 5, sk 2; repeat from * 4 more times, then sl st to the first sc. (6 sc, 6 ch-5 arches)*
Round 3 (petals): In each ch-5 arch, work (sc, hdc, 2 dc, 2 tr, ch 2, 2 tr, 2 dc, hdc, sc), then sl st to the first sc. (72 sts: 12 per petal, plus 6 ch-2 tips)
Place a marker in the tip of one petal. This is the top petal. Counting clockwise from it, the petals are upper-right, lower-right, bottom, lower-left and upper-left.
The Heart
Round 4 (heart frame): Sl st across to the ch-2 tip of the top petal. Ch 1, sc in the tip; this sc is the dip. Then ch 11, sc in the upper-right tip; ch 9, sc in the lower-right tip; ch 9, sc in the bottom tip; ch 9, sc in the lower-left tip; ch 9, sc in the upper-left tip; ch 11, and sl st to the first sc. (6 sc, 2 ch-11 arches, 4 ch-9 arches)
Round 5 (heart fill): Sl st into the first ch-11 arch and ch 1. Then work around the heart as follows:
- Right lobe: in the ch-11 arch, work (3 sc, 3 hdc, 5 dc, 3 hdc, 3 sc). (17 sts)
- Sc in the next sc.
- Upper side arch: 11 sc in the ch-9 arch.
- Sc in the next sc.
- Lower fan arch: in the ch-9 arch, work (2 sc, 7 dc, 2 sc). (11 sts)
- Tip: (sc, ch 2, sc) in the bottom sc.
- Lower fan arch: (2 sc, 7 dc, 2 sc).
- Sc in the next sc.
- Upper side arch: 11 sc.
- Sc in the next sc.
- Left lobe: (3 sc, 3 hdc, 5 dc, 3 hdc, 3 sc).
- Skip the dip sc, then sl st to the first sc.
(84 sts + 1 ch-2 tip)
Check the count: 17 + 1 + 11 + 1 + 11 + 2 + 11 + 1 + 11 + 1 + 17 = 84. The extra stitches packed into the ch-11 arches push them up into round lobes. Skipping the dip pulls the top center down. The 7-dc fans make the textured area above the tip.
For Round 6, number the Round 5 stitches 1–84, starting with the first sc of the right lobe and ending with the last sc of the left lobe. Mark sts 7, 14, 38, 47, 71 and 78.
Squaring the Block
Round 6 (lattice): With RS facing, work a standing dc in st 14, then ch 5 and dc in the same st. This is the top-right corner.
- Right side: ch 5, sc in st 20; ch 5, sc in st 27; ch 5, sc in st 34; ch 9. Work (dtr, ch 5, dtr) in st 38 for the bottom-right corner.
- Bottom: ch 7, sc in st 41; ch 5, sc in the tip ch-2 sp; ch 5, sc in st 44; ch 7. Work (dtr, ch 5, dtr) in st 47 for the bottom-left corner.
- Left side: ch 9, sc in st 51; ch 5, sc in st 58; ch 5, sc in st 65; ch 5. Work (dc, ch 5, dc) in st 71 for the top-left corner.
- Top: ch 6, sc in st 78; ch 6, tr in the Round 4 dip sc (working behind Round 5); ch 6, sc in st 7; ch 6, and sl st to the top of the standing dc.
(16 side arches + 4 corner ch-5 sps)
Each side has 24 chains in its arches: right 5+5+5+9, bottom 7+5+5+7, left 9+5+5+5, top 6+6+6+6. The tall dtr corners reach out into the empty lower corners, and the tr in the dip lifts the top center up to the line of the lobes.
Round 7: Sl st into the corner ch-5 sp and ch 1. In each corner ch-5 sp, work (3 sc, ch 2, 3 sc). In each side arch, work one sc for each chain in that arch (5, 6, 7 or 9 sc). Don’t work into the anchor sts. Sl st to the first sc and fasten off.
(120 sc: 30 sc per side between the corner ch-2 sps, plus 4 corner ch-2 sps)
In this pattern, “per side” means the 30 sc between two corner ch-2 spaces. That count includes the 3 sc on each side of the corners. The ch-2 spaces themselves are not counted.
Checkpoint: 30 sc at 5 sc per inch = 6 in (15.2 cm).
Make All Pieces
Make 110 blocks, all in Blush Pink: 55 for each panel. Weave in the ends as you go and block every block to 6 in (15.2 cm) square before joining.
Lay out each panel with every heart’s tip pointing down, 5 blocks across and 11 down:
Row 1:  H H H H H
Row 2:  H H H H H
Row 3:  H H H H H
  ...   (repeat)
Row 11: H H H H H
Joining
Method: flat slip stitch join through the back loops.
Place two blocks RS up, side by side. Insert the hook through the inner back loop of a corner ch-2 sp on each block and sl st. Then sl st through the inner back loops of each matching pair of sc, 30 pairs in all, one stitch to one stitch. Finish with a sl st through the next pair of corner ch-2 sps. Joining stitches do not add to the block count.
Join the blocks into 11 horizontal strips of 5. Then join the strips along their long edges in the same way, so each seam has 5 × 30 = 150 stitch pairs plus the corner spaces. Where four corners meet, sl st through all of them together.
Tension: Keep each sl st as loose as an sc. Tight joins make the panel pucker and pull in the long edges. Stretch the seam gently every 10 sts to check that it gives as much as the blocks do.
Size checkpoint: The joined panel should measure 30 in × 66 in (76.2 cm × 167.6 cm).
Border
Border gauge: same as the blocks, 5 sts per inch.
Round 1: With RS facing, join the yarn in the top-right corner ch-2 sp and ch 1. In each of the 4 outer corner sps, work (sc, ch 2, sc). Along each edge, sc in every sc. At every seam, skip the two joined corner ch-2 sps; no stitch is worked there. Sl st to the first sc.
- Top and bottom: 5 × 30 = 150 sc, plus 1 corner sc at each end = 152 sts per side between the corner ch-2 sps
- Long sides: 11 × 30 = 330 sc + 2 = 332 sts per side
Round 2 (mesh): Sl st into the corner sp, ch 5 (counts as dc + ch 2), and dc in the same sp. *Ch 1, sk 1, dc in next st; repeat from * to the end of the side. Ch 1, then work (dc, ch 2, dc) in the corner sp. Repeat for each side and sl st to the 3rd ch of the starting ch-5.
- Top and bottom: 76 dc + 77 ch-1 sps between the corner dc
- Long sides: 166 dc + 167 ch-1 sps
Round 3: Ch 1. Sc in each dc and each ch-1 sp, and work (sc, ch 2, sc) in each corner sp. Sl st to the first sc and fasten off.
- Top and bottom: 77 + 76 = 153, plus 2 sc in the corner dc and 2 sc from the corner sps = 157 sts per side
- Long sides: 167 + 166 + 4 = 337 sts per side
Bottom scallops: With RS facing, join the yarn in the first sc of the bottom edge. Sc in that st, then sk 2, 7 dc in next st, sk 2, sc in next st; repeat from * 26 times in total. (26 fans)* Fasten off.
Top tabs: Leave the first 13 sts of the top edge unworked. Join the yarn in the 14th st. Row 1: ch 1, sc in the next 11 sts. Rows 2–22: ch 1, turn, sc in each sc across. (11 sts per row) Fasten off, leaving a 12 in (30.5 cm) tail. Skip 13 sts and make the next tab. Make 6 tabs in total, with the last 13 sts left unworked.
Fold each tab to the WS and whipstitch its last row behind border Rounds 1–2, directly under its own 11 sts.
Why the math works:
- 150 sc = 5 blocks × 30, so the edge stays at 30 in (76.2 cm) with no ruffling.
- The even counts (152 and 332) divide exactly into mesh pairs.
- The bottom count of 157 = 6 × 26 + 1, so the fans begin and end on an sc.
- The top count of 157 = 6 tabs × 11 + 7 gaps × 13, so the tabs are spaced evenly. Each tab is 2.2 in (5.6 cm) wide, each gap is 2.6 in (6.6 cm), and each tab is 4 in (10.2 cm) long, folding to a 2 in (5.1 cm) loop.
Final Blocking
- Weave in all remaining ends along the seams.
- Soak the panel in cool water for 15 minutes, then press out the water. Don’t wring it.
- Roll it in towels to remove more water.
- Lay it flat on mats measuring 31.5 in × 68.25 in (80.0 cm × 173.4 cm).
- Pin the corners first, then the midpoint of each side, then every 3 in (7.6 cm) in between.
- Pin each bottom scallop at its center dc to sharpen the points.
- Mist the lobes and petal tips, then shape them with your fingers.
- Let it dry completely, which takes 24–48 hours. Unpin only when it is fully dry.
Final Quality-Control Checklist
- Every block measures 6 in (15.2 cm) square, with all hearts pointing down
- All seams lie flat and match stitch to stitch
- Each side has the correct border count: 157 sts on top and bottom, 337 on the long sides
- 26 fans across the bottom and 6 evenly spaced tabs across the top
- The panel measures 31.5 in × 68.25 in (80.0 cm × 173.4 cm)
- Both panels match in length to within 0.5 in (1.3 cm)
Troubleshooting
- The center ring cups: Pull the magic ring tighter, or work only 17 sc and add an increase in Round 2 (moving the ch-5 arches evenly).
- The lobes look flat: Check that you worked the full 17 sts in each ch-11 arch and skipped the dip sc.
- The corners curl in: Your dtr may be too short. Pull up each loop to full height.
- The block is not square: Recount the chains in each Round 6 arch; every side must total 24.
- The border ruffles: You probably worked into the seam corners. Recount to 150 sts along the edge.
- The panel stretches when hung: Re-block it, and use a lighter-weight rod or extra tabs.
Care
Hand wash in cool water with mild soap, roll in a towel, and dry flat, pinning to size if needed. Don’t tumble dry. Hang the panels only once they are fully dry.
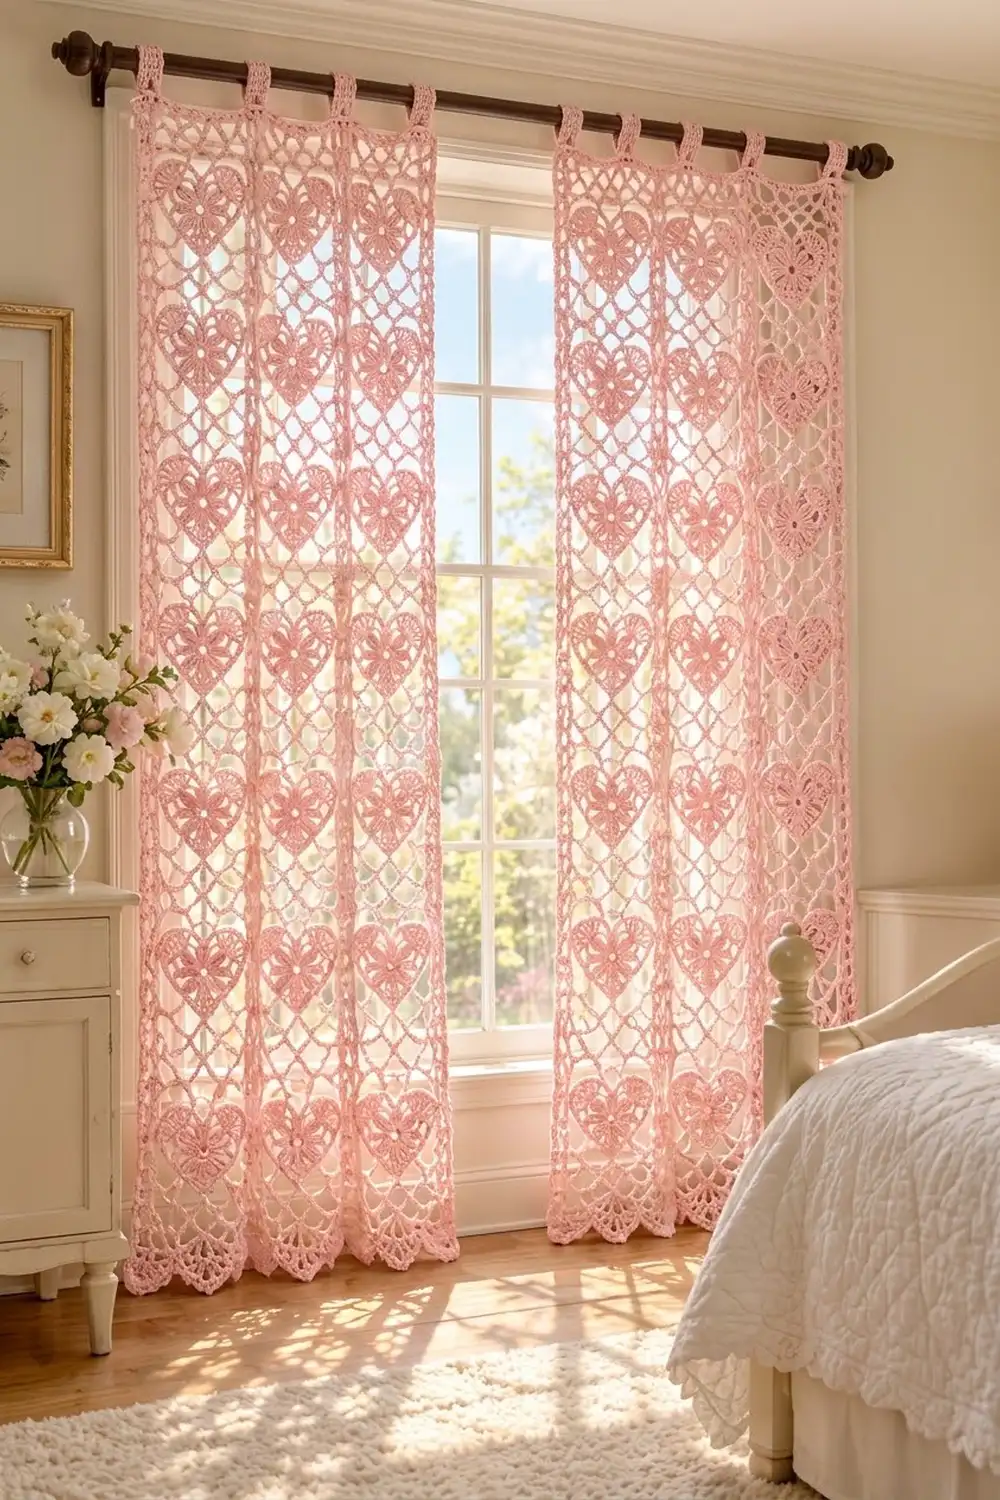
Final Notes
The measurement chain runs like this:
- 20 sc = 4 in (10.2 cm)
- 30 sc per side gives a 6 in (15.2 cm) block
- 5 × 11 blocks make a 30 in × 66 in (76.2 cm × 167.6 cm) panel
- The border adds 0.75 in (1.9 cm) on each side
- The scallops add 0.75 in (1.9 cm) at the bottom, for a finished 31.5 in × 68.25 in (80.0 cm × 173.4 cm)
- The tabs bring the total length to 70.25 in (178.4 cm)
Check your size at each stage, and the pair will hang evenly.
Happy crocheting!