

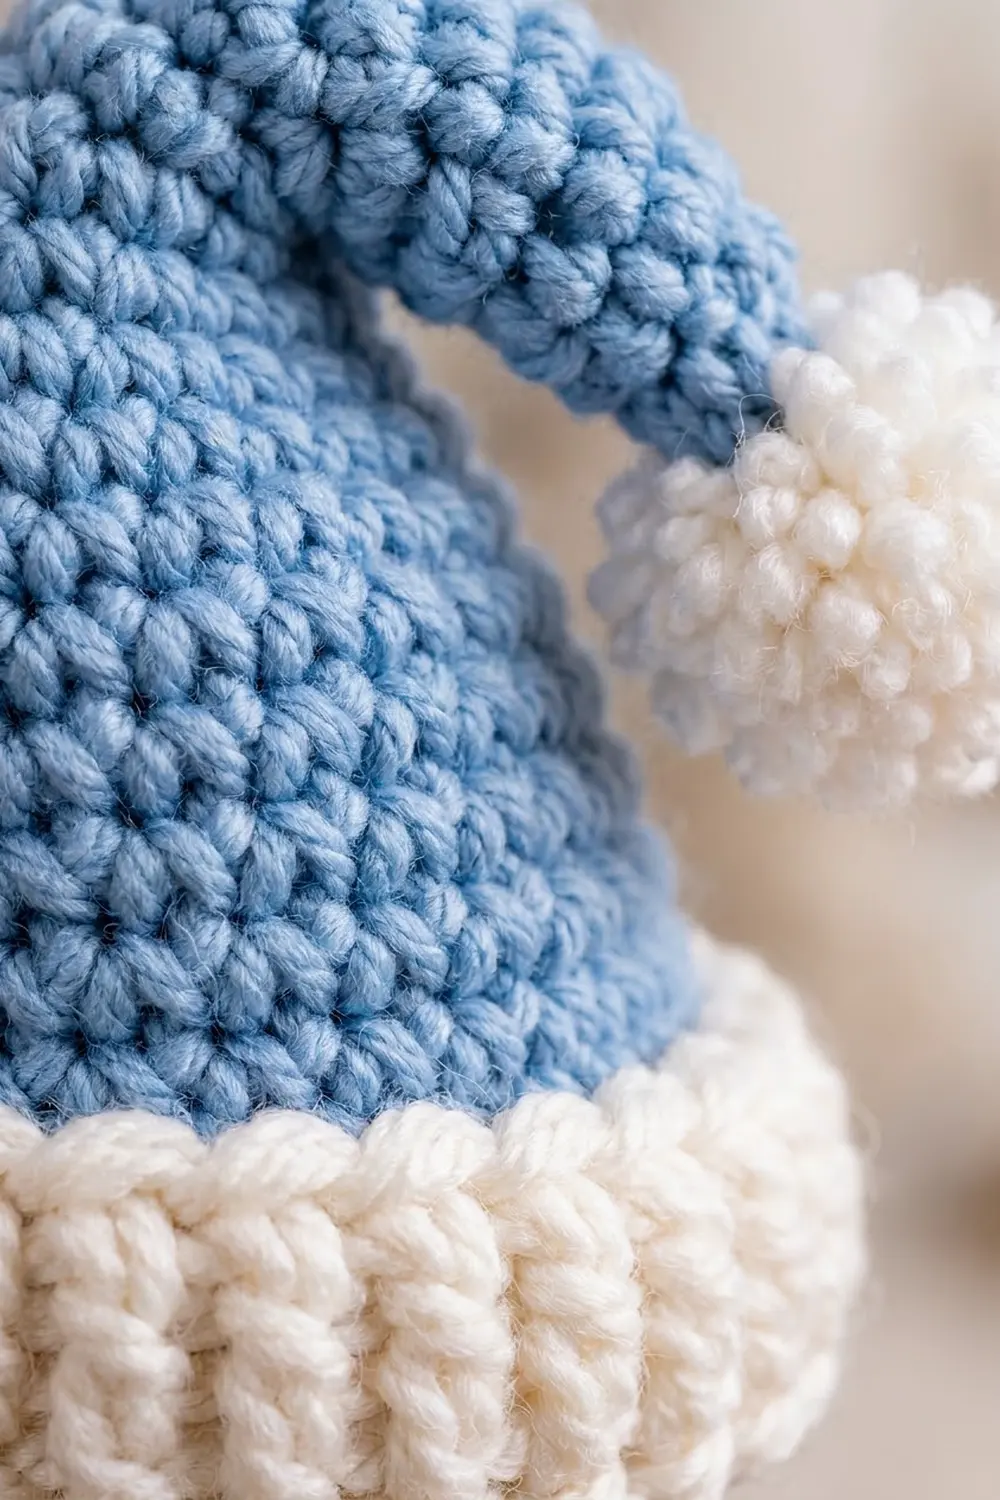
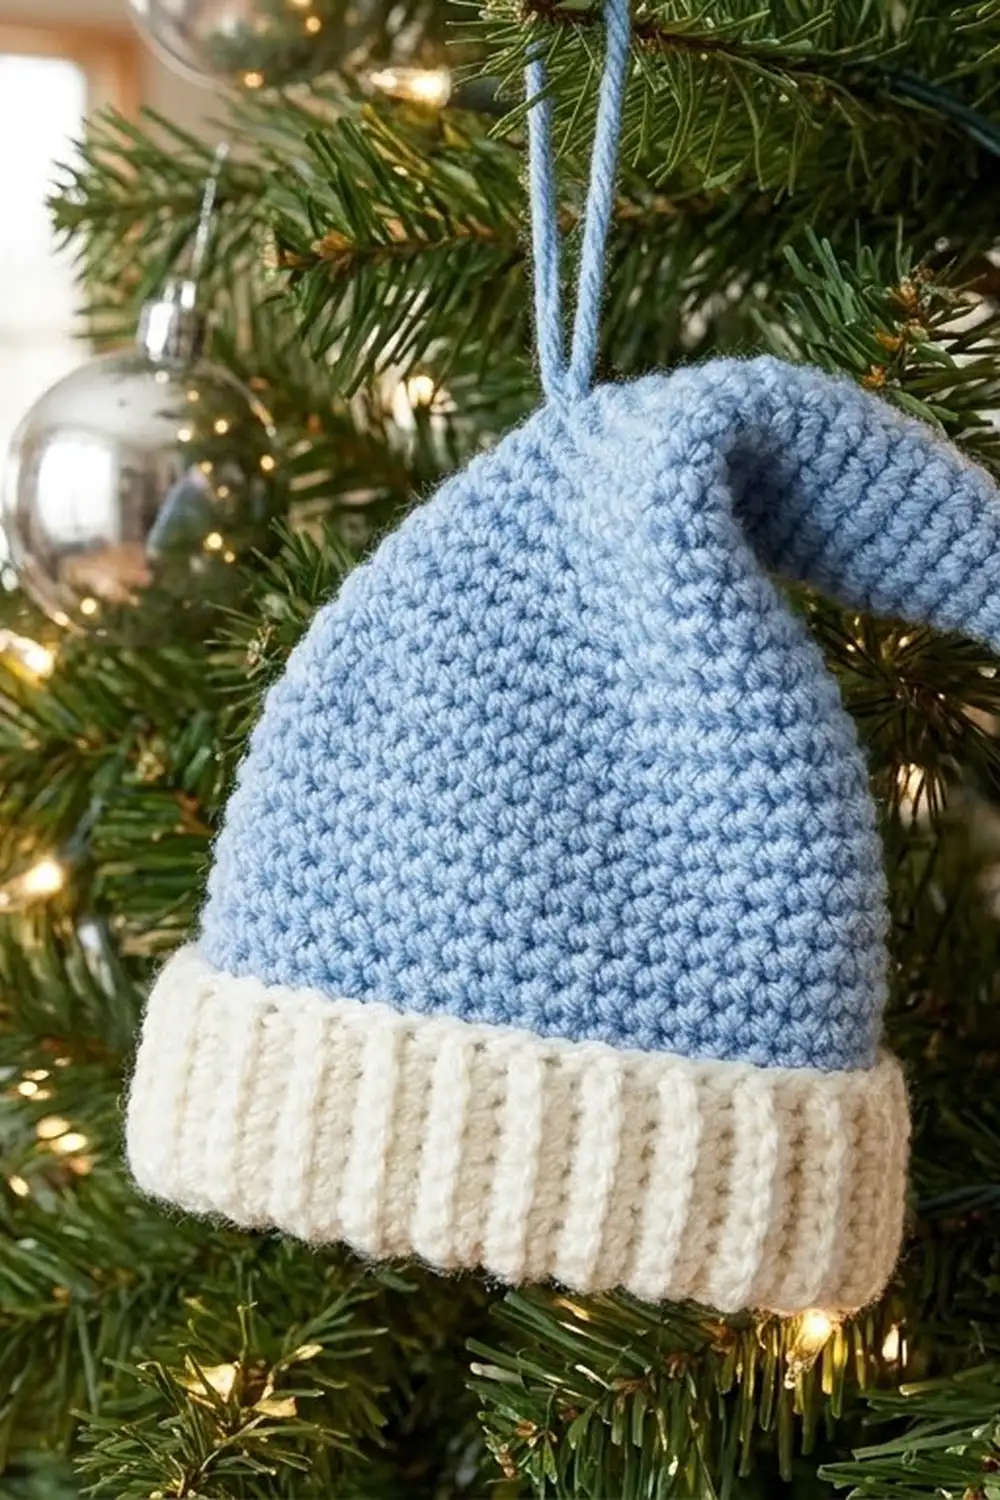
This little Santa hat is a soft change from the usual red. The body is powder blue in tight single crochet, and the cream-white brim has raised ribs that look like knitting. A white pompom finishes the floppy tip, which folds down to one side.
The style is cozy and Nordic. It fits a frosted tree, a silver-and-white color scheme, or a gift tag. The pattern uses US crochet terms throughout.
The finished ornament measures about 3.5 in (8.9 cm) wide at the brim and 3.75 in (9.5 cm) tall with the tip folded. Without the hanging loop, it sits comfortably in the palm of your hand.
You work the hat body from the tip down as one continuous spiral cone. You then change to white and work the ribbed brim directly onto the last round, so there is nothing to sew there. Last, you make a small stuffed pompom, sew it to the tip, fold the tip down, and add a hanging loop.
Finished Size and Construction
- Finished size: 3.5 in (8.9 cm) wide x 3.75 in (9.5 cm) tall, with the tip folded
- Skill level: Easy / advanced beginner
- Terminology: US crochet terms
- Yarn weight: Worsted (#4)
- Hook: 4.0 mm (G-6)
- Number of pieces: 1 ornament, made from a hat body with an attached brim, 1 pompom and 1 hanging loop
- Layout: Single ornament, no joining of motifs
- Hat body size (flat, unfolded): 3 in (7.6 cm) wide x 3.25 in (8.3 cm) tall
- Size before the brim: 3 in (7.6 cm) wide at the lower edge
- Brim (border) depth: 1.25 in (3.2 cm)
Materials
Use a smooth worsted-weight yarn. A cotton blend or soft acrylic both work, as long as the stitches show clearly. Avoid very fuzzy or splitty yarn, because the ribs on the brim need crisp stitch definition. If your yarn is about 200 m per 100 g, these amounts are accurate:
- Powder blue: 8 g, about 16 m (body and hanging loop)
- Cream white: 6 g, about 12 m (brim and pompom)
These amounts include a small safety margin for tails and test swatches.
Tools:
- 4.0 mm (G-6) crochet hook
- Stitch marker
- Tapestry needle
- A small pinch of polyester fiberfill (for the pompom)
- Scissors
- Optional: a stiff toothbrush or pet slicker brush for fluffing the pompom
- Optional: a small cone of rolled cardstock for blocking
Abbreviations (US Terms)
- MR – magic ring
- ch – chain
- sl st – slip stitch
- sc – single crochet
- dc – double crochet
- inc – 2 sc in the same stitch
- dec – single crochet decrease: insert hook in next st, pull up a loop, insert in following st, pull up a loop, yarn over and pull through all 3 loops
- st(s) – stitch(es)
- rnd(s) – round(s)
Special stitches:
- fpdc (front post double crochet): Yarn over. Insert the hook from front to back around the post of the stitch, then out to the front again. Complete a dc as usual.
- bpdc (back post double crochet): Yarn over. Insert the hook from back to front around the post of the stitch, then out to the back again. Complete a dc as usual.
Alternating fpdc and bpdc over an even number of stitches makes the raised vertical ribs on the brim.
Gauge and Checkpoints
Gauge: 10 sc x 11 rnds = 2 in (5.1 cm), worked in a spiral. That is 5 stitches and 5.5 rounds per inch.
Make one full hat body (Rnds 1–19) before committing to a batch. Measure it at each checkpoint below:
- After Rnd 10 (the tip): about 1.75 in (4.4 cm) long, 12 sts
- After Rnd 19 (the body): 3 in (7.6 cm) wide laid flat, 3.25 in (8.3 cm) tall, 30 sts
- After Rnd 23 (the brim): 3.5 in (8.9 cm) wide laid flat, brim 1.25 in (3.2 cm) deep
- Pompom: about 1.1 in (2.8 cm) across
If your body is wider than 3 in (7.6 cm): go down to a 3.5 mm hook.
If it is narrower than 3 in (7.6 cm): go up to a 4.5 mm hook.
Gaps between stitches mean your tension is too loose for amigurumi-style fabric. Go down a hook size even if the width matches, because the cone needs firm stitches to hold its shape.
Hat Body (Powder Blue)
Work in a continuous spiral without joining. Place a marker in the first stitch of each round and move it up as you go.
Rnd 1: With blue, make an MR and work 4 sc into the ring. Pull it tight. (4)
Rnd 2: Sc in each st around. (4)
Rnd 3: [Sc in next st, inc] 2 times. (6)
Rnd 4: Sc in each st around. (6)
Rnd 5: [Sc in next 2 sts, inc] 2 times. (8)
Rnd 6: Sc in each st around. (8)
Rnd 7: [Sc in next 3 sts, inc] 2 times. (10)
Rnd 8: Sc in each st around. (10)
Rnd 9: [Sc in next 4 sts, inc] 2 times. (12)
Rnd 10: Sc in each st around. (12)
Checkpoint: The tip is a slim tube about 1.75 in (4.4 cm) long. Increasing slowly, every other round, keeps it narrow enough to fold over.
Rnd 11: [Sc in next 3 sts, inc] 3 times. (15)
Rnd 12: Sc in each st around. (15)
Rnd 13: [Sc in next 4 sts, inc] 3 times. (18)
Rnd 14: [Sc in next 5 sts, inc] 3 times. (21)
Rnd 15: [Sc in next 6 sts, inc] 3 times. (24)
Rnd 16: [Sc in next 7 sts, inc] 3 times. (27)
Rnd 17: [Sc in next 8 sts, inc] 3 times. (30)
Rnds 18–19: Sc in each st around. (30)
At the end of Rnd 19, sl st into the next st to smooth the step in the spiral. Cut the blue yarn, leaving a 4 in (10.2 cm) tail to weave in later.
Checkpoint: The cone lies flat at 3 in (7.6 cm) wide (30 sts ÷ 5 sts per inch = 6 in / 15.2 cm around, which is 3 in / 7.6 cm flat). It is 3.25 in (8.3 cm) tall from tip to edge. Lay it flat so the color-change point falls at one side fold. That side becomes the back.
Border: The Ribbed Brim (Cream White)
The brim is this ornament’s border. You work it in joined rounds directly onto the last blue round.
Border gauge: 5 sts per inch around. Each dc-height round adds about 0.35 in (0.9 cm), and the sc round adds about 0.2 in (0.5 cm).
Per-side counts: Laid flat, the hat has a front and a back. Each count below is split evenly, half on each side, and there are no corner stitches to add, because the brim is a tube.
Rnd 20 (conversion round): Join white in any st of Rnd 19. Ch 1. Then work [sc in next 4 sts, inc] 6 times. That is 30 sts worked one in each existing stitch, plus 6 extra stitches from the increases, for 36. Join with a sl st to the first sc. (36: 18 front, 18 back)
Rnd 21: Ch 2 (does not count as a st). Dc in each st around. Join with a sl st to the first dc. (36: 18 front, 18 back)
Rnd 22: Ch 2 (does not count as a st). [Fpdc around next st, bpdc around next st] 18 times. Join with a sl st to the first fpdc. (36: 9 ribs front, 9 ribs back)
Rnd 23: Ch 2 (does not count as a st). [Fpdc around the fpdc, bpdc around the bpdc] 18 times. Join with a sl st to the first fpdc. (36)
Fasten off with an invisible join, then weave in all tails on the inside.
Why the math works: The body ends at 30 sts, or 15 per side. Adding 6 stitches in Rnd 20 gives 36, or 18 per side. That is 3 extra stitches per side, which adds about 0.6 in (1.5 cm) of width on each face. The post-stitch ribbing pulls in a little, so the brim settles at about 3.5 in (8.9 cm) wide instead of the full 3.6 in (9.1 cm). That leaves the slight flare you see in the finished hat.
Because 36 is even, the 18 fpdc/bpdc pairs line up perfectly, and each rib sits directly above the rib below it. The brim depth adds up to about 0.2 + 0.35 + 0.35 + 0.35 = 1.25 in (3.2 cm).
Pompom (Cream White)
Rnd 1: With white, work 6 sc in an MR. (6)
Rnd 2: Inc in each st around. (12)
Rnd 3: [Sc in next st, inc] 6 times. (18)
Rnds 4–5: Sc in each st around. (18)
Rnd 6: [Sc in next st, dec] 6 times. (12)
Stuff firmly with a pinch of fiberfill.
Rnd 7: Dec 6 times. (6)
Cut the yarn, leaving an 8 in (20.3 cm) tail. Thread it through the front loops of the last 6 sts and pull tight to close.
For the nubby, fluffy look in the photo, brush the surface lightly with a stiff brush until the stitches soften into a fuzzy halo. The finished pompom measures about 1.1 in (2.8 cm) across.
Assembly and Hanging Loop
- Attach the pompom. Use the pompom’s tail to sew it centered over the closed MR at the hat tip. Pass through the tip 3–4 times so the pompom can’t spin.
- Fold the tip. Bend Rnds 1–10 sideways and down toward the front-right of the hat, so the pompom rests beside the cone at about Rnd 15.
- Tack the fold. Using a short length of blue, tack the underside of the tip (around Rnd 8) to the body at Rnd 13 with 2 small hidden stitches. Keep the bend soft and rounded, not creased.
- Make the hanging loop. Hold 2 strands of blue together and ch 25. The chain should be about 5 in (12.7 cm) long. Fasten off, leaving tails at both ends.
- Attach the loop. Thread both ends of the chain through the top of the cone at Rnd 11, just behind the fold, 2 sts apart. Knot them securely inside the hat and weave in the ends. The loop should stand about 2.5 in (6.4 cm) above the hat.
Final Blocking
- Roll a piece of cardstock into a cone that fits snugly inside the hat body, or use a firmly stuffed plastic bag.
- Slide the hat over the form, with the brim seated evenly.
- Spritz the hat lightly with water until it is just damp, not soaked.
- Use your fingers to straighten the brim ribs so they run vertically, and ease the brim out to 3.5 in (8.9 cm) wide.
- Check that the folded tip curves smoothly and that the pompom sits beside the cone, not in front of it.
- Let it dry completely, usually 6–8 hours, then remove the form.
- Fluff the pompom once more with your brush.
For acrylic yarn, you can steam-block by holding a steam iron 1 in (2.5 cm) above the fabric. Never let the iron touch the yarn.
Final Quality-Control Checklist
- Body ends at exactly 30 sts, and the brim at exactly 36 sts
- Flat body width before the brim is 3 in (7.6 cm)
- Finished width is 3.5 in (8.9 cm) and height is 3.75 in (9.5 cm) with the tip folded
- Brim is 1.25 in (3.2 cm) deep, with 9 raised ribs showing on the front
- No gaps or fiberfill visible through the pompom
- Pompom sewn on securely and tacked so it doesn’t flip
- Hanging loop knotted inside and stands about 2.5 in (6.4 cm) tall
- All tails woven in on the inside, with no white showing through the blue
Troubleshooting
The tip won’t fold neatly. Your tension in Rnds 1–10 is too tight. Work those rounds slightly looser, or soften the fabric with steam before folding.
The ribs are slanted or don’t line up. Check that you worked exactly 36 sts in Rnd 21. Also check that each fpdc in Rnd 23 goes around a fpdc from Rnd 22.
The brim ruffles. You likely added extra increases in Rnd 20. Rework the round with exactly 6 increases.
The brim is narrower than the body. Your post stitches are too tight. Pull up a slightly taller loop on each fpdc and bpdc.
A visible jog at the color change. Keep the join at the back side fold, and use an invisible join at the end of Rnd 23.
The pompom looks flat or lumpy. Add a little more stuffing before Rnd 7, and roll it between your palms to round it out.
Care
Spot clean with cool water and mild soap, press out the water in a towel, and reshape it to dry flat. Don’t machine wash or tumble dry, or the pompom and brim ribs will lose their shape.
Final Notes
The measurement chain is simple: tip at 12 sts and 1.75 in (4.4 cm) long; body at 30 sts and 3 in (7.6 cm) wide; brim at 36 sts, 3.5 in (8.9 cm) wide and 1.25 in (3.2 cm) deep; pompom at 1.1 in (2.8 cm). If each checkpoint matches, the finished ornament will measure 3.5 in (8.9 cm) by 3.75 in (9.5 cm). Make one, check it against these numbers, and then make as many as you like. They make lovely gift toppers, too.
Happy crocheting!