

This little evil eye hanging is quick to make and looks good. A tiny black pupil sits inside bright rings of turquoise, white and royal blue. A soft scalloped edge turns the simple circle into a charm that looks finished from across the room.
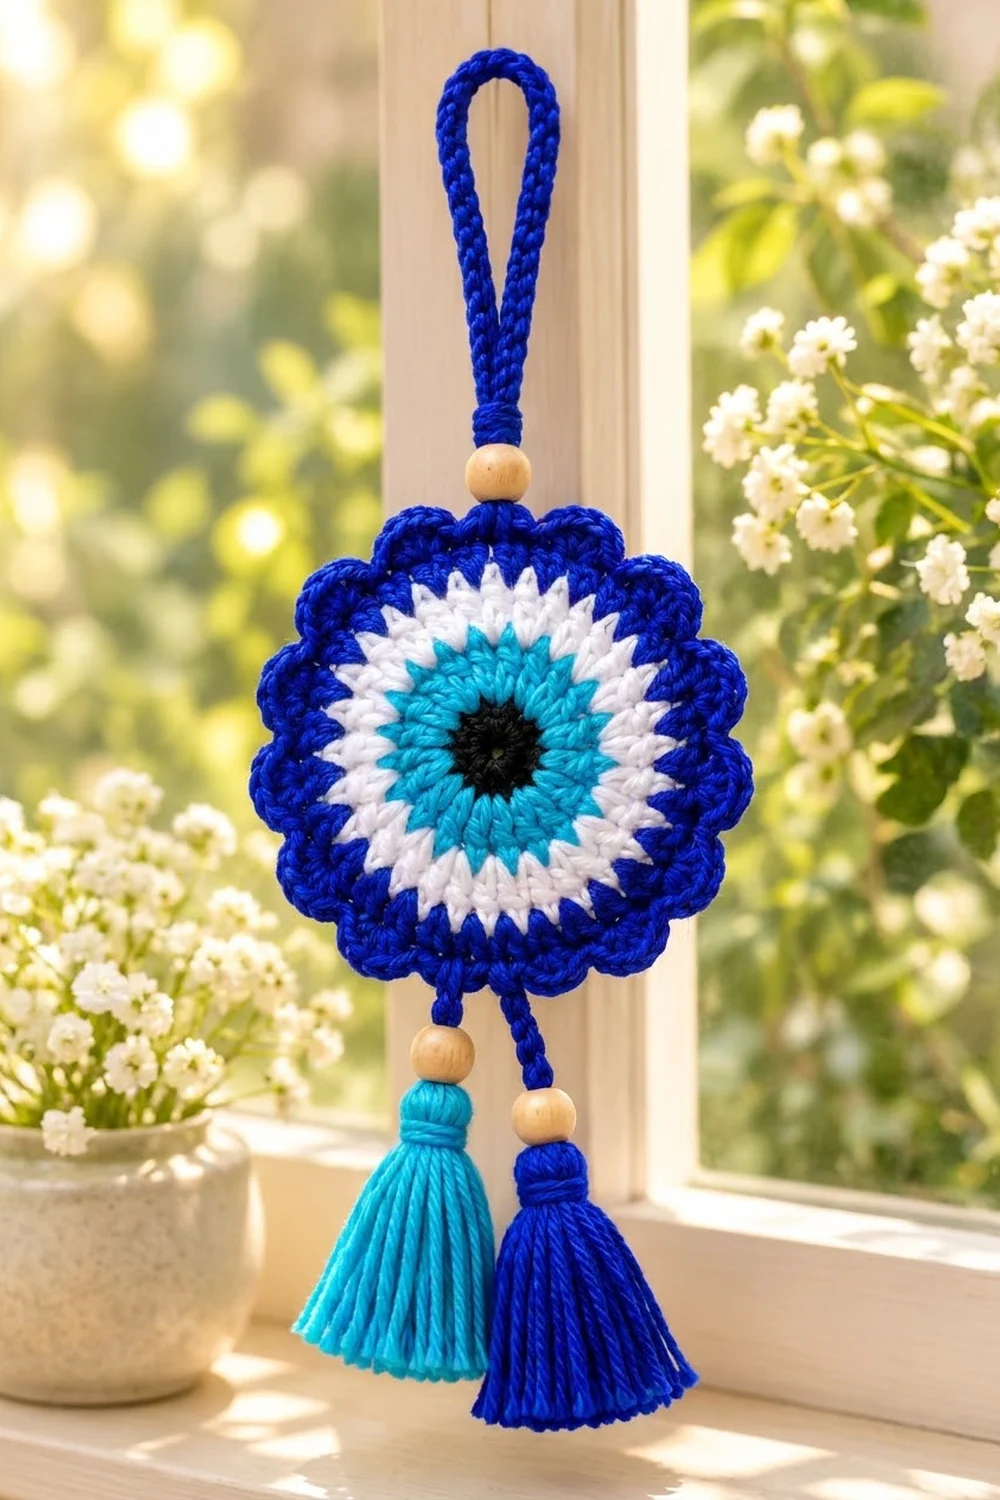
The palette uses the classic nazar colors: black, turquoise, white and a deep royal blue. Two tassels, one turquoise and one royal blue, swing from the bottom on short cords with natural wooden beads. A matching royal blue cord loop lets you hang it in a window, on a door handle or from a rear-view mirror.
The pattern uses US crochet terms. The finished motif is about 4.75 in (12.1 cm) across from scallop tip to scallop tip. With the loop and tassels, the whole hanging is about 12.5 in (31.8 cm) long.
Construction is simple. You work one solid circle of double crochet in five rounds, changing color as you go, then add one round of scalloped edging. The hanging loop is a slip-stitch cord. The tassels are wrapped separately and tied on at the end.
Finished Size and Construction
- Finished motif size: 4.75 in (12.1 cm) diameter, tip to tip
- Total hanging length: about 12.5 in (31.8 cm) including loop and tassels
- Skill level: Easy
- Terminology: US crochet terms
- Yarn weight: DK / light (#3) cotton or cotton blend
- Hook: 3.5 mm (E-4)
- Number of pieces: 1 motif, plus 1 cord loop and 2 tassels
- Layout: single round motif, hung vertically
- Piece size before border (after Round 5): 4 in (10.2 cm)
- Border depth: about 0.375 in (1.0 cm) per side
Materials
Choose a smooth mercerized or combed cotton in DK weight. Cotton keeps the stitches crisp, holds the scallops flat and makes tassels that hang straight. Avoid fuzzy or brushed yarns, which blur the edges between the color rings.
Yarn (DK cotton, about 120 m per 50 g):
- Black: 3 g (7 m) for the pupil
- Turquoise: 10 g (24 m) for 2 rounds and 1 tassel
- White: 5 g (12 m) for 1 round
- Royal blue: 15 g (36 m) for 2 rounds, the cord loop and 1 tassel
These quantities include a comfortable margin for checking gauge, joins and weaving in ends.
Tools:
- 3.5 mm (E-4) crochet hook
- 3 natural wooden beads, 12 mm (about 0.5 in / 1.3 cm), with holes large enough for two strands of yarn
- Stiff card cut to 2.75 in (7.0 cm) tall, for the tassels
- Tapestry needle
- Sharp scissors
- 1 stitch marker
- Rust-proof pins and a blocking mat or folded towel
- Ruler or tape measure
Abbreviations (US Terms)
- ch: chain
- sl st: slip stitch
- sc: single crochet
- hdc: half double crochet
- dc: double crochet
- st(s): stitch(es)
- MR: magic ring
- rep: repeat
Special stitch: Scallop. Worked over 5 stitches: sc in next st, hdc in next st, 3 dc in next st, hdc in next st, sc in next st. One scallop uses 5 stitches of the previous round and makes 7 new stitches.
Color change: Work the joining sl st of the old round with the new color. The new round then starts cleanly in its own color, with no stray loop of the old color on top.
Gauge and Checkpoints
There is no separate swatch. You check gauge on the motif itself, so start the motif and measure after Round 3 before going on. Since the hanging is only one piece, testing this first piece takes just a few minutes.
Gauge: Rounds 1–3 = 2.5 in (6.4 cm) diameter.
Lay the circle flat and measure from edge to edge through the center, without stretching.
Checkpoints:
- After Round 1: 1 in (2.5 cm)
- After Round 3: 2.5 in (6.4 cm)
- After Round 4: 3.25 in (8.3 cm)
- After Round 5: 4 in (10.2 cm)
- After Round 6 (scallops): 4.75 in (12.1 cm) tip to tip
If your circle is too big, go down to a 3.25 mm or 3 mm hook. If it is too small, go up to a 3.75 mm or 4 mm hook. A slightly different size is fine for a hanging, but the circle must stay flat. Ruffling means your stitches are too loose or there are too many. Cupping means your tension is too tight.
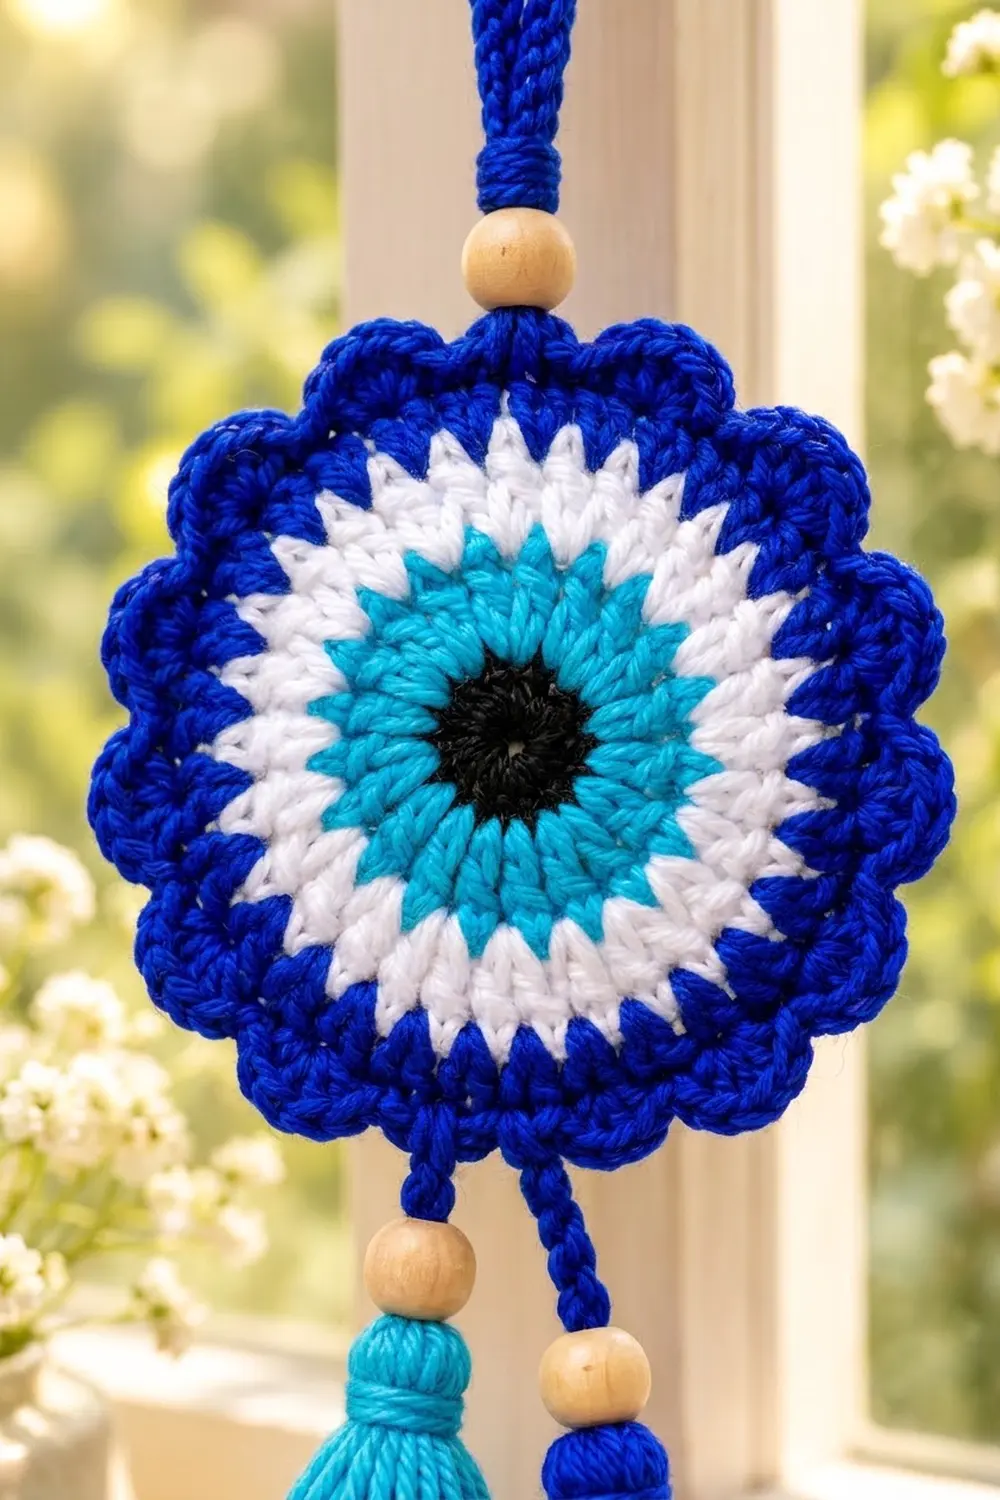
Pattern: Evil Eye Motif
The ch 3 at the start of each round counts as the first dc. Join each round with a sl st into the top of the beginning ch 3. Do not turn. Keep the right side facing you the whole time.
Round 1 (black)
Make a MR. Ch 3, then work 11 dc into the ring. Pull the ring closed tightly. Join with a sl st to the top of the ch 3. (12 dc)
Join turquoise in the final sl st, then cut black, leaving a 4 in (10.2 cm) tail.
Checkpoint: 1 in (2.5 cm) across.
Round 2 (turquoise)
Ch 3, dc in same st as join. Work 2 dc in each remaining st around. Join. (24 dc)
Round 3 (turquoise)
Ch 3, 2 dc in next st. Dc in next st, 2 dc in next st; rep from * 11 times. Join. (36 dc)
Change to white in the joining sl st.
Checkpoint: 2.5 in (6.4 cm) across. This is your gauge check.
Round 4 (white)
Ch 3, dc in next st, 2 dc in next st. Dc in next 2 sts, 2 dc in next st; rep from * 11 times. Join. (48 dc)
Change to royal blue in the joining sl st.
Checkpoint: 3.25 in (8.3 cm) across.
Round 5 (royal blue)
Ch 3, dc in next 2 sts, 2 dc in next st. Dc in next 3 sts, 2 dc in next st; rep from * 11 times. Join. (60 dc)
Do not fasten off. Keep working with royal blue.
Checkpoint: 4 in (10.2 cm) across. The circle should lie completely flat. This is your size before the border.
Tip: Increases in the same place every round stack into straight lines that can push the circle toward a 12-sided shape. The photo shows gentle radial lines, which are part of the look. If your circle looks angular, you can move the 2-dc increase over by one stitch on alternate rounds. The stitch count does not change.
Border: Scalloped Edge
The border is one conversion round in royal blue. It turns the smooth circle into 12 rounded scallops.
Border gauge: At 4 in (10.2 cm) diameter, the outer edge is about 12.6 in (32.0 cm) around. Each scallop covers 5 stitches of Round 5, which is about 1.05 in (2.7 cm) of that edge.
Round 6 (royal blue)
Ch 1 (does not count as a st). Sc in same st as join, hdc in next st, 3 dc in next st, hdc in next st, sc in next st. Sc in next st, hdc in next st, 3 dc in next st, hdc in next st, sc in next st; rep from * 10 more times. Join with a sl st to the first sc. (12 scallops)
Stitch count: 60 sts worked one per existing stitch + 24 extra sts (2 extra from each 3-dc group × 12) = 84 sts.
Per scallop: 1 sc, 1 hdc, 3 dc, 1 hdc, 1 sc = 7 sts, worked over 5 sts of Round 5.
Fasten off. Weave in all ends on the wrong side, running each tail only through stitches of its own color.
Why the math works: 60 divides evenly by 5, so you get exactly 12 scallops with no leftover stitches. Each scallop ends with a sc and the next one starts with a sc, so each valley is a pair of sc lying flat on the circle. Each peak is the center dc of a 3-dc group. Those tall center stitches add about 0.375 in (1.0 cm) on each side, taking the diameter from 4 in (10.2 cm) to 4.75 in (12.1 cm).
Placement: Choose one scallop as the top and mark its center dc with the stitch marker. The scallop directly opposite, 6 scallops away, is the bottom, where the tassels hang. Choose a top that hides the joining seam of the rounds toward the back or side.
Hanging Loop
With royal blue, ch 47. Starting in the 2nd ch from the hook, sl st in the back bump of each ch across. (46 sl sts) Fasten off, leaving 6 in (15.2 cm) tails at both ends.
The cord should be about 7 in (17.8 cm) long. If it is not, add or remove chains.
Fold the cord in half. Thread both ends together through one wooden bead. Slide the bead down until the loop above it measures about 3 in (7.6 cm). Pass the ends through the marked center dc of the top scallop from front to back, then tie a firm square knot so the bead sits snugly against the scallop. Weave the tails back up into the cord and trim.
Tassels and Tassel Cords
Tassels (make 1 turquoise, 1 royal blue)
Wrap yarn 30 times around the 2.75 in (7.0 cm) card. Slide a 10 in (25.4 cm) tie strand under the wraps at the top and knot it tightly. Cut through the wraps along the bottom edge.
Wrap a 12 in (30.5 cm) strand of the same color 6 times around the tassel, 0.375 in (1.0 cm) below the top, to form the head. Knot it, then thread the tails down into the tassel with a needle. Trim all the ends evenly to 2.5 in (6.4 cm).
Attaching
The two ends of each tassel’s tie strand become its cord.
- Turquoise tassel: Thread both tie ends through a wooden bead, then through the first dc of the bottom scallop’s 3-dc group. Adjust so about 0.75 in (1.9 cm) of cord shows between the motif and the bead. Knot on the back.
- Royal blue tassel: Thread the tie ends through a bead, then through the third dc of the same 3-dc group. Adjust so about 1.25 in (3.2 cm) of cord shows, so this tassel hangs a little lower. Knot on the back.
Weave all the cord ends into the back of Rounds 5 and 6.
Final Blocking
- Fold the tassels and loop off the edge of the mat so they stay dry.
- Lightly mist the motif with water until it is damp but not soaked.
- Lay it right side up on the blocking mat.
- Pin the center dc of each of the 12 scallops to a 4.75 in (12.1 cm) diameter. Check it with a ruler across opposite peaks.
- Press the inner rings gently with your palm so the circle does not dome.
- Steam the tassels lightly from above, without touching the iron to the yarn. Comb the strands straight with your fingers.
- Let everything dry completely before you unpin it.
Final Quality-Control Checklist
- The black pupil is closed tight in the center with no visible hole.
- Round counts are 12, 24, 36, 48 and 60, then 84 for the border.
- Each color ring is a clean, even band with no stray color at the joins.
- The diameter is 4 in (10.2 cm) before the border and 4.75 in (12.1 cm) after.
- All 12 scallops are the same size and evenly spaced.
- The loop is centered on the top scallop and is about 3 in (7.6 cm) long.
- The tassels hang from the bottom scallop, with the blue one slightly lower.
- The total length is about 12.5 in (31.8 cm).
- All ends are woven in on the back.
Troubleshooting
The circle ruffles. Your tension may be loose, or you may have added an extra increase. Count each round, and go down a hook size if the counts are correct.
The circle cups. Your tension is too tight, or you missed an increase. Recount, then go up a hook size.
The center hole won’t close. Pull the magic ring tail firmly before you join Round 1. Then secure it with a few stitches on the back.
The scallop count is off. Round 5 probably did not have exactly 60 sts. Recount it before the border, because you need 60 for 12 even scallops.
The joining seam shows. Join into the top chain of the ch 3, not the gap beside it, and make every color change in the joining sl st.
The hanging tilts. The loop is off-center. Re-tie it through the exact center dc of the top scallop.
The tassels look messy. Steam them again, then trim with sharp scissors while the strands are held straight.
Care
Spot clean, or hand wash gently in cool water, then reshape and dry flat. Keep it out of harsh direct sun for long periods so the bright blues don’t fade.
Final Notes
The measurements build step by step: 1 in (2.5 cm) after Round 1, 2.5 in (6.4 cm) after Round 3, 3.25 in (8.3 cm) after Round 4, 4 in (10.2 cm) after Round 5 and 4.75 in (12.1 cm) after the scalloped border. Stitch counts go 12, 24, 36, 48 and 60, then 84 in 12 scallops. Add a 3 in (7.6 cm) loop and two beaded tassels, and the finished hanging is about 12.5 in (31.8 cm) long.
Make one for your own window, for a friend’s new home or for a car mirror. Happy crocheting!