

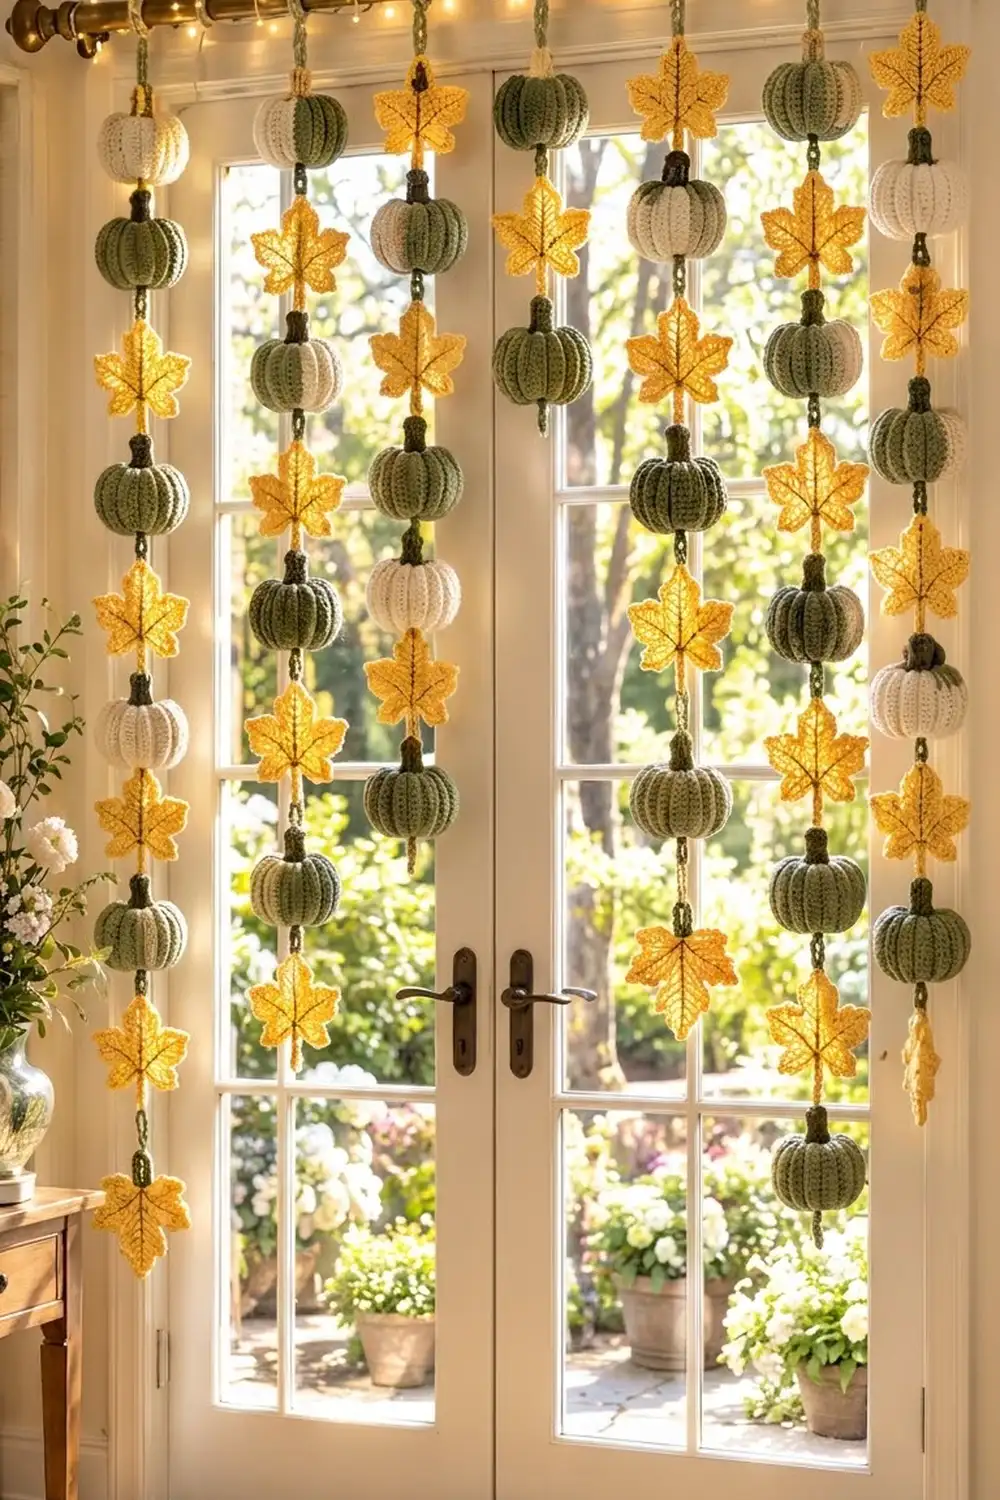
This hanging curtain is made of seven vertical strands of small ribbed pumpkins and flat maple leaves strung on sage green chain cords. Hung from a rod across a glass door or window, it lets light through and gives a soft autumn look that lasts from early fall through Thanksgiving.
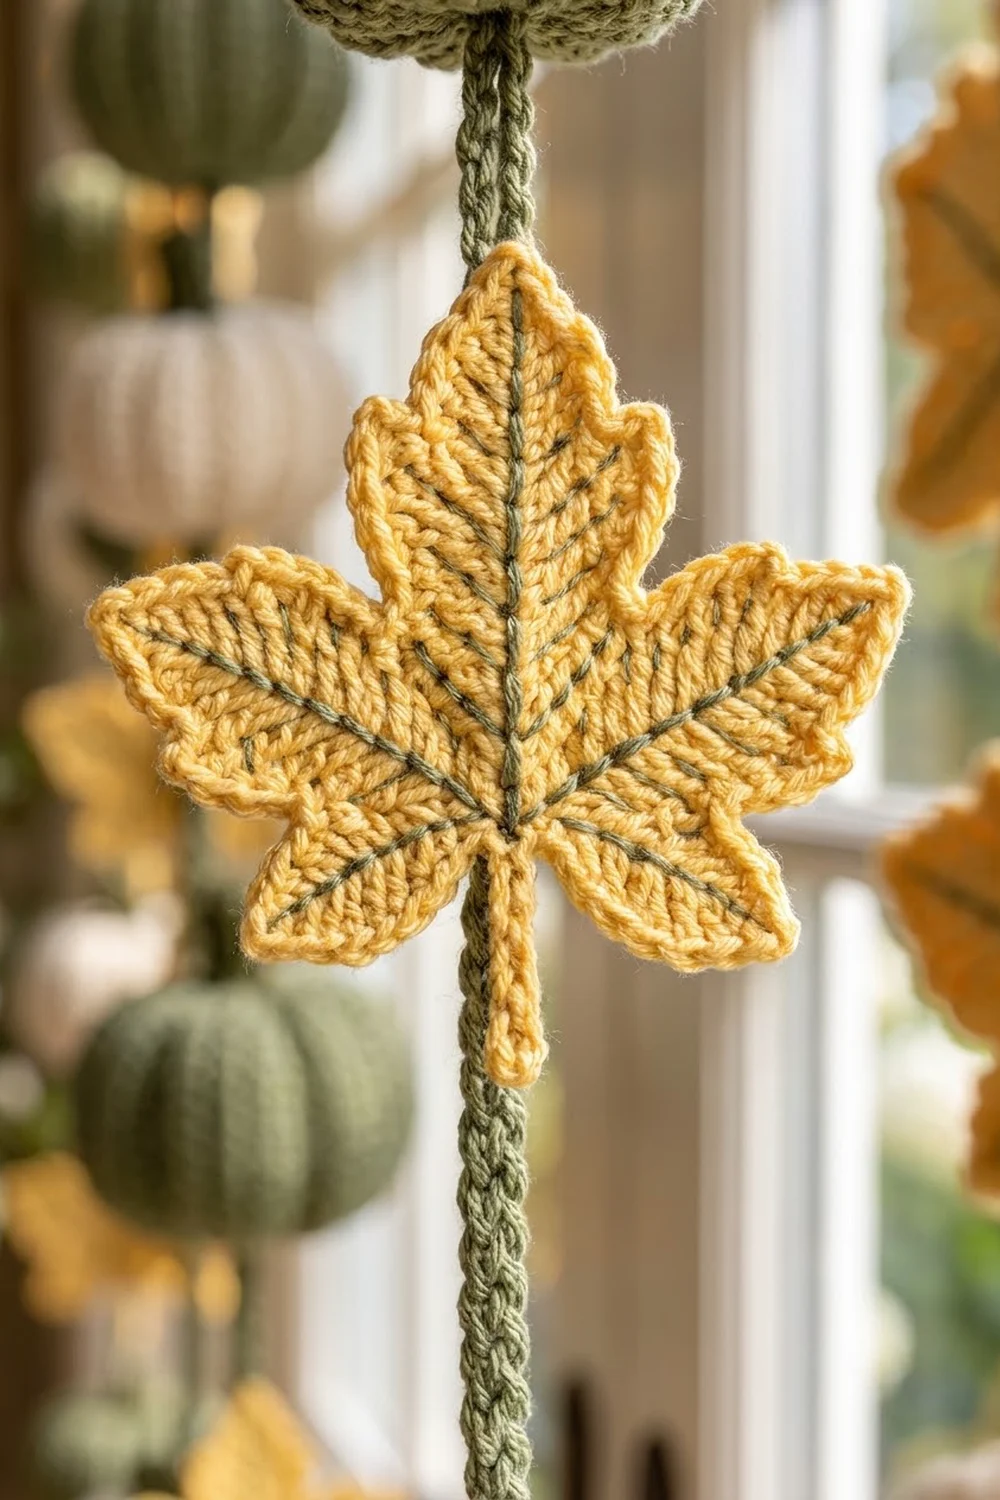
The palette is calm and natural: sage green and creamy ivory pumpkins with sage stems, and buttery yellow leaves with sage embroidered veins. The pumpkins have vertical ribs from back-loop single crochet and are cinched into eight soft sections. The leaves have five pointed lobes and a short slip-stitch stem.
This pattern uses US crochet terms. The finished curtain is about 33 in (83.8 cm) wide and 70.5 in (179.1 cm) long from the top of the rod to the bottom of the lowest motif. Each strand carries 12 motifs, alternating pumpkins and leaves, so the whole curtain has 42 pumpkins and 42 leaves.
Construction is simple and repetitive. Each pumpkin is a small flat ribbed rectangle that is seamed, gathered, stuffed and segmented. Each leaf is worked in the round from a magic ring. Once all the motifs are done, you chain each strand from the top down and attach the pumpkins and leaves as you reach them.
Finished Size and Construction
- Finished size: about 33 in (83.8 cm) wide x 70.5 in (179.1 cm) long
- Skill level: Easy-intermediate
- Terminology: US crochet terms
- Yarn weight: Worsted (#4), cotton or cotton blend
- Hook: 4.0 mm (US G-6)
- Number of pieces: 42 pumpkins (30 sage, 12 cream), 42 stems, 42 leaves, 7 chain cords
- Layout: 7 strands x 12 motifs, strands spaced 5 in (12.7 cm) apart on the rod
- Pumpkin size: 2.25 in (5.7 cm) wide x 1.75 in (4.4 cm) tall, plus a 0.75 in (1.9 cm) stem
- Leaf size: 3 in (7.6 cm) tip to tip, plus a 1.5 in (3.8 cm) stem
- Leaf size before border: 2.75 in (7.0 cm) tip to tip after Round 3
- Border depth: one round of single crochet, about 0.125 in (0.3 cm)
Materials
Use a smooth worsted cotton or cotton blend. Cotton holds its shape on a hanging piece, doesn’t stretch much under the weight of the motifs and shows the pumpkin ribs clearly. The amounts below assume about 180 m per 100 g.
- Sage green: 320 g (576 m) for pumpkins, all stems, cords and leaf veins
- Cream/ivory: 90 g (162 m) for pumpkins
- Butter yellow: 150 g (270 m) for leaves
These quantities include a margin of about 15% for swatching, tails and small differences in tension.
Tools
- 4.0 mm (US G-6) crochet hook
- Polyester fiberfill, about 150 g
- Tapestry needle with a large eye
- Stitch markers
- Scissors and a flexible tape measure
- Pins and a foam blocking mat
- Curtain rod up to 1.5 in (3.8 cm) in diameter
Abbreviations (US Terms)
- ch: chain
- sl st: slip stitch
- sc: single crochet
- hdc: half double crochet
- dc: double crochet
- tr: treble crochet
- BLO: back loop only
- st(s): stitch(es)
- sp: space
- rep: repeat
Special technique: pull-through join. Drop the working loop from your hook. Push the hook through the pumpkin, from the exit point back to the entry point. Pick up the dropped loop and draw it back through, so the chains you just made sit inside the pumpkin.
Gauge and Checkpoints
Fabric gauge: 18 sts and 20 rows = 4 in (10.2 cm) in BLO single crochet worked in rows.
Chain gauge: 4 ch = 1 in (2.5 cm).
Make one pumpkin and one leaf before you start the full set. Measure at each checkpoint:
- Pumpkin after Row 10: 2 in (5.1 cm) long and 2.25 in (5.7 cm) wide
- Pumpkin panel after Row 32: 6.4 in (16.3 cm) long and 2.25 in (5.7 cm) wide
- Finished pumpkin: 2.25 in (5.7 cm) wide and 1.75 in (4.4 cm) tall
- Leaf after Round 2: 1.25 in (3.2 cm) across
- Leaf after Round 3: 2.75 in (7.0 cm) tip to tip
- Leaf after Round 4: 3 in (7.6 cm) tip to tip
If your pieces come out too big, go down to a 3.75 mm hook. If they’re too small, go up to a 4.5 mm hook. The pumpkins need firm fabric so the stuffing doesn’t show through. If yours look gappy, go down a hook size even if your size is close to gauge. Check your chain gauge too, because it sets the strand length.
Pumpkin (make 42: 30 sage, 12 cream)
The pumpkin is worked flat. The 10 foundation stitches set the pumpkin’s height, and the 32 rows wrap around its circumference. Each BLO row leaves a raised ridge that runs from top to bottom on the finished pumpkin.
Row 1: Ch 11. Sc in 2nd ch from hook and in each ch across. Turn. (10 sc)
Rows 2–32: Ch 1 (does not count as a st). Sc BLO in each st across. Turn. (10 sc in each row)
After Row 32, leave a 24 in (61.0 cm) tail and fasten off.
Seam: Fold the panel so Row 1 meets Row 32. Using the tail, whipstitch the 10 foundation loops to the 10 stitches of the last row to make a tube.
Gather the bottom: Weave the tail through the 32 row-ends along one open edge. Pull it tight and knot.
Stuff: Stuff firmly through the open top with about 3 g of fiberfill. Shape it into a round, slightly flattened ball.
Gather the top: Weave the tail through the 32 row-ends of the top edge. Pull tight and knot.
Segment: Insert the needle from top center to bottom center. Wrap the yarn up the outside along a row line, go back down through the center and pull snugly. Move over 4 rows and repeat. Make 8 wraps in total, one every 4 rows (8 x 4 = 32 rows), to get 8 even sections. Knot at the bottom center and hide the tail inside.
Stem (make 42, all sage)
Round 1: Magic ring, 6 sc in ring. Do not join; work in a spiral. (6 sc)
Rounds 2–4: Sc in each st around. (6 sc in each round)
Sl st in the next st, leave an 8 in (20.3 cm) tail and fasten off. The stem is about 0.75 in (1.9 cm) tall. Sew it to the top of the pumpkin just off center, so the cord can enter right beside it.
Leaf (make 42, yellow)
Round 1: Magic ring, ch 1, 10 sc in ring. Sl st to first sc. (10 sc)
Round 2: Ch 1, 2 sc in each st around. Sl st to first sc. (20 sc)
Checkpoint: 1.25 in (3.2 cm) across.
Round 3 (lobes): Ch 1 (does not count). *Sc in next st, (hdc, dc) in next st, (tr, ch 2, tr) in next st, (dc, hdc) in next st. Rep from * 4 more times. Sl st to first sc. (35 sts and 5 ch-2 sps)
Each lobe uses 4 stitches of Round 2 and makes 7 stitches plus 1 tip space. Across 5 lobes, that’s 20 stitches used and 35 stitches made. The sc between lobes forms the low notches, and the treble pairs form the points.
Checkpoint: 2.75 in (7.0 cm) tip to tip.
Don’t fasten off. Go straight on to the leaf border below.
Make All Pieces
Before assembly, make:
- Sage pumpkins: 30
- Cream pumpkins: 12
- Sage stems: 42 (one on every pumpkin)
- Yellow leaves: 42, bordered and veined
In the layout grid, P = sage pumpkin, C = cream pumpkin and L = leaf. Position 1 is at the top.
Pos   S1  S2  S3  S4  S5  S6  S7
 1    C   L   P   L   P   L   P
 2    L   C   L   P   L   P   L
 3    P   L   P   L   P   L   C
 4    L   P   L   P   L   C   L
 5    P   L   C   L   P   L   P
 6    L   P   L   C   L   P   L
 7    P   L   P   L   C   L   P
 8    L   P   L   P   L   P   L
 9    C   L   P   L   P   L   P
10    L   C   L   P   L   C   L
11    P   L   P   L   P   L   C
12    L   P   L   C   L   P   L
Odd strands start with a pumpkin and even strands start with a leaf, so the motifs make a checkerboard across the door. Every strand has 6 pumpkins and 6 leaves. Strands 1 to 7 have 2, 2, 1, 2, 1, 2 and 2 cream pumpkins, which adds up to 12.
Joining (Building Each Strand)
Each strand is one continuous sage chain worked from the top down. You attach the pumpkins with the pull-through join and the leaves with slip stitches.
Hanging loop: Ch 24 and sl st to the first ch to form a ring. The ring is 6 in (15.2 cm) around and hangs 3 in (7.6 cm) below the top of the rod.
Gap: Ch 12 before every motif. Each gap is 3 in (7.6 cm).
To attach a pumpkin: Ch 7, which matches the pumpkin’s 1.75 in (4.4 cm) height. Drop the loop. Insert the hook at the bottom center, push it up through the stuffing and bring it out beside the stem. Pick up the loop and draw it back down through the pumpkin. Insert the hook into one stitch of the bottom gather and sl st to anchor it.
To attach a leaf (stem pointing down): Sl st into the ch-2 tip of Lobe 3, the top lobe opposite the stem. Ch 14, which is 3.5 in (8.9 cm). Lay the chain down the center back of the leaf and sl st into the end of the stem. The leaf hangs flat, and the cord is hidden behind it.
Strand sequence: Make the hanging loop, then work (ch 12 gap + motif) 12 times, following your strand’s column in the grid. After the last motif, ch 1, fasten off and weave the end into the chain.
Chain count per strand: 24 (loop) + 144 (12 gaps x 12) + 42 (6 pumpkins x 7) + 84 (6 leaves x 14) + 1 = 295 ch.
Length check: 3 in (7.6 cm) loop drop + 36 in (91.4 cm) of gaps + 10.5 in (26.7 cm) of pumpkins + 21 in (53.3 cm) of leaves = 70.5 in (179.1 cm). Even strands have the motifs in a different order but come out the same length.
Tension advice: Chain at an even, relaxed tension that matches your gauge chain. If you chain tightly, a strand can come out several inches short. Hang each strand as soon as it’s done and check it against 70.5 in (179.1 cm) before you start the next one.
Border: Leaf Edging Round
The leaf border is one round worked straight after Round 3. It sharpens the points, deepens the notches and gives the leaf a firm, neat edge that holds up on a hanging piece.
Border gauge: One round of sc adds about 0.125 in (0.3 cm) all around. The leaf grows from 2.75 in (7.0 cm) to 3 in (7.6 cm) tip to tip.
Round 4: Do not ch 1. *Sl st in the valley sc, sc in each of the next 3 sts (hdc, dc, tr), (sc, ch 2, sc) in ch-2 sp, sc in each of the next 3 sts (tr, dc, hdc). Rep from * 4 more times. (45 sts and 5 ch-2 tips)
Count per lobe: 7 sts worked one into each existing stitch + 2 extra sc at the tip = 9 sts. Round total: 35 sts worked one into each stitch + 10 extra = 45 sts.
Why the math works: The 2 extra stitches at each tip let the edge turn sharply around the point without cupping. The slip stitch in each valley keeps the notch low and crisp. Everywhere else you work one stitch into each stitch, so the leaf stays flat.
Stem: Ch 7. Sl st in the 2nd ch from hook and in each of the next 5 ch (6 sl sts). Sl st into the first sl st of Round 4 and fasten off. The stem comes out of the notch between Lobe 5 and Lobe 1, directly opposite Lobe 3, and is about 1.5 in (3.8 cm) long.
Veins: With sage yarn, backstitch from the center ring out to each of the 5 tips, then continue the center vein down into the stem. This uses about 1 m of yarn per leaf. Weave in all ends on the back.
Final Blocking
- Lightly spray each leaf until it’s damp.
- Pin it at 3 in (7.6 cm) tip to tip, with one pin in each ch-2 tip and one in each valley.
- Pin the stem straight.
- Let the leaves dry completely, for at least 6 hours.
- Don’t block the pumpkins. Roll each one gently between your palms to even out the sections.
- Hang the finished strands on the rod for 24 hours so the chains relax to their final length.
- Space the loops 5 in (12.7 cm) apart for a 33 in (83.8 cm) wide curtain.
Final Quality-Control Checklist
- Every pumpkin is 2.25 in (5.7 cm) wide with 8 even sections
- No stuffing shows between stitches
- Every stem is firmly sewn on
- Every leaf is 3 in (7.6 cm) tip to tip with 5 sharp points
- The veins are on the front and the cord is hidden on the back
- Each strand has 12 motifs in the correct grid order
- All strands are 70.5 in (179.1 cm) long, within 1 in (2.5 cm)
- The hanging loops slide freely on the rod
- All ends are woven in and trimmed
Troubleshooting
Pumpkin ribs look faint: Make sure every row after Row 1 is worked in the back loop only.
Pumpkin is lumpy: Pull the fiberfill into small tufts before stuffing, and tighten all the segment wraps evenly.
Leaf cups: Your trebles are too tight. Go up a hook size for Round 3 only.
Leaf ruffles: Make sure you added only 2 sc at each tip in Round 4.
Pumpkin slides down the cord: Redo the anchor sl st through a firm stitch of the bottom gather.
Strands are uneven: Recount the chains in each gap, then add or remove chains in the last gap.
Leaf tilts: The cord must start at the Lobe 3 tip and end at the stem tip, directly opposite it.
Care
Take the curtain down to clean it. Spot clean with mild soap and cool water and lay it flat to dry. Store it loosely coiled so the cords don’t tangle.
Final Notes
Each measurement builds on the one before. A gauge of 18 sts and 20 rows to 4 in (10.2 cm) gives a 2.25 in (5.7 cm) by 6.4 in (16.3 cm) panel, which becomes a 2.25 in (5.7 cm) pumpkin. Each leaf grows from 1.25 in (3.2 cm) to 2.75 in (7.0 cm), and the border brings it to 3 in (7.6 cm). With a chain gauge of 4 ch to 1 in (2.5 cm), 12 motifs and 12 gaps make a 70.5 in (179.1 cm) strand. Seven strands spaced 5 in (12.7 cm) apart give a 33 in (83.8 cm) curtain. If you check each stage, the curtain will hang evenly.
Happy crocheting!