

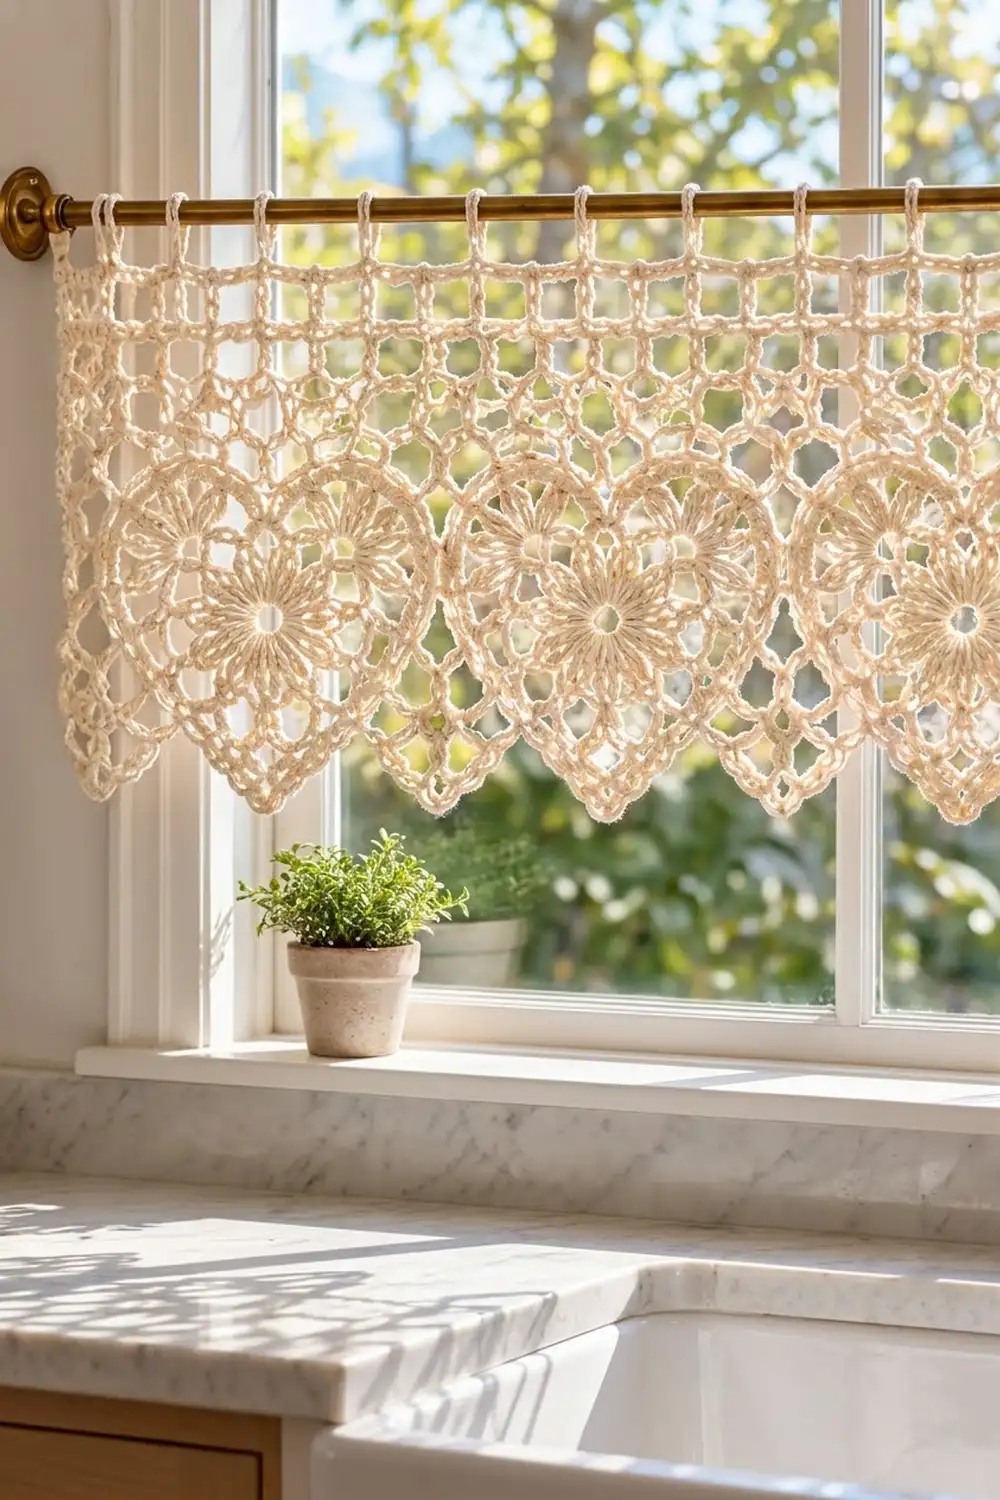
The Heartlight Valance is a café-curtain topper made from a row of lace hearts. Each heart has a round flower in the center, surrounded by open chain-loop mesh that forms two soft lobes and a sharp point. The joined hearts make a lacy, pointed lower edge that lets light through, and a simple filet mesh band across the top holds them straight.
The valance is worked in one color of cream cotton thread. The style is farmhouse lace: airy, washable and quiet enough for a kitchen window all year. The pattern uses US crochet terms throughout.
The finished valance measures 36 in (91.4 cm) wide and 7.4 in (18.8 cm) deep, not counting the hanging loops. The hanging loops add about 1 in (2.5 cm) when the valance is on the rod.
To make it, you crochet eight hearts in the round and join each one to the one before it during its last round. Then you work a leveling row across the tops of the hearts, build a mesh header and finish with chain loops for the rod.
Finished Size and Construction
- Finished size: 36 in x 7.4 in (91.4 cm x 18.8 cm), plus loops
- Skill level: Intermediate
- Terminology: US
- Yarn weight: Size 3 mercerized cotton crochet thread (close to fingering weight)
- Hook: 2.75 mm (US C-2)
- Number of pieces: 8 heart motifs, plus a header worked straight onto them
- Layout: 8 hearts in a single horizontal row
- Single heart size: 4.5 in x 4.5 in (11.4 cm x 11.4 cm)
- Size before header: 36 in x 4.5 in (91.4 cm x 11.4 cm)
- Header depth: 2.9 in (7.4 cm)
Materials
Use a smooth, tightly plied, mercerized cotton thread in size 3. Mercerized cotton shows the lace clearly, keeps its shape after blocking and handles kitchen humidity and washing well. Avoid fuzzy or loosely spun thread, because it blurs the chain loops.
- Cream: 60 g (about 170 m / 186 yd), based on thread with about 140 m per 50 g
Each heart uses about 10 m of thread. The header and loops use about 35 m. The quantity above includes a generous margin for gauge swatches and weaving in ends.
Tools:
– 2.75 mm (US C-2) crochet hook
– Tapestry needle
– Stitch markers (at least 2)
– Rustproof pins and a blocking board or foam mats
– Measuring tape
– Spray bottle; spray starch (optional)
Abbreviations (US Terms)
- ch – chain
- sl st – slip stitch
- sc – single crochet
- hdc – half double crochet
- dc – double crochet
- tr – treble crochet (yarn over twice)
- dtr – double treble crochet (yarn over 3 times, then [yarn over, pull through 2] 4 times)
- lp(s) – loop(s)
- sp(s) – space(s)
- rep – repeat
Special technique – joining loop: Ch 2, sl st around the named loop of the earlier heart, ch 2. This replaces one ch-5 loop and counts as that loop.
Gauge and Checkpoints
Make one complete heart before you start the others, then block it and measure it. That first heart is your gauge swatch.
- After Rnd 1: 1 in (2.5 cm) across
- After Rnd 3 (flower): 2.25 in (5.7 cm) across
- After Rnd 4: 3 in (7.6 cm) across
- After Rnd 5: 3.5 in (8.9 cm) across
- After Rnd 6: 4 in (10.2 cm) wide
- After Rnd 7, blocked: 4.5 in x 4.5 in (11.4 cm x 11.4 cm), measured from lobe peaks to tip and across the widest point
Mesh gauge: 10 mesh squares = 4.5 in (11.4 cm) wide, and 6 rows = 2.7 in (6.9 cm). Each square is 0.45 in (1.1 cm).
If your blocked heart is more than 1/8 in (0.3 cm) too big, change to a 2.5 mm hook. If it is too small, change to a 3 mm hook. Use the same hook for the header so the mesh lines up with the hearts.
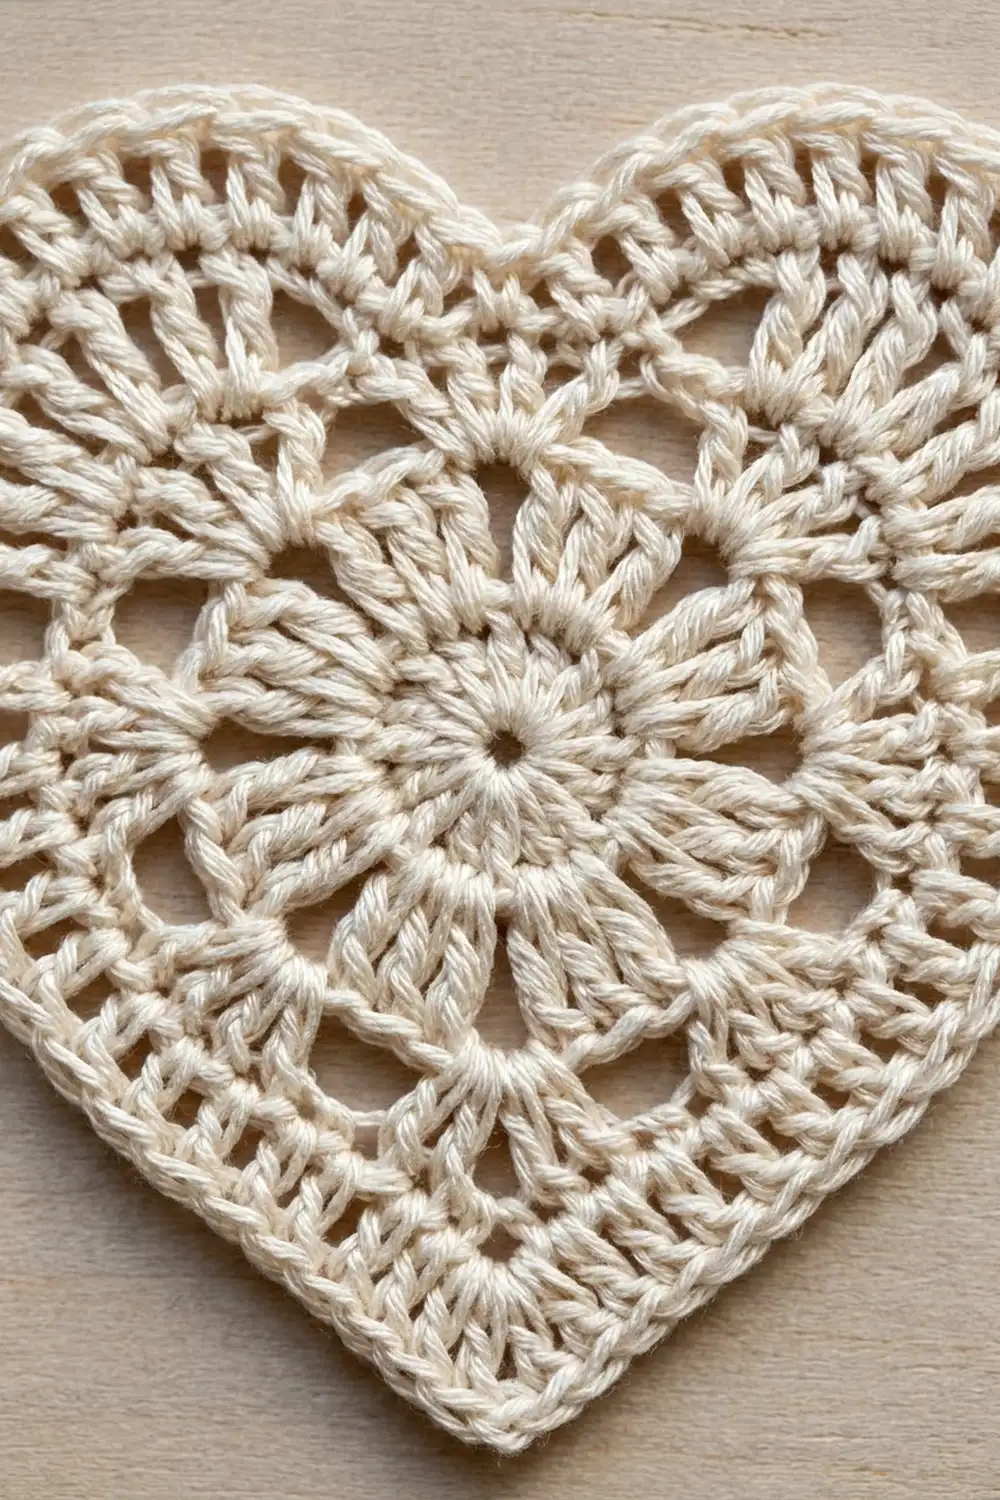
Heart Motif (make 8)
Rnd 1: Ch 8 and join with a sl st to form a ring. Ch 3 (counts as dc), then work 23 dc in the ring. Join with a sl st to the top of the beg ch-3. (24 dc)
Rnd 2: Ch 3 (counts as dc), dc in next 2 dc, ch 3, dc in next 3 dc, ch 3 7 times. Join to the top of the beg ch-3. (24 dc in 8 groups of 3, 8 ch-3 sps)
Rnd 3: Ch 3 (counts as dc), dc in same st, dc in next dc, 2 dc in next dc, ch 3, skip ch-3 sp, 2 dc in next dc, dc in next dc, 2 dc in next dc, ch 3, skip ch-3 sp 7 times. Join. (40 dc in 8 petals of 5, 8 ch-3 sps)
The petals now flare into eight wedges around the open center.
Rnd 4: Sl st in next 2 dc to reach the center dc of the petal. Ch 1, sc in same dc, ch 7, sc in center (3rd) dc of next petal, ch 7 7 times. Join to the first sc. (8 sc, 8 ch-7 lps)
Place a marker in the first sc. It marks the top center of the heart.
Rnd 5: Sl st into the next ch-7 lp. Ch 1, (sc, ch 5, sc) in same lp, ch 5, (sc, ch 5, sc) in next ch-7 lp, ch 5 7 times. Finish with ch 2, then join with a dc in the first sc. The ch 2 and dc together count as the last ch-5 lp. (16 sc, 16 ch-5 lps)
Number the loops 1 to 16 in working order. Loop 16 (the one closed by the joining dc) sits over the top center, and loop 8 sits at the bottom.
Rnd 6 (shaping): Ch 1, sc around the joining dc in loop 16; this is the top center. Then work:
- ch 4, sc in lp 1
- ch 6, sc in lp 2, ch 7, sc in same lp 2
- ch 7, sc in lp 3, ch 7, sc in same lp 3
- ch 7, sc in lp 4
- ch 6, sc in lp 5
- ch 5, sc in lp 6
- ch 5, sc in lp 7
- ch 5, sc in lp 8, ch 9 (tip), sc in same lp 8
- ch 5, sc in lp 9
- ch 5, sc in lp 10
- ch 5, sc in lp 11
- ch 6, sc in lp 12
- ch 7, sc in lp 13, ch 7, sc in same lp 13
- ch 7, sc in lp 14, ch 7, sc in same lp 14
- ch 6, sc in lp 15
- ch 4, join to the first sc
(21 sc, 21 ch-sps: 2 ch-4, 4 ch-6, 8 ch-7, 6 ch-5, 1 ch-9 tip)
The doubled ch-7 loops form the lobes, the short ch-4 loops pull in the top dip and the ch-9 loop sets the point. Each half mirrors the other exactly.
Rnd 7 (edge): Sl st into the next ch-4 sp. Ch 1, sc in same sp, ch 5, sc in next sp, ch 5 9 times. In the ch-9 tip work (sc, ch 7, sc), then ch 5. Then work sc in next sp, ch 5 9 times, sc in last ch-4 sp, ch 2 and join to the first sc. Fasten off. (22 sc; 22 lps: 20 ch-5, 1 ch-7 tip, 1 ch-2 top dip)
Number the Rnd 7 loops 1 to 22 in working order:
– Loops 1–10 run down one side.
– Loop 11 is the ch-7 tip.
– Loops 12–21 run up the other side.
– Loop 22 is the ch-2 dip.
Loop k mirrors loop 22 − k. The joins use loops 5 and 6 on one side and loops 16 and 17 on the other.
Make All Pieces
- Hearts: 8, all in cream
- Heart 1: Work in full, using Rnd 7 as written.
- Hearts 2–8: Join to the previous heart in Rnd 7, as described below.
Layout (seen from the right side, header on top):
[ MESH HEADER — 80 squares across ]
[H1][H2][H3][H4][H5][H6][H7][H8]
Joining
Join each new heart during its Rnd 7. Work as written until you reach loop 16:
- Loop 16: After the sc that starts it, work a joining loop into loop 6 of the previous heart. Then sc in the next sp.
- Loop 17: Work a joining loop into loop 5 of the previous heart. Then sc in the next sp.
- Finish the round as written.
The two hearts are now joined at their widest points with two connections. The lower join pairs mirror loops 16 and 6, and the upper join pairs 17 and 5. Because the paired loops are mirror positions, the hearts sit level and their lobes line up.
Keep the joining loops the same tension as the free ch-5 loops. A tight sl st pulls the hearts together and shortens the row. A loose one leaves a gap that sags.
Check the length as you go. Each heart adds 4.5 in (11.4 cm), so two joined hearts measure 9 in (22.9 cm) across and four measure 18 in (45.7 cm). All eight measure 36 in (91.4 cm).
Make sure every heart has its dip at the top before you join it.
Border (Mesh Header and Hanging Loops)
Border gauge: One mesh square is 0.45 in (1.1 cm). Each heart’s top contributes exactly 10 ch-2 sps, so the header is 8 x 10 = 80 squares wide.
Row 1 (leveling, right side facing): Join thread in loop 17 of Heart 1. Ch 5 (counts as dtr), then ch 2. Work the 10-stitch heart sequence below, then do the following:
- Between hearts: Work a dtr into the upper join point (where loop 5 of one heart meets loop 17 of the next), ch 2.
- Next heart: Work the heart sequence again, starting at its loop 18.
- End: After loop 4 of Heart 8, work a dtr in loop 5 of Heart 8.
Heart sequence (work ch 2 after each stitch):
– tr in lp 18
– hdc in lp 19
– sc in lp 20
– dc in lp 21
– tr in lp 22
– dc in lp 1
– sc in lp 2
– hdc in lp 3
– tr in lp 4
Count for one heart: the dtr before it, plus 9 stitches = 10 stitches, each followed by ch 2 = 10 ch-2 sps per heart. The row total is 81 stitches and 80 ch-2 sps (8 x 10 sps, plus 1 closing dtr).
The short stitches sit on the lobe peaks and the tall ones drop into the dip and the gaps between hearts, so the top of the row is straight.
Rows 2–6: Ch 5 (counts as dc and ch 2), turn. Dc in next st, ch 2 across. Dc in the top of the turning ch. (81 dc, 80 ch-2 sps per row)
After Row 6, the header measures 2.7 in (6.9 cm) from the lobe peaks.
Row 7: Ch 1, turn. Sc in first dc, then 2 sc in next ch-2 sp, sc in next dc 80 times. (241 sc = 80 x 3 + 1)
The header now measures 2.9 in (7.4 cm).
Row 8 (hanging loops): Ch 1, turn. Sc in first sc, then ch 14, skip 5 sc, sc in next sc 40 times. Fasten off. (41 sc, 40 ch-14 lps)
Why the math works:
– Ten 0.45 in squares make 4.5 in (11.4 cm), exactly one heart width, so the header matches the hearts below it.
– Three sc per square keeps Row 7 the same width as the mesh.
– One loop every 6 sc puts a loop every 2 squares, which is 0.9 in (2.3 cm) apart, so 240 ÷ 6 = 40 loops with no stitches left over.
– Each ch-14 loop fits a rod up to 0.5 in (1.3 cm) across.
Final Blocking
- Weave in all ends along the chains, but don’t trim them yet.
- Soak the valance in cool water for 10 minutes, then press the water out in a towel.
- Pin the top edge of Row 7 in a straight line 36 in (91.4 cm) long.
- Pin each heart. Put one pin at the tip, one at the dip and one at each lobe peak. Each heart should measure 4.5 in (11.4 cm) from peak to tip.
- Pin the side edges of the header square.
- Open the loops of the center flowers with your fingers.
- Mist with starch if you want crisp points. Let it dry completely.
- Unpin the valance and trim the ends.
Final Quality-Control Checklist
- Each heart has 22 loops in Rnd 7, and the tip loop is a ch-7.
- Every heart has its dip at the top and all eight tips point straight down.
- Joins are at loops 5 and 6 matched to loops 17 and 16 on every pair.
- Each mesh row has 81 dc and 80 sps.
- Row 7 has 241 sc.
- There are 40 hanging loops, evenly spaced.
- The valance measures 36 in x 7.4 in (91.4 cm x 18.8 cm).
Troubleshooting
- Flower cups instead of lying flat: Your Rnd 1 ring is too tight. Use a ch-8 ring and spread the 24 dc evenly around it.
- Heart looks round: Block harder at the dip and the tip. Also check that loop 22 is a ch-2 and the tip is a ch-7.
- Hearts tilt: A heart was joined at the wrong loops. Count the loops again from the top dip.
- Header wavy: Your mesh is looser than the hearts. Go down a hook size for the header only.
- Header pulls the hearts in: Your mesh is too tight. Check that you have 10 sps per heart.
- Loops too small for the rod: Increase the ch-14 loops to ch-16. This won’t change any other counts.
Care
Hand wash in cool water with mild soap, then reshape and dry flat or pinned. Re-starch after washing if you want crisp points.
Final Notes
The size of the valance depends on a chain of measurements that build on each other:
– The flower measures 2.25 in (5.7 cm).
– Each heart blocks to 4.5 in (11.4 cm).
– Each heart adds 10 mesh squares of 0.45 in (1.1 cm).
– Eight hearts make 36 in (91.4 cm).
– The header brings the depth to 7.4 in (18.8 cm).
Check your first heart, and the rest of the valance will come out the right size.
Happy crocheting!