

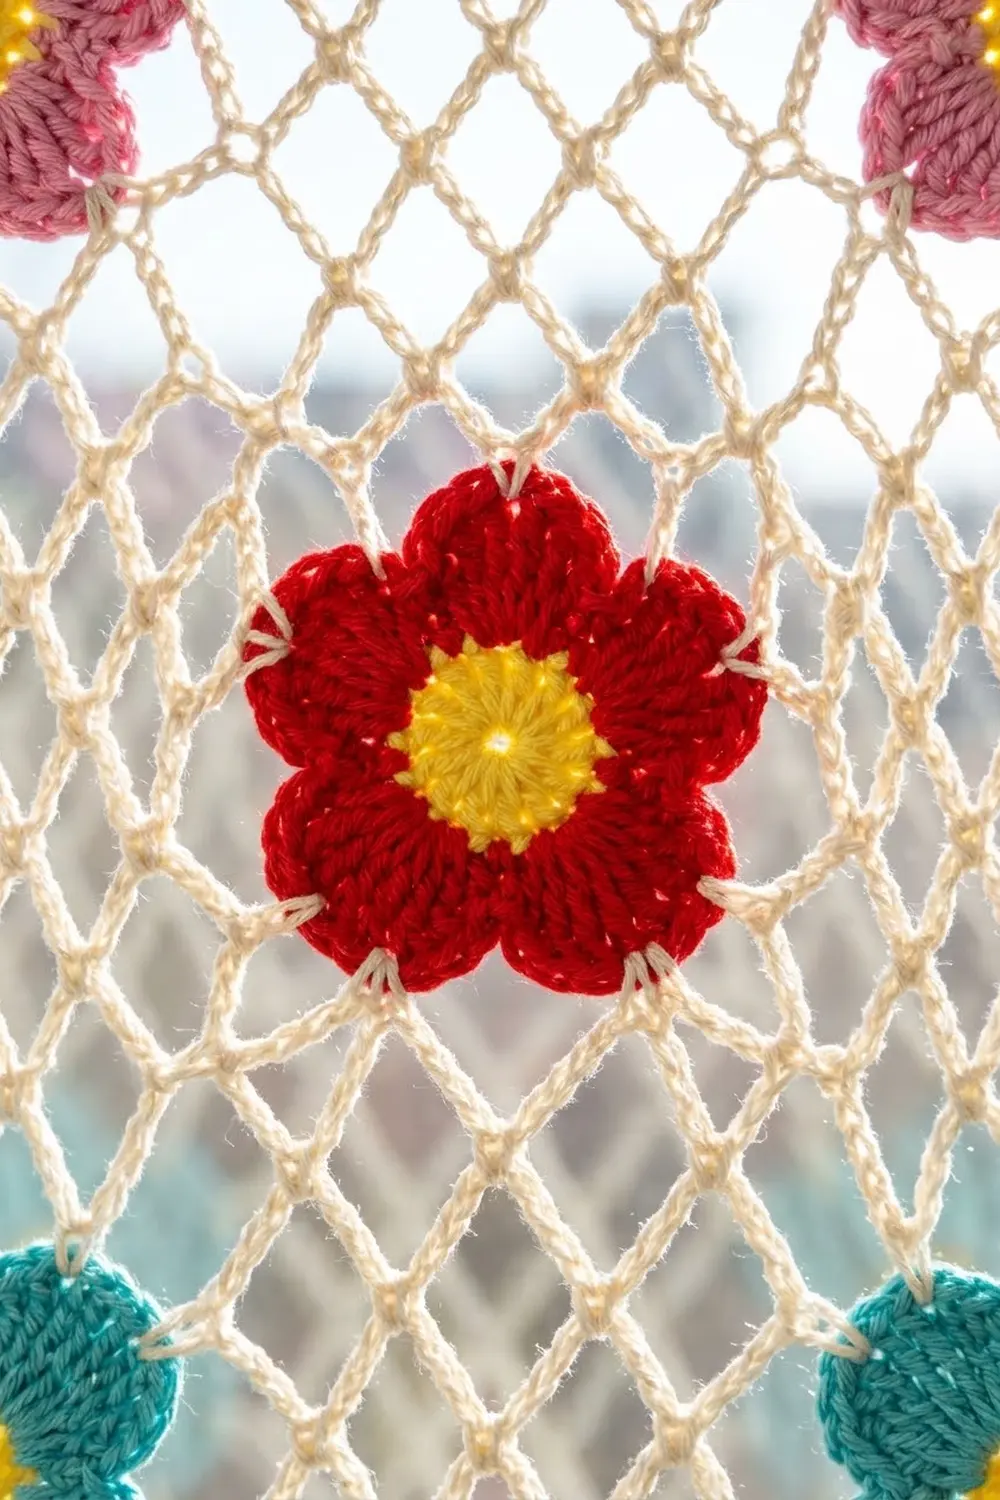
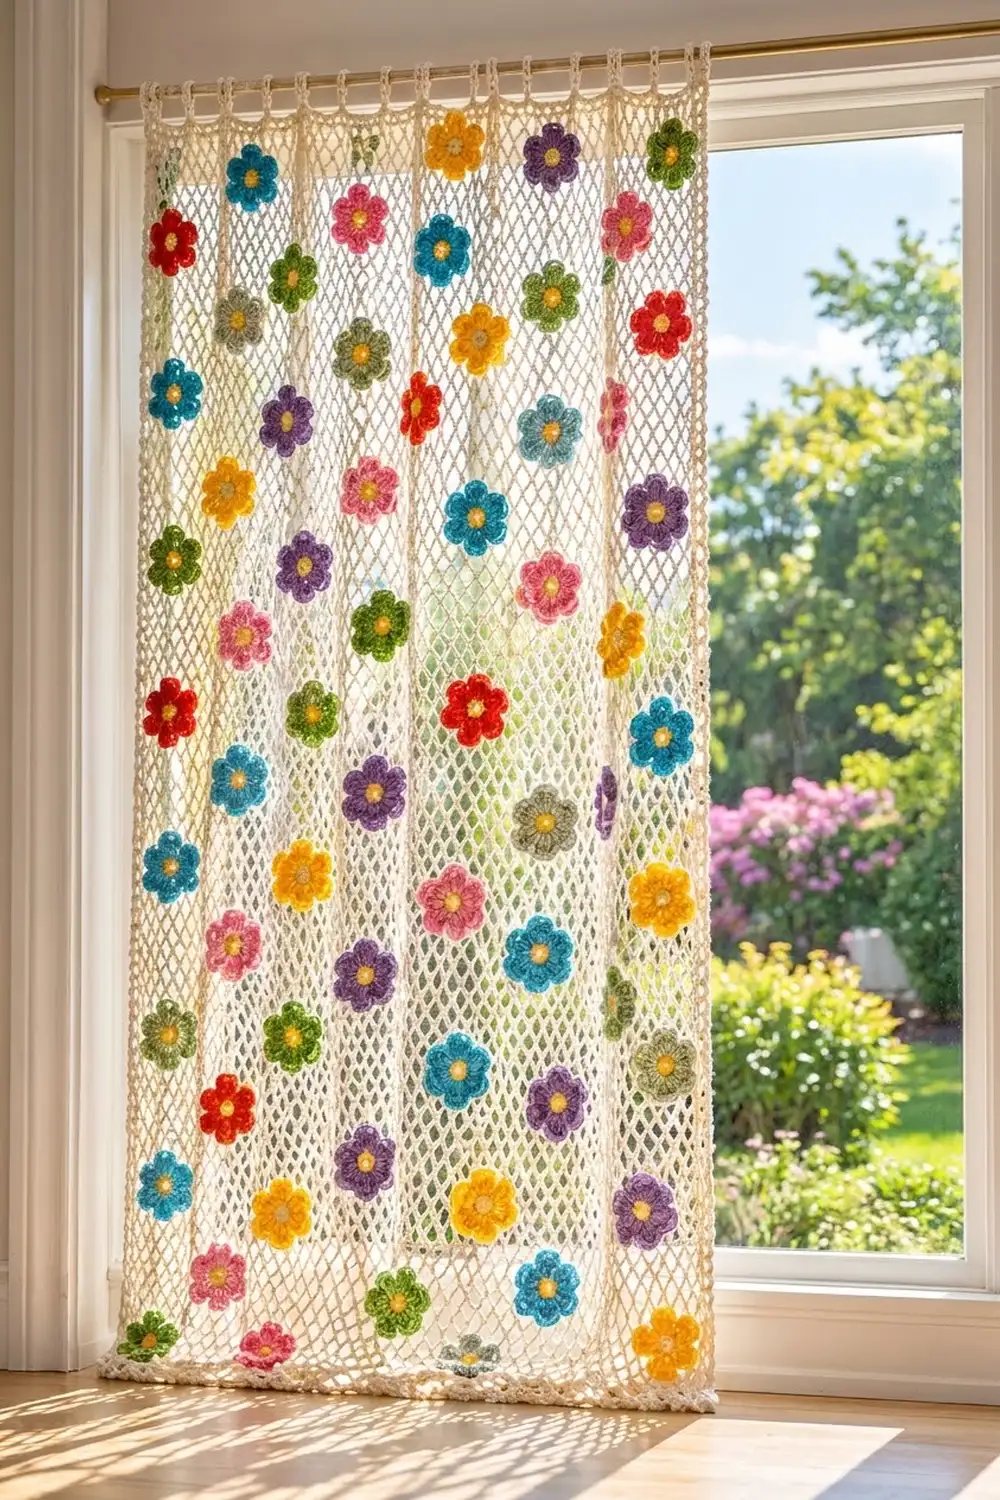
This curtain is a single airy panel of cream diamond mesh with bright five-petal flowers scattered across it in neat, staggered rows. When it hangs in a sunny window, light comes through the open net and the flowers look like a garden seen through a trellis.
The flowers come in seven colors: red, pink, purple, turquoise, golden yellow, leaf green and sage green. Every flower has the same lemon-yellow center, which ties the colors together. The style is cheerful and cottage-like, but the construction is simple and repetitive.
The pattern uses US crochet terms. The finished panel measures 30 in wide x 60 in long (76.2 x 152.4 cm), plus 2 in (5.1 cm) hanging tabs along the top edge.
First you crochet one mesh panel in rows of chain-5 net loops. Next you add a 4-round single crochet border and work 11 tabs across the top. Finally you make 59 small flowers and sew them onto the mesh following a layout grid. No pieces are joined edge to edge; the flowers are appliqués on a single panel.
Finished Size and Construction
- Finished size: 30 x 60 in (76.2 x 152.4 cm), plus 2 in (5.1 cm) tab loops
- Skill level: Easy (advanced beginner)
- Terminology: US crochet terms
- Yarn weight: Worsted weight (#4) cotton
- Hook: 5.0 mm (H-8)
- Number of pieces: 1 mesh panel + 59 appliqué flowers
- Layout: 13 staggered flower rows, alternating 5 and 4 flowers
- Flower size: 2.75 in (7.0 cm) across
- Mesh size before border: 28 x 58 in (71.1 x 147.3 cm)
- Border depth: 1 in (2.5 cm) on every side
Materials
Choose a smooth mercerized or combed cotton in worsted weight, about 180 m per 100 g. Cotton holds the mesh shape, hangs straight and does not fuzz in sunlight. Avoid very soft or loosely plied yarns, because the net loops will stretch and sag.
- Cream (mesh, border, tabs): 400 g / 720 m
- Lemon yellow (centers): 70 g / 126 m
- Red: 25 g / 45 m
- Pink: 25 g / 45 m
- Purple: 25 g / 45 m
- Turquoise: 25 g / 45 m
- Golden yellow: 25 g / 45 m
- Leaf green: 25 g / 45 m
- Sage green: 25 g / 45 m
All quantities include a margin of about 15% for gauge swatches, tails and sewing.
Tools:
- 5.0 mm (H-8) crochet hook
- Tapestry needle
- Stitch markers (at least 12)
- Rust-proof pins and a large blocking surface
- Measuring tape
- Scissors
- Spray bottle or steam iron
Abbreviations (US Terms)
- ch – chain
- sc – single crochet
- hdc – half double crochet
- dc – double crochet
- tr – treble crochet (yo twice, insert hook, pull up a loop, [yo, pull through 2 loops] 3 times)
- sl st – slip stitch
- MR – magic ring
- sp – space
- st(s) – stitch(es)
- rep – repeat
- RS / WS – right side / wrong side
Special stitch – Net loop: ch 5, sc in the next ch-5 loop. Each net loop forms one side of a diamond, and the sc sits at the knot where the diamonds meet.
Gauge and Checkpoints
Mesh gauge: 3 net loops and 6 rows = 4 in (10.2 cm), measured lightly stretched and pinned flat.
Border gauge: 15 sc and 16 rounds = 4 in (10.2 cm).
Flower gauge: One finished flower = 2.75 in (7.0 cm) across.
Make one flower first, then a mesh swatch. For the swatch, ch 14 and work Rows 1–3 of the panel. Then rep Rows 2–3 twice more, for 7 rows and 3 loops. Pin the swatch out gently and measure it.
Checkpoints:
- Foundation and Row 1: 28 in (71.1 cm) wide
- After Row 15: 10 in (25.4 cm) long
- After Row 45: 30 in (76.2 cm) long
- After Row 87: 58 in (147.3 cm) long
- After border: 30 x 60 in (76.2 x 152.4 cm)
If your mesh is too big, go down 0.5 mm. If it is too small, go up 0.5 mm. Net fabric is forgiving in length, but the foundation fixes the width, so check width first.
Part 1: Mesh Panel
With Cream, ch 86.
Row 1 (RS): Sc in 2nd ch from hook, *ch 5, sk 3 ch, sc in next ch; rep from * across. Turn. (21 ch-5 loops, 22 sc)
Row 2: Ch 5 (counts as dc + ch 2), sc in first ch-5 loop, *ch 5, sc in next ch-5 loop; rep from * across, ch 2, dc in last sc. Turn. (20 full ch-5 loops, 2 edge ch-2 sps, 21 sc)
Row 3: Ch 1, sc in first dc, *ch 5, sc in next ch-5 loop; rep from * to turning ch, ch 5, sc in 3rd ch of turning ch. Turn. (21 ch-5 loops, 22 sc)
Rows 4–87: Rep Rows 2–3 forty-two more times, ending with a Row 3 repeat. Do not turn and do not fasten off.
Row 87 is the top edge. Every odd row has an sc at both ends and every even row has a dc at both ends, so the sides stay straight.
Checkpoint: 21 loops wide, 87 rows long, 28 x 58 in (71.1 x 147.3 cm) when lightly stretched.
Part 2: Border
Work all rounds with RS facing. Place a marker in the center sc of each 3-sc corner and move it up every round.
Rnd 1: Ch 1, 3 sc in last sc of Row 87 (corner).
- Side 1: Working down the row ends, *3 sc around the next dc row end, 2 sc around the next sc row end; rep from * until you reach Row 2, then 3 sc around the dc end of Row 2. (213 sc between corners)
- Bottom corner: 3 sc in the base of the first sc of Row 1.
- Bottom: Working along the foundation, 5 sc around each group of 3 skipped ch, skipping the ch under each Row 1 sc. (105 sc between corners)
- Bottom corner: 3 sc in the base of the last sc of Row 1.
- Side 2: Working up the row ends, 3 sc around the dc end of Row 2, *2 sc around the next sc row end, 3 sc around the next dc row end; rep from * to Row 86. (213 sc between corners)
- Top corner: 3 sc in first sc of Row 87.
- Top: 5 sc in each ch-5 loop across, skipping the sc between loops. (105 sc between corners)
- Join with sl st to first sc.
On each side, the 43 dc row ends get 3 sc each (129 sc) and the 42 sc row ends get 2 sc each (84 sc), for 213 sc. Add the extra corner sc and the corner center at each end, and each side has 217 sc. The top and bottom each have 105 + 4 = 109 sc. Rnd 1 total: 648 sc.
Rnd 2: Ch 1, sc in each sc around, working 3 sc in each corner center. Join. (Top/bottom 111, sides 219; 656 sc)
Rnd 3: Rep Rnd 2. (Top/bottom 113, sides 221; 664 sc)
Rnd 4: Rep Rnd 2. (Top/bottom 115, sides 223; 672 sc) Fasten off.
Why the math works: At 15 sc = 4 in (10.2 cm), 3 loops take 15 sc. So 5 sc per loop matches the mesh width: 105 sc = 28 in (71.1 cm). On the sides, each pair of rows (one loop’s height) also gets 5 sc. The 4 rounds add 1 in (2.5 cm) on every side, and adding 2 sc per side each round keeps the corners flat. The result is 30 x 60 in (76.2 x 152.4 cm).
Checkpoint: The border lies flat with no ruffling or cupping.
Part 3: Hanging Tabs
The top edge has 115 sts after Rnd 4. You will make 11 tabs, each 5 sts wide, with 6 sts between tabs: 11 x 5 + 10 x 6 = 115.
Tab: With RS facing, join Cream in the first st of the tab position.
- Row 1: Ch 1, sc in same st and next 4 sts. Turn. (5 sc)
- Rows 2–16: Ch 1, sc in each sc across. Turn. (5 sc)
Fasten off, leaving a 12 in (30.5 cm) tail. Each tab is about 1⅓ in (3.4 cm) wide and 4 in (10.2 cm) long.
Work the first tab over sts 1–5, where st 1 is the corner center. Skip 6 sts, work the next tab over the following 5 sts, and continue across. The last tab ends on the final corner center.
Fold each tab to the WS and whipstitch Row 16 to the base of border Rnd 1. Each tab forms a 2 in (5.1 cm) loop that fits a rod up to 1.25 in (3.2 cm) thick.
Part 4: Flowers (Make 59)
Rnd 1 (center): With Lemon yellow, MR, ch 1, 10 sc in ring. Pull the ring closed and join with sl st to first sc. Fasten off. (10 sc)
Checkpoint: The center measures 1 in (2.5 cm) across.
Rnd 2 (petals): Join petal color with sl st in any sc. *Sl st in next sc, (hdc, dc, 2 tr, dc, hdc) in next sc; rep from * 4 more times, ending in the joining st. Join with sl st to first sl st. (5 petals of 6 sts each + 5 sl sts = 35 sts)
Fasten off, leaving an 18 in (45.7 cm) tail for sewing. Weave in the yellow tails.
Checkpoint: The flower measures 2.75 in (7.0 cm) across, with five rounded petals separated by small notches.
Quantities per color:
- Red: 9
- Pink: 9
- Purple: 9
- Turquoise: 8
- Golden yellow: 8
- Leaf green: 8
- Sage green: 8
Total: 59 flowers, all with lemon-yellow centers.
Part 5: Flower Placement
Rows marked A hold 5 flowers and rows marked B hold 4. Read each row left to right with RS facing (R = red, P = pink, V = purple, T = turquoise, Y = golden yellow, G = leaf green, S = sage green).
Row 1  (A):  R   P   V   T   Y
Row 2  (B):    G   S   R   P
Row 3  (A):  V   T   Y   G   S
Row 4  (B):    R   P   V   T
Row 5  (A):  Y   G   S   R   P
Row 6  (B):    V   T   Y   G
Row 7  (A):  S   R   P   V   T
Row 8  (B):    Y   G   S   R
Row 9  (A):  P   V   T   Y   G
Row 10 (B):    S   R   P   V
Row 11 (A):  T   Y   G   S   R
Row 12 (B):    P   V   T   Y
Row 13 (A):  G   S   R   P   V
Horizontal positions (flower centers, measured from the left finished edge):
- A rows: 3, 9, 15, 21, 27 in (7.6, 22.9, 38.1, 53.3, 68.6 cm)
- B rows: 6, 12, 18, 24 in (15.2, 30.5, 45.7, 61.0 cm)
Vertical positions: The Row 1 centers sit 3 in (7.6 cm) below the top finished edge. Each following row is 4.5 in (11.4 cm) lower. Row 13 sits at 57 in (144.8 cm), which leaves 3 in (7.6 cm) at the bottom.
Block the panel first (Final Blocking steps 1–5) so your measurements are accurate. Mark every flower center with a pin. Sew each flower with its own tail: tack the center to the nearest net knot, then tack each petal tip to the mesh with one small stitch. Keep the stitches loose enough that the mesh does not pucker.
Final Blocking
- Soak the panel (without flowers) in cool water for 15 minutes. Press the water out; do not wring.
- Roll the panel in towels to remove excess moisture.
- Lay it flat and pin the corners to 30 x 60 in (76.2 x 152.4 cm).
- Pin along every edge every 3 in (7.6 cm), keeping the border straight.
- Gently tug the mesh so the diamonds are even and the loops open, then let it dry completely.
- Sew on the flowers. Steam each flower lightly from above without touching it, then pat the petals flat.
Final Quality-Control Checklist
- Mesh is 21 loops wide and 87 rows long
- Border Rnd 4 has 115 sts on the top and bottom and 223 sts on each side
- Corners are square and flat
- There are 11 tabs, evenly spaced and all the same length
- There are 59 flowers, each 2.75 in (7.0 cm) across with 5 petals
- Color layout matches the grid, with no two same-color flowers touching
- Every petal tip is tacked and no tails show on the RS
- Panel measures 30 x 60 in (76.2 x 152.4 cm)
Troubleshooting
Mesh is narrower at the top than at the bottom. Your loops are getting tighter. Count 5 ch every time and keep your chain tension even.
Side edges wave. You probably added or skipped a turning ch. Check that every even row starts with ch 5 and ends with ch 2, dc.
Border ruffles. Work 2 sc instead of 3 in a few dc row ends, or go down 0.5 mm for the border only.
Border pulls in. Make sure you are working 5 sc in each loop, not 4.
Flowers cup. The petal round is too tight. Go up 0.5 mm for Rnd 2.
Curtain sags in the middle. The cotton is relaxing under its own weight. Reblock it and let it dry flat before you rehang it.
Care
Hand wash in cool water with a mild detergent, then dry flat and pin the mesh back to size. Keep it out of the dryer so the petals hold their shape and the panel keeps its length.
Final Notes
Every measurement comes from the gauge of 3 loops and 6 rows = 4 in (10.2 cm). That gives 21 loops x 87 rows = 28 x 58 in (71.1 x 147.3 cm). Four border rounds add 1 in (2.5 cm) per side for a 30 x 60 in (76.2 x 152.4 cm) panel, and the 11 tabs form 2 in (5.1 cm) loops. Then 59 flowers, each 2.75 in (7.0 cm) across, fill 13 staggered rows set 4.5 in (11.4 cm) apart.
Check your width early and block before you sew, and the panel will hang straight and bright.
Happy crocheting!