

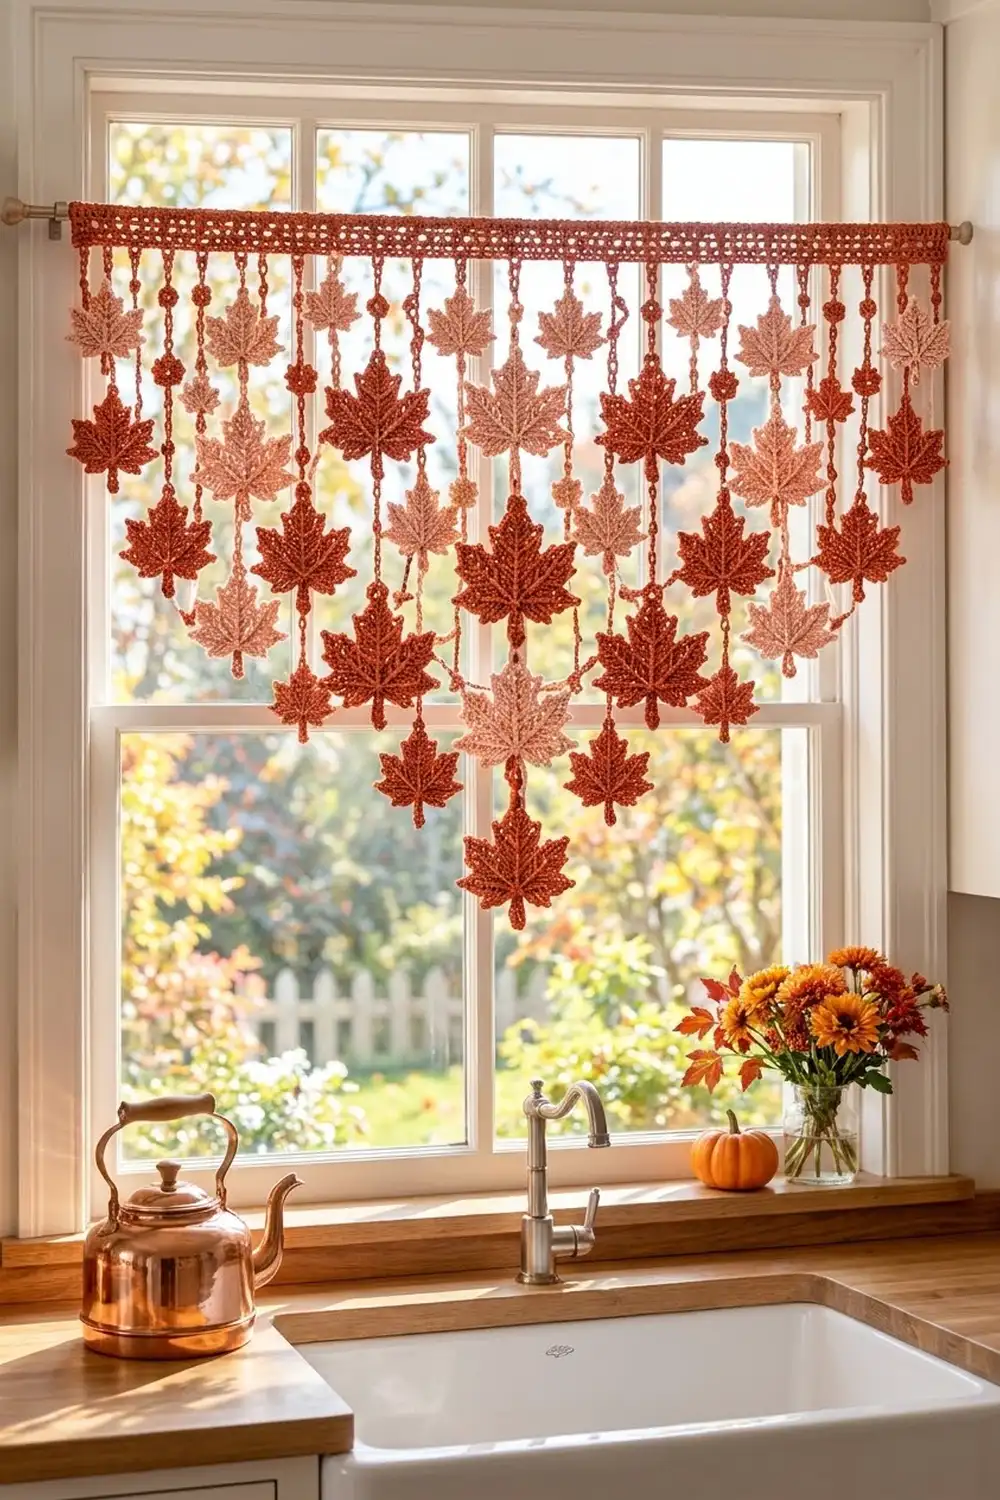
The Harvest Cascade curtain is a window valance made of crocheted maple leaves. Chain strands of five-point leaves hang from a narrow mesh header band. The center strands are the longest, so the lower edge forms a soft V and the leaves look like they are falling past the glass.
It uses two colors: warm terracotta and soft blush pink. They alternate down every strand, and each strand starts with the opposite color from the strand next to it. Every leaf has a ridged, knit-like texture, raised veins, picot points and a short chain stem.
This pattern uses US crochet terms. The finished curtain measures about 35 in (88.9 cm) wide and 35.5 in (90.2 cm) long, from the top of the header to the lowest leaf tip.
You’ll work in three stages. First, make 54 flat leaves, each one a small round center with five lobes worked in short rows. Next, crochet the header band in rows and add a three-round border. Finally, chain 13 strands down from the header and attach the leaves as you go.
Finished Size and Construction
- Finished size: 35 in (88.9 cm) x 35.5 in (90.2 cm)
- Skill level: Intermediate
- Terminology: US terms
- Yarn weight: Sport (#2) cotton
- Hook: 3.25 mm (US D-3)
- Number of pieces: 54 leaves + 1 header band
- Layout: 13 strands of 3 to 6 leaves each, with the longest in the center
- Leaf size: 3.5 in (8.9 cm) x 3.5 in (8.9 cm), including a 1 in (2.5 cm) stem
- Header before border: 34 in (86.4 cm) x 1.5 in (3.8 cm)
- Border depth: 0.5 in (1.3 cm) on each side, so the finished header is 35 in (88.9 cm) x 2.5 in (6.4 cm)
Materials
Use a smooth, mercerized sport-weight cotton. It shows the ridges clearly, holds sharp points after blocking and won’t sag while hanging. The amounts below assume about 155 m (170 yd) per 50 g.
- Terracotta: 150 g, about 465 m (508 yd). This covers 27 leaves, the header, all the strand chains and the veins on the terracotta leaves.
- Blush pink: 100 g, about 310 m (339 yd). This covers 27 leaves and their veins.
Tools:
– 3.25 mm (US D-3) hook
– Tapestry needle
– Stitch markers
– Rustproof pins and a blocking mat
– Spray bottle
– Measuring tape
– Slim café rod or tension rod
All quantities include a margin of about 15% for gauge differences and swatching.
Abbreviations (US Terms)
- ch: chain
- sl st: slip stitch
- sc: single crochet
- dc: double crochet
- BLO: back loop only
- sc2tog / sc3tog: single crochet 2 / 3 together
- st(s): stitch(es)
- sp: space
- rep: repeat
Picot point: Ch 3, sl st in 3rd ch from hook.
Surface slip stitch: Hold the yarn behind the work. Insert the hook from front to back through the fabric, pull up a loop and draw it through the loop on the hook. This leaves a raised chain line on the front.
Gauge and Checkpoints
Gauge: 11 sc x 12 rows = 2 in (5.1 cm), worked in sc BLO.
Chain gauge: 6 ch = 1 in (2.5 cm).
Make one complete leaf first and use it as your test piece. Check it at three points:
- After Rnd 3: The disc measures 1.4 in (3.6 cm) across.
- After all lobes: The leaf measures 3.5 in (8.9 cm) from one large side tip to the other.
- After the stem: The leaf measures 3.5 in (8.9 cm) from the top picot to the end of the stem.
If the disc is too big, go down half a hook size. If it is too small, go up half a size. An error of 0.25 in (0.6 cm) per leaf adds up to 1.5 in (3.8 cm) on the longest strand.
For the header, Row 1 should measure 34 in (86.4 cm).
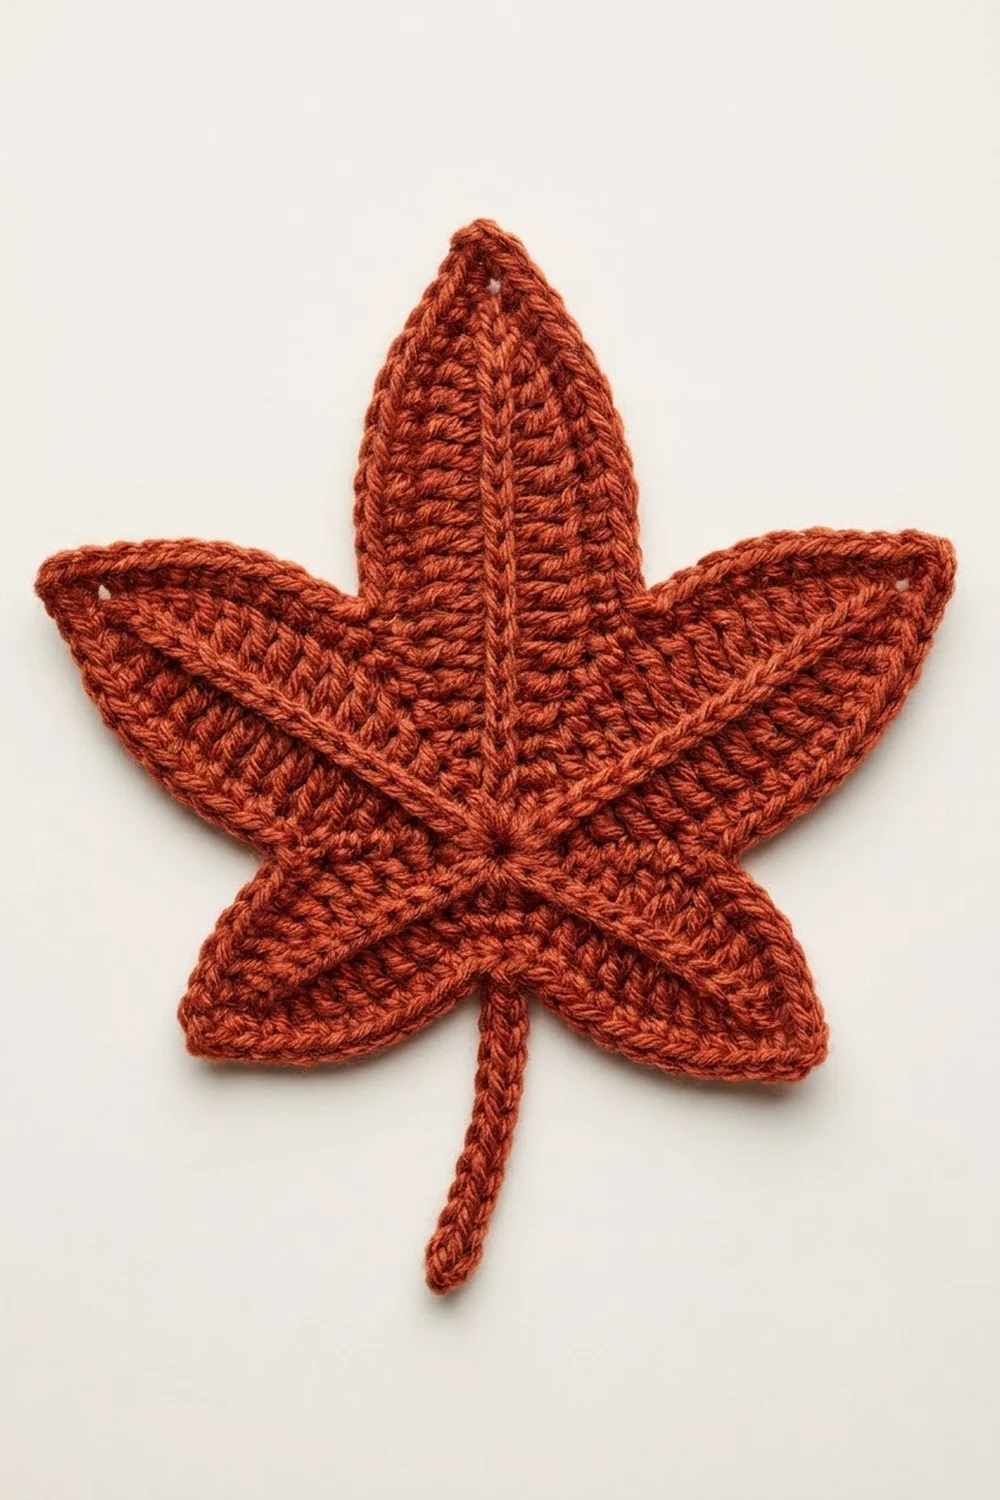
Leaf Pattern (make 54)
The center is worked in joined rounds with the right side facing. Each lobe is then worked in short rows directly off the center stitches.
Center Disc
Rnd 1: Magic ring, ch 1, 8 sc in ring, sl st to first sc. (8 sts)
Rnd 2: Ch 1, 2 sc in each st around, sl st to first sc. (16 sts)
Rnd 3: Ch 1, *sc in next st, 2 sc in next st; rep from * 7 more times, sl st to first sc. (24 sts)
Number the Rnd 3 stitches 1–24. St 1 is the one holding the joining sl st. The stitches are used like this:
- Sts 1–3: small lobe
- Sts 4–8: large side lobe
- Sts 9–13: top lobe
- Sts 14–18: large side lobe
- Sts 19–21: small lobe
- Sts 22–24: stem
Every lobe has an odd number of rows. That means its last row ends on the side facing the next lobe, so you slip stitch down that edge and keep going without cutting the yarn.
Small Lobe (sts 1–3)
Row 1: Ch 1, sc in same st as join and next 2 sts. (3 sts)
Row 2: Ch 1, turn, sc BLO in each st. (3 sts)
Row 3: Ch 1, turn, sc3tog BLO. (1 st)
Picot point. Sl st down the side edge, working 1 in each row-end of Rows 2 and 1. (2 sl sts)
Large Side Lobe (sts 4–8)
Row 1: Ch 1, sc in next 5 disc sts. (5 sts)
Row 2: Ch 1, turn, sc BLO in each st. (5 sts)
Row 3: Ch 1, turn, sc2tog BLO, sc BLO in next st, sc2tog BLO. (3 sts)
Row 4: Ch 1, turn, sc BLO in each st. (3 sts)
Row 5: Ch 1, turn, sc3tog BLO. (1 st)
Picot point. Sl st down the side edge, working 1 in each row-end of Rows 4 to 1. (4 sl sts)
Top Lobe (sts 9–13)
Row 1: Ch 1, sc in next 5 disc sts. (5 sts)
Rows 2–3: Ch 1, turn, sc BLO in each st. (5 sts)
Row 4: Ch 1, turn, sc2tog BLO, sc BLO in next st, sc2tog BLO. (3 sts)
Rows 5–6: Ch 1, turn, sc BLO in each st. (3 sts)
Row 7: Ch 1, turn, sc3tog BLO. (1 st)
Picot point. Sl st down the side edge, working 1 in each row-end of Rows 6 to 1. (6 sl sts)
Remaining Lobes and Stem
Work a Large Side Lobe over sts 14–18. Then work a Small Lobe over sts 19–21; its Row 1 is ch 1, sc in next 3 disc sts.
Stem: Sl st in st 22, sc in st 23, ch 9. Sl st in 2nd ch from hook and in each of the next 7 ch. (8 sl sts) Sl st in st 23, sl st in st 24, sl st in st 1. Fasten off.
The top lobe is 7 rows tall and the side lobes are 5 rows tall, so the top point stands highest, like a real maple leaf.
Veins
Use the same color as the leaf. Work surface sl st on the right side, about 1 sl st per round or row:
- Center vein: From the stem base, through the disc center, to the top picot. (about 10 sl sts)
- Side veins: From the disc center to each large side picot. (about 8 sl sts each)
- Short veins: From the disc center to each small lobe picot. (about 5 sl sts each)
Work the veins loosely so the leaf stays flat. Weave in the ends on the back.
Make All Pieces
- Terracotta leaves: 27
- Blush pink leaves: 27
- Header band: 1, in terracotta
Lightly block every leaf before you assemble the strands. In the grid below, T = terracotta and B = blush. Strand 1 is at the right as you face the front, and Leaf 1 is the top leaf of each strand.
Strand:  1  2  3  4  5  6  7  8  9  10 11 12 13
Leaf 1:  T  B  T  B  T  B  T  B  T  B  T  B  T
Leaf 2:  B  T  B  T  B  T  B  T  B  T  B  T  B
Leaf 3:  T  B  T  B  T  B  T  B  T  B  T  B  T
Leaf 4:  -  -  B  T  B  T  B  T  B  T  B  -  -
Leaf 5:  -  -  -  -  T  B  T  B  T  -  -  -  -
Leaf 6:  -  -  -  -  -  -  B  -  -  -  -  -  -
Total:   3  3  4  4  5  5  6  5  5  4  4  3  3
The grid totals 54 leaves: 27 T and 27 B.
Joining
Complete the header band and its border (see Border) first. The strands hang from Border Rnd 3.
Method: Each strand is one continuous length of terracotta, worked from the header down.
- Join with a sl st in the marked stitch on the bottom edge.
- Work the first connector:
- Odd strands: ch 12, 2 in (5.1 cm).
- Even strands: ch 24, 4 in (10.2 cm).
The different lengths stagger the leaves on neighboring strands so they don’t collide.
3. With the leaf’s right side facing, insert the hook front to back through the top picot and sl st.
4. Surface sl st down the back of the leaf, behind the center vein, to the end of the stem. This takes about 20 sl sts. It anchors the leaf facing forward and carries the yarn out of sight.
5. Ch 12, 2 in (5.1 cm), and join the next leaf the same way.
6. Fasten off at the stem end of the last leaf.
Tension: Count the connector chains, and measure them too. Tight chains shorten a strand and distort the V. Lay each strand flat and check it before you start the next one.
Size checkpoint:
– Strand 1 hangs 16.5 in (41.9 cm) below the header.
– Strand 2 hangs 18.5 in (47.0 cm).
– Strand 7 hangs 33 in (83.8 cm).
Adding the 2.5 in (6.4 cm) header gives 35.5 in (90.2 cm) overall.
Border
Header Band (terracotta)
Foundation: Ch 188.
Row 1: Sc in 2nd ch from hook and in each ch across. (187 sts)
Row 2: Ch 1, turn, sc in each st. (187 sts)
Row 3: Ch 4 (counts as dc + ch 1), turn, skip next st, dc in next st, *ch 1, skip next st, dc in next st; rep from * across. (94 dc + 93 ch-1 sps = 187 sts)
Row 4: Ch 1, turn, sc in each dc and each ch-1 sp. (187 sts)
Rows 5–6: Rep Rows 3–4. Do not fasten off.
The header now measures 34 in (86.4 cm) x 1.5 in (3.8 cm). It has 4 sc rows and 2 mesh rows.
Border Gauge
The border uses the main gauge, 11 sc = 2 in (5.1 cm). Each round adds about 1/6 in (0.4 cm) per side, so three rounds add 0.5 in (1.3 cm).
Each side count below includes both of that side’s corner stitches. The corner stitch is the center sc of each 3-sc group.
Rnd 1: Ch 1, do not turn. Work around the header as follows, then sl st to first sc:
– Top: 3 sc in first st, sc in next 185 sts, 3 sc in last st.
– Short side: 8 sc along the row-ends (1 per sc row-end and 2 per dc row-end, so 4 + 4).
– Bottom: Work the free loops of the foundation chain the same way as the top.
– Second short side: 8 sc along the row-ends.
Rnd 1 count: Each side has 189 (long) and 12 (short) sts. Total: 189 + 189 + 12 + 12 − 4 shared corners = 398 sts.
Rnd 2: Ch 1, sc in each st, working 3 sc in each corner st. Sl st to first sc. Each side has 191 and 14 sts. (406 sts)
Rnd 3: Rep Rnd 2. Fasten off. Each side has 193 and 16 sts. (414 sts)
Why the math works: Each 3-sc corner adds 1 stitch to each of its two sides. So every round adds 2 stitches per side and 8 in total.
The Rnd 3 bottom edge has 193 sts, which leaves 191 between the corners. Starting from the bottom-right corner, mark st 6, then every 15th st after it (sts 6, 21, 36 … 186). That gives 13 markers. Check: 5 + 1 + (12 x 15) + 5 = 191, so there is a 5-st margin at each end. The strands sit about 2.7 in (6.9 cm) apart.
At 5.5 sts per inch, 193 sts = 35.1 in (89.2 cm), which matches the 35 in (88.9 cm) finished width.
Final Blocking
- Mist the whole curtain until it is evenly damp, not soaked.
- Pin the header to 35 in (88.9 cm) x 2.5 in (6.4 cm), straightening the top edge first.
- Lay each strand straight below its marker and pin the connectors to their measured lengths.
- Pin every picot out to a sharp point, then press the gaps between the lobes inward.
- Lift the veins slightly with a fingertip.
- Let everything dry completely, about 24 hours.
- Thread a slim rod through the ch-1 spaces of Row 5, or use café clips.
Final Quality-Control Checklist
- [ ] 54 leaves, 27 of each color, placed as shown in the grid
- [ ] Every leaf measures 3.5 in (8.9 cm) x 3.5 in (8.9 cm) and has five sharp points
- [ ] Veins lie flat with no puckering
- [ ] Header measures 35 in (88.9 cm) x 2.5 in (6.4 cm) with square corners
- [ ] 13 strands spaced 15 sts apart, with a 5-st margin at each end
- [ ] Strand 7 hangs 33 in (83.8 cm), and the strands on each side mirror each other
- [ ] All ends are woven in
Troubleshooting
- Leaf cups: The disc is too tight. Go up half a hook size, or block the leaf harder.
- Lobe leans: The side sl st count is off. You need 2, 4 or 6 sl sts.
- Veins pucker: Rework the vein more loosely.
- Header ripples: Recount each row; it should have 187 sts.
- Uneven strands: Rework the connectors to their measured length.
- Leaves twist: Rework the back sl st line closer to the center vein.
Care
Hand wash cool with mild soap, roll in a towel and dry flat, re-pinning the points if needed. Avoid long periods of strong direct sun to limit fading.
Final Notes
Each stage sets up the next:
- A 1.4 in (3.6 cm) disc gives a 3.5 in (8.9 cm) leaf.
- Correct leaves with 2 in (5.1 cm) connectors give a 33 in (83.8 cm) center strand.
- The 34 in (86.4 cm) header grows to 35 in (88.9 cm) with its 0.5 in (1.3 cm) border.
Check each stage and the curtain will finish at 35 in (88.9 cm) x 35.5 in (90.2 cm).
Happy crocheting!