

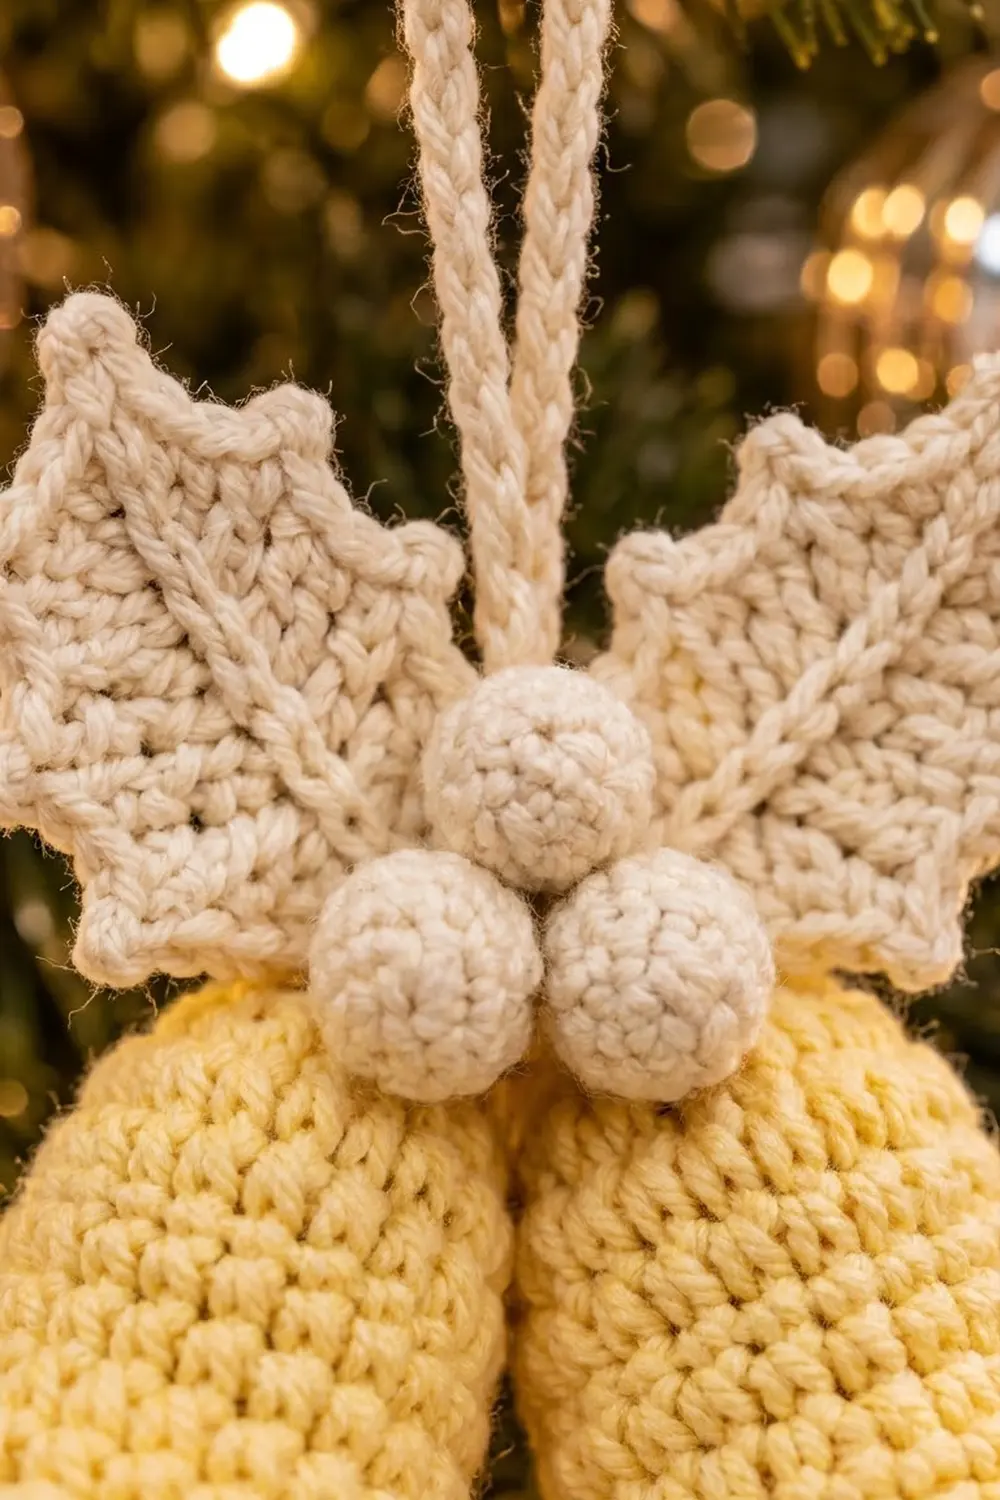
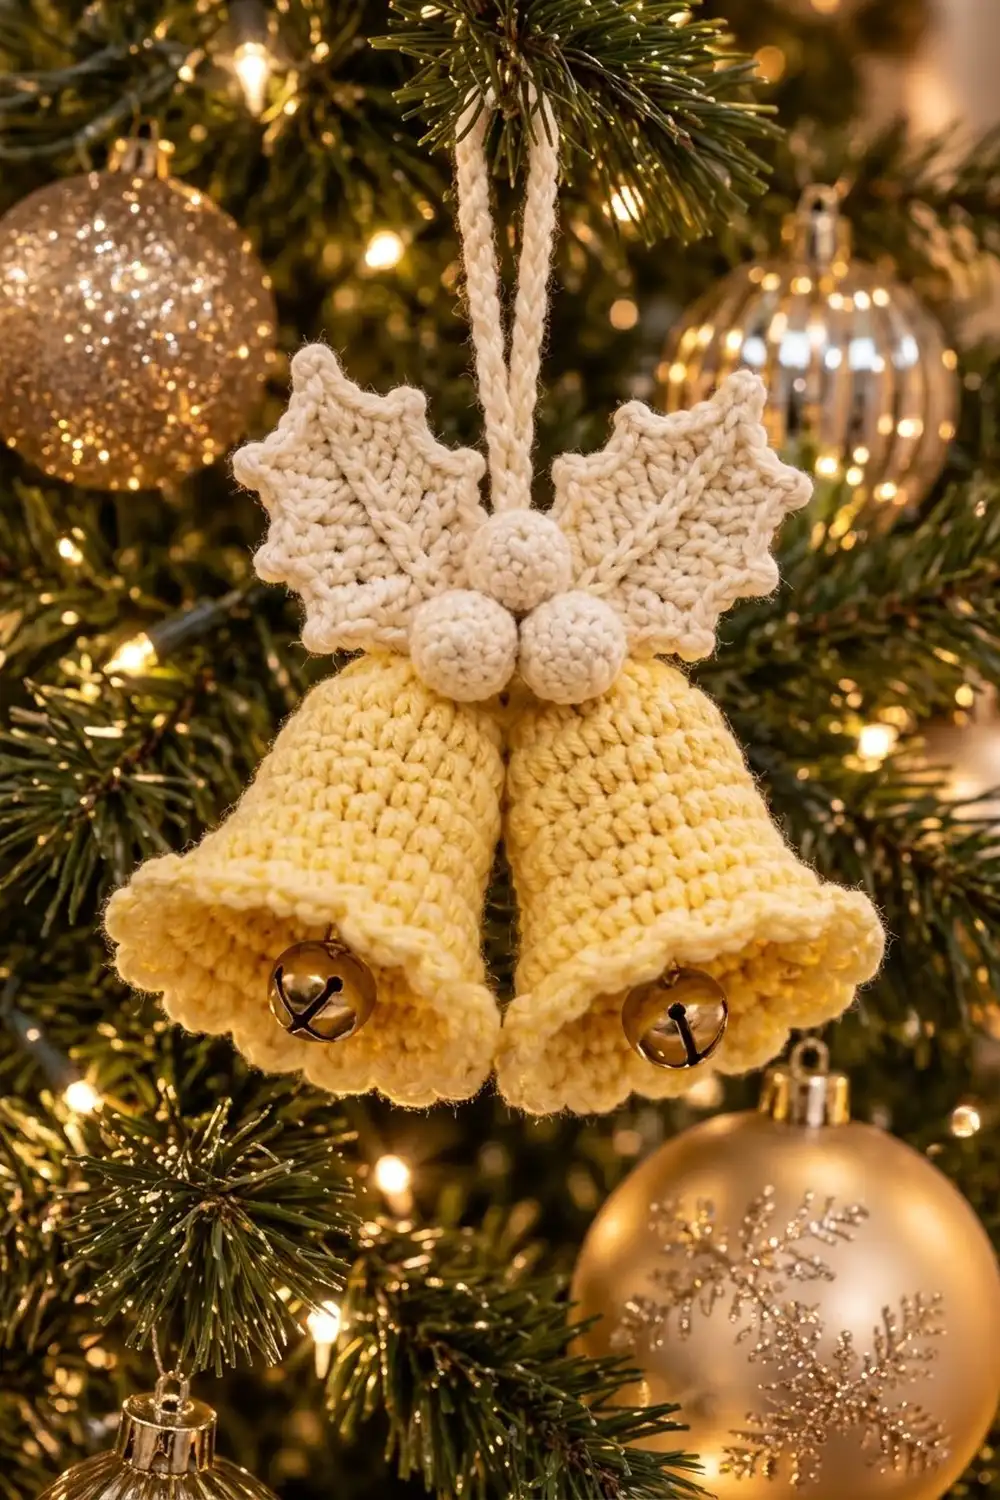
This ornament pairs two soft yellow bells with a cream holly topper. The bells sit side by side, each with a flared scalloped rim and a real gold jingle bell inside, so it chimes a little when the tree moves. Two pointed holly leaves, three round berries and a rope-like hanging loop finish the top.
There are only two colors: a pale buttery yellow for the bells and a warm cream for the holly, berries and loop. The look is vintage and gentle, and it suits gold, champagne and natural-wood decor much better than the usual bright red and green.
The pattern uses US crochet terms. The finished ornament is about 6 in (15.2 cm) wide and 5 in (12.7 cm) tall, and the hanging loop adds about 3 in (7.6 cm).
Here’s how it comes together. You crochet each bell top-down in continuous rounds, then make the leaves, berries and loop separately. You sew the two bells together, crochet a scalloped border around each free rim, hang the jingle bells inside, and then sew the holly cluster on top.
Finished Size and Construction
- Finished size: about 6 in (15.2 cm) wide × 5 in (12.7 cm) tall, plus a 3 in (7.6 cm) loop
- Skill level: Advanced beginner
- Terminology: US
- Yarn weight: Worsted (#4) cotton
- Hook: 3.5 mm (E-4)
- Number of pieces: 8 (2 bells, 2 leaves, 3 berries, 1 loop)
- Layout: 2 bells side by side, with the holly cluster centered above them
- Bell size before border: 3 in (7.6 cm) tall, with an opening 3.6 in (9.1 cm) wide when flattened
- Bell size after border: about 3.5 in (8.9 cm) tall
- Border depth: about 0.5 in (1.3 cm)
Materials
Choose a smooth, tightly plied worsted cotton or cotton blend. Cotton holds the bell shape without stuffing and shows the stitch texture clearly. Avoid fuzzy or very soft acrylic, because the rims will droop.
- Pale yellow: 20 g, about 38 m (2 bells, including the borders)
- Cream: 15 g, about 29 m (2 leaves, 3 berries, 1 loop)
These quantities include a margin of about 20% for swatching and sewing tails.
Tools and notions:
- 3.5 mm (E-4) crochet hook
- 2 gold jingle bells, 20 mm (0.8 in)
- A small amount of polyester fiberfill (for the berries)
- Stitch marker
- Tapestry needle
- Scissors
- Pins and a spray bottle for blocking
Abbreviations (US Terms)
- ch – chain
- sl st – slip stitch
- sc – single crochet
- hdc – half double crochet
- dc – double crochet
- inc – 2 sc in the same stitch
- dec – single crochet 2 together (the invisible dec through front loops is recommended)
- st(s) – stitch(es)
- MR – magic ring
- rnd(s) – round(s)
Special stitches:
- Point: ch 3, sl st in 2nd ch from hook, sc in next ch. A point does not use up a stitch from the previous round.
- Scallop: 5 hdc in the same stitch.
Gauge and Checkpoints
Gauge: 20 sc × 20 rnds = 4 in (10.2 cm) in sc worked in continuous rounds. That’s 5 sts and 5 rnds per 1 in (2.5 cm).
Make one bell first and check it before you make anything else. The bell is your gauge swatch.
Checkpoints:
- After Rnd 3: the flat crown measures about 1.1 in (2.8 cm) across.
- After Rnd 7: the piece measures about 1.4 in (3.6 cm) from the top center down to the hook.
- After Rnd 15: the bell is 3 in (7.6 cm) tall, and the opening is 3.6 in (9.1 cm) wide when flattened.
If your bell is too big: go down to a 3.25 mm hook. Don’t skip rounds, because every stitch count matters for the border math.
If your bell is too small: go up to a 3.75 mm hook, but keep the fabric firm enough that no fiberfill-sized gaps show.
Bell (Make 2)
Use pale yellow. Work in continuous rounds without joining, and move the stitch marker up to the first stitch of each round.
Crown
- Rnd 1: 6 sc in MR. (6)
- Rnd 2: inc in each st around. (12)
- Rnd 3: (sc in next st, inc) 6 times. (18)
Upper body
- Rnds 4–7: sc in each st around. (18)
These four straight rounds form the narrow neck of the bell.
Flare
- Rnd 8: (sc in next 2 sts, inc) 6 times. (24)
- Rnds 9–10: sc in each st around. (24)
- Rnd 11: (sc in next 3 sts, inc) 6 times. (30)
- Rnds 12–13: sc in each st around. (30)
- Rnd 14: (sc in next 4 sts, inc) 6 times. (36)
- Rnd 15: sc in each st around. (36)
Sl st in the next st and fasten off, leaving a 12 in (30.5 cm) tail on the first bell only. You’ll use that tail for joining.
The increases are spaced further apart as the bell grows, so the sides curve out gradually instead of forming a straight cone. Stagger the increase position by one stitch if you see a sharp hexagon forming.
Holly Leaf (Make 2)
Use cream. Ch 11.
Rnd 1: this round is worked down both sides of the foundation chain.
- Sc in 2nd ch from hook.
- Hdc in next ch, dc in next 5 ch, hdc in next ch, sc in next ch.
- Work 3 sc in the last ch. This is the tip.
- Rotate the work and continue along the opposite side of the chain: sc in next ch, hdc in next ch, dc in next 5 ch, hdc in next ch, sc in next ch.
- Sl st to the first sc.
Count: side A 9 + tip 3 + side B 9 = 21 sts.
The foundation chain stays as a slightly raised line down the middle of the leaf, and that line is the vein.
Rnd 2 (points): ch 1. Number the stitches of Rnd 1 from 1 to 21, starting at the first sc.
- Sc in sts 1–2, point, sc in sts 3–4, point, sc in sts 5–6, point, sc in sts 7–9.
- Sc in st 10, (sc, point, sc) in st 11, sc in st 12.
- Sc in sts 13–15, point, sc in sts 16–17, point, sc in sts 18–19, point, sc in sts 20–21.
- Sl st to the first sc.
Count: 9 + 4 + 9 = 22 sc and 7 points (3 per side plus 1 at the tip).
Fasten off, leaving a 10 in (25.4 cm) tail for sewing. Each leaf measures about 2.5 in (6.4 cm) long and 1.5 in (3.8 cm) wide, including the points.
Berry (Make 3)
Use cream.
- Rnd 1: 6 sc in MR. (6)
- Rnd 2: inc in each st around. (12)
- Rnd 3: (sc, inc) 6 times. (18)
- Rnds 4–6: sc in each st around. (18)
- Rnd 7: (sc, dec) 6 times. (12)
Stuff the berry firmly.
- Rnd 8: dec 6 times. (6)
Fasten off, close the hole with the tail, and keep the tail for sewing. Each berry is about 1.1 in (2.8 cm) across.
Hanging Loop (Make 1)
Use cream. Ch 36. Sl st in the back bump of the 2nd ch from hook and of each remaining ch. (35 sl sts)
Working into the back bumps twists the cord slightly and gives it the rope texture. The cord is about 7 in (17.8 cm) long. Fasten off and leave both tails.
Make All Pieces
| Piece | Color | Quantity |
|---|---|---|
| Bell | Pale yellow | 2 |
| Holly leaf | Cream | 2 |
| Berry | Cream | 3 |
| Hanging loop | Cream | 1 |
Layout (front view):
              [ LOOP ]
   [LEAF L]   (Berry 1)   [LEAF R]
         (Berry 2)(Berry 3)
       [ BELL L ][ BELL R ]
The leaves angle up and out at about 30° from horizontal. Berry 1 sits on top, with Berries 2 and 3 tucked below it over the bell crowns.
Joining
Method: whipstitch with the yellow tail you left on the first bell.
Stitch-to-stitch logic:
- Flatten each bell gently so the beginning-of-round jog sits at the center back.
- Hold the bells side by side.
- On each bell, choose the vertical column of stitches closest to the other bell.
- Starting at Rnd 4 and ending at Rnd 9, whipstitch one stitch of the left bell to the matching stitch of the right bell on the same round. That gives 6 matched pairs over 6 rounds, or about 1.2 in (3.0 cm) of contact.
- Take two extra tacking stitches across the two crowns at Rnd 3 so the tops can’t separate.
Below Rnd 9 the bells stay free, so they splay apart naturally into the shape shown.
Tension: pull each whipstitch just snug enough to close the gap. If you pull harder, the bells twist toward each other and the rims tilt.
Size checkpoint: the joined pair should measure about 5 in (12.7 cm) across the two openings before the border. If it’s wider, add one more pair of joining stitches at Rnd 10.
Border (Bell Rim)
The border is worked separately around each bell’s free rim, after joining. Each rim starts with exactly the 36 stitches of Rnd 15. The joining seam uses no rim stitches, so nothing is added or lost there.
Border gauge: same as the bell, 5 sts per 1 in (2.5 cm). Each scallop repeat covers 4 sts, or 0.8 in (2.0 cm) of rim.
Join pale yellow with a sl st in any stitch of Rnd 15 at the back of the bell.
Rim Rnd 1 (trim round): ch 1, (sc in next 2 sts, 2 sc in next st) 12 times, sl st to the first sc.
Count: 36 sts worked 1-per-stitch + 12 extra = 48 sts.
This round makes the rim flare outward and roll slightly.
Rim Rnd 2 (scallops): (sl st in next st, skip 1 st, scallop in next st, skip 1 st) 12 times. Sl st to the first sl st.
Count: 12 scallops, using 12 × 4 = 48 sts.
Fasten off and weave in the end. Repeat on the second bell.
Why the math works: 36 is divisible by 3, so the trim repeat (sc, sc, 2 sc) fits exactly 12 times and adds exactly 12 sts, giving 48. Since 48 ÷ 4 = 12, the scallop repeat closes perfectly with no leftover or squeezed stitches. The 12 scallops also line up evenly over the 6 flare increases from Rnd 14, so the edge ripples evenly all around.
Jingle bells:
- Cut a 6 in (15.2 cm) yellow strand.
- Thread it through the shank of one jingle bell.
- Pass both ends up through the center of the magic ring and knot them on top, adjusting the strand so the jingle bell hangs level with Rim Rnd 1.
- Repeat for the second bell.
The knots will be hidden under the berries.
Holly cluster:
- Fold the loop in half and sew both tails to the joined crowns at center top.
- Sew the base of each leaf over the crowns, with the leaf bases touching at center and the tips angled up and out.
- Sew Berries 2 and 3 side by side over the leaf bases.
- Sew Berry 1 above them, covering the loop ends.
Final Blocking
- Spritz both leaves lightly with water.
- Pin each of the 7 points on each leaf outward onto a foam mat, keeping the leaf flat and the vein straight.
- Push a rolled washcloth or a small shot glass into each bell, mouth down, to support the rim.
- Spritz the borders and pin out each scallop so all 12 sit evenly.
- Let everything dry completely, usually 6–8 hours.
- Remove the pins and forms, then check that the jingle bells still hang freely.
If you’re using cotton, you can block with a light steam instead: hold the iron above the piece and never press it.
Final Quality-Control Checklist
- [ ] Each bell has 36 sts at Rnd 15, 48 sts in Rim Rnd 1, and 12 scallops.
- [ ] Each bell is about 3.5 in (8.9 cm) tall, including the border.
- [ ] The bells are joined over 6 matched pairs, Rnds 4–9, with no visible gaps.
- [ ] Each leaf has 22 sc and 7 points, and measures about 2.5 in (6.4 cm) long.
- [ ] All three berries are firm and round, about 1.1 in (2.8 cm) across.
- [ ] Both jingle bells hang inside the rims and ring freely.
- [ ] The loop is centered and the ornament hangs level.
- [ ] All ends are woven in securely.
Troubleshooting
The bells look like cones, not bells: your increases are stacking. Stagger where the increase falls on Rnds 8, 11 and 14.
The rim cups inward: your Rim Rnd 1 is too tight. Work it with a hook one size larger.
The scallops don’t close evenly: recount Rim Rnd 1. You need exactly 48 sts.
The leaves curl: the dc section is too tight compared with the sc edges. Block the leaves flat, or work Rnd 2 slightly looser.
The ornament tilts when hanging: move the loop toward the lighter side, or add a joining stitch to level the bells.
Fiberfill shows through the berries: go down a hook size, or use a strand of matching cream yarn as stuffing.
Care
Spot clean with cool water and mild soap, then reshape and dry flat. Don’t put it in the washing machine, because the jingle bells and seams can loosen.
Final Notes
The measurement chain is simple:
- Gauge of 5 sts and 5 rnds per 1 in (2.5 cm)
- A crown 1.1 in (2.8 cm) across
- A bell 3 in (7.6 cm) tall with 36 sts at the opening
- A joined pair 5 in (12.7 cm) across
- 48-st borders with 12 scallops, adding 0.5 in (1.3 cm)
- A finished ornament about 6 in (15.2 cm) wide and 5 in (12.7 cm) tall
If each checkpoint matches, the next stage will too. Make one, then make a little cluster of them for the tree.
Happy crocheting!