

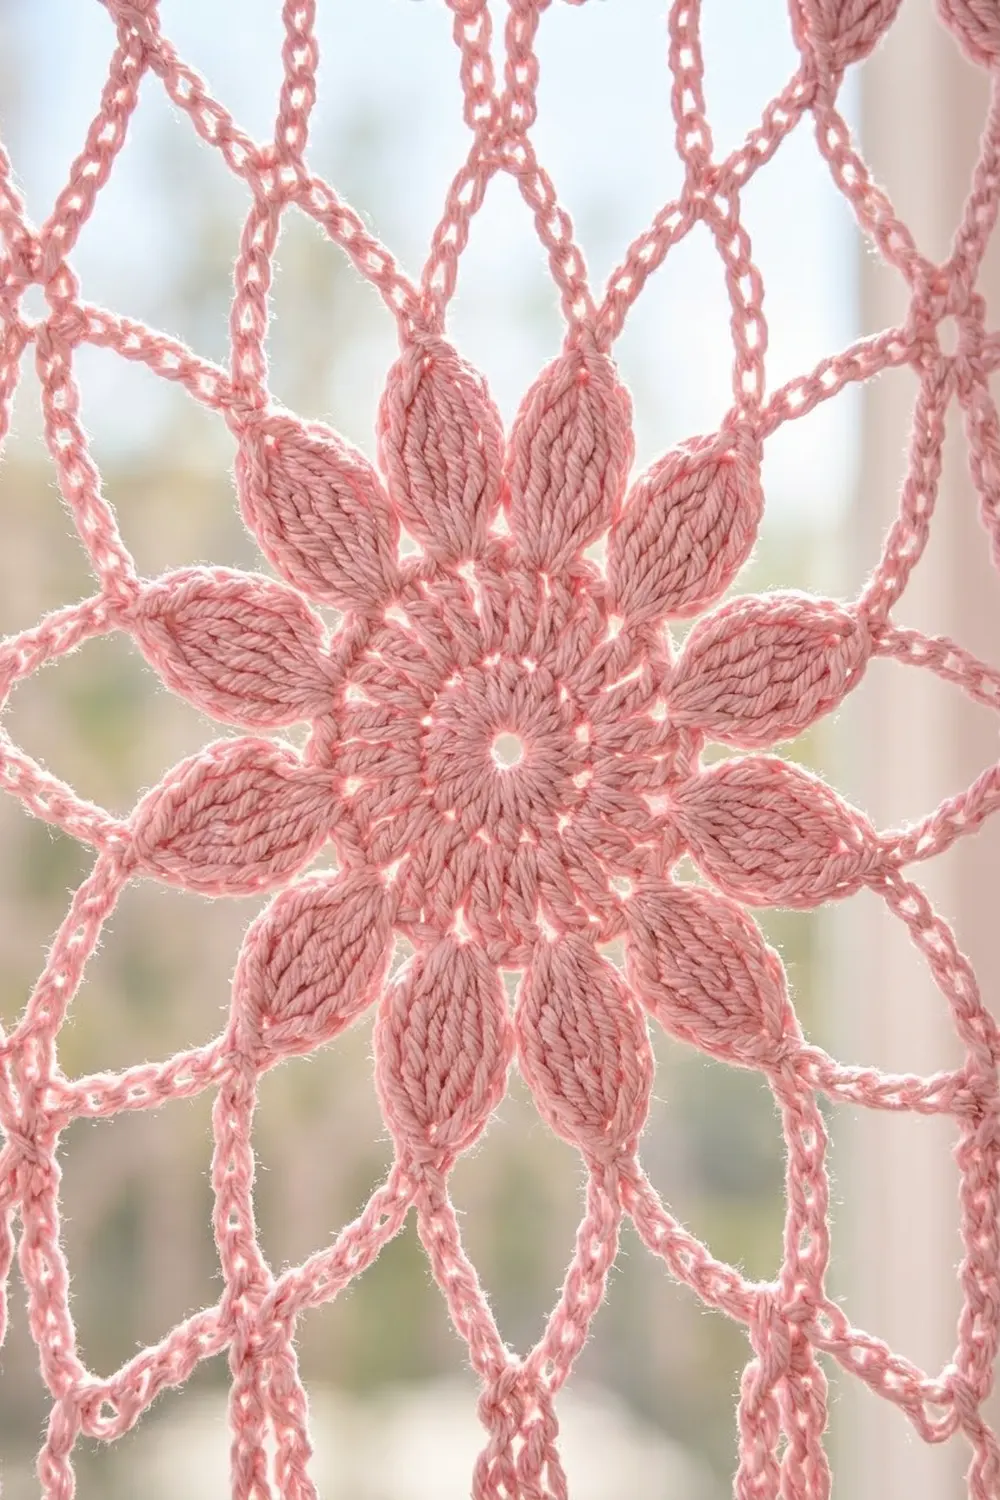
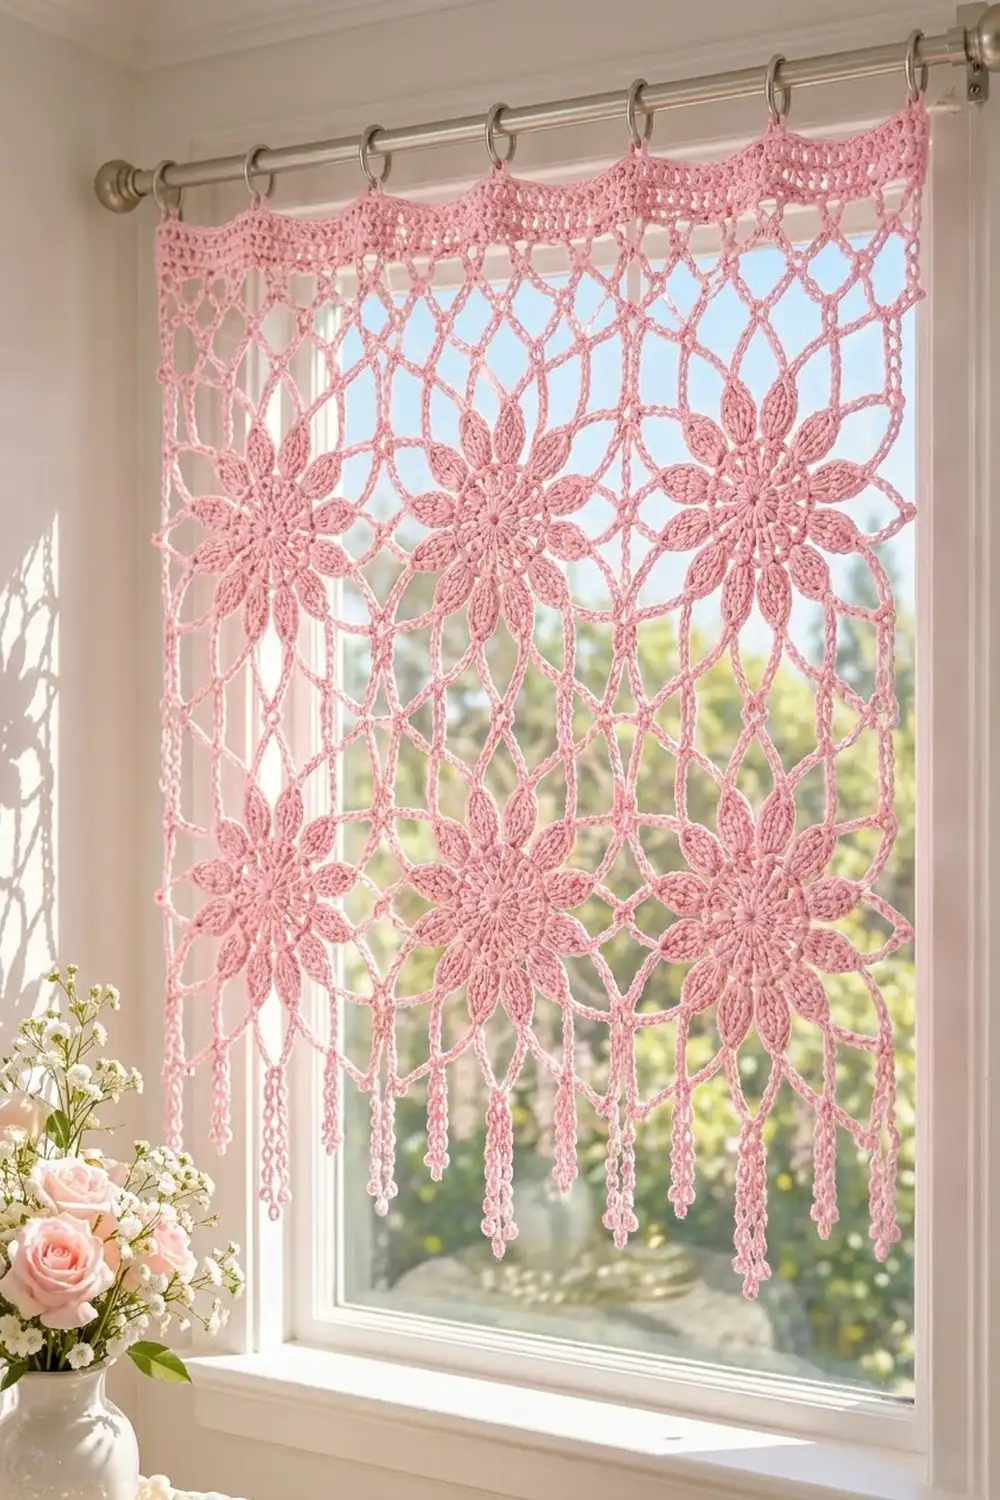
The Rosewater Bloom panel is a light, airy lace curtain built from six flower squares. Each square holds a twelve-petal bloom with pointed oval petals, set inside an open lattice of chain arches. When the panel hangs in a window, the sun shines through the lattice and the flowers stand out as solid shapes.
The whole piece is worked in one soft pastel pink cotton, which keeps the look calm and romantic. A solid header with a small scalloped edge runs across the top, and a row of slim chain drops with bobble tips hangs from the bottom edge. It suits a kitchen window, a cottage-style bathroom, or a small door pane.
This pattern uses US crochet terms throughout. The finished panel measures 24.5 in (62.2 cm) wide and 18.25 in (46.4 cm) long from the scalloped top to the bottom edge, plus 4.5 in (11.4 cm) of fringe, for a total length of 22.75 in (57.8 cm).
Construction is simple and modular. You make six identical motifs in the round, join them into a 3 by 2 grid with flat slip-stitch seams, work one single-crochet round around everything, then add the header rows across the top and the drop fringe across the bottom.
Finished Size and Construction
- Finished size: 24.5 in x 22.75 in (62.2 cm x 57.8 cm) including fringe
- Skill level: Intermediate
- Terminology: US crochet terms
- Yarn weight: Sport weight (#2) mercerized cotton
- Hook: 3.5 mm (E-4)
- Number of pieces: 6 identical flower motifs
- Layout: 3 motifs across x 2 motifs down
- Motif size: 8 in x 8 in (20.3 cm x 20.3 cm) after blocking
- Size before border: 24 in x 16 in (61.0 cm x 40.6 cm)
- Border depth: sides and bottom 0.25 in (0.6 cm); top header 2 in (5.1 cm); fringe 4.5 in (11.4 cm)
Materials
Choose a smooth, mercerized cotton in sport weight. Cotton holds the pointed petal shape well, blocks crisply, and does not stretch much when hanging. Avoid fuzzy or very soft acrylics, because the lattice will lose its definition and the panel may sag.
- Pastel pink: 200 g, approximately 620 m (680 yd) of sport-weight cotton
Quantities include a margin of roughly 25 percent for gauge differences and a test motif.
Tools:
- 3.5 mm (E-4) crochet hook
- Tapestry needle
- Scissors
- 12 locking stitch markers
- Rustproof pins and a blocking mat or folded towels
- Spray bottle
- Measuring tape
- 8 curtain clip rings and a curtain rod for hanging
Abbreviations (US Terms)
- ch – chain
- sl st – slip stitch
- sc – single crochet
- hdc – half double crochet
- dc – double crochet
- tr – treble crochet
- sk – skip
- sp(s) – space(s)
- st(s) – stitch(es)
- RS / WS – right side / wrong side
Special stitches:
- Petal: In the indicated ch-10 loop work (sc, hdc, dc, 3 tr, ch 2, 3 tr, dc, hdc, sc). This gives 12 sts and a ch-2 tip. Because the loop is anchored in a single stitch, the stitches gather it into a closed, pointed oval.
- 4-dc cluster (4-dc cl): *Yarn over, insert hook in indicated ch, yarn over and pull up a loop, yarn over and draw through 2 loops; repeat from * 3 more times in the same ch, yarn over and draw through all 5 loops on hook.
- Drop: Ch 30, 4-dc cl in 4th ch from hook, sl st in back bump of each of next 26 ch, sl st in the same st where the Drop began.
Gauge and Checkpoints
Gauge matters here, because six motifs multiply any small error. Make one complete motif first, block it, and measure before starting the rest.
Gauge: 21 sc = 4 in (10.2 cm) along the Round 8 edge of a blocked motif.
Checkpoints for one motif:
- After Round 2: center measures about 1.75 in (4.4 cm) across.
- After Round 4: flower measures about 5 in (12.7 cm) across, tip to tip.
- After Round 5: about 6 in (15.2 cm) across.
- After Round 7: about 7.5 in (19.1 cm) side to side.
- After Round 8 and blocking: 8 in x 8 in (20.3 cm x 20.3 cm).
If your blocked motif is larger than 8 in (20.3 cm), go down a hook size to 3.25 mm. If it is smaller, go up to 3.75 mm. A difference of 0.25 in (0.6 cm) per motif adds up to 0.75 in (1.9 cm) across the panel width, so adjust before continuing.
Flower Motif (Make 6)
Work in joined rounds with the RS facing. Do not turn.
Round 1: Make a magic ring, ch 3 (counts as dc), 11 dc in ring, sl st to top of ch-3. Pull the ring closed. (12 dc)
Round 2: Ch 3 (counts as dc), dc in same st, 2 dc in each st around, sl st to top of ch-3. (24 dc)
Round 3: Ch 1, (sc, ch 10, sc) in next st, sc in next st; repeat from * 11 more times, sl st to first sc. (36 sc and 12 ch-10 loops)*
Each ch-10 loop hangs from a single stitch. These loops become the petal frames.
Round 4 (petals): Sl st in first ch-10 loop. Work Petal in ch-10 loop, sk next sc, sl st in next sc, sk next sc; repeat from * 11 more times. The last sl st lands in the middle sc before the first Petal. (12 Petals of 12 sts each, 12 ch-2 tips)* Fasten off.
Between each pair of petals there are 3 sc from Round 3: you skip the first, anchor in the middle one, and skip the last. This keeps the petals separate with a small gap at the base, as in the finished panel. Gently pinch each tip to shape the point.
Round 5: Join yarn with sc in the ch-2 tip of any Petal, ch 7, sc in ch-2 tip of next Petal; repeat from * 10 more times, ch 7, sl st to first sc. (12 sc and 12 ch-7 loops)*
Round 6: Sl st in first 3 ch of the next loop, sl st in the same loop, ch 1, sc in same loop. Ch 8, sc in next loop, ch 8, (sc, ch 10, sc) in next loop, ch 8, sc in next loop; repeat from * 2 more times, then from * to ** once, sl st to first sc. (16 sc, 12 ch-8 loops and 4 ch-10 corner loops)*
Every third ch-7 loop becomes a corner, which starts squaring the circle.
Round 7: Sl st in first 4 ch of next ch-8 loop, ch 1, sc in same loop. Ch 8, sc in next ch-8 loop, ch 8, (sc, ch 10, sc) in corner ch-10 loop, ch 8, sc in next ch-8 loop, ch 8, sc in next ch-8 loop; repeat from * 2 more times, then from * to ** once, sl st to first sc. (20 sc, 16 ch-8 loops and 4 ch-10 corner loops)*
You now have 4 ch-8 loops along each side between corners.
Round 8: Sl st in first 4 ch of next ch-8 loop, ch 1, 8 sc in same loop, 8 sc in next ch-8 loop. (5 sc, ch 2, 5 sc) in corner ch-10 loop, 8 sc in each of next 4 ch-8 loops; repeat from * 2 more times, (5 sc, ch 2, 5 sc) in last corner loop, 8 sc in each of last 2 ch-8 loops, sl st to first sc. Fasten off. (168 sc and 4 corner ch-2 sps)*
Work only into the loops; the Round 7 sc are hidden behind the new stitches.
Per side: 5 + (4 x 8) + 5 = 42 sc between the corner ch-2 sps. In this pattern, the corner ch-2 sps are not counted as stitches, so 4 x 42 = 168 matches the round total.
Make All Pieces
Make 6 motifs in pastel pink, using about 18 g each. Weave in the tails, then block each motif to 8 in x 8 in (20.3 cm x 20.3 cm) before joining. Pin each petal tip outward so the petals look like even ovals.
Layout (A = flower motif):
[A] [A] [A]
[A] [A] [A]
Joining
Join with a flat slip-stitch seam on the RS. Lay two motifs side by side, RS up, edges touching. Working through the back loops of both edges, the stitches pair up exactly, one for one.
Short seams: Sl st through both corner ch-2 sps, sl st through the back loops of the next 42 sc pairs, sl st through both corner ch-2 sps. (44 sl st per seam) Join the motifs into 2 strips of 3, using 4 short seams in total.
Long seam: Lay the two strips side by side and join them the same way. For each of the 3 motif pairs, work 1 sl st through the corner sps, 42 sl st, and 1 sl st through the corner sps. (3 x 44 = 132 sl st)
Keep the tension loose and even. The seam should lie flat and stretch as much as the motif edge. If it puckers, rip it out and redo it one hook size larger. The slip-stitch line sits on the RS like the chain lattice inside the motifs.
Size checkpoint: The joined panel should measure 24 in x 16 in (61.0 cm x 40.6 cm).
Border
Border gauge: 21 sc = 4 in (10.2 cm), the same as the motif edge.
Border Round 1 (all sides): With RS facing, join yarn in the top-right outer corner ch-2 sp. Ch 1, (sc, ch 2, sc) in same sp. Sc in each sc around, and work (sc, ch 2, sc) in each outer corner ch-2 sp. At the seam junctions, skip the joined corner ch-2 sps and go straight from the last sc of one motif to the first sc of the next. Sl st to first sc.
- Top and bottom: 3 motifs x 42 sc = 126 sc, plus the 2 corner sc = 128 sc each
- Each side: 2 motifs x 42 sc = 84 sc, plus the 2 corner sc = 86 sc each
- Total: 428 sc and 4 corner ch-2 sps
Why the math works: No stitches are added at the seams, so 126 sc across 24 in (61.0 cm) is 5.25 sc per inch, which is the same as the gauge. The edge stays flat and does not ruffle or pull in. The sides follow the same rule: 84 sc over 16 in (40.6 cm).
Header (top edge only): Work in rows across the 128 sc of the top edge.
Row 1 (RS): Join yarn in the top-right corner sc, ch 3 (counts as dc), dc in each sc across to the last sc, 2 dc in last sc. Turn. (128 dc worked 1 per sc + 1 extra dc = 129 dc)
Row 2 (WS): Ch 4 (counts as dc and ch 1), sk next st, dc in next st, ch 1, sk next st, dc in next st; repeat from * across. Turn. (65 dc and 64 ch-1 sps = 129 sts)*
Row 3 (RS): Ch 3 (counts as dc), dc in next ch-1 sp, dc in next dc; repeat from * across. Turn. (129 dc)*
Row 4 (WS): Ch 1, sc in first st, sk next st, 3 dc in next st, sk next st, sc in next st; repeat from * across. Fasten off. (32 shells and 33 sc)*
Check: 1 + (32 x 4) = 129. The header should measure 2 in (5.1 cm) from the motif edge to the top of the scallops.
Fringe (bottom edge only): With RS facing, join yarn in the bottom-left corner sc of Border Round 1. Work across the 128 bottom sc: sl st in next 4 sts, work Drop, sl st in next 4 sts; repeat from * 15 more times. Fasten off. (128 sl st and 16 Drops)*
The Drops sit about 1.5 in (3.8 cm) apart and hang 4.5 in (11.4 cm) long.
Final Blocking
- Weave in all remaining tails along the slip-stitch seams or inside the petals.
- Soak the panel in cool water for 10 minutes, then press out the water in a towel. Do not wring it.
- Lay it flat on a blocking mat, RS up.
- Pin the outer edge to 24.5 in (62.2 cm) wide and 18.25 in (46.4 cm) long, from the scallops to the bottom edge.
- Pin each petal tip outward and pull each lattice arch into a smooth curve.
- Pin the top of each scallop and straighten every Drop so it hangs straight down.
- Let the panel dry completely before you unpin it.
Final Quality-Control Checklist
- Each motif has 12 separate petals with pointed ch-2 tips.
- Each motif edge has 42 sc per side between corners.
- All seams are flat, with 44 sl st per motif pair.
- The joined panel measures 24 in x 16 in (61.0 cm x 40.6 cm).
- Border Round 1 has 128 sc on the top and bottom and 86 sc on each side.
- The header has 129 sts in Rows 1-3 and 32 scallops in Row 4.
- There are 16 Drops, evenly spaced, each 4.5 in (11.4 cm) long.
- The final size is 24.5 in x 22.75 in (62.2 cm x 57.8 cm).
Troubleshooting
Petals look round, not pointed: Make sure you work the ch 2 at the tip, and pinch the tip into a point while the panel is damp.
Petals overlap: Check that you skip 1 sc on each side of the anchoring sl st in Round 4.
Motif cups: Your chain loops are too short for your tension. Chain a little more loosely, or go up 0.25 mm for Rounds 5-8 only.
Motif ruffles: Chain a little more firmly, or go down 0.25 mm for Rounds 5-8.
Corners are uneven: Recount the loops after Round 6. You should have 3 ch-8 loops and 1 ch-10 loop per side.
Header flares: Count Row 1. Any extra dc beyond 129 will make the header wider than the panel.
Drops curl: Wet them, then pin them straight while they dry. Working the sl sts into the back bumps also helps the Drops hang flat.
Care
Hand wash in cool water with mild soap, and lay flat to dry, re-pinning the petals if needed. Keep it out of the dryer so the cotton does not shrink or distort.
Final Notes
The measurement chain runs through every step. Each motif blocks to 8 in (20.3 cm) with 42 sc per side. Six motifs joined without extra seam stitches make 24 in x 16 in (61.0 cm x 40.6 cm). The border adds 0.25 in (0.6 cm) on the sides and bottom, and the header adds 2 in (5.1 cm), giving 24.5 in x 18.25 in (62.2 cm x 46.4 cm). The fringe adds 4.5 in (11.4 cm), for a total length of 22.75 in (57.8 cm). Clip the 8 rings into the Row 2 mesh, at ch-1 sps 1, 10, 19, 28, 37, 46, 55 and 64, and hang it in your sunniest window.
Happy crocheting!