

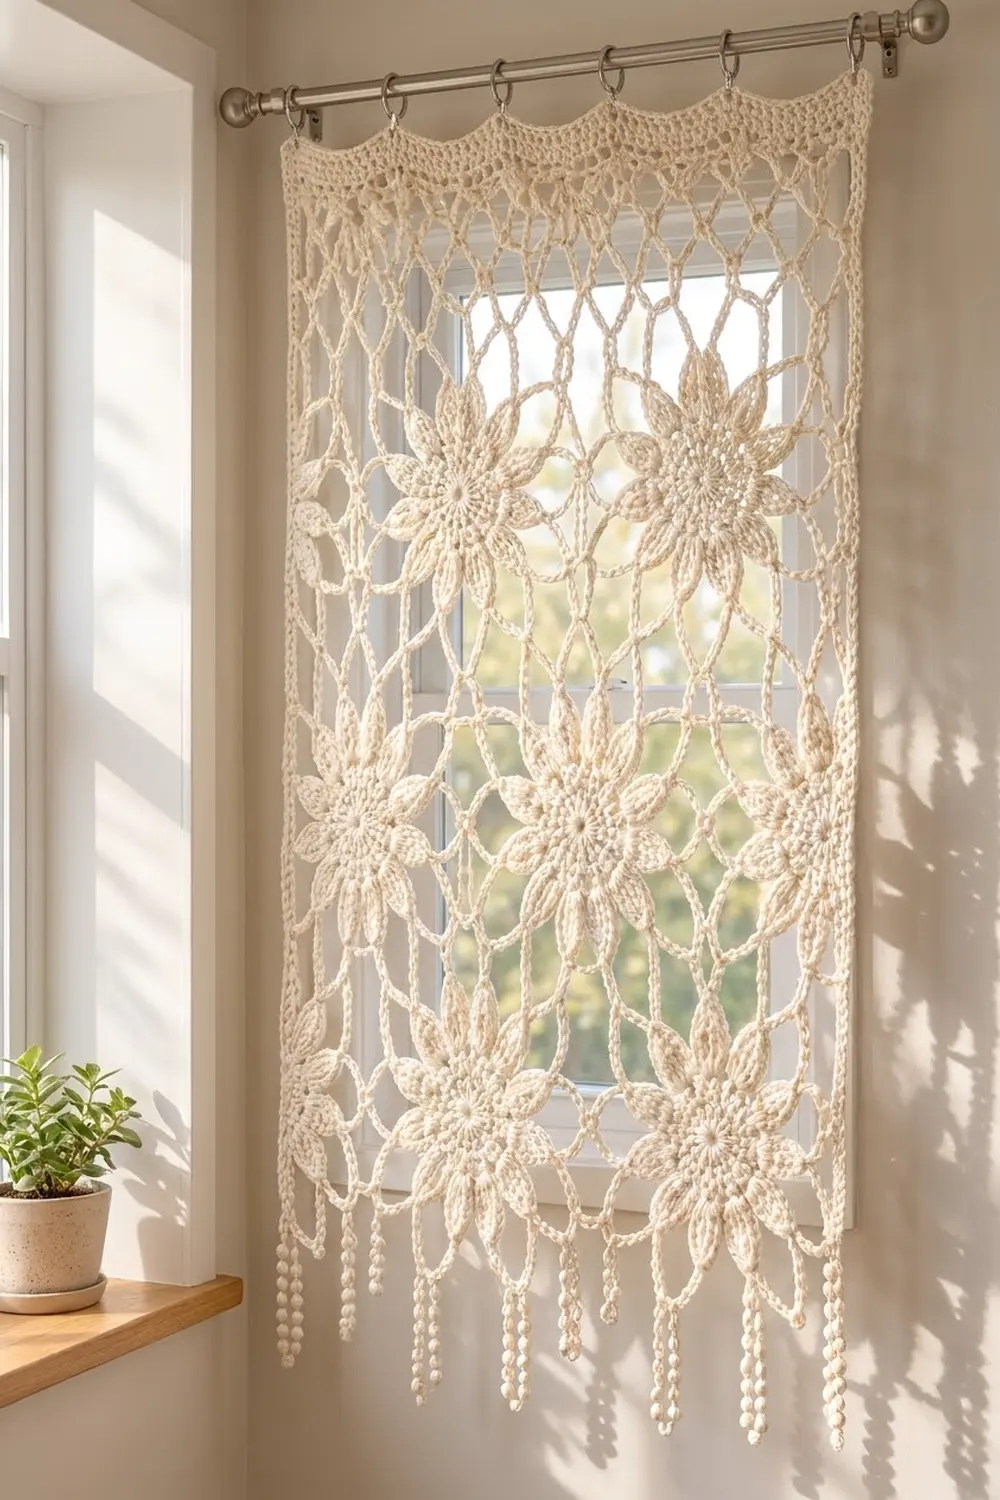
This curtain panel is soft, airy and full of light. Flower medallions with pointed petals sit inside an open lattice of chain loops. A solid header with a scalloped top runs across the upper edge, and beaded fringe hangs along the bottom.
The panel uses one color, a warm ivory or cream cotton. With a single color, the texture does all the work: firm flower centers, raised petals and open mesh that lets daylight through. It suits cottage, boho and romantic bedroom styles.
This pattern uses US crochet terms. The finished panel is 24.5 in (62.2 cm) wide and 34.5 in (87.6 cm) long from the scallop tips to the bottom border. With the 6 in (15.2 cm) fringe, the total length is 40.5 in (102.9 cm).
You crochet 12 square flower motifs and join them in a grid 3 motifs wide and 4 motifs tall. Then you work one round of single crochet all around, add the scalloped header across the top and attach the beaded fringe along the bottom.
Finished Size and Construction
- Finished size: 24.5 in x 34.5 in (62.2 cm x 87.6 cm), plus 6 in (15.2 cm) fringe
- Skill level: Intermediate
- Terminology: US crochet terms
- Yarn weight: DK (#3) cotton
- Hook: 4.0 mm (US G-6)
- Number of pieces: 12 identical motifs, joined into one panel
- Layout: 3 motifs wide x 4 motifs tall
- Motif size: 8 in x 8 in (20.3 cm x 20.3 cm)
- Size before border: 24 in x 32 in (61.0 cm x 81.3 cm)
- Border depth: 0.25 in (0.6 cm) border round on all edges, plus a 2 in (5.1 cm) header at the top
Materials
Choose a smooth, mercerized or combed cotton in DK weight. Cotton holds the petal shapes, blocks crisply and hangs well in a window. Avoid fuzzy yarns, because they hide the lace.
- Ivory/cream DK cotton: 250 g, about 575 m (629 yd)
Expected use: about 144 g for the 12 motifs, 25 g for the border and header, and 40 g for the fringe. The 250 g total includes a margin of about 40 g for swatching and joining.
Tools:
- 4.0 mm (US G-6) crochet hook
- Tapestry needle
- Stitch markers (at least 4)
- Scissors
- Measuring tape
- Blocking mats and rust-proof pins
- Spray bottle
- 8 curtain clip rings and a curtain rod
Abbreviations (US Terms)
- ch – chain
- sl st – slip stitch
- sc – single crochet
- hdc – half double crochet
- dc – double crochet
- tr – treble crochet
- sk – skip
- sp – space
- st(s) – stitch(es)
- RS – right side
Special stitches:
- Picot: Ch 3, sl st in 3rd ch from hook.
- Bead (bd): Ch 4. *Yarn over, insert hook in 4th ch from hook, yarn over, pull up a loop, yarn over, pull through 2 loops; repeat from * 3 more times (5 loops on hook). Yarn over and pull through all 5 loops. The cluster folds over into a small round bead.
Gauge and Checkpoints
Make one complete motif first and block it before making the rest. Every later measurement depends on this motif.
Edge gauge: about 18.5 sc = 4 in (10.2 cm), measured along the last round of a blocked motif. That means 37 sc = 8 in (20.3 cm) along one motif side.
Checkpoints for one motif:
- After Round 2: about 3 in (7.6 cm) across
- After Round 4 (petals): about 5.5 in (14.0 cm) across, tip to tip
- After Round 5: about 7 in (17.8 cm) across
- After Round 7: 8 in x 8 in (20.3 cm x 20.3 cm) after blocking
If your motif is too big, go down to a 3.75 mm hook. If it is too small, go up to a 4.5 mm hook. Change hooks before making more motifs. Being off by 0.5 in (1.3 cm) per motif adds up to 1.5 in (3.8 cm) across the width and 2 in (5.1 cm) down the length.
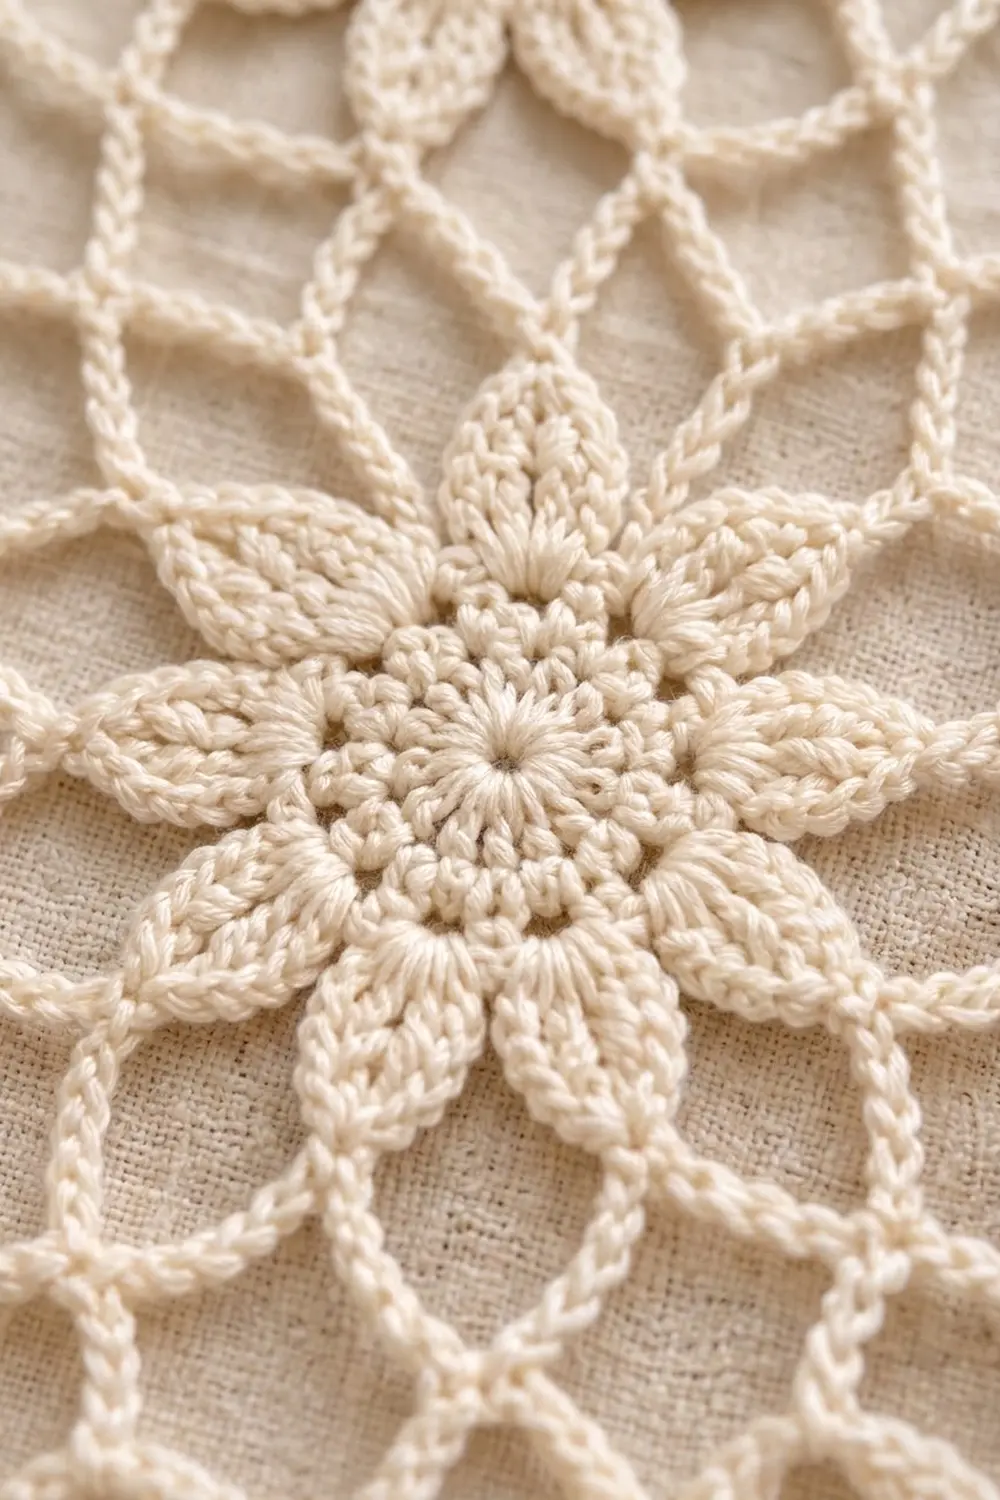
Flower Motif (Make 12)
Each motif starts as a round flower. The chain loops of Rounds 5 to 7 then turn it into a square. Keep the RS facing the whole time and do not turn.
Round 1: Make a magic ring. Ch 3 (counts as dc), 15 dc in ring. Join with sl st to top of ch-3. Pull the ring closed. (16 dc)
Round 2: Ch 3 (counts as dc), dc in same st, 2 dc in each st around. Join with sl st to top of ch-3. (32 dc)
This is a growth round. Every stitch gets 2 dc, so the round’s own count is 32 dc.
Round 3: Ch 1, sc in same st, *ch 4, sk 3 sts, sc in next st; repeat from * 6 more times, ch 4, sk 3 sts. Join with sl st to first sc. (8 sc, 8 ch-4 sps)
Each repeat uses 4 sts of Round 2: 8 x 4 = 32.
Round 4 (petals): Sl st into first ch-4 sp. In each ch-4 sp around, work (sc, hdc, 2 dc, tr, picot, tr, 2 dc, hdc, sc). Join with sl st to first sc. (8 petals)
Each petal has 10 sts plus 1 picot. The stitches rise from sc to tr and drop back down, so each petal ends in a pointed tip with a raised ridge down the center.
Round 5: Sl st in next hdc, next 2 dc and next tr, then sl st in the picot. Ch 1, sc in same picot, *ch 9, sc in picot of next petal; repeat from * 6 more times, ch 9. Join with sl st to first sc. (8 sc, 8 ch-9 loops)
Round 6 (squaring): Sl st in next 5 ch to reach the center of the first loop. This first loop is a corner loop. From here the loops alternate: corner, side, corner, side.
Ch 1, *(sc, ch 11, sc) in corner loop, ch 11, sc in next (side) loop, ch 11; repeat from * 3 more times. Join with sl st to first sc. (12 sc, 12 ch-11 sps)
Each repeat has 3 sc and 3 ch-11 sps: 4 x 3 = 12 of each.
Round 7 (edge): Ch 1, sc in same st as join. Work 11 sc in corner ch-11 sp and place a marker in the 6th of these 11 sc (this is the corner st). Sc in next sc, 11 sc in next ch-11 sp, sc in next (side) sc, 11 sc in next ch-11 sp, sc in next sc; repeat from * 3 more times, ending the last repeat at *. Join with sl st to first sc. Fasten off. (144 sc)
This is a conversion round: 12 sc worked 1 per existing sc, plus 12 sps x 11 sc = 132 sc, for 12 + 132 = 144 sc.
Count per side: Counting from one marked corner st to the next, both included: 1 corner + 5 + 1 + 11 + 1 + 11 + 1 + 5 + 1 corner = 37 sts per side. This count already includes both corner sts. Check: 4 sides x 36 (each corner shared) = 144.
Weave in ends neatly along the back of the sc edge. Wet-block the first motif to 8 in (20.3 cm) square and confirm gauge before you continue.
Make All Pieces
Make 12 motifs, all in ivory. Block every motif to the same 8 in (20.3 cm) square before joining. This makes the seams much easier.
Layout (each [M] is one motif):
[M] [M] [M]   <- top row (header goes above)
[M] [M] [M]
[M] [M] [M]
[M] [M] [M]   <- bottom row (fringe goes below)
Joining
Method: Slip stitch seam through back loops.
- Join the motifs into 4 horizontal rows first. Hold 2 motifs with RS together, corner sts lined up.
- Work through the back loop of each motif together and sl st in each st from corner st to corner st. That is 37 sl sts, with each stitch matched to one stitch.
- Add the third motif the same way. Each row now has 2 short seams.
- Join the 4 rows with 3 long seams. Each long seam is 3 x 37 = 111 sl sts. Where seams cross, work each motif’s 2 corner sts as usual. Do not skip them and do not add stitches.
Tension: Keep the slip stitches as loose as the motif edge. Each seam should measure 8 in (20.3 cm) per motif. If a seam pulls in, go up one hook size for joining only.
Checkpoint: The joined panel should measure 24 in x 32 in (61.0 cm x 81.3 cm) laid flat without stretching.
Border
The border has three parts: one round of sc all around, the scalloped header across the top and the beaded fringe along the bottom. Use the same 4.0 mm (US G-6) hook and the same edge gauge of 18.5 sc = 4 in (10.2 cm).
Border Round
Starting counts: Each short edge (top and bottom) has 3 motifs x 37 sts = 111 sts. Each long edge (sides) has 4 motifs x 37 sts = 148 sts. Add no stitches at the seams, because these counts already include every motif’s corner sts.
Round 1: With RS facing, join yarn in any st on a long side. Ch 1, sc in each st around, working 3 sc in each of the 4 outer panel corner sts. Join with sl st to first sc. Fasten off.
Counts per side, including the center sc of each corner group:
- Top and bottom: 111 (worked 1 per st) + 2 (extra corner sts) = 113 sts
- Each long side: 148 (worked 1 per st) + 2 (extra corner sts) = 150 sts
- Total: 2 x 111 + 2 x 148 + 8 = 526 sts
Check: 2 x 113 + 2 x 150 – 4 shared corner sts = 526.
Scalloped Header
Work across the 113 sts of the top edge only.
Row 1: With RS facing, join yarn in the top-right corner st. Ch 3 (counts as dc), dc in each st across. (113 dc)
Row 2: Ch 3 (counts as dc), turn. Dc in each st across, working the last dc in top of turning ch. (113 dc)
Row 3 (scallops): Ch 1, turn. Sc in first st, *sk 3 sts, 7 dc in next st, sk 3 sts, sc in next st; repeat from * 13 more times. Fasten off. (14 scallops, 15 sc)
Why the math works: 3 motifs x 37 = 111 sts, plus 2 corner sts = 113. Each scallop uses 8 sts and the row starts with 1 sc, so 1 + (14 x 8) = 113. The scallops end evenly at both sides with no adjusting.
The header is about 2 in (5.1 cm) deep from the border round to the scallop tips.
Beaded Fringe
Work along the 113 sts of the bottom edge. Count fringe positions from the right: st 1, then every 8th st after it (sts 1, 9, 17 and so on up to 113). That gives 1 + (112 ÷ 8) = 15 strands.
Each strand: With RS facing, join yarn in the fringe st. Ch 1, sc in same st. Work 8 bd. Fasten off, leaving a 6 in (15.2 cm) tail. Thread the tail onto a needle and weave it up through the centers of the beads to hide it.
Each strand hangs about 6 in (15.2 cm) long.
Final Blocking
- Weave in all remaining ends before blocking.
- Soak the panel in cool water for 10 minutes, then gently press out the water. Do not wring.
- Roll it in a towel to remove extra moisture.
- Lay it flat on blocking mats, RS up.
- Pin it to 24.5 in (62.2 cm) wide and 34.5 in (87.6 cm) long, from the bottom border to the scallop tips.
- Pin along the sides every 2 in (5.1 cm), keeping the edges straight.
- Open each petal tip with your fingers and pin the picot points if needed.
- Pin each scallop tip along the header so the scallops are even.
- Lay the fringe flat and straighten each strand.
- Let it dry completely before unpinning.
Final Quality-Control Checklist
- Each motif has 144 sts in Round 7 and 37 sts per side.
- All 12 motifs measure 8 in (20.3 cm) square.
- Every seam lies flat and matches 1 st to 1 st.
- The joined panel measures 24 in x 32 in (61.0 cm x 81.3 cm).
- The border round has 113 sts on the top and bottom and 150 sts on each side.
- The header has 14 even scallops.
- There are 15 fringe strands, each with 8 beads.
- All ends are hidden.
- The finished panel measures 24.5 in x 34.5 in (62.2 cm x 87.6 cm), plus fringe.
Troubleshooting
Petals curl or cup. The Round 3 chains may be too tight. Loosen your ch-4 sts, or pin the petals flat when blocking.
The motif is not square. Check that corner and side loops alternate in Round 6. Each corner loop must get (sc, ch 11, sc).
One side has 36 or 38 sts. Recount the sc in each ch-11 sp. Each space takes exactly 11 sc.
Seams pucker. Your slip stitches are too tight. Rework them with a larger hook.
The panel ruffles at the edges. You have too many border sts. Recount to 113 per short side and 150 per long side.
Scallops do not end evenly. The top count is not 113. Fix the border round before working the header.
Beads look flat. Pull the 4-dc cluster closed firmly so it folds over the ch-4.
Care
Hand wash in cool water with mild soap, press the water out gently and dry flat. Re-pin the scallops and petal tips if they lose their shape.
Final Notes
The measurement chain is simple. One motif has 37 sts per side and measures 8 in (20.3 cm). Three motifs make 24 in (61.0 cm) across and four make 32 in (81.3 cm) down. The border round adds 0.25 in (0.6 cm) to each edge and gives 113 sts across the top, enough for 14 even scallops. The 2 in (5.1 cm) header and 6 in (15.2 cm) fringe complete the panel at 24.5 in x 40.5 in (62.2 cm x 102.9 cm) overall.
Check the first motif carefully and the rest of the panel will follow.
Happy crocheting!