

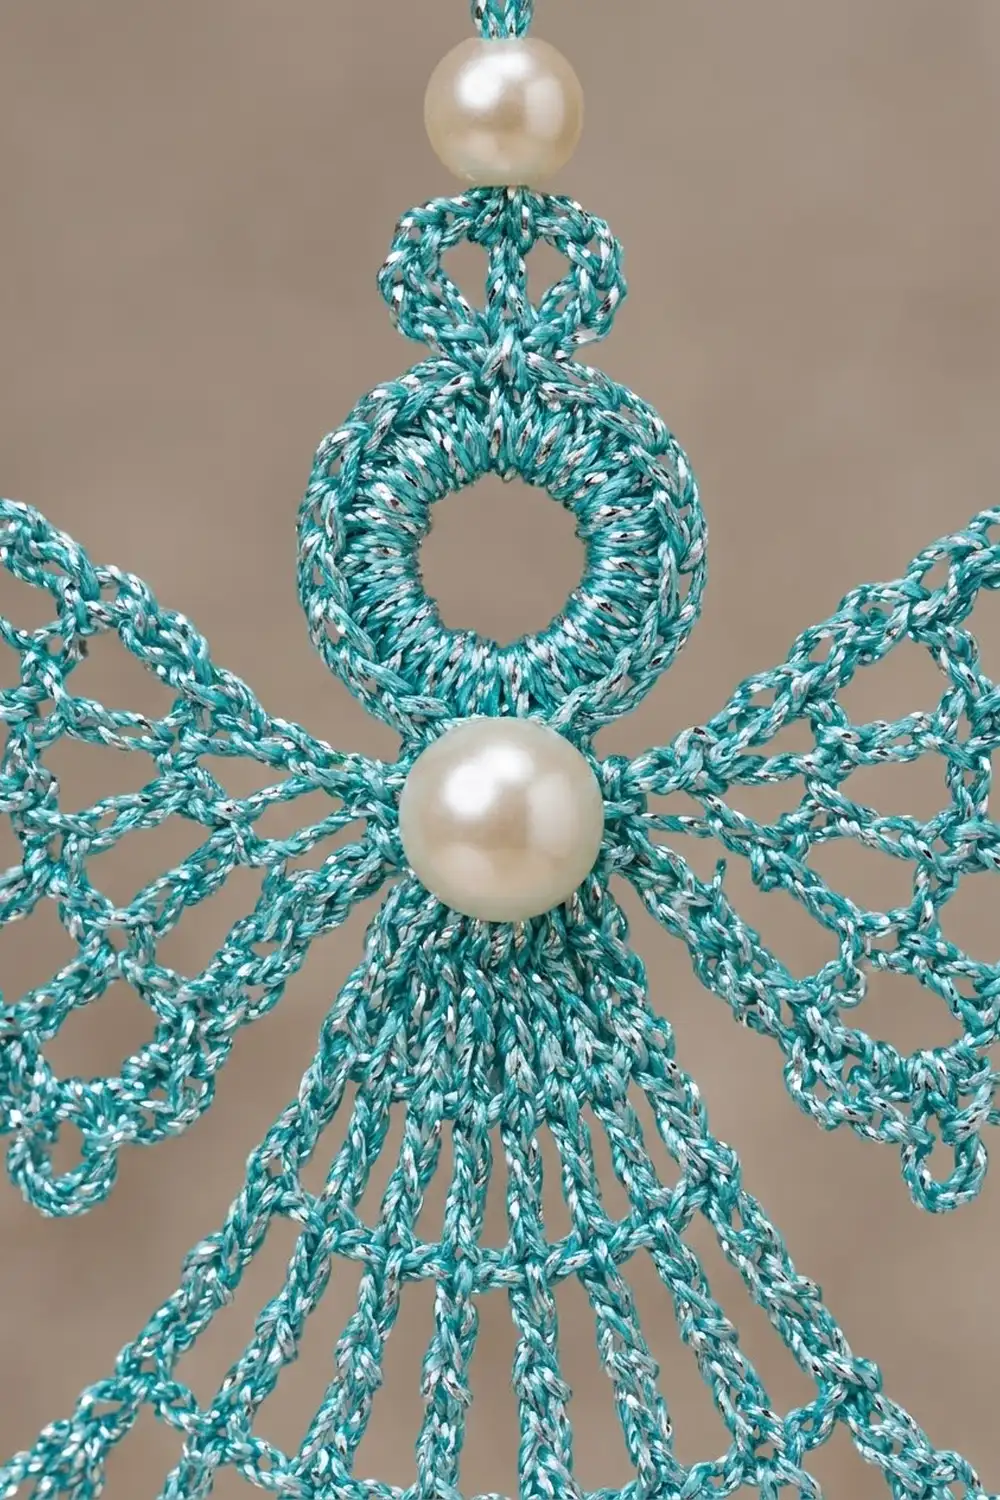
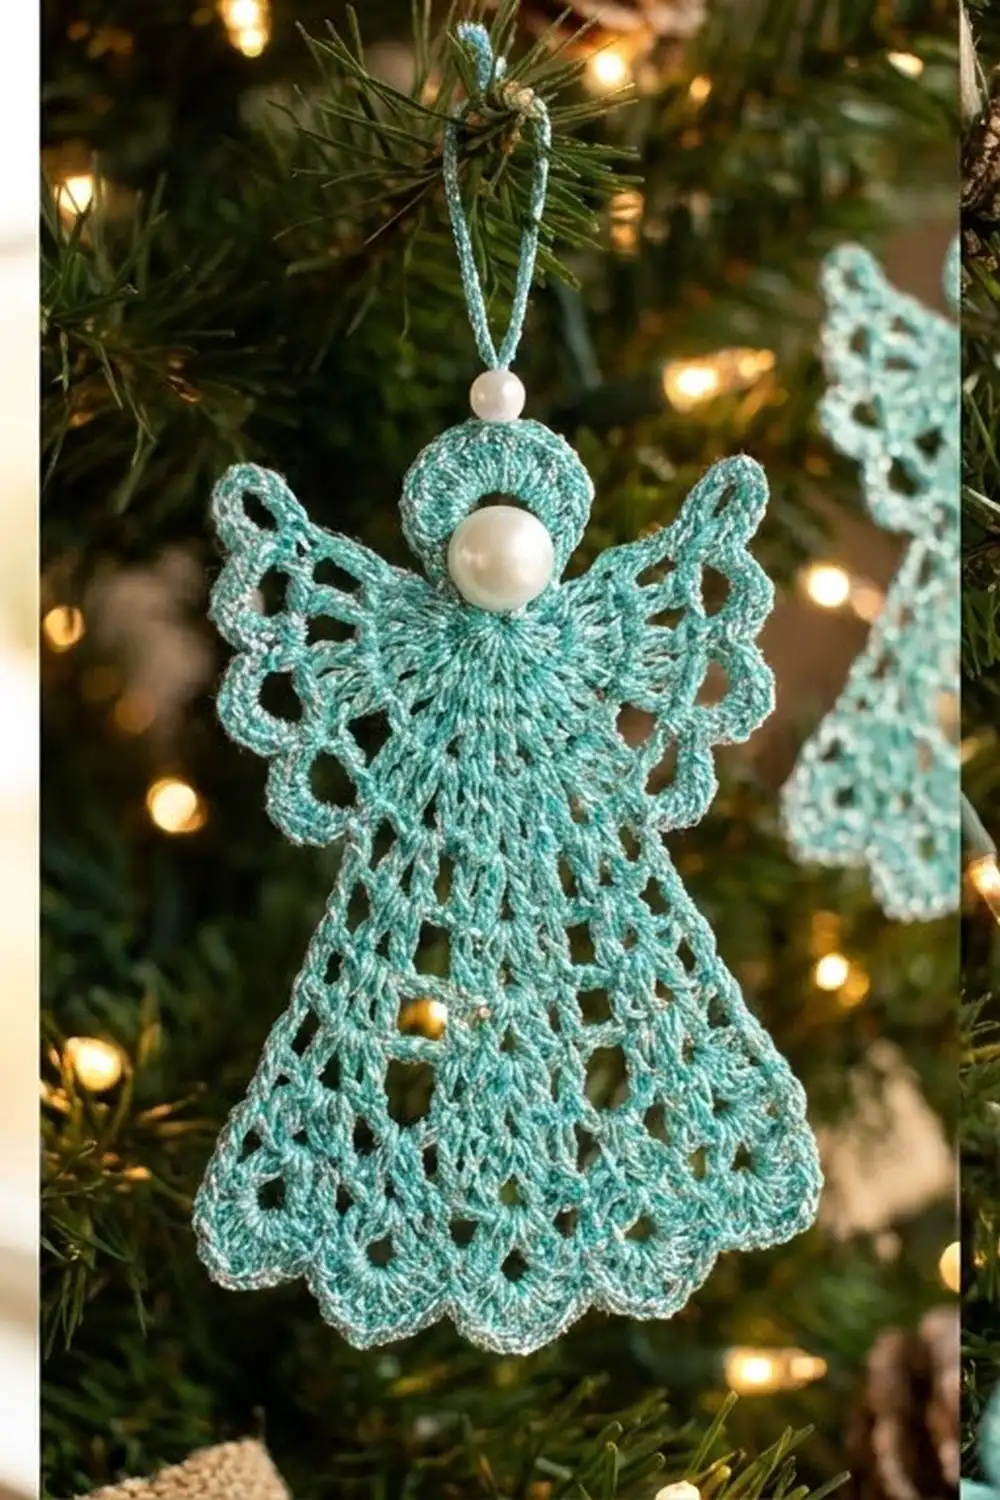
The Seaglass Pearl Angel is a delicate thread-crochet ornament made in shimmering aqua metallic thread. It has an open ring for a head, a flared lace skirt with vertical ribs, and two airy fan-shaped wings with picot edges. A white pearl at the neck and a smaller pearl on the hanging loop finish it.
Aqua and silver sparkle bring a cool, frosty feel to a Christmas tree, especially against warm lights. It also suits a coastal or winter-white theme, and you can make one in an evening.
This pattern uses US crochet terms. The finished angel measures about 2.6 in (6.6 cm) tall from the top of the head to the hem points, and about 3 in (7.6 cm) across the wings. The hanging loop is extra.
Construction is simple and seamless. First you work the head as a ring. Then you work the skirt in turned rows from the bottom of the ring and the two wings in turned rows from its sides. The skirt gets a scalloped picot border, and a beaded hanging loop goes on the top. Last, you sew on the neck pearl and stiffen the angel.
Finished Size and Construction
- Finished size: 2.6 in (6.6 cm) tall × 3 in (7.6 cm) wide at the wings
- Skill level: Intermediate (fine thread, small hook)
- Terminology: US crochet terms
- Yarn weight: Size 10 crochet thread (Lace, weight 0)
- Hook: 1.5 mm steel hook (US steel 8)
- Number of pieces: 1 (worked in one piece; no sewing except the pearl)
- Layout: Single motif: head ring, skirt below, one wing on each side
- Head ring size: 0.8 in (2.0 cm) across the outside edge
- Size before border: 2.2 in (5.6 cm) tall; skirt hem 2.4 in (6.1 cm) across
- Border depth: 0.4 in (1.0 cm), on the skirt hem only
Materials
Thread: Use a size 10 cotton or cotton-blend crochet thread with a metallic strand. Choose a smooth, tightly twisted thread so the ribs and picots stay crisp. Very slippery all-metallic threads are harder to stiffen.
- Aqua metallic (aqua with silver): 5 g, about 25 m (27 yd)
Tools and notions:
- 1.5 mm steel crochet hook (US steel 8)
- 1 white pearl bead, 6 mm (neck)
- 1 white pearl bead, 4 mm (hanging loop; the hole must fit doubled thread)
- Fine beading needle or a size 24 tapestry needle
- Sharp scissors
- Fabric stiffener or heavy spray starch
- Foam blocking board, plastic wrap and rustproof pins
The thread quantity includes about a 20% margin for your gauge swatch, tails and a little frogging.
Abbreviations (US Terms)
- ch – chain
- sl st – slip stitch
- sc – single crochet
- dc – double crochet
- sp – space
- sk – skip
- RS – right side
- st(s) – stitch(es)
- [ ] – repeat the bracketed steps the number of times stated
Special stitch:
- Picot: Ch 3, then sl st into the 3rd ch from the hook (the first chain of the 3).
- Pair: Two dc side by side, each worked into its own stitch. On the skirt and wings, the pairs stack on top of each other to form the ribs.
Turning chain: Throughout this pattern, ch 3 at the start of a row counts as the first dc.
Gauge and Checkpoints
Gauge: 14 dc and 5 rows of dc = 1 in (2.5 cm) square with size 10 thread and a 1.5 mm hook.
Make one test angel up to the end of the skirt before you commit to a batch. Thread tension changes a lot from one person to the next, and this piece is too small to absorb much difference.
Checkpoints:
- Head ring: 0.8 in (2.0 cm) across the outside, with an opening about 0.4 in (1.0 cm) across.
- Skirt after Row 3: 0.6 in (1.5 cm) from the ring to the lower edge.
- Skirt after Row 7: 1.4 in (3.6 cm) from the ring to the lower edge, and about 2.4 in (6.1 cm) straight across the hem.
- Each wing after Row 3: about 0.75 in (1.9 cm) out from the ring.
- After the border: total height 2.6 in (6.6 cm), hem about 2.75 in (7.0 cm) across.
Too big? Go down to a 1.25 mm hook, or pull each chain snug before you start the next stitch. Too small? Go up to a 1.75 mm hook. Keep your stitch counts exactly as written. The lace pattern depends on the counts, so change the size with your hook, not with extra stitches.
Head Ring
Ch 16 and join with a sl st to the first ch to form a ring. Leave a 6 in (15.2 cm) tail.
Rnd 1: Ch 1. Work 32 sc into the center of the ring, working over the tail as you go. Join with a sl st to the first sc. (32 sc)
Pack the stitches closely so the chain ring is completely hidden. The ring should lie flat without ruffling. If it ruffles, start again with a slightly looser foundation chain.
Do not fasten off. The join stitch becomes the first stitch of the skirt base.
Ring map: The skirt uses 5 sc at the bottom of the ring. On each side, skip 1 sc next to the skirt; the next 3 sc are the wing base. That leaves 19 sc free across the top. The hanger attaches to the 10th of those, the top center.
Skirt
You work the skirt in turned rows downward from the ring, so the ribs fan out. Every row begins with ch 3, which counts as the first dc of the first pair.
Row 1 (RS): Ch 3, dc in the same sc as the join. [Ch 1, 2 dc in next sc] 4 times. Turn. (5 pairs: 10 dc + 4 ch = 14 sts)
Row 2: Ch 3, dc in next dc. [Ch 2, dc in each of next 2 dc] 4 times. Turn. (5 pairs: 10 dc + 8 ch = 18 sts)
Row 3 (rib-adding row): Ch 3, dc in next dc. [Ch 1, 2 dc in next ch-2 sp, ch 1, dc in each of next 2 dc] 4 times. Turn. (9 pairs: 18 dc + 8 ch = 26 sts)
This row adds a new pair in each of the 4 spaces, so 5 ribs become 9.
Row 4: Ch 3, dc in next dc. [Ch 1, sk ch-1 sp, dc in each of next 2 dc] 8 times. Turn. (9 pairs: 18 dc + 8 ch = 26 sts)
Row 5: Ch 3, dc in next dc. [Ch 2, sk ch-1 sp, dc in each of next 2 dc] 8 times. Turn. (9 pairs: 18 dc + 16 ch = 34 sts)
Row 6: Ch 3, dc in next dc. [Ch 2, sk ch-2 sp, dc in each of next 2 dc] 8 times. Turn. (9 pairs: 18 dc + 16 ch = 34 sts)
Row 7: Ch 3, dc in next dc. [Ch 3, sk ch-2 sp, dc in each of next 2 dc] 8 times. Turn. (9 pairs: 18 dc + 24 ch = 42 sts)
The spaces get wider from ch 1 to ch 2 to ch 3, which makes the bell shape. Every pair sits straight on top of the pair below, so the 9 ribs run cleanly from the neck to the hem.
Checkpoint: The skirt measures 1.4 in (3.6 cm) from the ring and about 2.4 in (6.1 cm) across the hem. The whole piece measures 2.2 in (5.6 cm) from the top of the ring to the hem. Do not fasten off. Go straight into the border.
Skirt Border (Scalloped Picot Hem)
The border is worked across the skirt hem only. The hem is one edge with 9 pairs and 8 ch-3 spaces, and it gets 8 scallops.
Border gauge: One scallop repeat from Border Row 2 (8 sc + 1 picot) measures about 0.33 in (0.8 cm) wide.
Border Row 1 (shells): Ch 1. Sc in each of the first 2 dc. [(2 dc, ch 2, 2 dc) in next ch-3 sp, sc in each of next 2 dc] 8 times. Turn.
Count: 18 sc (2 on each of the 9 pairs) + 8 shells × (4 dc + 2 ch) = 18 + 48 = 66 sts
Border Row 2 (picots): Ch 1. Sc in each of the first 2 sc. [Sc in each of next 2 dc, (sc, picot, sc) in next ch-2 sp, sc in each of next 2 dc, sc in each of next 2 sc] 8 times. Fasten off, leaving a 6 in (15.2 cm) tail.
Count: 2 + 8 × 8 = 66 sc + 8 picots
Why the math works: Border Row 2 places exactly one sc in every stitch of Row 1. That’s 32 sc over the shell dc and 18 sc over the sc, for 50 sc. Then it puts 2 sc into each of the 8 ch-2 spaces, for 16 more: 50 + 16 = 66. Row 1 also had 66 stitches, so the hem doesn’t gather or flute. The picots are the only addition, one at the center of each shell, so every scallop ends in a dotted point.
Checkpoint: The border adds 0.4 in (1.0 cm), which brings the angel to 2.6 in (6.6 cm) tall. The 2 edge sc plus 8 repeats of about 0.33 in (0.8 cm) come to roughly 2.75 in (7.0 cm) along the hem.
Wings (Make 2)
Hold the angel RS facing with the skirt pointing down. On one side, skip the 1 ring sc next to the skirt. The wing base is the next 3 sc going up. Each wing row is symmetrical, so you can join at either end of those 3 sc.
Row 1: Join the thread with a sl st in the first wing-base sc. Ch 3, dc in the same sc. [Ch 2, 2 dc in next sc] 2 times. Turn. (3 pairs: 6 dc + 4 ch = 10 sts)
Row 2: Ch 3, dc in next dc. [Ch 3, sc in next ch-2 sp, ch 3, dc in each of next 2 dc] 2 times. Turn. (6 dc + 2 sc + 12 ch = 20 sts)
Row 3: Ch 3, dc in next dc. [(Ch 4, sc in next ch-3 sp) 2 times, ch 4, dc in each of next 2 dc] 2 times. Turn. (6 dc + 4 sc + 24 ch = 34 sts; 6 ch-4 sps)
Row 4: Ch 3, dc in next dc. [(Ch 5, sc in next ch-4 sp) 3 times, ch 5, dc in each of next 2 dc] 2 times. Turn. (6 dc + 6 sc + 40 ch = 52 sts; 8 ch-5 sps)
Row 5 (picot edge): Ch 1. Sc in each of the first 2 dc. [(3 sc, picot, 3 sc) in each of next 4 ch-5 sps, sc in each of next 2 dc] 2 times. Fasten off.
Count: 8 ch-5 sps × 6 sc = 48 sc, plus 6 sc over the 3 pairs = 54 sc + 8 picots
The 3 dc pairs form the wing’s ribs, and the chain loops between them open into the fan-shaped mesh. Make the second wing the same way on the other side of the ring.
Checkpoint: Each wing reaches about 1.1 in (2.8 cm) out from the ring. With the wings angled upward, the angel measures about 3 in (7.6 cm) across.
Hanging Loop and Pearls
Thread the 4 mm pearl onto the working thread before joining.
Hanger: Join with a sl st in the top-center sc of the ring (the 10th of the 19 free sc). Ch 2. Slide the pearl up against the hook and ch 1 to lock it in place. Ch 35, then sl st into the locking ch-1 to form the loop. Fasten off. The loop should stand about 1.25 in (3.2 cm) above the pearl.
Neck pearl: Using one of the tails and the beading needle, sew the 6 mm pearl to the RS at the neck, centered over the join between the ring and skirt Row 1. Pass through the bead twice. Weave in all tails along the dc ribs, not across the open spaces.
Final Blocking
- Dissolve or dilute the stiffener as the label directs.
- Soak the angel completely, then gently squeeze out the excess. Never wring it.
- Blot it in a towel until it is damp but not dripping.
- Lay plastic wrap over the foam board and place the angel RS up.
- Pin the head ring into a true circle. A rolled-up paper tube inside it helps.
- Pin the skirt so the 9 ribs fan out evenly. It should be 2.4 in (6.1 cm) across Row 7 and 2.75 in (7.0 cm) across the border.
- Pin each of the 8 hem picots to a point, then each of the 16 wing picots.
- Open the wings to about 3 in (7.6 cm) across, angled upward.
- Check the total height: 2.6 in (6.6 cm).
- Let it dry completely, at least 12 hours, before you unpin it.
Final Quality-Control Checklist
- The head ring has 32 sc and no chain shows through.
- The skirt has 9 straight ribs and 42 sts in Row 7.
- The border has 66 sc and 8 picots, one at the center of each shell.
- Each wing has 54 sc and 8 picots in Row 5.
- The wings are level with each other, with 1 skipped sc between each wing and the skirt.
- The hanger is at the true top center, and the pearl is locked in place.
- The neck pearl is centered and secure.
- The angel is 2.6 in (6.6 cm) tall × 3 in (7.6 cm) wide and stiff enough to hold its shape.
Troubleshooting
- The ring is cupping: You have too many sc for your chain ring, or the chain is too tight. Remake it with a looser foundation chain.
- The ribs are drifting sideways: You’re working into the chain spaces instead of the dc. Count your pairs at the end of every row.
- The hem is ruffling: Border Row 1 is too loose. Tighten your dc or go down a hook size for the border only.
- The wings are lopsided: Check that you skipped exactly 1 sc next to the skirt on both sides.
- The picots are disappearing: Pull each sl st firmly, and pin each picot to a point during blocking.
- The angel is limp: Use more stiffener, or apply a second coat once the first is dry.
Care
Store the angel flat in tissue, away from damp. If it gets dusty, rinse it in cool water and re-stiffen it over the same pinning layout.
Final Notes
Your measurements build on each other. A 0.8 in (2.0 cm) ring and seven skirt rows give 2.2 in (5.6 cm) before the border. The 0.4 in (1.0 cm) border brings the height to 2.6 in (6.6 cm). The wings, about 1.1 in (2.8 cm) each, make the angel 3 in (7.6 cm) wide. Hit each checkpoint and your angels will come out matching, ready to fill a whole tree.
Happy crocheting!