

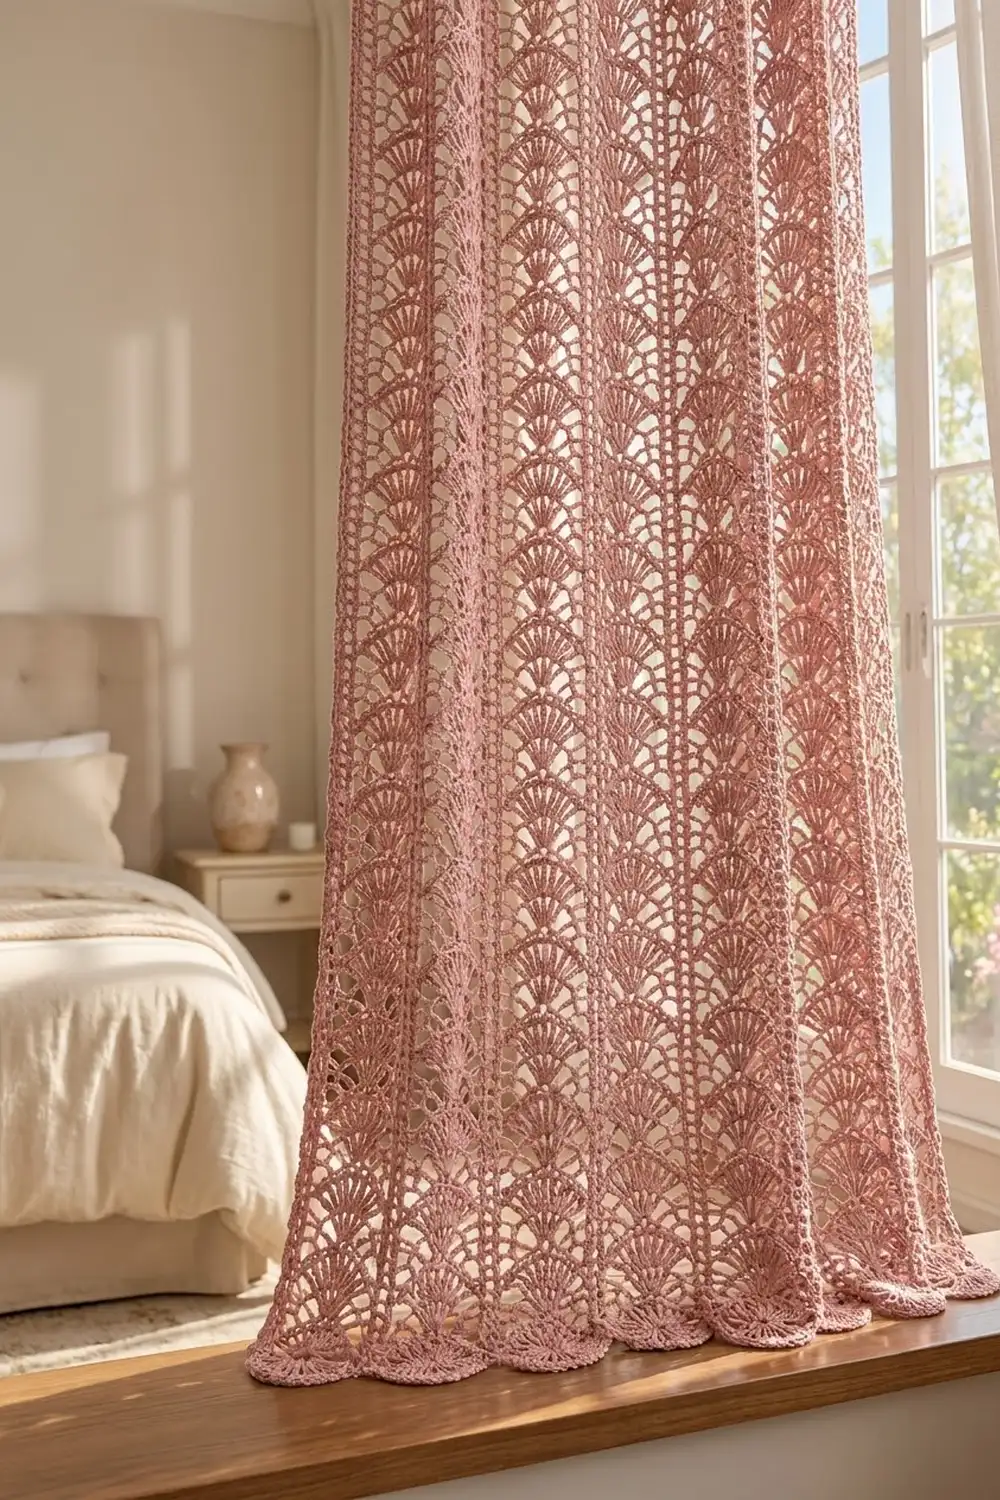
The Rose Fan Cascade curtain panel is a long, airy lace panel with a vintage look. Columns of open fans run from the hem to the top, each fan topped by a light arch of chain loops. Raised seams divide the columns, and a row of small scallops finishes the hem.
The sample is worked in a single dusty rose cotton. One soft color shows off the lace and lets light through the fans. The panel suits a romantic bedroom, a cottage-style living room or any window where you want privacy without losing daylight.
This pattern uses US crochet terms. The finished panel measures 43 in (109.2 cm) wide by 83 in (210.8 cm) long after the border and blocking.
You make six identical strips from the hem upward, one fan at a time. Then you join them with a slip-stitch seam and add a two-round border with scallops along the bottom edge. Every stage has a measurement checkpoint, so you can confirm the panel’s size before you go on.
Finished Size and Construction
- Finished size: 43 in × 83 in (109.2 cm × 210.8 cm)
- Skill level: Intermediate
- Terminology: US
- Yarn weight: DK (light #3) cotton
- Hook: 4.0 mm (US G-6)
- Number of pieces: 6 strips
- Layout: 6 strips side by side, in 1 row
- Strip size: 7 in × 81.5 in (17.8 cm × 207.0 cm)
- Size before border: 42 in × 81.5 in (106.7 cm × 207.0 cm)
- Border depth: 0.5 in (1.3 cm) at the sides and top, 1 in (2.5 cm) at the hem
Materials
Yarn: Choose a smooth DK cotton or cotton blend. It gives crisp stitches and hangs well. Avoid fuzzy yarns, which blur the fans, and very stretchy acrylics, which can stretch over time on a long curtain.
- Dusty Rose: 1,100 g / 2,530 m (twenty-two 50 g balls of about 115 m each)
Each strip uses about 160 g (368 m). The seams and border use about 50 g (115 m). The total above includes a margin for your gauge swatch and for differences in tension. Buy all the yarn from the same dye lot.
Tools:
– 4.0 mm (US G-6) crochet hook
– Tapestry needle
– Locking stitch markers
– Tape measure
– Blocking mats or a large clean sheet, and rust-proof pins
– Spray bottle
– 10–14 curtain clip rings, for hanging
Abbreviations (US Terms)
- ch – chain
- sl st – slip stitch
- sc – single crochet
- dc – double crochet
- sk – skip
- sp(s) – space(s)
- st(s) – stitch(es)
- tch – turning chain
- RS / WS – right side / wrong side
Special stitches:
– V-st: (dc, ch 3, dc) in the same stitch.
– Edge (row start): ch 4 (counts as dc + ch 1), sk the ch-1 sp, dc in the next dc. On Row 2 only, sk 1 st instead of the ch-1 sp.
– Edge (row end): dc in the next dc, ch 1, dc in the 3rd ch of the tch.
Each edge forms a small dc-ch-dc ladder down both long sides of the strip.
Gauge and Checkpoints
Base gauge: 20 dc = 4 in (10.2 cm).
Pattern gauge (blocked): 4 pattern rows (one fan) = 2 in (5.1 cm). One strip is 7 in (17.8 cm) wide.
Test with your first strip rather than a separate swatch. Work Rows 1–10, then pin the strip flat, mist it and let it dry.
- Checkpoint 1 (Row 1): 35 dc measure 7 in (17.8 cm) across.
- Checkpoint 2 (Row 10): the strip is 5 in (12.7 cm) tall after blocking.
- Checkpoint 3 (Row 82): about 41 in (104.1 cm) tall.
- Checkpoint 4 (Row 163): 81.5 in (207.0 cm) tall after blocking.
If Row 1 is wider than 7 in (17.8 cm), go down a hook size. If it is narrower, go up a size. Over 163 rows, a difference of just 0.25 in (0.6 cm) in each fan adds up to about 10 in (25.4 cm), so check row height carefully. If your fans are short, make your dc a little taller instead of adding rows. That keeps the stitch counts the same.
Strip (Make 6)
You work the strip in rows, turning at the end of each row. Row 1 is the RS.
Foundation: Ch 37.
Row 1 (RS): Dc in the 4th ch from the hook (the skipped ch count as 1 dc), dc in each ch across. Turn. (35 dc)
Row 2 (WS, base mesh): Ch 4 (counts as dc + ch 1), sk next st, dc in next st. Ch 3, sk 2 sts, sc in next st. [Ch 5, sk 5 sts, sc in next st] 4 times. Ch 3, sk 2 sts, dc in next st, ch 1, sk next st, dc in top of tch. Turn.
(4 dc, 5 sc, 2 ch-1 sps, 2 ch-3 sps, 4 ch-5 sps)
Count the stitches the row uses: 3 edge sts + 3 + 6 + 6 + 6 + 6 + 2 + 3 edge sts = 35 ✓. The 3rd sc of the row sits on st 18, the exact center of the strip. That sc is where every fan starts.
Fan Repeat (Rows 3–6)
Row 3 (RS, V row): Edge. Ch 3, sc in the ch-3 sp. Ch 5, sc in the next ch-5 sp. Ch 5, sc in the next ch-5 sp. Ch 2, V-st in the center sc. Ch 2, sc in the next ch-5 sp. Ch 5, sc in the next ch-5 sp. Ch 5, sc in the ch-3 sp. Ch 3, edge. Turn.
(4 edge dc, 6 sc, 1 V-st)
Row 4 (WS, fan row): Edge. Ch 3, sk the ch-3 sp, sc in the next ch-5 sp. Ch 5, sc in the next ch-5 sp. Ch 3, sk the ch-2 sp, work 11 dc in the ch-3 sp of the V-st. Ch 3, sk the ch-2 sp, sc in the next ch-5 sp. Ch 5, sc in the next ch-5 sp. Ch 3, sk the ch-3 sp, edge. Turn.
(4 edge dc, 11 fan dc, 4 sc)
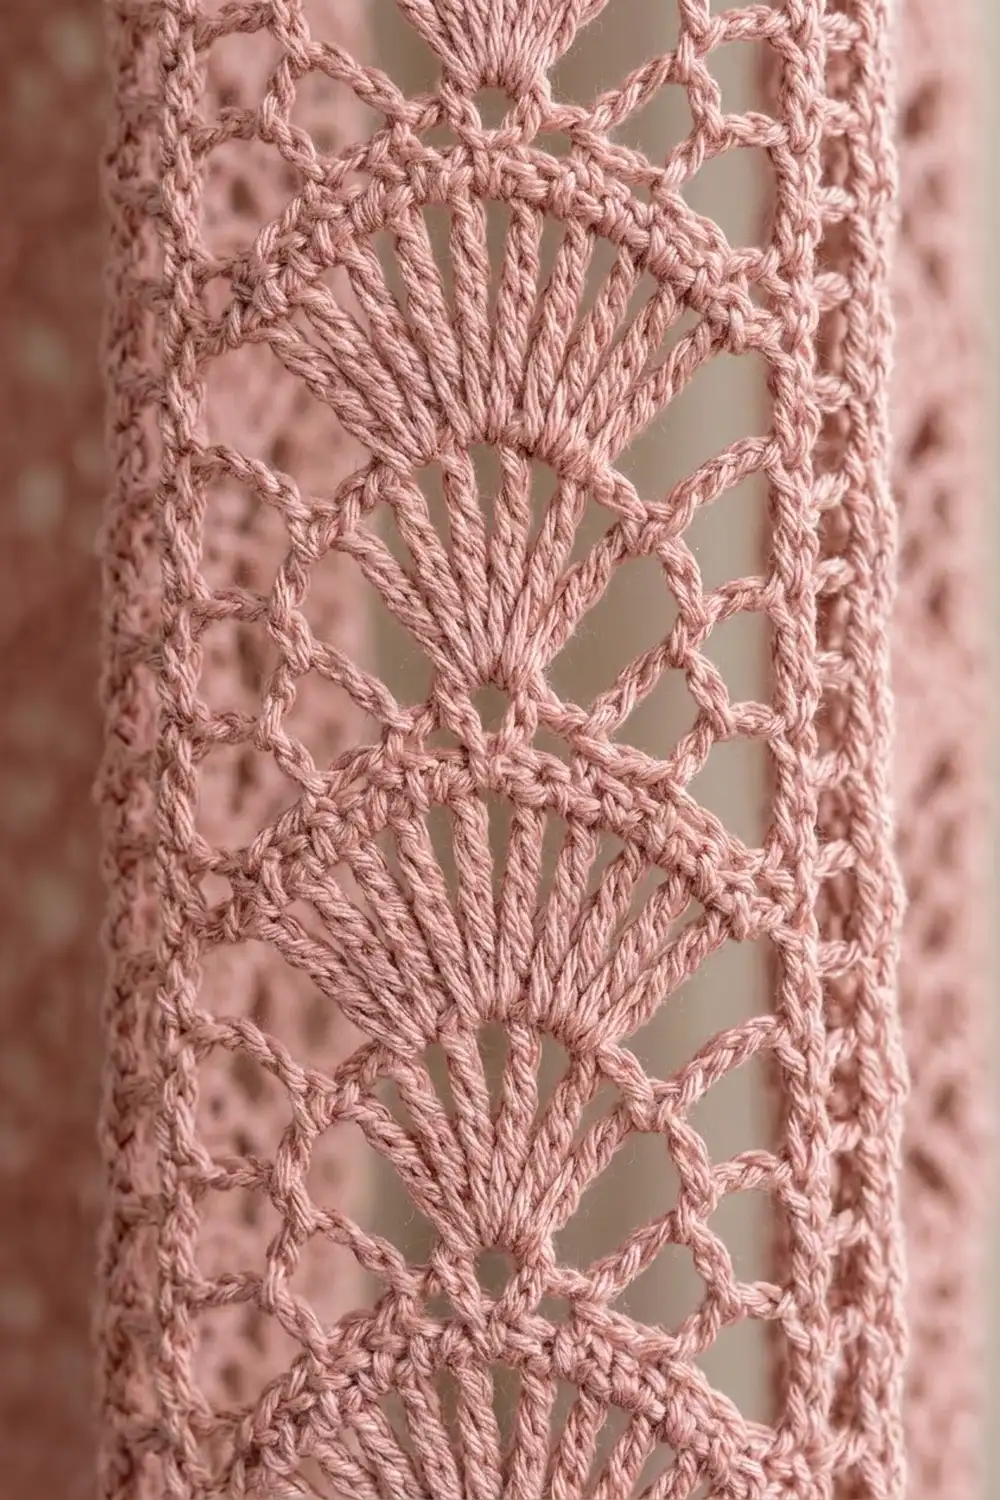
All 11 fan stitches grow out of a single space, so the fan opens upward from one point, as in the photo.
Row 5 (RS, open fan row): Edge. Ch 3, sc in the first ch-3 sp. Ch 5, sc in the ch-5 sp. Ch 3, sc in the ch-3 sp. Ch 1, dc in the first fan dc, [ch 1, dc in the next dc] 10 times, ch 1, sc in the next ch-3 sp. Ch 3, sc in the ch-5 sp. Ch 5, sc in the last ch-3 sp. Ch 3, edge. Turn.
(4 edge dc, 11 fan dc, 12 ch-1 sps in the fan, 6 sc)
Row 6 (WS, arch row): Edge. Ch 3, sk the ch-3 sp, sc in the ch-5 sp. Ch 5, sk the ch-3 sp and the first 2 ch-1 sps, sc in the next ch-1 sp. Ch 5, sk the next 3 ch-1 sps, sc in the next dc (this is the 6th, center fan dc). Ch 5, sk the next 3 ch-1 sps, sc in the next ch-1 sp. Ch 5, sk the next 2 ch-1 sps and the ch-3 sp, sc in the ch-5 sp. Ch 3, sk the ch-3 sp, edge. Turn.
(4 dc, 5 sc, 2 ch-1 sps, 2 ch-3 sps, 4 ch-5 sps)
The four ch-5 loops arch over the fan. The center sc sits on the middle fan dc, so the next fan stacks directly above this one. Row 6 has the same layout as Row 2, so the repeat lines up exactly.
Rows 7–162: Repeat Rows 3–6 another 39 times, for 40 fans in total. End with a Row 6.
Row 163 (RS, closing row): Ch 3 (counts as dc), dc in the ch-1 sp, dc in the next dc. 2 dc in the ch-3 sp. [Dc in the next sc, 5 dc in the next ch-5 sp] 4 times. Dc in the next sc, 2 dc in the ch-3 sp. Dc in the next dc, dc in the ch-1 sp, dc in the 3rd ch of the tch. Fasten off.
(35 dc: 3 + 2 + 24 + 1 + 2 + 3)
The closing row brings the strip back to 35 stitches, matching Row 1. Weave in the ends along the edge ladders, not through the fans.
Make All Pieces
- Dusty Rose: 6 strips, about 160 g (368 m) each.
Before joining, check that every strip has 163 rows and 40 fans. Lay the strips with the RS up and the foundation edges at the bottom:
TOP (Row 163 edges)
| S1 | S2 | S3 | S4 | S5 | S6 |
BOTTOM / HEM (foundation edges)
Joining
Method: Slip-stitch seam on the RS, with the WS of the two strips together. This gives the raised vertical lines seen between the fan columns.
Hold Strip 1 and Strip 2 with their WS together and their hem edges matched. Join the yarn at the hem corner through both layers. Work 2 sl st into each row-end, through the edge dc posts of both strips. Every row has a dc edge, so the stitches line up row for row: 163 rows × 2 = 326 sl st per seam. Fasten off.
Join Strips 3–6 the same way, for 5 seams in total.
Tension: Your slip stitches should be as long as the dc posts they cover. If they are too tight, the seam puckers and pulls the panel shorter than the strips. If you tend to slip stitch tightly, use a hook one size up for the seams.
Checkpoint: Lay the joined panel flat. It should measure 42 in × 81.5 in (106.7 cm × 207.0 cm). The seams add no width, and no stitches are added along the top or bottom.
Border
Border gauge: 5 sc = 1 in (2.5 cm), across both the stitch edges and the row-end edges.
Rnd 1: With the RS facing, join with sc in the top right corner st, working 2 more sc into the same st (3 sc in the corner).
- Top: sc in each of the next 208 sts, 3 sc in the last st (corner).
- Left side: working into the row-ends of Rows 163 to 1, work 2 sc in each odd-numbered row and 3 sc in each even-numbered row. (82 × 2 + 81 × 3 = 407 sc)
- Bottom: 3 sc in the corner st. Sc in each of the next 208 foundation ch, working into the loops on the underside. 3 sc in the last ch (corner).
- Right side: 407 sc into the row-ends, worked the same way.
Sl st to the first sc.
(Top and bottom: 214 sc each including the corner groups. Sides: 407 each. Total: 1,242 sc)
The top edge has 6 strips × 35 sts = 210 sts: 1 corner st + 208 + 1 corner st. The bottom edge works the same way. Seams add no extra stitches.
Rnd 2: Sl st into the next sc (the corner center), ch 1, 3 sc in the same st.
- Top: sc in each of the next 210 sc, 3 sc in the corner center.
- Left side: sc in each of the next 409 sc, 3 sc in the corner center.
- Bottom (scallops): Sk 2 sc, 7 dc in the next sc, sk 2 sc, sc in the next sc. Repeat from * 35 times. Then work 3 sc in the corner center.
- Right side: sc in each of the next 409 sc.
Sl st to the first sc. Fasten off.
(Top: 210 sc. Sides: 409 each. Bottom: 35 scallops = 280 sts. Corners: 4 × 3 = 12. Total: 1,320 sts)
Why the math works: Each side has 1 + 208 + 1 = 210 stitches between the corner centers. Each scallop uses exactly 6 stitches, and 35 × 6 = 210, so the last sc lands right next to the corner. The sides have 1 + 407 + 1 = 409 stitches. At 5 sc per inch, 210 sc = 42 in (106.7 cm) and 407 sc ≈ 81.5 in (207.0 cm), so the border lies flat without stretching or ruffling.
Each scallop is 1.2 in (3.0 cm) wide and about 0.75 in (1.9 cm) deep. Each sc round adds 0.25 in (0.6 cm), which gives a finished size of 43 in × 83 in (109.2 cm × 210.8 cm).
Final Blocking
- Weave in all remaining ends along the edge ladders or the border.
- Soak the panel in cool water with a little wool wash for 15 minutes.
- Press the water out gently. Roll the panel in towels to remove more. Do not wring it.
- Lay it flat on mats or a sheet, RS up.
- Pin the corners to 43 in × 83 in (109.2 cm × 210.8 cm).
- Pin along each seam so it runs straight and the fans line up.
- Pin the point of each scallop to open it slightly.
- Let it dry completely, which takes 24–48 hours. Remove the pins only when it is fully dry.
Final Quality-Control Checklist
- All 6 strips have 40 fans, and the fans line up across the seams.
- Every fan has 11 dc that open from one point.
- The center sc of each arch row sits on the 6th fan dc.
- The seams are straight and slightly raised, with no puckers.
- Rnd 1 has 1,242 sc, and Rnd 2 has 35 scallops along the hem.
- The panel lies flat with square corners at 43 in × 83 in (109.2 cm × 210.8 cm).
Troubleshooting
- Fans lean to one side: you counted the Row 6 skips wrong. Make sure you skip 3 ch-1 sps on each side of the center dc.
- Strip narrows as you go up: the edge ch-4 is too tight. Chain loosely, or use ch 5 in place of ch 4.
- Strips differ in length: block each strip to 81.5 in (207.0 cm) before joining, or count rows again.
- Hem ruffles: the bottom of Rnd 1 has too many stitches. Recount to 214, including the corner groups.
- Sides curl in: you worked too few row-end sc. Check for 407 per side.
- Panel grows longer while hanging: this is normal for cotton lace. Wash and re-block it flat, then dry it flat.
Care
Hand wash in cool water, or machine wash on a delicate cycle inside a large mesh bag. Always dry it flat and reshape it to size before hanging.
Final Notes
Here is the full measurement chain. Thirty-five stitches give a 7 in (17.8 cm) strip. Forty fans plus 3 extra rows give 81.5 in (207.0 cm). Six strips joined with no added stitches make 42 in (106.7 cm). A two-round border brings the panel to 43 in × 83 in (109.2 cm × 210.8 cm).
Check each stage before moving on. Hang the panel with clip rings and enjoy the soft fan pattern against the light.
Happy crocheting!