

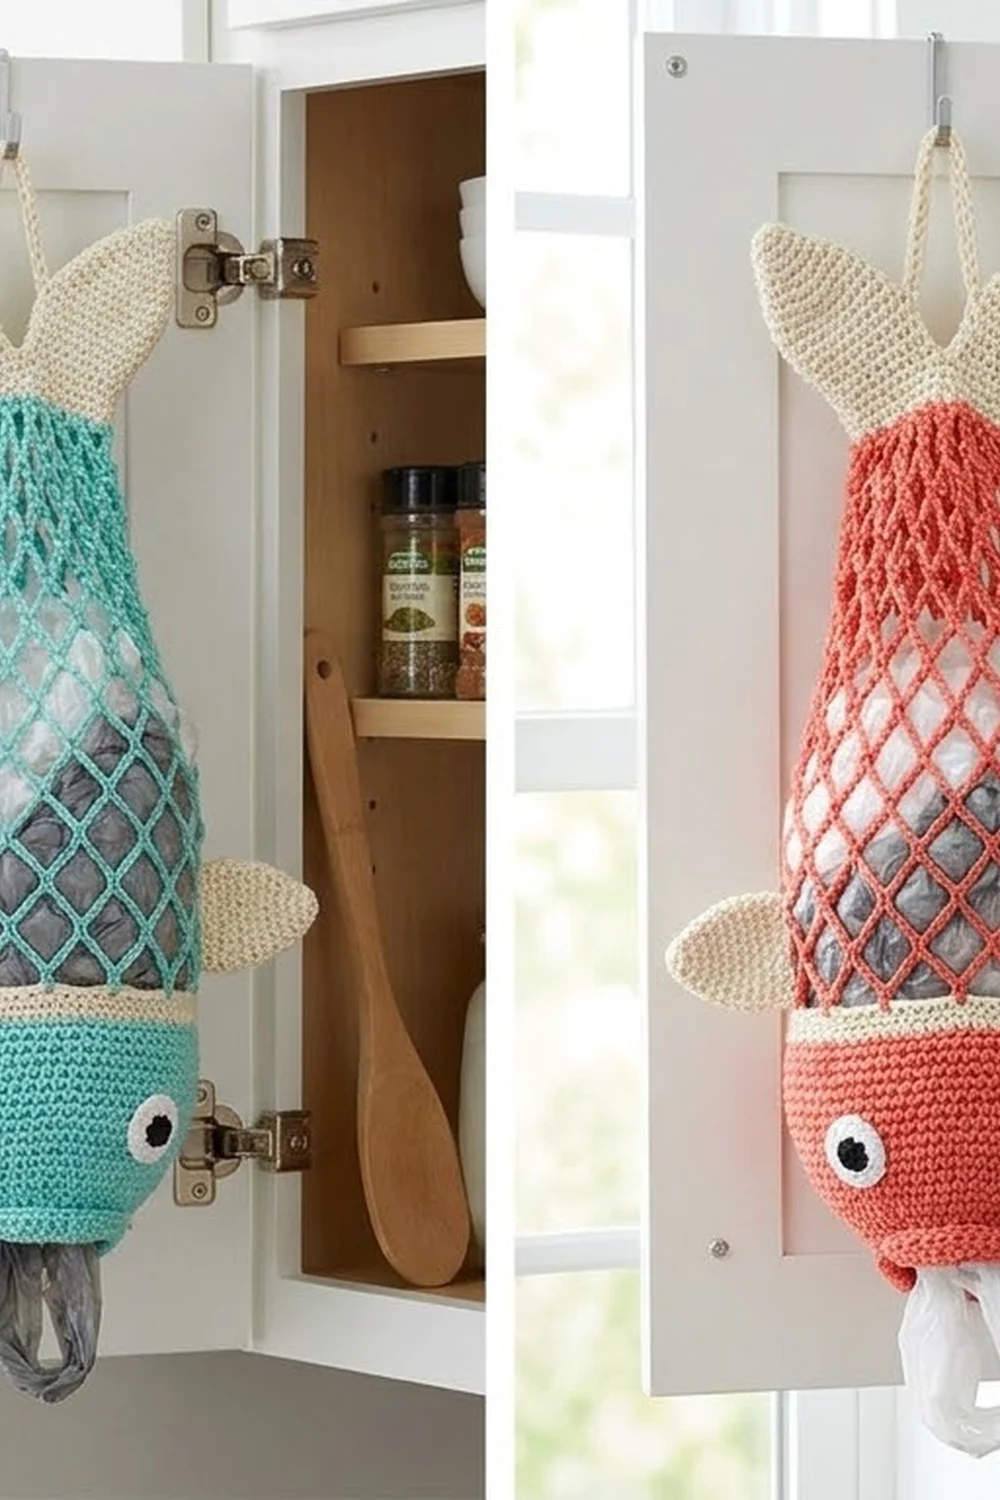
This cheerful fish holds a whole kitchen’s worth of plastic grocery bags. You push used bags in through the open net body, then pull them out one at a time through the small round mouth. It hangs from a cabinet hook by a chain loop between its two tail lobes, so it stays out of the way.
The sample uses coral cotton for the body, cream for the fins, tail and top band, and white and black for the eyes. It looks just as good in aqua, mint or sunny yellow. The style is soft and playful, with a solid, rounded head and an open net body that lets you see when the bags are running low.
The pattern uses US crochet terms. The finished holder is about 6 in (15.2 cm) wide across the head and 21.5 in (54.6 cm) tall from the mouth to the tail tips, not counting the hanging loop.
You work the body as one seamless tube from the mouth up. First comes a solid single-crochet head, then a chain-loop net that narrows by using shorter chains, then a short cream band that you flatten and close at the top. After that you make the fins, tail lobes and eyes separately and sew them on.
Finished Size and Construction
- Finished size: 6 in (15.2 cm) wide x 21.5 in (54.6 cm) tall, plus a 2 in (5.1 cm) hanging loop
- Fin span: 9.5 in (24.1 cm) from fin tip to fin tip
- Skill level: Easy / Advanced Beginner
- Terminology: US
- Yarn weight: Worsted (#4) cotton
- Hook: 5.0 mm (H-8)
- Number of pieces: 7 (1 body, 2 side fins, 2 tail lobes, 2 eyes)
- Layout: Vertical tube with the mouth at the bottom and the tail at the top. Eyes and fins sit on the head, and the tail lobes sit at the top.
- Head circumference: 12 in (30.5 cm), which is 6 in (15.2 cm) laid flat
- Body length before the mouth border: 19 in (48.3 cm)
- Border (mouth rim) depth: 0.25 in (0.6 cm)
Materials
Use smooth worsted-weight cotton or a cotton blend. Cotton holds its shape when the holder is stuffed full and doesn’t stretch out over time. Avoid acrylic that is very slippery or very stretchy, because the net will sag.
- Coral (main color): 90 g / 162 m (177 yd)
- Cream: 20 g / 36 m (39 yd)
- White: 6 g / 11 m (12 yd)
- Black: 3 g / 5 m (5 yd)
Tools:
– 5.0 mm (H-8) crochet hook
– Tapestry needle
– Stitch markers (at least 4)
– Scissors
– Measuring tape
– Rust-proof pins and a blocking mat
All quantities include a margin of about 15% for your gauge swatch and weaving in ends.
Abbreviations (US Terms)
- ch – chain
- sl st – slip stitch
- sc – single crochet
- hdc – half double crochet
- dc – double crochet
- tr – treble crochet
- sk – skip
- inc – 2 sc in the same stitch
- sc2tog – single crochet 2 together
- sp – space
- rep – repeat
- st(s) – stitch(es)
Special stitch: joining loop. In the net rounds, you close each round with a short chain and a dc (or hdc) instead of a full chain loop. That short chain plus the tall stitch equals one chain loop, and it leaves your hook in the middle of that loop, ready for the next round. Every net round therefore has 14 loops: 13 chain loops plus 1 joining loop.
Gauge and Checkpoints
Gauge: 14 sc x 16 rounds = 4 in (10.2 cm), worked in sc in the round.
Work the head (Rounds 1–18) first and use it as your test piece. Check these measurements:
- After Round 1: the mouth ring lies flat at 6 in (15.2 cm) around.
- After Round 6: the piece measures 12 in (30.5 cm) around and 1.5 in (3.8 cm) tall.
- After Round 18: the head measures 6 in (15.2 cm) wide laid flat and 4.5 in (11.4 cm) tall.
If your head is too big, go down one hook size. If it is too small, go up one hook size. Matching the width matters more than matching the height. A head that is too wide makes the net hang loose, and one that is too narrow makes it hard to pull bags through.
Net checkpoints (hanging lightly):
- After Round 25: 7 in (17.8 cm) of net
- After Round 29: another 3.5 in (8.9 cm)
- After Round 33: another 3 in (7.6 cm)
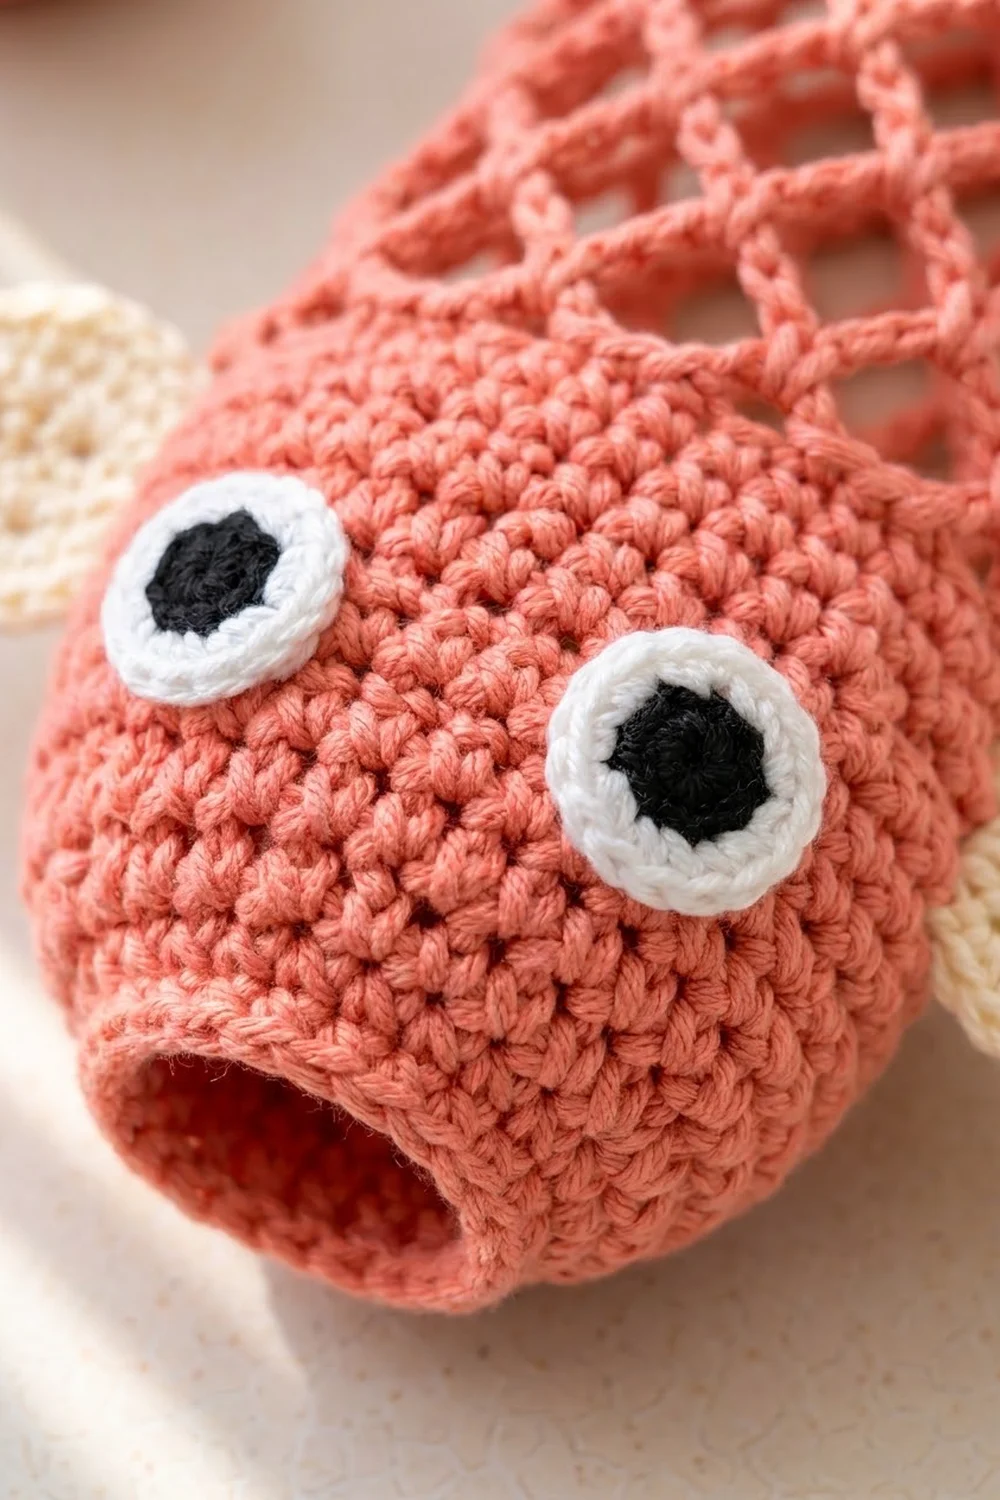
Body (Coral, Worked from the Mouth Up)
Work in continuous rounds for Rounds 1–18. Move a stitch marker to the first stitch of each round as you go.
Round 1: Ch 21 and sl st into the first ch to form a ring, making sure the chain isn’t twisted. Ch 1, then sc in each ch around. (21 sc)
Round 2: (Sc in next 2 sts, inc) 7 times. (28 sc) The piece now measures 8 in (20.3 cm) around.
Round 3: Sc in each st around. (28 sc)
Round 4: (Sc in next 3 sts, inc) 7 times. (35 sc) The piece now measures 10 in (25.4 cm) around.
Round 5: Sc in each st around. (35 sc)
Round 6: (Sc in next 4 sts, inc) 7 times. (42 sc)
Rounds 7–18: Sc in each st around. (42 sc in each round) Twelve straight rounds give the head its rounded dome shape. At the end of Round 18, sl st into the next st.
Head check: 6 in (15.2 cm) wide laid flat and 4.5 in (11.4 cm) tall.
Net Section
Round 19 (setup): Ch 1, sc in the same st. Ch 5, sk 2 sts, sc in next st; rep from * 12 more times. Ch 2, sk the last 2 sts, and dc in the first sc. (14 loops)
Stitch check: 1 sc + (13 repeats x 3 sts) + 2 skipped sts = 42 sts. Every head stitch is used, so the net spreads evenly around the head.
Rounds 20–25: Ch 5, sc in next ch-5 loop; rep from * 12 more times. Ch 2, dc in the top of the joining dc. (14 loops in each round)
Rounds 26–29: Ch 4, sc in next loop; rep from * 12 more times. Ch 1, dc in the top of the joining stitch. (14 loops in each round)
Rounds 30–33: Ch 3, sc in next loop; rep from * 12 more times. Ch 1, hdc in the top of the joining stitch. (14 loops in each round)
The shorter chains narrow the tube gradually without changing the number of loops, so the diamond pattern stays even all the way up. Fasten off coral.
Cream Top Band
Round 34 (conversion round): Join cream around the post of the joining hdc. Work 2 sc around that post, then 2 sc in each of the remaining 13 ch-3 loops. (2 + 26 = 28 sc)
Round 35: Sc2tog 14 times. (14 sc)
Round 36: Sc in each st around. (14 sc) The band is now 4 in (10.2 cm) around, which is 2 in (5.1 cm) laid flat.
Close the top: Flatten the band so 7 stitches sit in front and 7 in back, lined up with the eyes’ center line, which runs front to back. Ch 1, then sc through both layers 7 times. (7 sc)
Hanging loop: Ch 15, sl st into the 4th sc of the top row (the center stitch), then work 15 sl sts back along the chain to make a firm loop. Fasten off. The loop stands about 2 in (5.1 cm) tall.
Body check: 19 in (48.3 cm) from the mouth to the top seam.
Side Fins (Cream, Make 2)
Ch 8.
Round 1: Sc in the 2nd ch from the hook, hdc in next ch, dc in next 2 ch, hdc in next 2 ch, sc in last ch. (7 sts) Ch 2 to form the tip. Rotate the piece and work along the free loops of the foundation chain: sc in first ch, hdc in next 2 ch, dc in next 2 ch, hdc in next ch, sc in last ch. (7 sts) Sl st into the first sc. (14 sts + the ch-2 tip)
Round 2: Ch 1, sc in next 7 sts, 3 sc in the ch-2 tip, sc in next 7 sts. (7 + 3 + 7 = 17 sc) Sl st to join. Fasten off, leaving a 12 in (30.5 cm) tail for sewing.
Each fin measures 2.25 x 1.25 in (5.7 x 3.2 cm).
Tail Lobes (Cream, Make 2)
Ch 11.
Round 1: Sc in the 2nd ch from the hook, hdc in next ch, dc in next 2 ch, tr in next 2 ch, dc in next 2 ch, hdc in next ch, sc in last ch. (10 sts) Ch 2 to form the tip. Working along the free loops of the foundation chain, work the same stitches in reverse order: sc, hdc, 2 dc, 2 tr, 2 dc, hdc, sc. (10 sts) Sl st into the first sc. (20 sts + the ch-2 tip)
Round 2: Ch 1, sc in next 10 sts, 3 sc in the ch-2 tip, sc in next 10 sts. (10 + 3 + 10 = 23 sc) Sl st to join. Fasten off, leaving a long tail for sewing.
Each lobe measures 3.25 x 1.75 in (8.3 x 4.4 cm). The tr stitches in the middle give the lobe a wide, curved leaf shape.
Eyes (Make 2)
Round 1 (black): Make a magic ring and work 6 sc into it. (6 sc) Pull the ring tight.
Round 2 (switch to white): 2 sc in each st around. (12 sc)
Round 3: (Sc in next st, inc) 6 times. (18 sc) Sl st to join. Fasten off, leaving a tail for sewing.
Each eye is 1.25 in (3.2 cm) across.
Make All Pieces
- Coral: 1 body
- Cream: 2 side fins, 2 tail lobes (the top band and hanging loop are part of the body)
- White and black: 2 eyes
Placement map (front view, mouth at the bottom):
        \  o  /      <- tail lobes + loop (cream)
        [=====]      <- cream band, top seam
        |<><>|      <- net, narrowing
       |<><><>|
      |<><><><>|
   <( |  O  O  | )>  <- fins on Rnds 14–17, eyes on Rnds 10–14
      |________|
         (  )        <- mouth (Rnd 1)
Joining (Sewing the Appliqués On)
Method: Whipstitch each piece on with its own yarn tail, working through the back loops of the appliqué’s last round and into the head stitches underneath.
Eyes: Center the eyes over Rounds 10–14, with their centers 2 in (5.1 cm) apart. Sew one stitch of the eye’s outer round to each body stitch it covers. That works out to about 18 small whipstitches per eye.
Fins: Fold 0.25 in (0.6 cm) at the base of each fin. Sew it to the side fold of the head over Rounds 14–17, with the tip angled outward and slightly upward. That’s 4 rounds of anchoring, about 1 stitch per round on each face.
Tail lobes: Overlap the base of each lobe 0.5 in (1.3 cm) behind the top seam, one lobe on each side of the hanging loop. Angle each lobe about 45° outward so the tips rise 2.25 in (5.7 cm) above the seam.
Tension: Pull each stitch snug but not tight. If an appliqué cups or puckers, your stitches are too tight.
Size checkpoint: The tail tips sit 21.5 in (54.6 cm) above the mouth, and the fin span is 9.5 in (24.1 cm).
Border: Mouth Rim
The mouth is round, so this border has no corners or sides. Its count is tied to the 21 stitches of Round 1.
Border gauge: same as the body, 14 sc = 4 in (10.2 cm).
Border Round 1: With the mouth facing you, join coral in any free loop of the foundation chain. Ch 1, then sc in each free loop around. (21 sc) Sl st to join.
Border Round 2: Sl st in each sc around. (21 sl sts) Fasten off.
Why the math works: Round 1 was 21 stitches, and the border works exactly 1 stitch into each of them, with no increases or decreases. The rim stays 6 in (15.2 cm) around, so it won’t ruffle or pull in. The slip-stitch round firms up the edge so bags slide out cleanly. The border adds 0.25 in (0.6 cm), bringing the body from 19 in (48.3 cm) to 19.25 in (48.9 cm). The tail lobes rise another 2.25 in (5.7 cm) above that, for 21.5 in (54.6 cm) in total.
Final Blocking
- Weave in all ends, running each one back through solid sc stitches rather than the net.
- Lightly mist the whole piece with water.
- Lay it flat, pinning the head to 6 in (15.2 cm) wide.
- Gently stretch the net lengthwise and pin it so the diamonds open evenly.
- Pin the fins and tail lobes flat at their tips.
- Let it dry completely, then unpin it and hang it up.
Final Quality-Control Checklist
- The head measures 6 in (15.2 cm) wide and 4.5 in (11.4 cm) tall.
- Every net round has 14 loops.
- The cream band has 14 sc, and the top seam has 7 sc.
- The eyes are level and 2 in (5.1 cm) apart.
- The fins match in angle and height.
- The tail lobes form an even V around the hanging loop.
- The mouth rim lies flat at 6 in (15.2 cm) around.
- The total height is 21.5 in (54.6 cm).
Troubleshooting
- The net twists to one side: This is normal for continuous rounds. Block it straight, or start each round in the joining loop exactly as written.
- You have 13 or 15 loops: Recount the setup round. You should have 1 sc, 13 repeats, and 2 skipped stitches.
- The mouth is too tight for bags: Undo the slip-stitch round and leave the sc round as the border.
- The fins flop down: Sew them across all 4 rounds, not just 1 or 2.
- The eyes cup: Add 1 more inc in Round 3, or block the eyes flat before sewing.
Care
Hand wash in cool water and lay flat to dry. Reshape the net while it is damp.
Final Notes
Each stage depends on the one before it. A 21-stitch mouth grows to a 42-stitch head that is 6 in (15.2 cm) wide. Those 42 stitches divide evenly into 14 net loops, and the loops narrow over 15 rounds to a 28-stitch cream band. The band decreases to 14 stitches and closes as 7 stitches across the top. If each checkpoint matches, the finished fish will measure 21.5 in (54.6 cm) tall. Make one in every kitchen color you love.
Happy crocheting!