

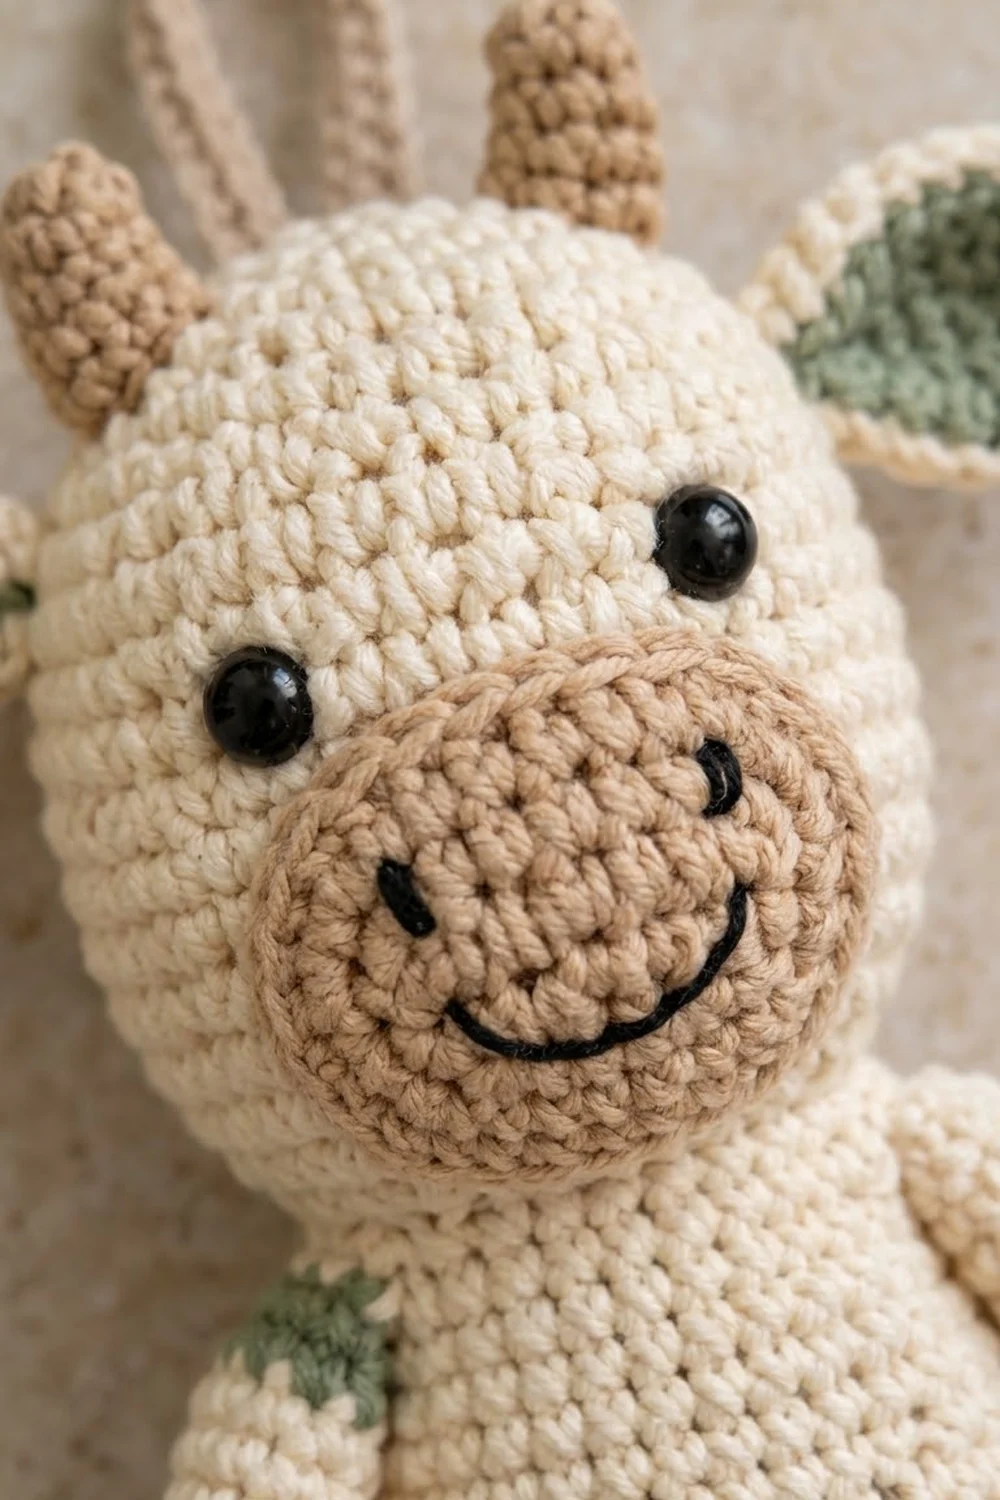
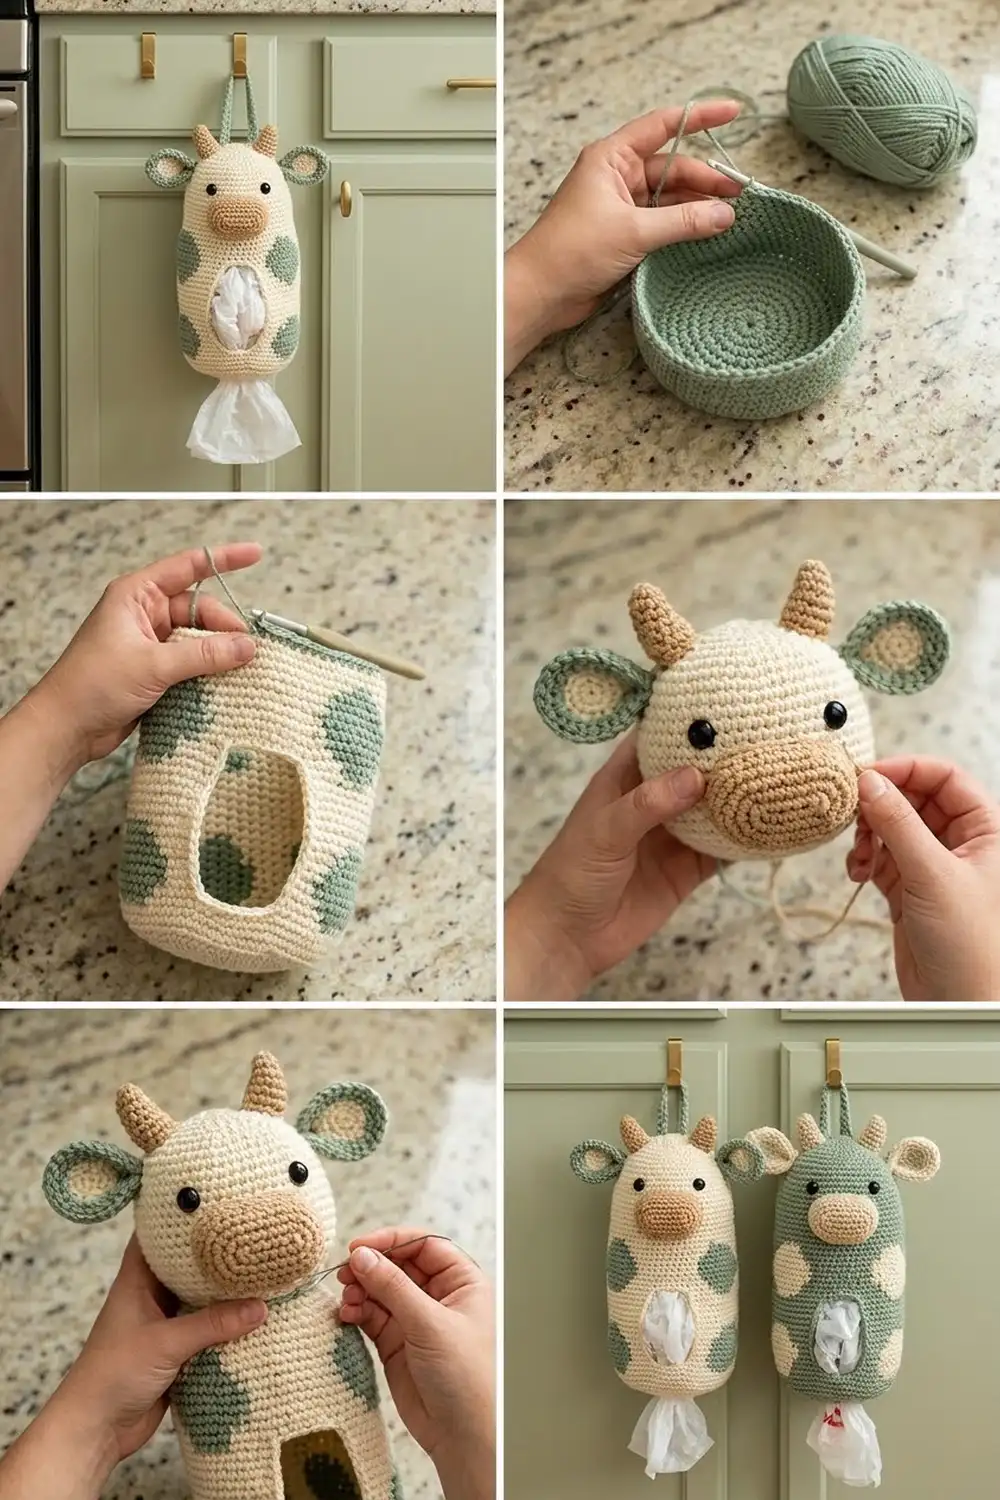
This cow keeps plastic grocery bags tidy and makes a kitchen cabinet door look friendlier. You stuff bags in through the tall front window and pull them out one at a time from the small opening at the bottom, between the cow’s legs.
The main color is soft cream. The spots, hooves and hands are sage green, and the muzzle and horns are light tan. For the reversed version, make the body and head in sage and the spots in cream.
This pattern uses US crochet terms. The finished holder is about 5 in (12.7 cm) wide across the body and about 17 in (43.2 cm) tall from hooves to the top of the head. With the hanging loop, it’s 18.5 in (47.0 cm) tall.
You work the body as one tube from the bottom up in joined rounds. You work the window section in turned rows, then close it back into rounds. You make the head and small parts separately and sew everything together at the end.
Finished Size and Construction
- Finished size: 5 in (12.7 cm) wide x 17 in (43.2 cm) tall; 18.5 in (47.0 cm) with the loop
- Skill level: Intermediate
- Terminology: US
- Yarn weight: #4 worsted, cotton or cotton blend
- Hook: 4.0 mm (G-6)
- Number of pieces: 20 (body, head, muzzle, 2 ears, 2 horns, 2 arms, 2 legs, 8 spots, loop)
- Layout: one vertical hanging holder
- Body tube: 5 in (12.7 cm) wide when flat x 13 in (33.0 cm) tall
- Window size before border: 2.5 in (6.4 cm) wide x 8 in (20.3 cm) tall
- Border depth: 1 round of sc, about 0.25 in (0.6 cm)
Materials
Cotton or a cotton-acrylic blend holds its shape best and won’t snag on bags. Choose a smooth yarn so the spots and face show up clearly. The amounts below assume about 180 m per 100 g.
- Cream (MC): 130 g / 234 m
- Sage green (CC): 25 g / 45 m
- Light tan (TC): 10 g / 18 m
- Black yarn or embroidery floss: about 1 m, for the smile
Tools:
- 4.0 mm (G-6) hook
- 2 black safety eyes, 10 mm
- About 30 g of polyester fiberfill
- Tapestry needle
- Stitch markers
- Rust-proof pins
- Tape measure
All quantities include about a 15% margin.
Abbreviations (US Terms)
- ch: chain
- sl st: slip stitch
- sc: single crochet
- hdc: half double crochet
- dc: double crochet
- inc: 2 sc in the same stitch
- dec: sc 2 together (the invisible decrease is recommended)
- MR: magic ring
- BLO: back loop only
- st(s): stitch(es)
Joined round: At the end of each body round, sl st to the first sc. Start the next round with ch 1 (this ch doesn’t count as a stitch). Joined rounds keep the window straight above the bottom opening. Spiral rounds would make the tube twist.
Gauge and Checkpoints
Gauge: 16 sc x 18 rounds = 4 in (10.2 cm).
Test your gauge on the body itself: work Rounds 1–11, flatten the tube and measure.
- After Round 1: the bottom ring measures 6 in (15.2 cm) around.
- After Round 11: the tube is 5 in (12.7 cm) wide when flat and about 2 in (5.1 cm) tall.
- After Row 47: the window section is 8 in (20.3 cm) tall.
- After Round 60: the body is about 13 in (33.0 cm) tall.
If the tube is wider than 5 in (12.7 cm), go down 0.5 mm in hook size. If it’s narrower, go up 0.5 mm. If stuffing shows through the head, use a hook 0.5 mm smaller for the head only.
Body (Make 1)
Use MC throughout.
Bottom opening and base
- Rnd 1: Ch 24 and sl st to the first ch to form a ring, without twisting. Ch 1, sc in each ch, then join. (24 sts)
- Rnd 2: *Sc 2, inc*; repeat from * 8 times, then join. (32 sts)
- Rnd 3: *Sc 3, inc*; repeat from * 8 times, then join. (40 sts)
- Rnds 4–11: Sc in each st, then join. (40 sts)
Rounds 1–3 make a flat ring around the bottom opening. From Round 4, the tube rises straight up.
Window section
Flatten the tube so that the last 10 sts of Round 11 sit centered on the front. Mark the front.
- Row 12: Ch 1, sc in the first 30 sts, then turn. Leave the last 10 sts unworked; they form the bottom edge of the window. (30 sts)
- Rows 13–47: Ch 1, sc in each st, then turn. (30 sts; 36 window rows in total)
The opening now measures 2.5 in (6.4 cm) wide x 8 in (20.3 cm) tall.
Close the window
- Rnd 48: Ch 1, sc in each of the 30 sts, ch 10, then sl st to the first sc. (30 sc + 10 ch)
- Rnd 49: Ch 1, sc in each of the 30 sc, then sc in each of the 10 ch. Join. (40 sts)
- Rnds 50–56: Sc in each st, then join. (40 sts)
Rounds 48–56 add 9 rounds, about 2 in (5.1 cm) of solid body above the window.
Top shaping
- Rnd 57: *Sc 3, dec*; repeat 8 times. (32 sts)
- Rnd 58: *Sc 2, dec*; repeat 8 times. (24 sts)
- Rnd 59: *Sc 1, dec*; repeat 8 times. (16 sts)
- Rnd 60: Dec 8 times. (8 sts)
Fasten off, leaving a 6 in (15.2 cm) tail. Thread the tail through the front loops of the last 8 sts, pull it closed and secure it. Don’t stuff the body.
Head (Make 1)
Use MC. Work in continuous spiral rounds and mark the first st of each round.
- Rnd 1: 6 sc in MR. (6)
- Rnd 2: Inc 6 times. (12)
- Rnd 3: *Sc 1, inc*; repeat 6 times. (18)
- Rnd 4: *Sc 2, inc*; repeat 6 times. (24)
- Rnd 5: *Sc 3, inc*; repeat 6 times. (30)
- Rnd 6: *Sc 4, inc*; repeat 6 times. (36)
- Rnd 7: *Sc 5, inc*; repeat 6 times. (42)
- Rnds 8–15: Sc in each st. (42)
Insert the safety eyes between Rounds 11 and 12, 7 sts apart.
- Rnd 16: *Sc 5, dec*; repeat 6 times. (36)
- Rnd 17: *Sc 4, dec*; repeat 6 times. (30)
- Rnd 18: *Sc 3, dec*; repeat 6 times. (24)
Stuff the head firmly.
- Rnd 19: *Sc 2, dec*; repeat 6 times. (18)
- Rnd 20: *Sc 1, dec*; repeat 6 times. (12)
- Rnd 21: Dec 6 times. (6)
Finish stuffing, close the opening and fasten off. The head should measure about 3.5 in (8.9 cm) across.
Muzzle (Make 1)
Use TC.
- Rnd 1: Ch 7. Starting in the 2nd ch from the hook, sc in the next 5 ch, then work 3 sc in the last ch. Working along the other side of the chain, sc 4, then 2 sc in the last ch. (14)
- Rnd 2: Inc, sc 4, inc 3 times, sc 4, inc 2 times. (20)
- Rnd 3: *Sc 1, inc*, sc 4, *sc 1, inc* 3 times, sc 4, *sc 1, inc* 2 times. (26)
- Rnd 4: Sc in each st. (26)
Fasten off, leaving a long tail. The muzzle should measure 2.25 in (5.7 cm) x 1.5 in (3.8 cm). With black yarn, backstitch a smile about 1 in (2.5 cm) wide across the center.
Ears (Make 2)
- Rnd 1 (CC): Ch 7. Starting in the 2nd ch from the hook, work sc, hdc, dc, dc, hdc. In the last ch, work (sc, ch 2, sc). Working along the other side of the chain, work hdc, dc, dc, hdc, sc. Sl st to the first sc and fasten off CC. (12 sts + ch-2 tip)
- Rnd 2 (MC): Join MC in the first st with ch 1. Sc in the next 6 sts, work (sc, ch 1, sc) in the ch-2 tip space, then sc in the next 6 sts. Sl st to the first sc. (14 sc + ch-1 tip)
Fasten off, leaving a tail. Each ear is a sage leaf shape with a cream rim, about 2 in (5.1 cm) x 1.25 in (3.2 cm).
Horns (Make 2)
Use TC.
- Rnd 1: 4 sc in MR. (4)
- Rnd 2: *Sc 1, inc*; repeat 2 times. (6)
- Rnds 3–5: Sc in each st. (6)
Stuff lightly and fasten off, leaving a tail. Each horn is about 1.25 in (3.2 cm) tall.
Arms (Make 2)
- Rnd 1 (CC): 6 sc in MR. (6)
- Rnd 2: *Sc 2, inc*; repeat 2 times. (8)
- Rnd 3: Sc in each st. (8) Change to MC.
- Rnds 4–9 (MC): Sc in each st. (8)
Stuff only the tip. Flatten the arm and work 4 sc across the top through both layers. Fasten off, leaving a tail. Each arm is about 2 in (5.1 cm) long.
Legs (Make 2)
- Rnd 1 (CC): 6 sc in MR. (6)
- Rnd 2: Inc 6 times. (12)
- Rnd 3: Sc in the BLO of each st. (12)
- Rnd 4: Sc in each st. (12) Change to MC.
- Rnds 5–8 (MC): Sc in each st. (12)
Stuff lightly. Flatten the leg and work 6 sc across the top through both layers. Each leg is about 1.75 in (4.4 cm) long and 1.5 in (3.8 cm) wide.
Spots and Loop
Large spot (make 3, CC):
- Rnd 1: Ch 5. Starting in the 2nd ch from the hook, sc in the next 3 ch, then work 3 sc in the last ch. Working along the other side, sc 2, then 2 sc in the last ch. (10)
- Rnd 2: Inc, sc 2, inc 3 times, sc 2, inc 2 times. (16)
- Rnd 3: *Sc 1, inc*, sc 2, *sc 1, inc* 3 times, sc 2, *sc 1, inc* 2 times. (22)
Each large spot is about 2 in (5.1 cm) x 1.5 in (3.8 cm).
Medium spot (make 3, CC): Work Rounds 1–2 of the large spot. (16) Each is about 1.5 in (3.8 cm) x 1 in (2.5 cm).
Small spot (make 2, CC): Work 6 sc in MR, then inc 6 times. (12) Each is about 1 in (2.5 cm) across.
Loop (MC): Ch 13. Sc in the 2nd ch from the hook and in each ch across. (12) The strip is 3 in (7.6 cm) long.
Make All Pieces
Before you start sewing, check that you have every piece:
- MC: 1 body, 1 head and 1 loop, plus the MC sections of the ears, arms and legs
- CC: 3 large, 3 medium and 2 small spots, plus the ear centers and the arm and leg tips
- TC: 1 muzzle and 2 horns
Front view:
              [loop]
          [horn]  [horn]
 [ear]   (  o  HEAD  o  )   [ear]
              [muzzle]
 [arm]   |   BODY TOP   |   [arm]
         |  .--------.  |
   (spot)|  | WINDOW |  |(spot)
         |  |        |  |
         |  '--------'  |
         |  bottom ring |
             [leg][leg]
Joining
Whipstitch every piece with its matching tail. Work one stitch into each edge stitch of the piece and one into the body fabric beneath it. Pull each stitch snug enough to close gaps, but not so tight that the fabric puckers.
- Spots: Pin the spots to the sides and back, at least 0.5 in (1.3 cm) from the window. Let one large spot wrap around each side. Work one whipstitch per edge st: 22 for a large spot, 16 for a medium and 12 for a small.
- Head: Center the head on the closed top so it covers Rounds 55–60. Sew around a circle of about 24 head sts.
- Muzzle: Pin the muzzle over head Rounds 12–17, below the eyes. Sew around all 26 edge sts, adding a little stuffing before you close it.
- Ears: Pinch each ear base in half and sew the ears to the sides of the head at Rounds 7–8.
- Horns: Sew the horns to the top of the head at Rounds 4–5, 6 sts apart.
- Arms: Sew the 4 closing sts of each arm to the sides of the body at Round 52.
- Legs: Sew the 6 closing sts of each leg to the front of Round 4, 1 in (2.5 cm) apart, so the legs hang below the bottom opening.
- Loop: Fold the strip in half and sew both ends to the top center of the head.
Size checkpoint: Hang up the holder. It should measure about 17 in (43.2 cm) from hooves to head, or 18.5 in (47.0 cm) including the loop.
Border: Window Edging
Border gauge: 4 sc per 1 in (2.5 cm), the same as the body gauge.
Join MC at the bottom right corner of the window and work 1 round of sc:
- Bottom edge: Sc in each of the 10 unworked sts of Round 11. (10)
- First side: *Sc in each of the next 8 row ends, skip 1 row end*; repeat 4 times. (32)
- Top edge: Sc in the free loop of each of the 10 ch from Round 48. (10)
- Second side: Work as for the first side. (32)
Sl st to the first sc. Total: 84 sc. Fasten off and weave in the ends.
Why the math works: The top and bottom edges each have 10 sts, which is 2.5 in (6.4 cm) at 4 sc per inch. Each side has 36 row ends over 8 in (20.3 cm), and 8 in at 4 sc per inch needs 32 sc. Skipping 1 row end in every 9 gives exactly 32, so the edge stays flat instead of wavy. With the edging in place, the opening measures about 2 in (5.1 cm) x 7.5 in (19.1 cm).
Final Blocking
- Lightly mist the body tube with water.
- Slide a rolled towel or a cardboard strip 5 in (12.7 cm) wide into the tube.
- Straighten the window edging and pin its corners into gentle curves.
- Let the body dry completely, then remove the insert.
- Shape the ears with your fingers and press the spots flat.
Keep heat away from the safety eyes.
Final Quality-Control Checklist
- The body is 5 in (12.7 cm) wide when flat and 13 in (33.0 cm) tall.
- The window is centered on the front, with exactly 84 sc in the edging.
- A bag pulls easily through the bottom opening.
- The eyes are locked in place, level and 7 sts apart.
- The spots lie flat with no gaps at the edges.
- All parts are sewn securely and all ends are woven in.
- The loop holds the holder’s weight when it’s full of bags.
Troubleshooting
- The tube twists: Use joined rounds, not spiral rounds.
- The window edge ruffles: Skip one extra row end on each side.
- The window edge pulls tight: Skip fewer row ends, keeping both sides equal.
- Bags won’t come out: Start with ch 28. Work Rnd 2 as *sc 6, inc* 4 times (32) and Rnd 3 as *sc 7, inc* 4 times (40).
- The head flops forward: Add more stuffing and sew a second circle of stitches farther back on the head.
- Stuffing shows through: Remake the head with a hook 0.5 mm smaller.
Care
Spot clean, or hand wash in cool water, then reshape and dry flat. Because of the safety eyes and small parts, this is a decor item, not a toy for small children.
Final Notes
Each measurement builds on the one before it:
- A gauge of 16 sc per 4 in (10.2 cm) gives a 40-st tube 5 in (12.7 cm) wide.
- A 10-st gap and 36 rows give a window 2.5 in (6.4 cm) x 8 in (20.3 cm).
- The 84-sc edging matches that opening, and the body finishes at 13 in (33.0 cm) tall.
- With the head, legs and loop added, the holder measures 18.5 in (47.0 cm).
Check each stage as you go and your cow will hang straight.
Happy crocheting!