

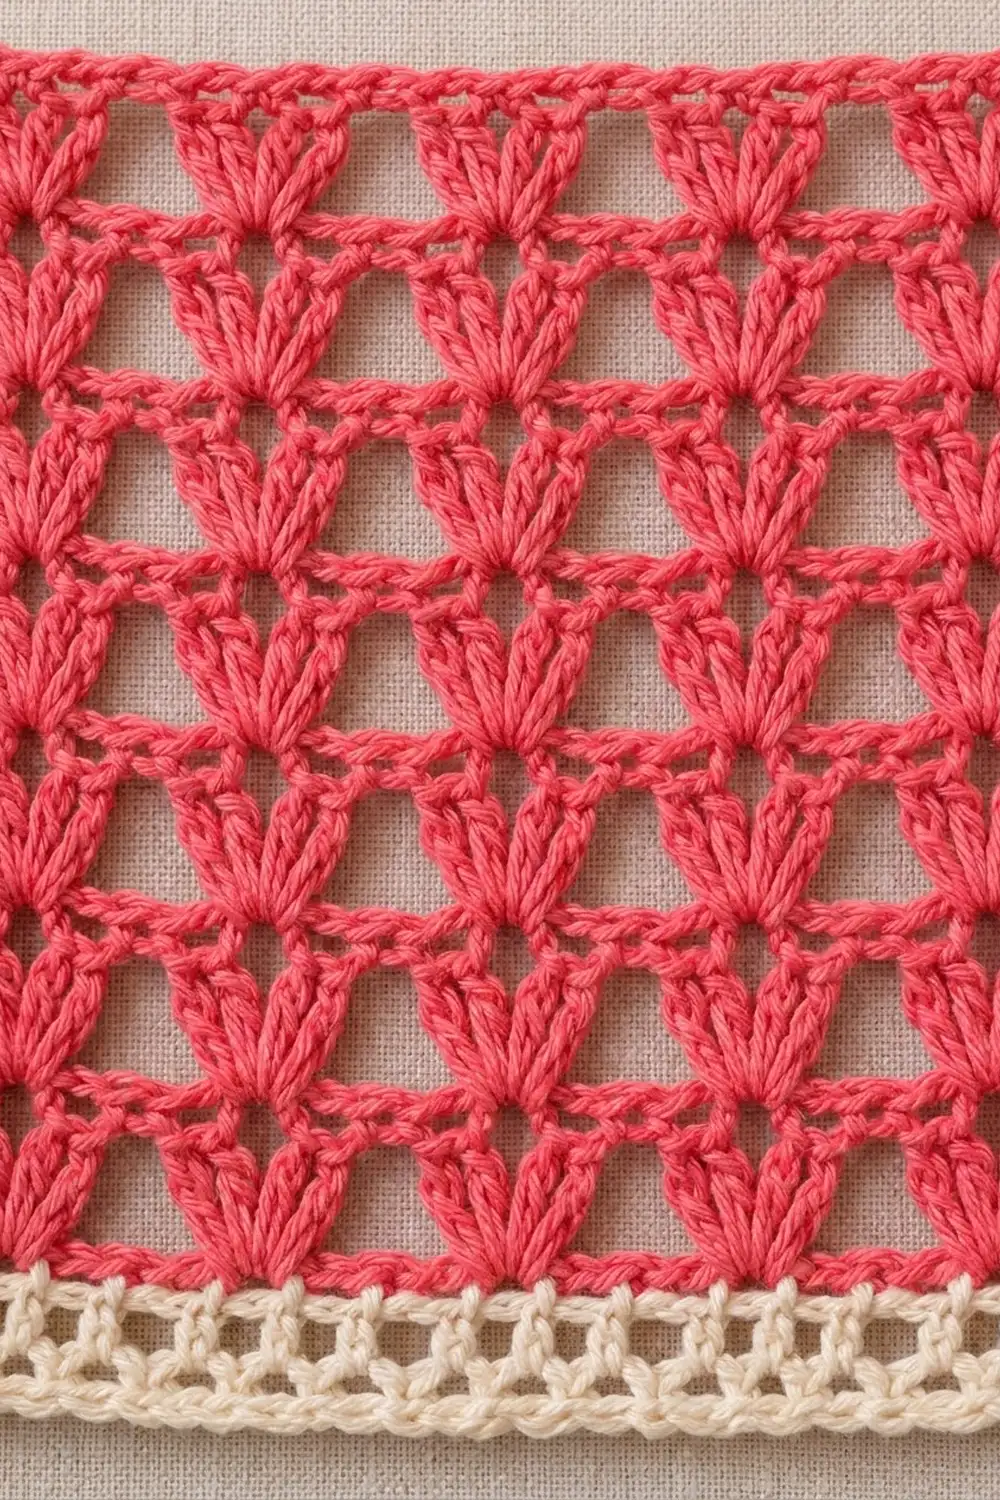
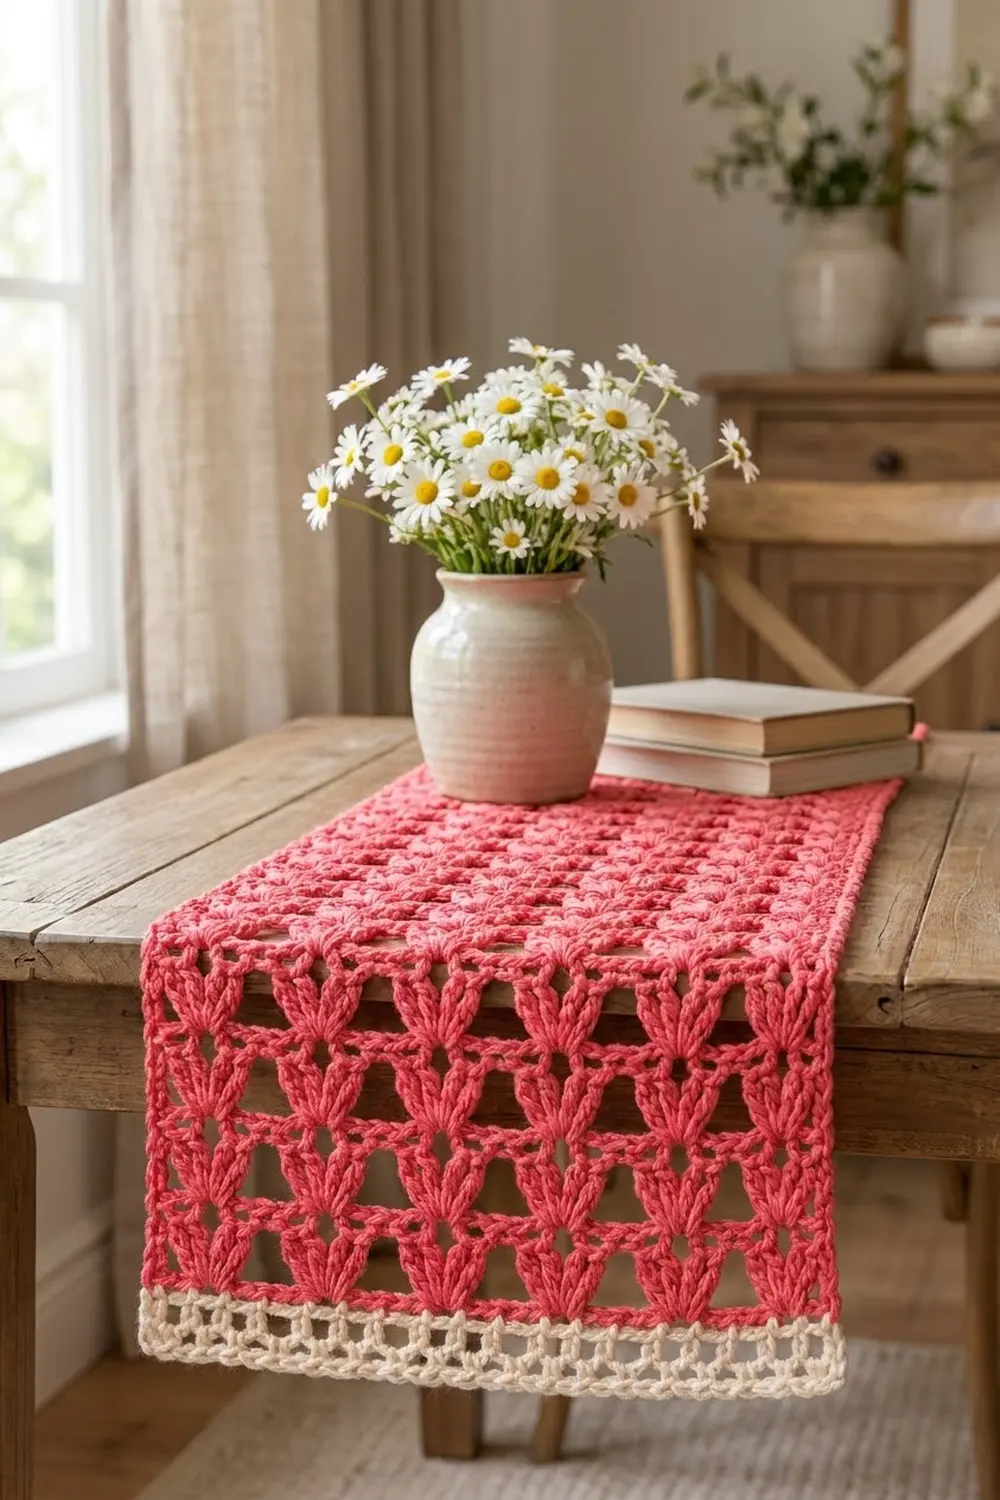
The Coral Tulip Lace Panel is a bright, airy rectangle made of stacked fan stitches. Each fan starts from a single point and opens upward like a tulip. A flat bar of single crochet caps every fan, and the small gaps between the fans become neat triangular windows. The look is structured but light.
Two colors carry the design. A warm coral pink forms the whole lace body, and a soft cream makes a crisp mesh band along the bottom edge. The contrast band gives the panel a clean finished “hem,” the kind you see on lace curtains and bedspreads.
This pattern uses US crochet terms throughout. The finished panel measures 10 in (25.4 cm) wide by 10.5 in (26.7 cm) tall after blocking.
Construction is simple. You crochet one flat piece in turned rows: a single crochet foundation row, then a two-row repeat of fan row and bar row, worked nine times. To finish, you join cream yarn to the foundation edge and work three border rows along the bottom only. Nothing is sewn or joined.
Finished Size and Construction
- Finished size: 10 in (25.4 cm) wide × 10.5 in (26.7 cm) tall
- Skill level: Easy–Intermediate
- Terminology: US crochet terms
- Yarn weight: DK (light worsted, category 3), cotton or cotton blend
- Hook: 4.0 mm (US G-6)
- Number of pieces: 1
- Layout: single flat rectangle worked in turned rows
- Piece size before border: 10 in (25.4 cm) wide × 9.25 in (23.5 cm) tall
- Border: cream band on the bottom edge only, 1.25 in (3.2 cm) deep
- Stitch count across: 49 stitches on every row
Materials
Yarn: Use a smooth DK-weight cotton or cotton blend so the fans show clearly. Fuzzy or very loose-plied yarns blur the triangles. Mercerized cotton gives the sharpest look.
- Coral pink (main color, MC): 40 g / 88 m
- Cream (contrast color, CC): 10 g / 22 m
These amounts include a margin of about 15% for your gauge swatch and weaving in ends.
Tools:
- 4.0 mm (US G-6) crochet hook
- Tapestry needle
- Scissors
- Stitch markers (2–3)
- Measuring tape or ruler
- Blocking mat and rust-proof pins
- Spray bottle with clean water
Abbreviations (US Terms)
- ch – chain
- sc – single crochet
- dc – double crochet
- sl st – slip stitch
- st(s) – stitch(es)
- sp – space
- sk – skip
- RS / WS – right side / wrong side
- MC / CC – main color / contrast color
Special stitch – Fan: Work 5 dc into the same stitch. The five posts share one base point and spread upward, which gives the tulip shape.
Turning chains: In the bar rows, the ch-3 at the start counts as 1 dc. In the fan rows, the ch-1 does not count as a stitch.
Gauge and Checkpoints
Gauge: One pattern repeat (6 sts: 1 sc + 1 fan) = 1.25 in (3.2 cm) wide. One fan row plus one bar row = 1 in (2.5 cm) tall.
Test first. Make a gauge swatch before you start the panel:
- Ch 26.
- Work Row 1 (25 sc), then work Rows 2–3 four times, adjusting the repeat to 4 fans.
- The swatch should measure 5 in (12.7 cm) wide × 4.25 in (10.8 cm) tall after a light steam.
Checkpoints on the panel:
- After Row 1: 49 sc, 10 in (25.4 cm) wide.
- After Row 5: 2.25 in (5.7 cm) tall.
- After Row 11: 5.25 in (13.3 cm) tall.
- After Row 19: 9.25 in (23.5 cm) tall.
- After the border: 10.5 in (26.7 cm) tall.
If your swatch is too big, go down one hook size, to 3.75 mm. If it’s too small, go up one size, to 4.5 mm. Check height separately. If the fans are tall but the width is right, keep the hook and pull up each dc loop a little less, instead of changing hooks.
Panel Pattern
Work the whole body in MC. Turn at the end of every row.
Foundation: With MC, ch 50.
Row 1 (RS): Sc in 2nd ch from hook and in each ch across. Turn. (49 sc)
This row is your base. The repeat needs a multiple of 6 sts plus 1, and 49 = (8 × 6) + 1.
Row 2 (fan row): Ch 1 (does not count as a st), sc in first sc. Sk 2 sc, Fan (5 dc) in next sc, sk 2 sc, sc in next sc; repeat from * 7 more times (8 repeats total). Turn.
(49 sts: 8 fans of 5 dc = 40 dc, plus 9 sc)
Each fan sits on one stitch, so its posts open upward from a single point. The sc between fans anchors the low point of each gap.
Row 3 (bar row): Ch 3 (counts as dc). Sc in each of next 5 dc, ch 1, sk next sc; repeat from * 6 more times (7 repeats). Sc in each of next 5 dc, dc in last sc. Turn.
(49 sts: 1 turning-ch dc + 40 sc + 7 ch-1 + 1 dc)
This is a conversion row, so read the count stitch by stitch. Each fan’s 5 dc become 5 sc, worked one per stitch. Each of the 7 inner sc between fans is replaced by 1 ch, and each of the 2 edge sc becomes 1 dc. That gives 40 + 7 + 2 = 49, with nothing added or lost.
The ch-1 bridges the gap between neighboring fan tops. The open triangle underneath it, pointing down to the sc of Row 2, is the signature window.
The edge dc are important. An edge sc in the fan row plus an edge dc in the bar row equals the height of a dc fan plus its sc bar, so the side edges stay straight.
Row 4 (fan row): Ch 1, sc in first dc. Sk 2 sc, Fan in next sc (the center sc of the 5-sc group), sk 2 sc, sc in next ch-1 sp. Repeat from * 7 more times. On the last repeat, work the final sc into the top of the turning ch-3 instead of a ch-1 sp. Turn.
(49 sts: 40 dc + 9 sc)
Each new fan sits exactly on the center of the fan below, so the tulips stack in straight vertical columns.
Row 5 (bar row): Repeat Row 3. (49 sts)
Rows 6–19: Repeat Rows 4–5 seven more times. Fasten off MC after Row 19.
Row 19 is a bar row, so the top edge is flat, with a row of small triangular windows just below it. That’s 9 fan rows in total, which matches the column count in the finished panel.
Panel check: 49 sts across, 10 in (25.4 cm) wide, 9.25 in (23.5 cm) tall. The height breaks down as 0.25 in (0.6 cm) for Row 1 plus 9 × 1 in (2.5 cm) for the fan/bar pairs.
Border (Cream Mesh Band, Bottom Edge Only)
The cream band is worked only along the foundation edge. The two side edges and the top edge get no border rows, so they have 0 extra stitches each.
Border gauge: 49 sts = 10 in (25.4 cm), the same as the body. You work exactly one border stitch into each foundation chain, so the width can’t change. Each mesh row is 0.5 in (1.3 cm) tall, and the sc row is 0.25 in (0.6 cm) tall.
Turn the panel upside down with the RS facing you, so the foundation chain runs across the top.
Border Row 1 (RS): Join CC with a sl st in the first foundation ch. Ch 1 (does not count), sc in the same ch and in each foundation ch across. Turn.
(Bottom edge: 49 sc)
You’re working into the free loops of the original 50-ch foundation, excluding the turning chain, so there are exactly 49 working loops. That matches the 49 sts of Row 1.
Border Row 2 (mesh): Ch 4 (counts as dc + ch 1), sk next sc. Dc in next sc, ch 1, sk next sc; repeat from * to the last sc, dc in last sc. Turn.
(Bottom edge: 25 dc + 24 ch-1 = 49 sts)
Border Row 3 (mesh): Ch 4 (counts as dc + ch 1). Dc in next dc, ch 1; repeat from * to the last st, dc in 3rd ch of the turning ch-4. Fasten off.
(Bottom edge: 25 dc + 24 ch-1 = 49 sts)
Each dc stacks directly on a dc, so the ch-1 spaces line up into small square windows.
Why the math works:
- An odd count of 49 lets the mesh start and end on a dc: (49 + 1) ÷ 2 = 25 dc, with 24 spaces between them.
- Every row stays at 49 sts, so the band stays exactly as wide as the panel, with no flare and no pull-in.
- Depth: 0.25 in (0.6 cm) + 0.5 in (1.3 cm) + 0.5 in (1.3 cm) = 1.25 in (3.2 cm).
- Finished height: 9.25 in (23.5 cm) + 1.25 in (3.2 cm) = 10.5 in (26.7 cm).
Final Blocking
- Weave in all ends along the side edges, working into stitches of the same color so no tails show through the windows.
- Lay the panel RS up on a blocking mat.
- Spray it evenly with water until it’s damp but not dripping.
- Pin the four corners first to a rectangle of 10 in (25.4 cm) × 10.5 in (26.7 cm).
- Pin along the top edge at every ch-1 bar so the triangular windows open evenly.
- Pin each side edge at every bar row, about every 1 in (2.5 cm), keeping the edges straight.
- Pin the bottom of the cream band at every other dc so the mesh squares sit square.
- Gently nudge each fan so its five posts spread symmetrically from the point.
- Let it dry completely, usually 12–24 hours, before unpinning.
Final Quality-Control Checklist
- [ ] Every row has 49 stitches.
- [ ] There are 9 fan rows, with 8 fans in each row.
- [ ] The fans stack in 8 straight vertical columns.
- [ ] Every fan has exactly 5 dc sharing one base stitch.
- [ ] Each bar row has 7 ch-1 bridges, with a triangular window under each one.
- [ ] The side edges are straight, with no stepping or dips.
- [ ] The cream band has 1 sc row and 2 mesh rows of 25 dc each.
- [ ] The mesh squares line up vertically.
- [ ] The panel measures 10 in (25.4 cm) × 10.5 in (26.7 cm) after blocking.
- [ ] All ends are woven in invisibly.
Troubleshooting
Fans lean to one side. You’re probably working the fan into the wrong sc. Count “skip 2, fan in 3rd” from the ch-1 space every time.
Columns drift sideways. On a fan row, the final sc must go into the turning ch-3 of the bar row below. Missing it shifts the whole next row.
Side edges dip on fan rows. Make sure the bar row starts with ch 3 and ends with a full dc, not a sc.
Triangular windows are closed up. Your bar-row ch-1 is too tight. Loosen it slightly, or make that chain with a hook one size larger.
The panel narrows toward the top. Count the sc in each bar row. You need exactly 5 per fan, not 4.
The cream band ruffles or puckers. Recount Border Row 1. It must be exactly 49 sc, one per foundation ch.
Mesh squares look like rectangles. Your dc are taller than your chains. Snug each dc down a little, or block it firmly.
Care
Hand wash in cool water with a mild detergent. Press out the water in a towel and dry flat, reshaping to 10 in (25.4 cm) × 10.5 in (26.7 cm).
Final Notes
The whole panel depends on one chain of measurements:
- Width: 6 sts per repeat at 1.25 in (3.2 cm), 8 repeats plus 1 closing stitch = 49 sts = 10 in (25.4 cm).
- Height: each fan/bar pair = 1 in (2.5 cm). Nine pairs plus the 0.25 in (0.6 cm) foundation = 9.25 in (23.5 cm).
- Border: the 49 border sts match the 49 panel sts exactly, and the band adds 1.25 in (3.2 cm), for a finished size of 10 in (25.4 cm) × 10.5 in (26.7 cm).
Check the stitch count at the end of every row and the measurements at the checkpoints. If you do, the tulips stack cleanly, the windows open evenly, and the cream band sits flat. If you later want a wider piece in the same stitch, add stitches in multiples of 6, keep the 6n + 1 rule, and the counts above still hold.
Happy crocheting!