

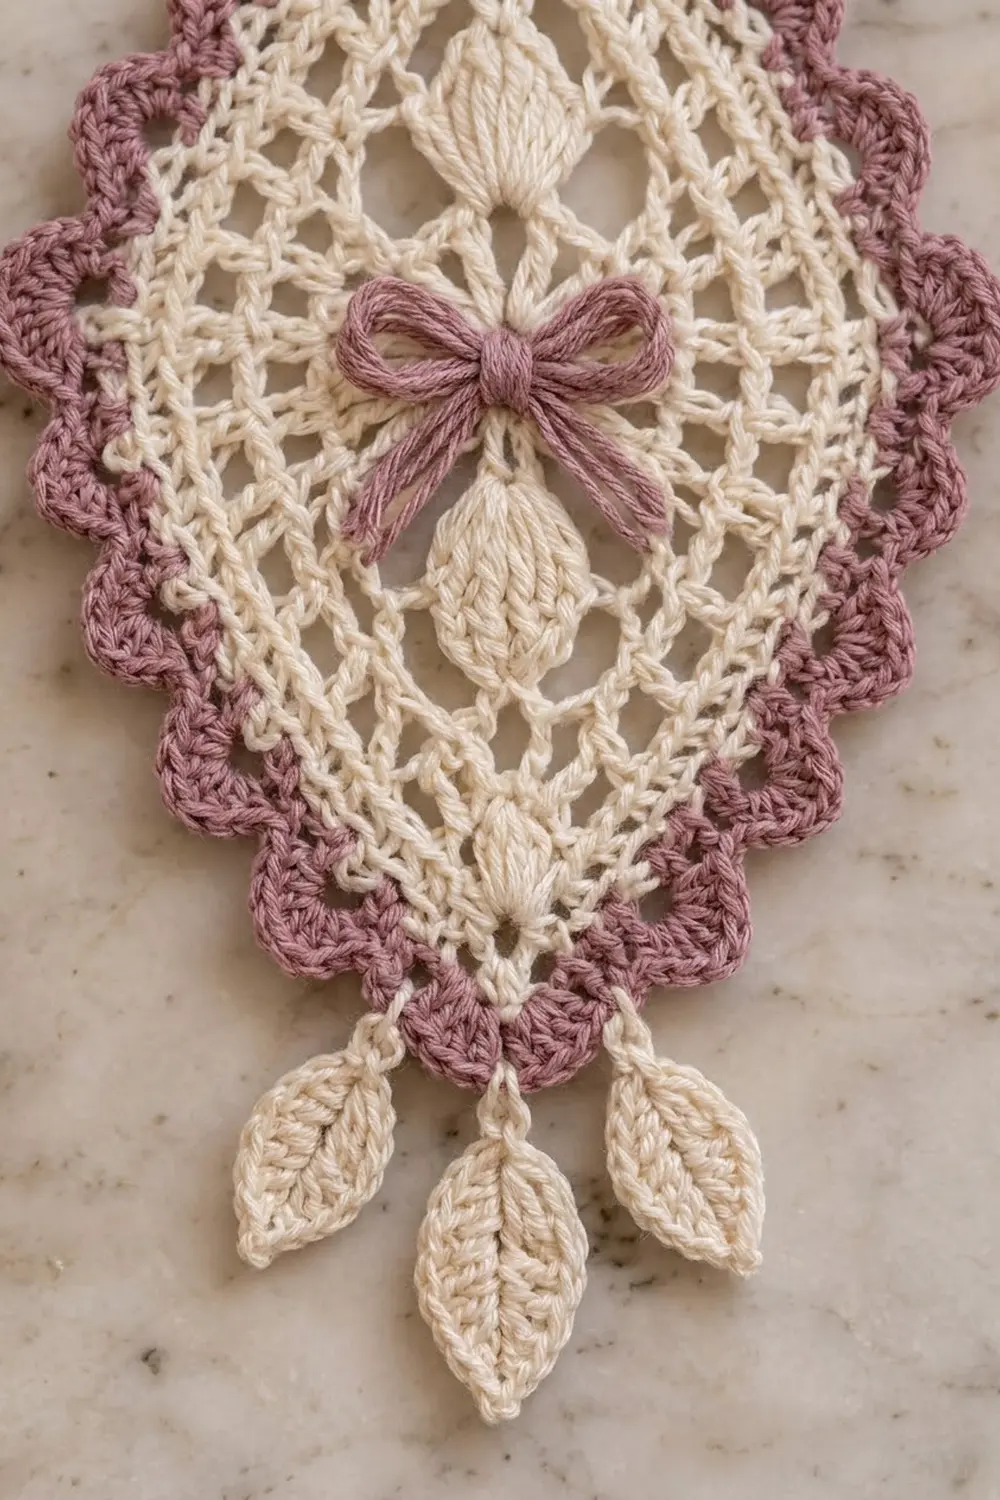
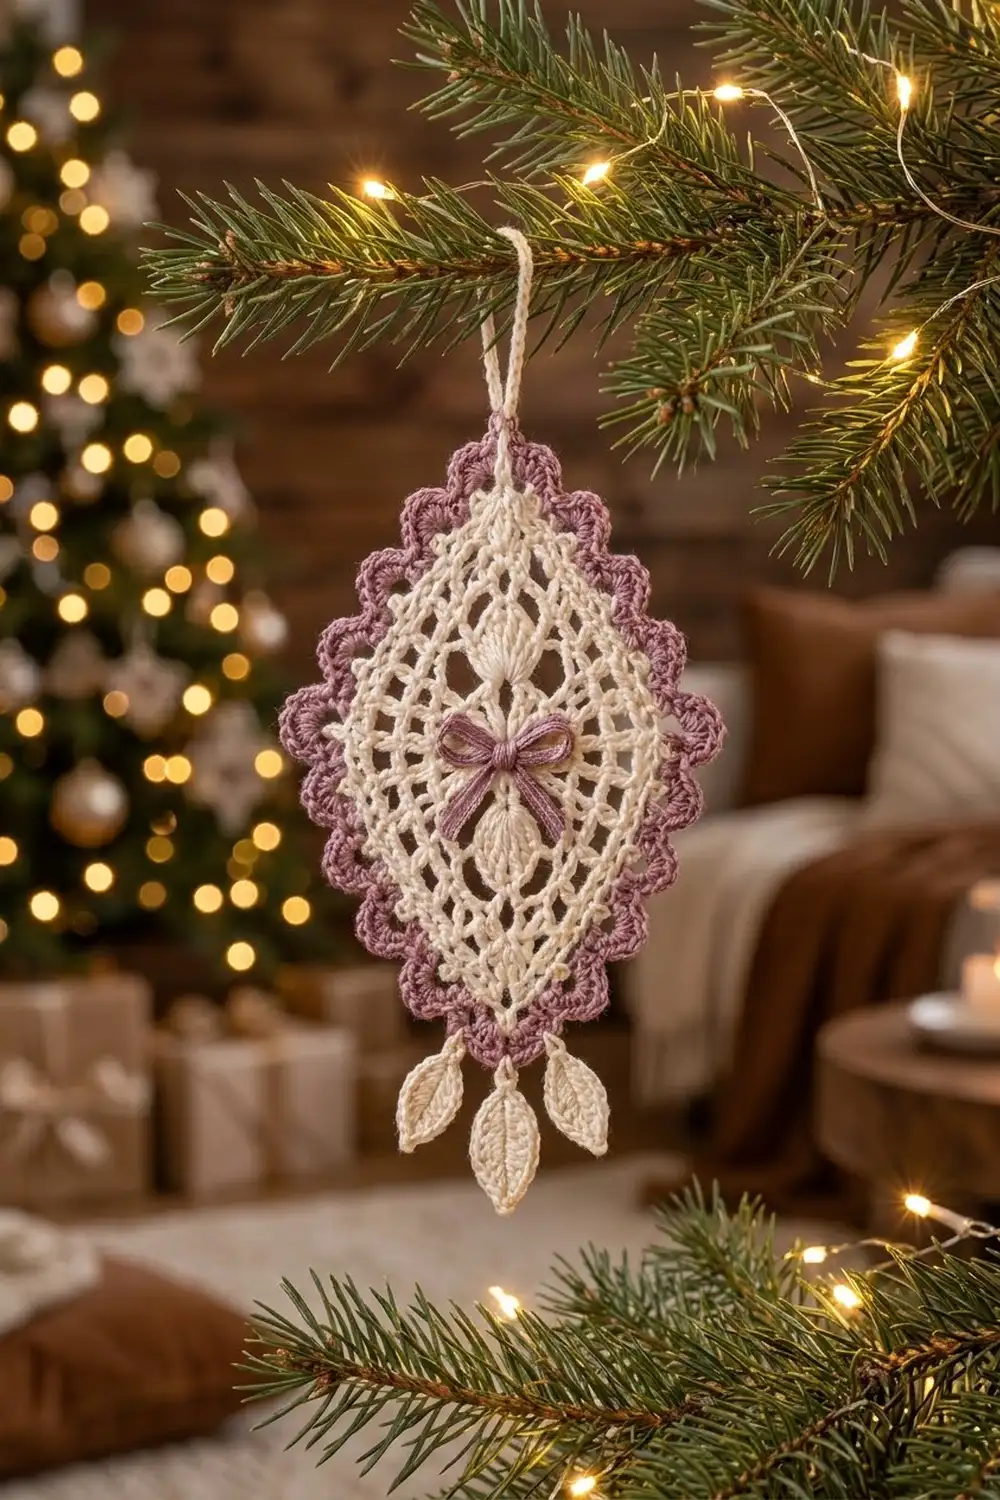
The Rosewood Bow Diamond is a lacy hanging ornament. It’s a tall cream diamond of open mesh with a scalloped dusty-mauve border and a small mauve bow embroidered at its center. Three cream leaves hang from the bottom tip, and a cream loop at the top tip lets you hang it on a tree branch.
The palette is soft and vintage: warm ivory cream for the lace, leaves, and loop, and a muted rose-mauve for the border and bow. Two small puff-stitch leaf shapes sit on the center column, one above the bow and one below it, so the piece looks like a bit of heirloom lace.
This pattern uses US crochet terms. The finished diamond measures about 4.6 in (11.7 cm) wide and 6.3 in (16.0 cm) tall, including the border. From the top of the loop to the tip of the center leaf, it hangs about 10 in (25.4 cm).
You work the diamond flat in rows of dc mesh, starting at the bottom tip. You increase out to the widest point and then decrease back to the top tip. A two-round mauve border goes around the diamond. Then you add the loop, attach three crocheted leaves, and embroider the bow.
Finished Size and Construction
- Finished size: about 4.6 in (11.7 cm) wide x 6.3 in (16.0 cm) tall, plus loop and leaves
- Hanging length: about 10 in (25.4 cm)
- Skill level: Intermediate
- Terminology: US
- Yarn weight: Super Fine (#1), fingering-weight cotton
- Hook: 2.5 mm
- Number of pieces: 1 diamond with 3 small leaves and 1 loop attached (a single ornament)
- Layout: one vertical diamond, with tips at the top and bottom
- Size before border: about 3.8 in (9.7 cm) wide x 5.3 in (13.5 cm) tall
- Border depth: about 0.4 in (1.0 cm) along each edge and about 0.5 in (1.3 cm) at each tip
Materials
Use a smooth mercerized cotton in fingering weight, about 200 m per 50 g. It shows the mesh clearly and takes starch well.
- Color A, Cream: 8 g, about 32 m (35 yd), for the diamond, loop, and leaves
- Color B, Dusty Mauve: 5 g, about 20 m (22 yd), for the border and bow
These amounts include a safety margin.
Tools:
- 2.5 mm crochet hook
- Tapestry needle
- 2 stitch markers
- Scissors
- Blocking mat, rustproof pins, and a spray bottle
- Optional: fabric stiffener or spray starch
Abbreviations (US Terms)
- ch – chain
- sl st – slip stitch
- sc – single crochet
- hdc – half double crochet
- dc – double crochet
- sk – skip
- sp – space
- st(s) – stitch(es)
- yo – yarn over
- RS – right side
Special stitches:
- Puff: (Yo, insert hook in the indicated st or sp, yo, pull up a loop to dc height) 4 times, then yo and pull through all 9 loops on the hook. A puff counts as 1 st and replaces a ch-1 in the mesh.
- Shell: 5 dc in the same st.
- Picot: Ch 3, sl st in the 3rd ch from hook.
- Corner shell: (3 dc, picot, 3 dc) in the same st.
Gauge and Checkpoints
Gauge: 24 sts and 12 rows = 4 in (10.2 cm) in dc mesh (dc, ch 1), after blocking. Each mesh square is about 0.33 in (0.8 cm) wide and tall.
This is a single small piece, so the ornament itself is your test piece. Press it lightly flat and measure at each checkpoint:
- After Row 4 (11 sts): about 1.8 in (4.6 cm) wide
- After Row 8 (23 sts): about 3.8 in (9.7 cm) wide and 2.7 in (6.9 cm) tall
- After Row 16: about 3.8 in (9.7 cm) wide and 5.3 in (13.5 cm) tall
- After Border Round 1: about 4.1 in (10.4 cm) wide
- After Border Round 2: about 4.6 in (11.7 cm) wide and 6.3 in (16.0 cm) tall
If it’s too big: Switch to a 2.25 mm hook, or tighten your chains so the ch-1 spaces don’t sag.
If it’s too small: Switch to a 2.75 mm hook, and pull each dc up to its full height.
The Diamond (Color A, Cream)
How the mesh works: A mesh row is a dc followed by repeated (ch 1, dc). The turning ch-4 counts as a dc + ch 1, and its top is the 3rd ch of the ch-4. Each ch-1 counts as 1 st in the stitch counts, so every row has an odd number of sts.
- Plain row: Ch 4, turn, sk the first ch-1 sp, dc in next dc. [Ch 1, sk ch-1 sp, dc in next dc] across, working the last dc in the 3rd ch of the turning ch. The count stays the same.
- Increase row (+4): Ch 4, turn, dc in the first dc (the base of the ch-4). [Ch 1, sk ch-1 sp, dc in next dc] across to the turning ch. Work (dc, ch 1, dc) in the 3rd ch of the turning ch. This adds 2 sts at each edge.
- Decrease row (−4): Turn, sl st in the first ch-1 sp and in the next dc, ch 4, sk next ch-1 sp, dc in next dc. [Ch 1, sk ch-1 sp, dc in next dc] across, ending with a dc in the dc before the last ch-1 sp. Leave the last ch-1 sp and the turning ch unworked. This removes 2 sts at each edge.
In puff rows, work a puff in place of “ch 1, sk ch-1 sp” at the position given, into the ch-1 sp or puff below it. On the next row, treat each puff as a ch-1 sp.
Row 1 (RS): Ch 5, dc in 5th ch from hook. The 4 skipped chs count as a dc + ch 1. (3 sts; bottom tip)
Row 2 (increase): Ch 4, turn, dc in first dc, ch 1, sk ch-1 sp, (dc, ch 1, dc) in top of beginning ch-5. (7 sts)
Row 3 (increase): Work an increase row. (11 sts)
Row 4 (plain, puff): Work a plain row with a puff at the 3rd of 5 ch-1 positions, which is the center. (11 sts; 1 puff)
Row 5 (increase, puff): Work an increase row with puffs at the 3rd, 4th, and 5th of 7 ch-1 positions. The center puff goes into the puff below. (15 sts; 3 puffs)
Row 6 (increase, puff): Work an increase row with a puff at the 5th of 9 ch-1 positions, which is the center. (19 sts; 1 puff)
Rows 4–6 form the lower leaf shape: 1 puff, then 3, then 1.
Row 7 (plain): (19 sts)
Row 8 (increase): (23 sts; widest row)
Row 9 (plain): (23 sts)
This is the widest point, about 3.8 in (9.7 cm). The bow goes over the center of Rows 8–9.
Row 10 (decrease): (19 sts)
Row 11 (plain, puff): Work a plain row with a puff at the 5th of 9 ch-1 positions. (19 sts; 1 puff)
Row 12 (decrease, puff): Work a decrease row with puffs at the 3rd, 4th, and 5th of 7 ch-1 positions. (15 sts; 3 puffs)
Row 13 (decrease, puff): Work a decrease row with a puff at the 3rd of 5 ch-1 positions. (11 sts; 1 puff)
Rows 11–13 form the upper leaf shape and mirror Rows 4–6.
Row 14 (plain): (11 sts)
Row 15 (decrease): (7 sts)
Row 16 (decrease): (3 sts; top tip)
Fasten off and weave in the ends.
Count check: 3, 7, 11, 11, 15, 19, 19, 23, 23, 19, 19, 15, 11, 11, 7, 3. The sequence reads the same in both directions, so the diamond is symmetrical.
Border (Color B, Dusty Mauve)
Border gauge: about 6.5 sc per 1 in (2.5 cm) along the edge. Each diagonal edge measures about 3.2 in (8.1 cm), so it needs 21 sc.
Row-end rule: Work 3 sc in the end of each increase or decrease row, because those ends step outward and are longer. Work 2 sc in the end of each plain row and in the end of Row 1.
- Rows 1–8 edge: Rows 2, 3, 5, 6, 8 (3 sc each = 15) + Rows 1, 4, 7 (2 sc each = 6) = 21 sc
- Rows 9–16 edge: Rows 10, 12, 13, 15, 16 (3 sc each = 15) + Rows 9, 11, 14 (2 sc each = 6) = 21 sc
Round 1:
- With RS facing, join B with a sl st in the Row 16 ch-1 sp. Ch 1, then work 3 sc in the same sp for the top corner.
- Work down the row-ends from Row 16 to Row 9 (21 sc).
- Work 3 sc at the side corner, inserting the hook under the edge st where Row 8 meets Row 9.
- Work down Rows 8 to 1 (21 sc).
- Work 3 sc around the foundation ch at the bottom tip for the bottom corner.
- Work up Rows 1 to 8 (21 sc).
- Work 3 sc at the second side corner.
- Work up Rows 9 to 16 (21 sc), then join with a sl st in the first sc.
Count: (4 edges x 21 sc) + (4 corners x 3 sc) = 84 + 12 = 96 sc. Between two corner-center sts there are 23 sts: 1 corner sc + 21 edge sc + 1 corner sc.
Round 2:
- Sl st in the next sc, which is the top corner center. Ch 3 (counts as dc), 2 dc in the same st, picot, 3 dc in the same st. This is the first corner shell.
- Edge run: Sk next sc, sc in next sc, [sk 1, shell in next sc, sk 1, sc in next sc] 5 times, sk next sc.
- Work a corner shell in the next sc (the corner center).
- Repeat steps 2–3 twice more.
- Work one more edge run, then join with a sl st in the 3rd ch of the beginning ch-3. Fasten off.
Count: Each edge has 5 shells + 6 sc (31 sts). Each corner has 6 dc and 1 picot. The round totals 124 dc + 24 sc = 148 sts, plus 4 picots, for 20 edge scallops and 4 pointed corners.
Why the math works: Each edge has 23 sts between corner centers. An edge run uses 1 skipped st + 1 sc + five 4-st repeats (20 sts) + 1 skipped st, which is 1 + 1 + 20 + 1 = 23. Every edge starts and ends the same way, so the scallops sit evenly from corner to corner.
Hanging Loop and Leaves (Color A, Cream)
Hanging loop: Join A with a sl st in the top-corner picot. Ch 24, then sl st in the same picot. Work 30 sc over the ch-24 loop, sl st in the picot, and fasten off. The loop hangs about 1.7 in (4.3 cm).
Leaf (make 3): Ch 8.
- Sc in 2nd ch from hook, hdc in next ch, dc in next 3 ch, hdc in next ch, 3 sc in last ch (leaf base).
- Working along the other side of the chain: hdc in next ch, dc in next 3 ch, hdc in next ch, sc in next ch.
- Picot, then sl st in the first sc for the leaf tip. (15 sts + tip picot)
Fasten off. Each leaf is about 1 in (2.5 cm) long and 0.5 in (1.3 cm) wide.
Attaching the leaves:
- Center leaf: Join A with a sl st in the bottom-corner picot. Ch 7, sl st in the center sc of a leaf base, sl st back along each ch, sl st in the picot, and fasten off.
- Side leaves: Join A in the 1st dc of the bottom corner shell. Ch 4, sl st in a leaf base, sl st back along each ch, and fasten off. Repeat in the 6th dc of the same shell.
The center leaf hangs about 2.0 in (5.1 cm) below the tip, and the two side leaves angle outward.
Embroidered Bow (Color B)
- Cut 18 in (45.7 cm) of B.
- Center the bow on the center column, on the line between Rows 8 and 9.
- Work two lazy daisy (detached-chain) loops pointing left and two pointing right, layering them so each side looks full. Make each loop about 0.5 in (1.3 cm) long.
- Add two straight-stitch tails angled downward, each about 0.4 in (1.0 cm) long.
- Wrap the center 4 times to form the knot.
The finished bow is about 1.25 in (3.2 cm) wide and sits between the two puff leaves. Secure the ends on the wrong side.
Final Blocking
- Soak the ornament in cool water for 5 minutes, then press out the water in a towel without wringing.
- Pin both tips first, so the diamond measures 6.3 in (16.0 cm) tall.
- Pin both side corners, so it measures 4.6 in (11.7 cm) wide.
- Pin each scallop and corner picot open, and pin the leaves flat.
- Check that the mesh squares are even and the center column is straight.
- If you like, mist with stiffener or starch.
- Let it dry fully, for at least 12 hours, before unpinning.
Final Quality-Control Checklist
- The diamond measures about 4.6 x 6.3 in (11.7 x 16.0 cm).
- The row counts match: 3, 7, 11, 11, 15, 19, 19, 23, 23, 19, 19, 15, 11, 11, 7, 3.
- Both leaf shapes run 1–3–1 puffs and sit on the center column.
- Border Round 1 has 96 sc, with 21 on each edge.
- Border Round 2 has 5 scallops per edge and a picot at each of the 4 corners.
- The bow is centered and symmetrical.
- The loop and leaves are secure, and all ends are woven in.
Troubleshooting
- The diamond leans to one side: You probably missed a turning-ch dc. Recount against the count check.
- The edges ripple: There are too many sc. Follow the 3/2 row-end rule exactly.
- The edges cup: Loosen your tension on Round 1 instead of adding sc.
- The puffs are bulky: Pull up shorter loops, or use 3 loops instead of 4.
- The scallops end unevenly: That edge doesn’t have 23 sts between corner centers. Recount Round 1.
- The leaves curl: Starch them and pin them flat to dry.
Care
Hand wash in cool water with mild soap, press dry in a towel, and reshape flat. Re-starch the ornament if it softens.
Final Notes
At gauge, 23 sts and 16 rows make a 3.8 x 5.3 in (9.7 x 13.5 cm) diamond. Round 1 puts 21 sc on each edge, which gives 23 sts between corner centers. Round 2 fits exactly five scallops on each edge and brings the ornament to 4.6 x 6.3 in (11.7 x 16.0 cm). The loop and leaves bring the hanging length to about 10 in (25.4 cm).
Happy crocheting!