

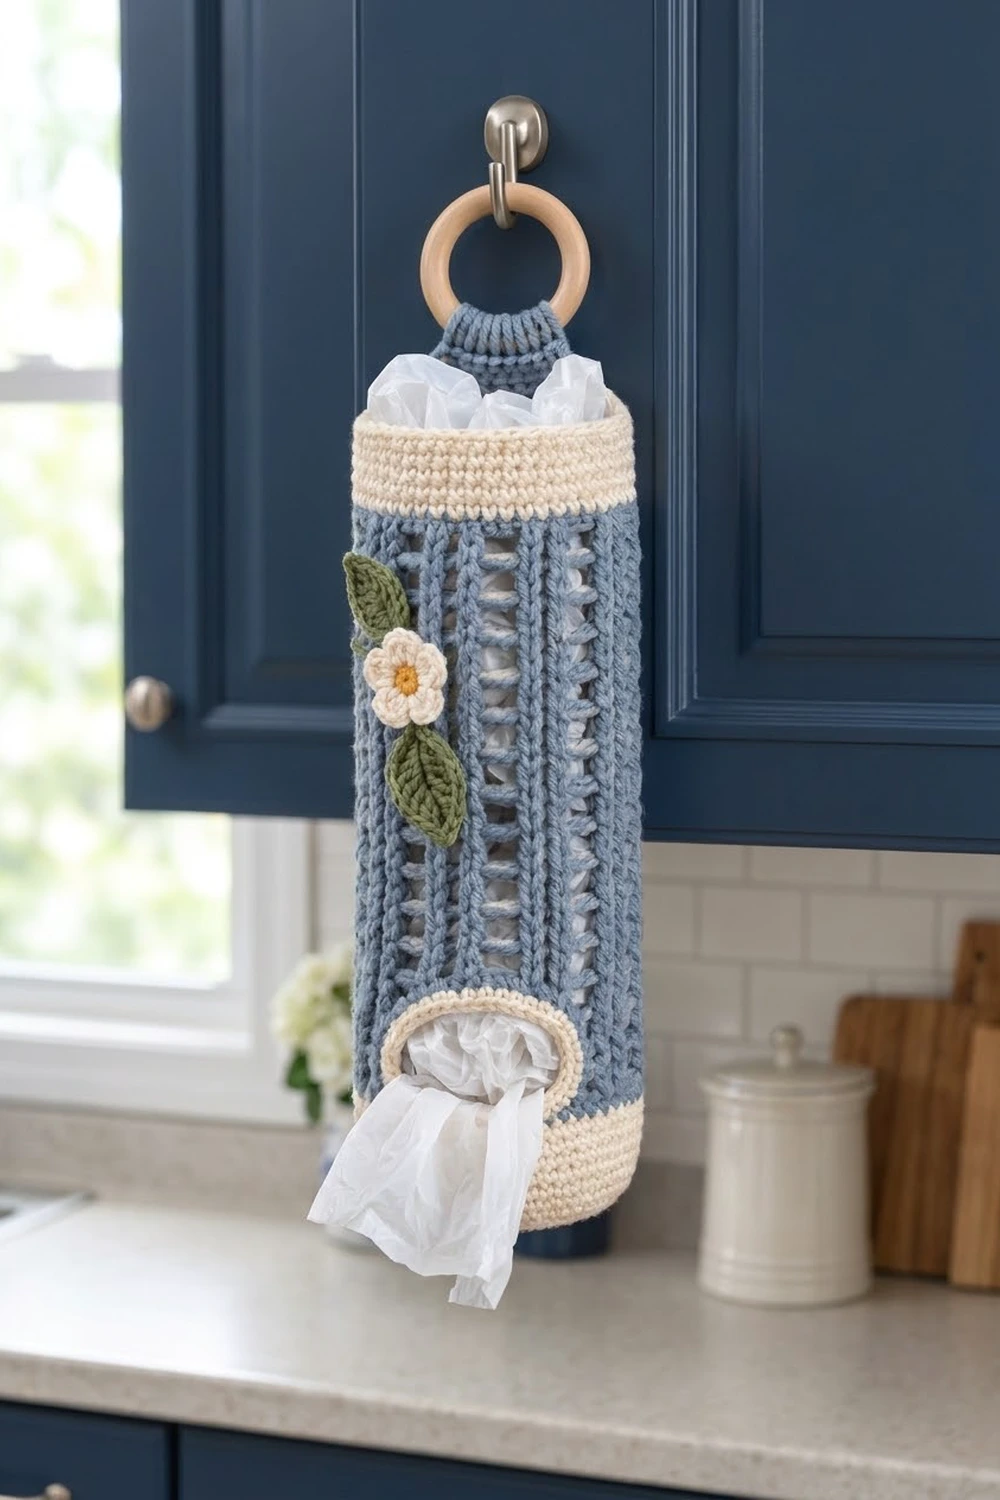
This bag holder is a tall, round tube that hangs from a wooden ring and keeps plastic grocery bags out of the cupboard. You stuff bags in through the top and pull them out one at a time through an oval hole near the bottom.
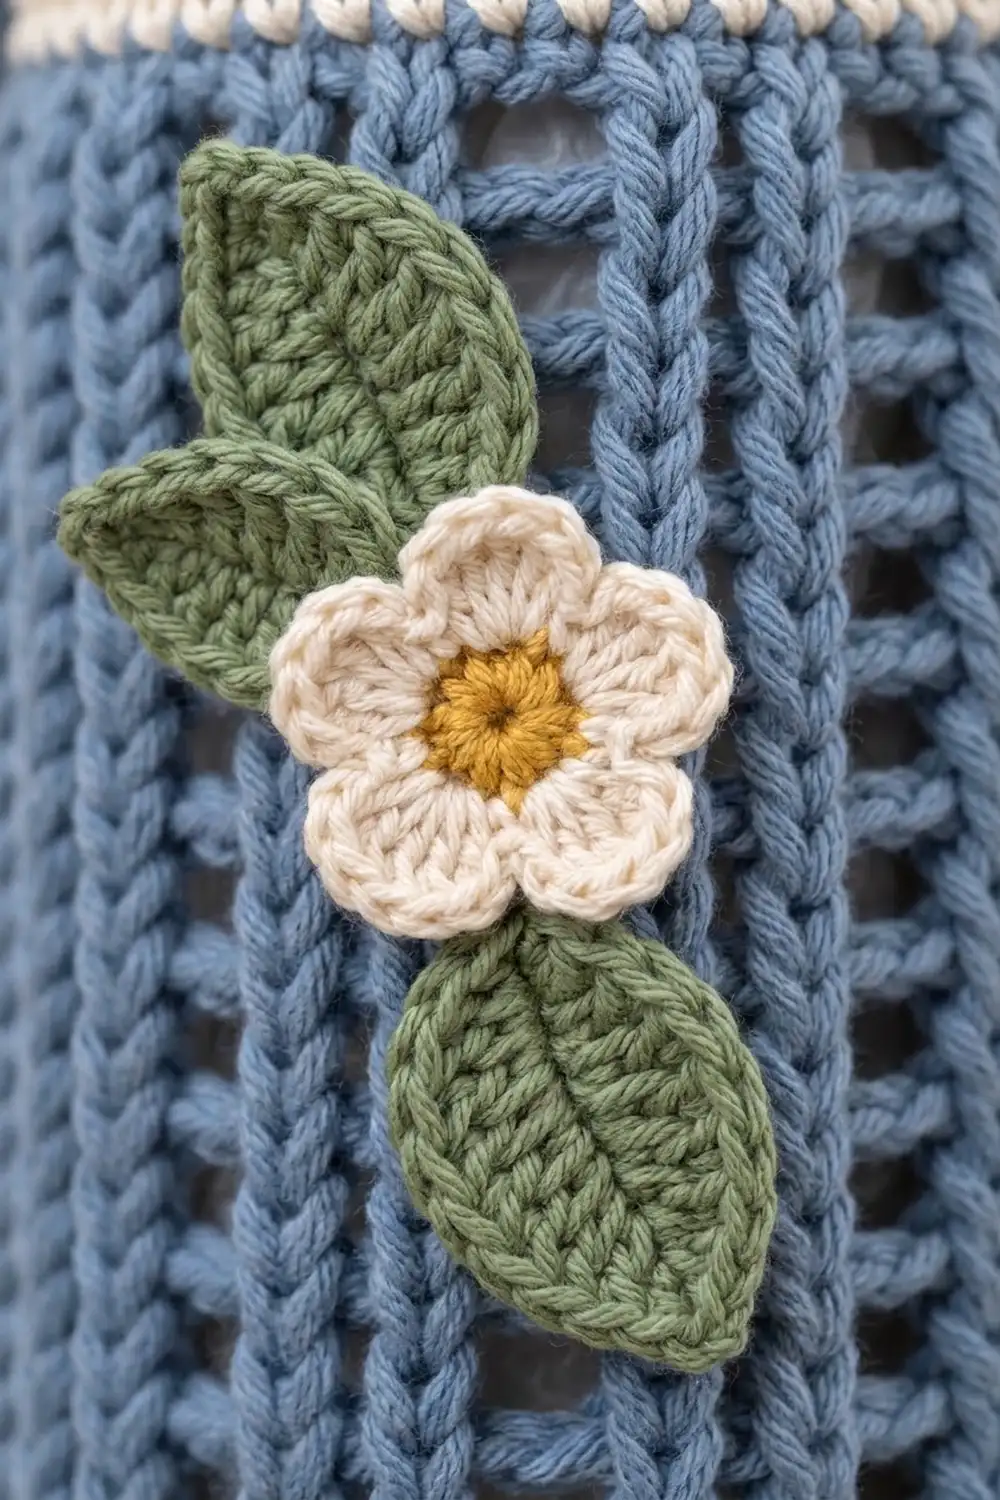
The main color is a soft dusty denim blue, worked in raised front-post columns with narrow open “ladder” windows between them. A cream base cup and a cream top band frame the ribs. Near the top is one cream five-petal flower with a golden-yellow center, set between two sage-green leaves.
The pattern uses US crochet terms. The finished tube measures 13.75 in (34.9 cm) tall and 13.75 in (34.9 cm) around, about 4.4 in (11.2 cm) across. Hung from its ring, the holder is about 18.75 in (47.6 cm) long.
The body is one continuous piece, worked bottom up in joined rounds. You make a flat circle, turn it up into a cup, work the ribbed body with the dispenser hole built in, and finish with a cream top band. A short tab is then worked in rows across the back and folded over the ring. Last, you sew on three small appliqués.
Finished Size and Construction
- Finished size: tube 13.75 in (34.9 cm) tall, 13.75 in (34.9 cm) circumference, about 4.4 in (11.2 cm) diameter; about 18.75 in (47.6 cm) long with tab and ring
- Skill level: Intermediate
- Terminology: US
- Yarn weight: Worsted (#4)
- Hook: 5.0 mm (H-8)
- Number of pieces: 1 holder body (with tab) + 3 appliqués (1 flower, 2 leaves)
- Layout: single tube, hung vertically; appliqué cluster on the upper front
- Piece size: 48 stitches around
- Size before top band: 11.75 in (29.8 cm) tall
- Top band depth: 2 in (5.1 cm)
Materials
Use a smooth worsted-weight cotton or cotton blend. Cotton keeps its shape when the holder is full, and it shows the post-stitch columns clearly. Acrylic works too, but it stretches more. The amounts below assume about 183 m per 100 g.
- Color A, dusty blue (body, tab): 75 g, about 137 m
- Color B, cream (base, top band, petals): 45 g, about 82 m
- Color C, sage green (leaves): 5 g, about 9 m
- Color D, golden yellow (flower center): 2 g, about 4 m
These amounts include a margin of about 15 percent for differences in tension.
Tools:
- 5.0 mm (H-8) crochet hook
- Wooden ring, 2.5 in (6.4 cm) outer diameter
- 2 stitch markers
- Tapestry needle and scissors
- Measuring tape
- Spray bottle and a rolled towel for blocking
Abbreviations (US Terms)
- ch – chain
- sl st – slip stitch
- sc – single crochet
- hdc – half double crochet
- dc – double crochet
- sc2tog – single crochet 2 together
- BLO – back loop only
- sk – skip
- sp – space
- st(s) – stitch(es)
- rnd(s) – round(s)
- RS / WS – right side / wrong side
Special stitch – FPdc (front post double crochet): Yarn over, insert the hook from front to back to front around the post of the stitch below, yarn over and pull up a loop, then (yarn over, pull through 2 loops) twice. The stitch sits on the front of the fabric and builds a raised column.
Gauge and Checkpoints
- Sc gauge: 14 sts and 16 rnds = 4 in (10.2 cm)
- Rib-mesh gauge: 14 sts (counting each ch-1 sp as a st) and 8 rnds = 4 in (10.2 cm)
Make the base first and use it as your test. The base sets the circumference for the whole holder.
Checkpoints:
- After Rnd 6, the flat circle measures 4.25–4.5 in (10.8–11.4 cm) across.
- After Rnd 12, the cup wall stands 1.5 in (3.8 cm) tall.
- After Rnd 33, the tube measures 11.75 in (29.8 cm) from the bottom fold.
- After Rnd 41, the tube measures 13.75 in (34.9 cm).
If your circle is too big: go down to a 4.5 mm hook. If it is too small: go up to a 5.5 mm hook. Do not change the stitch count. The 12 rib repeats only fit evenly into 48 stitches.
Pattern
Work in joined rounds with the RS facing. The join sits at the center back. Mark the first stitch of each round.
Base (Color B, cream)
Rnd 1: Make a magic ring, ch 1, 8 sc in ring, sl st to first sc. (8 sts)
Rnd 2: Ch 1, 2 sc in each st around, join. (16 sts)
Rnd 3: Ch 1, sc in next st, 2 sc in next st; repeat from * 8 times, join. (24 sts)
Rnd 4: Ch 1, sc in next 2 sts, 2 sc in next st; repeat 8 times, join. (32 sts)
Rnd 5: Ch 1, sc in next 3 sts, 2 sc in next st; repeat 8 times, join. (40 sts)
Rnd 6: Ch 1, sc in next 4 sts, 2 sc in next st; repeat 8 times, join. (48 sts)
Check Checkpoint 1.
Cup Wall (Color B)
Rnd 7: Ch 1, sc BLO in each st around, join. (48 sts) This turns the circle up into a cup with a crisp bottom edge.
Rnds 8–12: Ch 1, sc in each st around, join. (48 sts per rnd)
Fasten off. Check Checkpoint 2.
Ribbed Body (Color A, dusty blue)
Rnd 13: Join Color A at the center back. Ch 1, sc in each st around, join. (48 sts)
Rnd 14 (foundation): Ch 2 (does not count as a st), dc in next 3 sts, ch 1, sk next st; repeat from * 12 times, sl st to first dc. (36 dc + 12 ch-1 sps = 48 sts)
The 12 groups of 3 dc become the rib columns. The ch-1 spaces become the ladder windows.
Rnd 15 (dispenser hole): Ch 2 (does not count), [FPdc around each of next 3 dc, ch 1, sk next ch-1 sp] 5 times; ch 8, sk next 8 sts (2 repeats); [FPdc around each of next 3 dc, ch 1, sk next ch-1 sp] 5 times, sl st to first FPdc. (30 FPdc + 10 ch-1 sps + 8 ch = 48 sts)
The round starts at the center back, so the hole lands at the center front.
Rnd 16: Ch 2, [FPdc around each of next 3 sts, ch 1, sk next ch-1 sp] 5 times; working into the ch-8: [dc in next 3 ch, ch 1, sk next ch] twice; [FPdc around each of next 3 sts, ch 1, sk next ch-1 sp] 5 times, join. (36 dc and FPdc + 12 ch-1 sps = 48 sts)
A chain has no post to work around, so the 6 stitches over the hole are plain dc here. From the next round on, they are worked as FPdc like the rest.
Rnd 17: Ch 2, FPdc around each of next 3 sts, ch 1, sk next ch-1 sp; repeat from * 12 times, join. (36 FPdc + 12 ch-1 sps = 48 sts)
Rnds 18–33: Repeat Rnd 17. (48 sts per rnd)
That makes 20 rib-mesh rounds (Rnds 14–33), or 10 in (25.4 cm) of ribbed body. Fasten off. Check Checkpoint 3.
Border: Top Band and Dispenser-Hole Edging
The holder is one piece, so there is no joining step. Its border is the cream top band plus an sc edging around the dispenser hole.
Border gauge: same as the sc gauge, 14 sts and 16 rnds = 4 in (10.2 cm). Eight rounds make a 2 in (5.1 cm) band.
Top Band (Color B)
Rnd 34 (conversion): Join Color B at the center back. Ch 1, sc in each of next 3 FPdc, sc in next ch-1 sp; repeat from * 12 times, join. (36 sts worked 1 per existing st + 12 sc in ch-1 sps = 48 sts; 24 front + 24 back when flattened)
Rnds 35–41: Ch 1, sc in each st around, join. (48 sts per rnd)
Fasten off. Check Checkpoint 4.
Why the math works: the body has 12 repeats of 4 sts (3 posts + 1 ch-1 sp). Each repeat becomes 4 sc, so the band has exactly 48 sts, the same as the base. Because the count doesn’t change, the band won’t pull in or flare, and the top matches the 4.4 in (11.2 cm) base.
Dispenser-Hole Edging (Color A)
Join Color A at the lower right corner of the hole.
Edging rnd: Ch 1, 8 sc along the bottom edge (1 in each of the 8 skipped sts of Rnd 14), 2 sc around the end post at the left, 8 sc along the top edge (1 in each bottom loop of the ch-8), 2 sc around the end post at the right, sl st to first sc. (8 + 2 + 8 + 2 = 20 sts)
Relaxed, the hole measures about 2.25 in (5.7 cm) wide and 0.75 in (1.9 cm) tall. It stretches to about 1 in (2.5 cm) tall as bags are pulled out. Fasten off.
Hanging Tab (Color A)
Flatten the tube with the hole centered on the front. The tab is worked in rows across the back.
Row 1: With RS facing, join Color A in the top of Rnd 41, 8 sts to the right of the center-back join. Ch 1, sc BLO in next 16 sts, turn. (16 sts)
Even rows (2, 4, 6, 8, 10): Ch 1, sc2tog, sc BLO in each st to last 2 sts, sc2tog, turn.
Odd rows (3, 5, 7, 9): Ch 1, sc BLO in each st, turn.
Stitch counts: Rows 2–3: 14 sts. Rows 4–5: 12 sts. Rows 6–7: 10 sts. Rows 8–9: 8 sts. Row 10: 6 sts.
Rows 11–14: Ch 1, sc BLO in each st, turn. (6 sts per row)
The tab narrows from about 4.5 in (11.4 cm) to about 1.75 in (4.4 cm) wide. Rows 1–10 are 2.5 in (6.4 cm) tall. Leave a 12 in (30.5 cm) tail.
Slide the ring onto the tab. Fold Rows 11–14 over the ring to the WS and whipstitch the last row to the back of Row 10.
Appliqués
Flower (make 1)
Rnd 1: With Color D, make a magic ring, ch 1, 5 sc in ring, sl st to first sc. (5 sts) Fasten off.
Rnd 2: Join Color B in any sc. (Sl st, ch 2, 2 dc, ch 2, sl st) in same st, move to next st; repeat from * 5 times. (5 petals)
Fasten off with an 8 in (20.3 cm) tail. The flower measures about 1.5 in (3.8 cm) across.
Leaf (make 2)
Foundation: With Color C, ch 8.
Side 1: Sc in 2nd ch from hook, hdc in next ch, dc in next 3 ch, hdc in next ch, sc in last ch. (7 sts)
Tip: Ch 1, rotate to work along the bottom loops of the chain.
Side 2: Sc in first ch, hdc in next ch, dc in next 3 ch, hdc in next ch, sc in last ch. (7 sts) Sl st in the ch-1 tip.
Fasten off with an 8 in (20.3 cm) tail. Each leaf is about 2 in (5.1 cm) long and 0.75 in (1.9 cm) wide. The foundation chain leaves a slight ridge down the middle, like a vein.
Placing the Appliqués
Place the cluster on the upper front, slightly left of center, with the flower about 2 in (5.1 cm) below the top band.
- Pin one leaf above the flower’s spot, angled up and to the left.
- Pin the second leaf below it, angled down and to the right.
- Set the flower on top so it covers the base of both leaves.
Sew the leaves first with Color C, catching only the front of the rib columns. Sew the flower on top with Color B, stitching between the petals.
Final Blocking
- Weave in all ends.
- Fill the tube with a rolled towel so it holds a round shape.
- Mist the whole holder until it is evenly damp.
- Straighten the rib columns so they run straight up from cup to band.
- Shape the dispenser hole into a smooth oval.
- Press the leaves and petals flat with your fingers.
- Let it dry completely, standing on its base.
- Take out the towel and hang the holder.
Final Quality-Control Checklist
- Base is flat and 4.25–4.5 in (10.8–11.4 cm) across
- Cup wall is 1.5 in (3.8 cm) tall with a crisp fold
- 12 straight rib columns with 12 even windows
- Hole is centered on the front with 20 edging sts
- Tube is 13.75 in (34.9 cm) tall and 13.75 in (34.9 cm) around
- Band is 2 in (5.1 cm) deep and doesn’t flare
- Tab is centered on the back and the ring is secure
- Leaves sit under the flower; all ends are woven in
Troubleshooting
Rib columns lean or spiral. Always join into the first FPdc, not the ch-2.
Ladder windows close up. Your ch-1 is too tight. Keep each chain loose.
The band flares. Work Rnd 34 more firmly, or use a 4.5 mm hook for the band.
The hole puckers. Too many edging sts. Keep exactly 20.
The tab twists. Count 8 sts on each side of the center-back join before Row 1.
The holder sags when full. Switch to cotton or go down one hook size.
Care
Hand wash in cool water with mild soap and dry the holder standing upright. Remove the wooden ring first, or keep it dry, so it doesn’t swell or crack.
Final Notes
The measurement chain starts with the 48-st base, which is 4.4 in (11.2 cm) across and sets a 13.75 in (34.9 cm) circumference. The cup adds 1.5 in (3.8 cm), Rnd 13 adds 0.25 in (0.6 cm), and the ribs add 10 in (25.4 cm), bringing the tube to 11.75 in (29.8 cm). The band adds 2 in (5.1 cm) for a 13.75 in (34.9 cm) tube. The tab and ring bring the hanging length to about 18.75 in (47.6 cm).
Check the base, keep the 48-stitch count, and everything else will fit. Happy crocheting!