

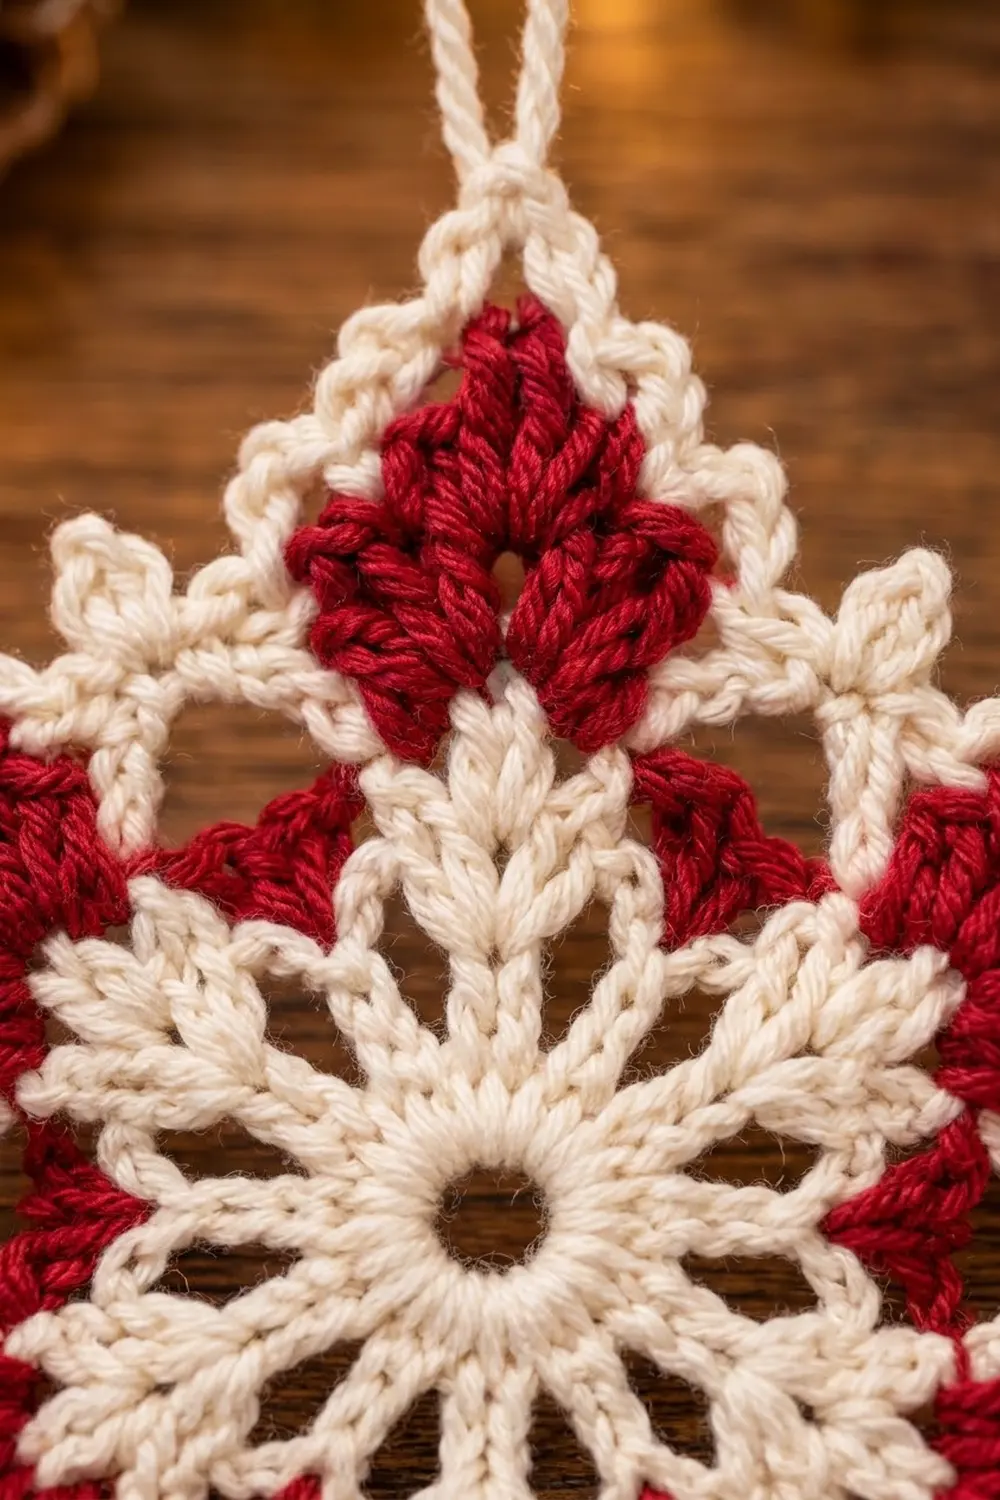
This Peppermint Frost Snowflake is a small, crisp holiday ornament in cream and cranberry red. It is a lacy six-pointed snowflake with a cream center. Bold red panels fill each point, and smaller red wedges sit in the valleys between them. A cream picot outline frames the whole shape and gives it a clean, frosted edge.
The design looks like a classic Scandinavian ornament: two colors, sharp geometry and a bit of open lace near the center. It looks good on a tree, tied to a gift or in a window.
This pattern uses US crochet terms throughout. The finished ornament measures 4.5 in (11.4 cm) from point to point, plus a 2 in (5.1 cm) hanging loop.
You work the snowflake as one single piece in joined rounds. Rounds 1–2 make the cream center and its twelve spokes. Rounds 3–4 add the red point panels and valley wedges. Rounds 5–6 add the cream outline, picots, pointed tips and the hanging loop. There is no joining and no sewing, only six rounds and a few ends to weave in.
Finished Size and Construction
- Finished size: 4.5 in (11.4 cm) point to point; about 3.5 in (8.9 cm) valley to valley
- Skill level: Easy-intermediate (color changes, sc3tog, picots)
- Terminology: US crochet terms
- Yarn weight: Sport weight (#2) mercerized cotton
- Hook: 3.0 mm (US C/2–D/3)
- Number of pieces: 1 (single motif)
- Layout: Six-pointed snowflake worked in the round
- Piece size before outline (after Round 4): 3.75 in (9.5 cm) point to point
- Outline depth (Rounds 5–6): about 3/8 in (1.0 cm) per edge
- Hanging loop: 2 in (5.1 cm), worked into the top point in Round 6
Materials
Yarn advice: Use a smooth mercerized cotton. It gives sharp stitch definition, holds the pointed tips after blocking and does not fuzz. Acrylic will work, but the points will be softer and less defined.
- Color A – Cream: 5 g, about 15 m (16 yd)
- Color B – Cranberry Red: 4 g, about 12 m (13 yd)
These amounts include a margin of about 25% for your gauge swatch, a tail at each color change and weaving in. A standard 50 g ball of each color is enough for several ornaments.
Tools:
– 3.0 mm crochet hook
– Tapestry needle
– Scissors
– 4 locking stitch markers
– Blocking mat or foam board
– Rustproof pins
– Spray bottle with water
– Optional: fabric stiffener or a light starch spray
Abbreviations (US Terms)
- ch – chain
- sl st – slip stitch
- sc – single crochet
- dc – double crochet
- sp – space
- st(s) – stitch(es)
- sc3tog – single crochet 3 together
- rep – repeat
- P – point space (marked in Round 3)
- V – valley space (marked in Round 3)
Special stitches:
- Picot: Ch 3, sl st into the front loop and left vertical bar of the last sc made.
- sc3tog: (Insert hook in next st, yo, pull up a loop) 3 times. Yo and draw through all 4 loops on hook. This uses 3 stitches and makes 1.
- Standing sc: With a slipknot on the hook, insert the hook in the stitch or space, yo, pull up a loop, yo and draw through both loops.
Gauge and Checkpoints
Gauge matters less than for clothing, but it controls the finished size and how sharp the points look. Make one full test snowflake first, then compare it with these checkpoints:
- After Round 1: the ring of 24 dc measures 1 in (2.5 cm) across.
- After Round 2: the spoke circle measures 1.75 in (4.4 cm) across.
- After Round 4: 3.75 in (9.5 cm) from red point to red point.
- After Round 6 (blocked): 4.5 in (11.4 cm) point to point.
If your piece is too big (Round 1 over 1.1 in / 2.8 cm), go down to a 2.75 mm hook. Also check that your dc are not too loose and tall.
If your piece is too small (Round 1 under 0.9 in / 2.3 cm), go up to a 3.25 mm hook. A tight center will also make the snowflake cup, so relax your tension in Rounds 1–2.
Measure flat after a light steam or spritz. Do not stretch the piece while you measure.
Pattern
Round 1 – Cream Center Ring (Color A)
Ch 6 and sl st to the first ch to form a ring.
Ch 3 (counts as dc). Work 23 dc into the ring. Sl st to the top of the beginning ch-3.
Stitch count: 24 dc.
The ring leaves a small open hole in the center, as shown in the photo.
Round 2 – Twelve Spokes (Color A)
Ch 3 (counts as dc), dc in next st, ch 3. Dc in each of next 2 sts, ch 3. Rep from * 10 more times. Sl st to the top of the beginning ch-3.
Stitch count: 24 dc in 12 pairs, plus 12 ch-3 sps.
Each dc pair is one cream spoke. Fasten off Color A and leave a 4 in (10.2 cm) tail.
Marking: Go around the ch-3 sps and label them alternately P (point) and V (valley). That gives 6 P sps and 6 V sps. Put a locking marker in the first P sp.
Round 3 – Red Base Panels (Color B)
Join Color B in the marked P sp. Ch 3 (counts as dc), then work (dc, ch 2, 2 dc) in the same sp. This is the first point shell. Ch 1, skip the next dc pair.
In the V sp, work 3 dc. Ch 1, skip the next dc pair. In the next P sp, work (2 dc, ch 2, 2 dc). Ch 1, skip the next dc pair. Rep from * 4 more times.
In the last V sp, work 3 dc, ch 1. Sl st to the top of the beginning ch-3.
Stitch count: 42 dc (6 point shells of 4 dc = 24, plus 6 valley groups of 3 dc = 18), 6 ch-2 tips, 12 ch-1 sps.
The ch-1 sits over each cream spoke, so the spokes still show between the red sections.
Round 4 – Building the Points (Color B)
Sl st in the next dc and into the ch-2 tip.
Ch 3 (counts as dc), then work (2 dc, ch 2, 3 dc) in the same tip. Ch 1, then skip the next 2 dc, the ch-1 sp and the first dc of the valley group. Sc in the center dc of the valley group. Ch 1, then skip the last dc of the valley group, the ch-1 sp and the first 2 dc of the next point shell.
In the ch-2 tip, work (3 dc, ch 2, 3 dc). Ch 1, skip to the center dc of the valley group as before, and sc in it. Ch 1, skip to the next tip. Rep from * 4 more times. Sl st to the top of the beginning ch-3.
Stitch count: 42 sts (6 point shells of 6 dc = 36 dc, plus 6 sc), 6 ch-2 tips, 12 ch-1 sps.
The 6-dc shell stacks on top of the 4-dc shell from Round 3, which makes the tall red V-shaped panel in each point. The valley wedge stays at 3 dc tall, capped by 1 sc, so it reads as the smaller red shape. Fasten off Color B.
Checkpoint: 3.75 in (9.5 cm) point to point.
Round 5 – Cream Outline (Color A)
Join Color A with a standing sc in any ch-2 tip. Work (ch 4, sc) in the same tip.
Sc in each of the next 3 dc. Sc in the ch-1 sp. Sc in the valley sc. Sc in the next ch-1 sp. Sc in each of the next 3 dc. In the next ch-2 tip, work (sc, ch 4, sc). Rep from * 4 more times, then rep from * to ** once. Sl st to the first sc.
Per point repeat: 11 sc + 1 ch-4 tip. That is 1 sc after the tip, 3 sc, 1 sc, 1 sc in the valley, 1 sc, 3 sc and 1 sc before the next tip.
Stitch count: (42 sts worked 1 per existing st) + (12 sc in ch-1 sps + 12 sc in tips) = 66 sc, plus 6 ch-4 tips.
Round 6 – Picot Edge and Hanging Loop (Color A)
Sl st into the first ch-4 tip. This will be the top point.
Ch 1, then work (2 sc, ch 18, 2 sc) in this tip. The ch-18 is the hanging loop.
First side: Sc in each of the next 2 sc, picot, sc in each of the next 2 sc. Sc3tog over the 3 valley sts (the sc from the ch-1 sp, the sc on the valley sc and the next ch-1 sc).
Second side: Sc in each of the next 2 sc, picot, sc in each of the next 2 sc.
Remaining points: In the next ch-4 tip, work (2 sc, ch 3, 2 sc). Rep the first side and second side. Rep from * 4 more times. Sl st to the first sc.
Per point repeat: 13 sts (4 sc in the tip + 8 sc + 1 sc3tog), 2 picots and 1 tip chain.
Stitch count: (48 sc worked 1 per existing st + 6 sc3tog worked over 18 sts) + 24 sc added in tips = 78 sts, 12 picots, 5 ch-3 tips + 1 ch-18 hanging loop.
The sc3tog pulls each valley inward and the tip chains push each point outward, which gives the snowflake its sharp silhouette. Fasten off and weave in all ends on the wrong side, inside matching colors.
Outline Gauge and Math
The cream outline (Rounds 5–6) works as the border of this single piece. Here a “side” means one point repeat, from the middle of one valley to the middle of the next. There are no square corners, so the corner-stitch rule for squares does not apply.
- Outline gauge: 2 rounds of sc = about 3/8 in (1.0 cm).
- Round 5, per point: 11 sc + ch-4 tip; 66 sc total.
- Round 6, per point: 13 sts + 2 picots + 1 tip chain; 78 sts total.
Why the math works:
- Round 4 has 7 sts per point (6 dc + 1 valley sc).
- Round 5 works those 7 sts 1 to 1, then adds 2 sc in the ch-1 sps and 2 sc in the tip. That gives 7 + 4 = 11 per point.
- In Round 6, the 11 sc split into 4 + 3 + 4. The two groups of 4 are worked 1 to 1 (8 sc). The center 3 become 1 sc3tog. Then 4 sc go into the tip: 8 + 1 + 4 = 13 per point.
- 13 × 6 = 78 ✓.
Each point is identical except that the top tip uses ch 18 instead of ch 3. The ch-18 is not counted as stitches, so the count stays 78.
Final Blocking
- Wet the snowflake in cool water and gently press out the excess in a towel. Do not wring it.
- Optional: dip it in diluted fabric stiffener for a firmer ornament.
- Lay it right side up on the blocking mat.
- Pin the center ring open, keeping it round at about 0.4 in (1.0 cm) across.
- Pin each of the 6 ch-3 tips out so they are 4.5 in (11.4 cm) from the opposite tip. Use a printed circle or a ruler to keep them evenly spaced at 60° apart.
- Pin each valley sc3tog at 3.5 in (8.9 cm) across from the opposite valley.
- Pin each picot outward so it shows as a small bump.
- Straighten each cream spoke so it points from the center toward a tip or a valley.
- Lay the hanging loop flat, straight up from the top point.
- Let it dry completely, usually 12–24 hours, before unpinning.
Final Quality-Control Checklist
- [ ] 6 points and 6 valleys, all evenly spaced
- [ ] 12 cream spokes visible around the center
- [ ] 6 large red point panels and 6 small red valley wedges
- [ ] 78 sts in Round 6, with 12 picots
- [ ] Every tip is sharp and every valley is pulled in
- [ ] Hanging loop is centered on the top point
- [ ] Measures 4.5 in (11.4 cm) point to point
- [ ] Lies flat with no cupping or ruffling
- [ ] All ends woven into the same color
Troubleshooting
The center cups or puckers. Round 1 is too tight. Remake the center with a looser tension or a 0.25 mm larger hook.
The snowflake ruffles. Your outline sc are too loose. Go down a hook size for Rounds 5–6 only.
The red panels look uneven. Recount Round 4. Each tip needs exactly 3 dc on each side of the ch-2.
The valleys don’t dip. Make sure the sc3tog is centered over the valley sc from Round 5.
Cream shows through the red. Carry no strands. Fasten off Color A after Round 2 and join Color B fresh.
The points look soft after blocking. Use fabric stiffener and pin each tip right at the ch-3.
The hanging loop is too long. Use ch 14 instead of ch 18. Rounds 5–6 do not change.
Care
Hand wash in cool water with mild soap, then reshape and dry flat. Re-block or re-stiffen as needed before storing the ornament flat in tissue paper.

Final Notes
Each stage builds on the last:
- Round 1 sets a 1 in (2.5 cm) ring of 24 dc.
- Round 2 makes 12 spokes at 1.75 in (4.4 cm).
- Rounds 3–4 add the red panels and reach 3.75 in (9.5 cm) from point to point.
- Rounds 5–6 add the 3/8 in (1.0 cm) cream outline and finish the snowflake at 4.5 in (11.4 cm), with 78 stitches, 12 picots and a 2 in (5.1 cm) hanging loop.
Check each measurement as you go and the final ornament will be sharp, flat and evenly balanced. One snowflake takes about an hour, so you can make a whole set for your tree.
Happy crocheting!