

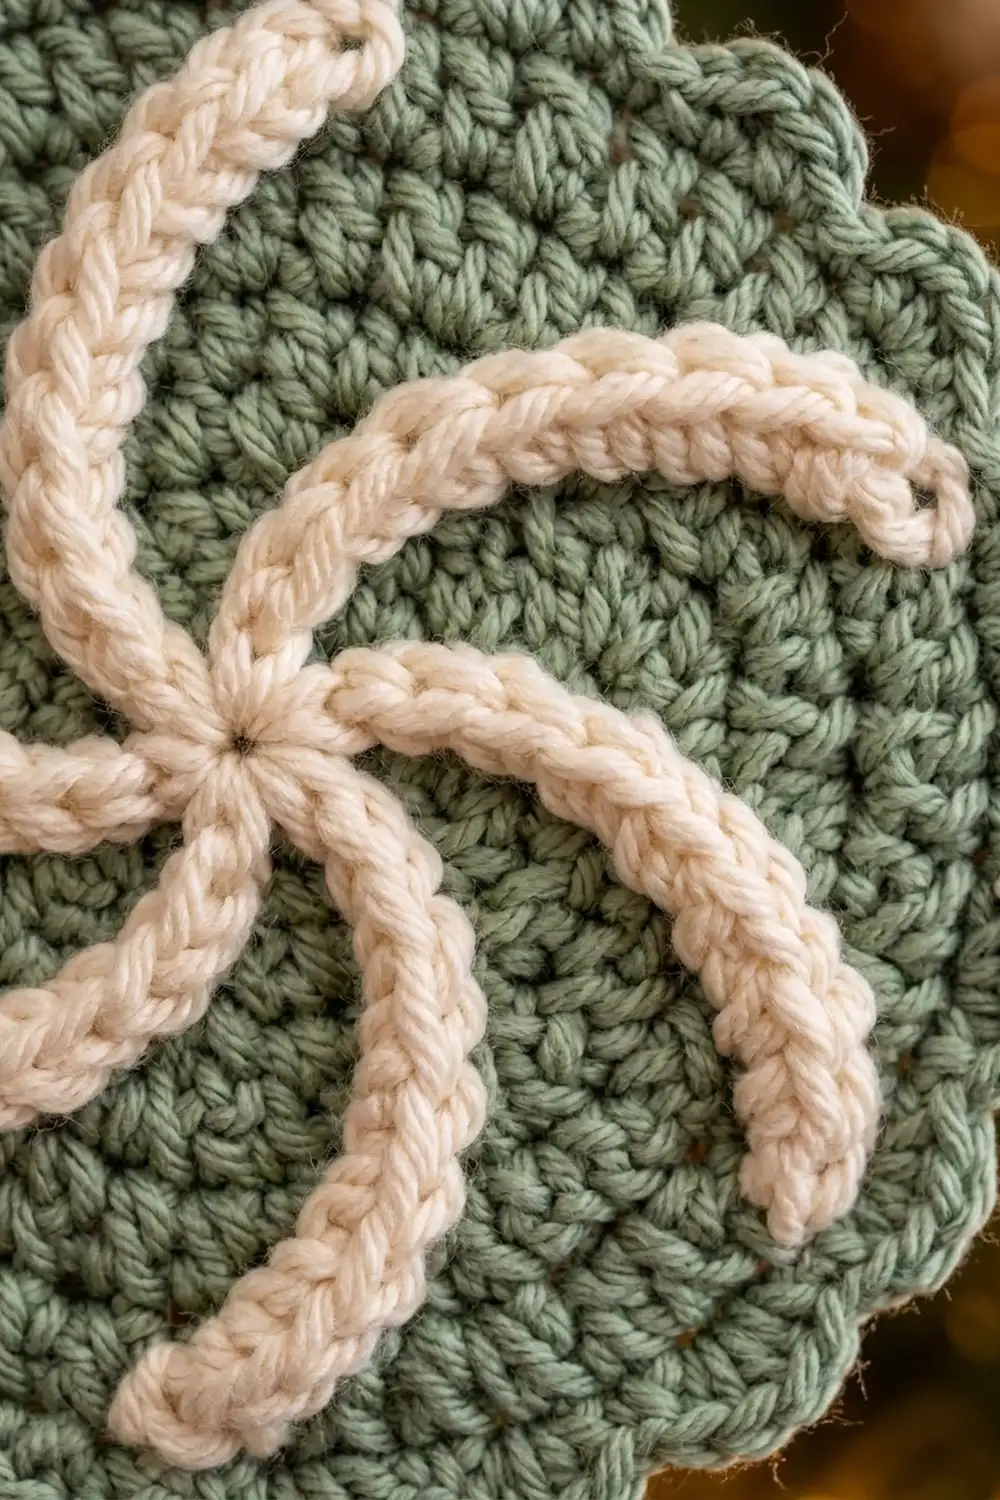
This ornament is a soft sage-green disc with seven cream arms that swirl out from the center like a peppermint pinwheel. A row of small scallops trims the edge, and a sturdy covered loop at the top lets it hang straight on a branch.
The look is calm and slightly vintage: muted green, warm cream, and tight, neat stitches. It also works as a gift tag, a package topper, or a window hanging.
The pattern uses US crochet terms. The finished ornament is 4.75 in (12.1 cm) across including the scalloped edge, and about 6.25 in (15.9 cm) tall including the loop.
Construction is simple. You crochet a flat circle of single crochet in joined rounds. Next you add the seven cream arms on top with surface slip stitch. Then you work one round of scallops and finish with the hanging loop. It is all one piece, so there is nothing to sew together.
Finished Size and Construction
- Finished size: 4.75 in (12.1 cm) across; 6.25 in (15.9 cm) tall with the loop
- Skill level: Easy / advanced beginner
- Terminology: US crochet terms
- Yarn weight: DK (light worsted, #3)
- Hook: 3.5 mm (E-4)
- Number of pieces: 1
- Layout: One round disc with surface decoration and an attached loop
- Piece size before border: 4 in (10.2 cm) across after Round 12
- Border depth: 0.375 in (1.0 cm) all around
- Hanging loop: about 1.5 in (3.8 cm) tall
Materials
Yarn: Use a smooth DK cotton or cotton blend. Cotton gives crisp stitch definition, keeps the disc flat, and makes the cream cords stand out clearly. Avoid fuzzy or very splitty yarns, because they hide the swirl.
- Color A, Sage Green: 15 g / about 35 m (38 yd), for the disc, the scallops, and the loop
- Color B, Cream: 5 g / about 12 m (13 yd), for the seven swirl arms, worked with the yarn held double
These amounts include a safety margin for gauge swatches and weaving in ends.
Tools:
- 3.5 mm (E-4) crochet hook
- 7 locking stitch markers, plus 1 extra
- Tapestry needle
- Scissors
- Ruler or tape measure
- Blocking mat and rust-proof pins
- Spray bottle with water
Abbreviations (US Terms)
- ch: chain
- sl st: slip stitch
- sc: single crochet
- dc: double crochet
- inc: 2 sc in the same stitch
- st(s): stitch(es)
- sk: skip
- MR: magic ring
- rep: repeat
Special stitch – surface slip stitch (surface sl st): Hold the yarn at the back of the work. Insert the hook from the front to the back through the fabric, then pull up a loop to the front. Insert the hook from front to back at the next point along your path, pull up a loop, and draw it through the loop already on the hook. Repeat from * to *. This makes a raised chain-like line on the front of the disc.
Gauge and Checkpoints
Gauge: 20 sc and 24 rounds = 4 in (10.2 cm) in sc with Color A and the 3.5 mm hook. That means each round adds about 1/6 in to the radius.
Measure as you go. These checkpoints matter more than a separate swatch:
- After Round 3 (21 sts): 1 in (2.5 cm) across
- After Round 6 (42 sts): 2 in (5.1 cm) across
- After Round 9 (63 sts): 3 in (7.6 cm) across
- After Round 12 (84 sts): 4 in (10.2 cm) across
- After the border: 4.75 in (12.1 cm) across
If your circle is too big, go down to a 3.25 mm hook. If it is too small, go up to a 3.75 mm hook. Restart from Round 1 rather than adding or removing rounds, because the scallop count depends on ending Round 12 with exactly 84 sts.
If the disc cups, your tension is too tight on the increases; loosen up slightly or go up a hook size. If it ruffles, your stitches are too loose; go down a hook size.
Disc (Color A)
Join each round with a sl st to the first sc. Ch 1 at the start of each round does not count as a stitch. Increases are stacked on Rounds 1–5 and staggered from Round 6 onward, which keeps the disc round instead of seven-sided.
Round 1: With Color A, make a MR. Ch 1, work 7 sc into the ring, then join. Pull the ring tight. (7 sts)
Round 2: Ch 1, inc in each st around, join. (14 sts)
Round 3: Ch 1, sc 1, inc, rep 7 times, join. (21 sts) Check: 1 in (2.5 cm).
Round 4: Ch 1, sc 2, inc, rep 7 times, join. (28 sts)
Round 5: Ch 1, sc 3, inc, rep 7 times, join. (35 sts)
Round 6: Ch 1, sc 2, inc, sc 2, rep 7 times, join. (42 sts) Check: 2 in (5.1 cm).
Round 7: Ch 1, sc 5, inc, rep 7 times, join. (49 sts)
Round 8: Ch 1, sc 3, inc, sc 3, rep 7 times, join. (56 sts)
Round 9: Ch 1, sc 7, inc, rep 7 times, join. (63 sts) Check: 3 in (7.6 cm).
Round 10: Ch 1, sc 4, inc, sc 4, rep 7 times, join. (70 sts)
Round 11: Ch 1, sc 9, inc, rep 7 times, join. (77 sts)
Round 12: Ch 1, sc 5, inc, sc 5, rep 7 times, join. (84 sts) Check: 4 in (10.2 cm).
Do not fasten off. Pull the working loop up to about 2 in (5.1 cm), slip the extra marker into it so it can’t unravel, and set the green yarn aside. You will come back to it for the border.
The round-by-round totals grow by exactly 7 each time: 7, 14, 21, 28, 35, 42, 49, 56, 63, 70, 77, 84. Round 12 is Round 12 × 7 = 84, which is the number the border needs.
Pinwheel Swirl Arms (Color B)
The seven arms are surface slip stitch lines that run from Round 2 out to Round 11. They leave a small green center and one plain green round (Round 12) inside the scallops.
Mark the starting points: On Round 2 (14 sts), place a locking marker in every other stitch so you have 7 markers spaced evenly around the center. Choose a side to be the front; the join seam can sit on the back of the swirl path or anywhere, since the cords cover it well.
Prepare the yarn: Cut about 1.5 m (59 in) of Color B and fold it in half so you work with the yarn held double. Held double, the cord is bold and rounded like the cords in the photo. Make one arm per length.
Arm path (work 7 times):
- With the yarn held behind the disc, insert the hook from the front through the center of a marked Round 2 stitch. Pull up a loop and leave a 6 in (15.2 cm) tail at the back. Remove the marker.
- Straight section: Work 1 surface sl st into the stitch directly outward in Round 3, then 1 into the stitch directly outward in Round 4. (2 sl sts)
- Curved section: For each of Rounds 5 through 11, work 1 surface sl st into the stitch that is one stitch clockwise of directly outward (seen from the front). (7 sl sts)
- That gives 9 surface sl sts per arm. Cut the yarn, pull the end through to the back, and leave a 6 in (15.2 cm) tail.
The 2 straight sts plus 7 shifted sts make the arm leave the center as a straight line and then sweep into a smooth curve. Each arm is about 1.9 in (4.8 cm) long, measured along the curve.
Why the arms never collide: All seven arms shift by the same 7 sts in the same direction, so they stay evenly spaced. At Round 11, each seventh of the round holds 11 sts. Each arm ends 7 sts clockwise of its own starting line, so there are still 4 green stitches before the next arm’s line.
Tension: Keep the surface sl sts the same length as one round of sc, about 1/6 in. If you pull tight, the disc puckers; if you work loose, the cord sags. Check that the disc still lies flat after each arm.
Weave all 14 cream tails into the back of the disc along the line of each arm, so they don’t show through the green.
Total cream surface sl sts: 7 arms × 9 = 63.
Border (Color A)
Border gauge: One scallop uses 4 sts of Round 12 and is about 0.7 in (1.8 cm) wide along the outer edge. The scallops add 0.375 in (1.0 cm) all around.
Take the marker out of the green working loop, put the loop back on the hook, and tighten it.
Round 13 (scallops): Ch 1, sc in the same st as the join (st 1). Sk 1 st, 5 dc in next st, sk 1 st, sc in next st. Rep from * to * 19 more times. Then sk 1 st, 5 dc in next st (st 83), sk 1 st (st 84), and join with a sl st to the first sc.
Count: 21 scallops. Each scallop is 1 sc + 5 dc, so the round has 21 sc + 105 dc = 126 sts.
Why the math works: Round 12 has 84 sts, and each scallop uses exactly 4 (sc, skip, 5 dc, skip). 84 ÷ 4 = 21 scallops with nothing left over. Each 5-dc shell fills a 3-st span (skip, shell, skip), which adds just enough outer length for the wider circle without ruffling. Because the disc is round, there are no corners to count. Each of the 21 repeats is the same.
Do not fasten off yet.
Hanging Loop (Color A)
Choose the scallop sc nearest the top of a swirl arm so the pinwheel hangs nicely. If your join is not at that spot, sl st along the edge to reach the chosen sc.
- In the chosen sc, ch 16, then sl st into the same sc to form a loop.
- Work 24 sc over the chain loop (into the loop space, covering the chain), keeping the stitches packed tight.
- Sl st into the base sc. Fasten off, leaving a 6 in (15.2 cm) tail.
The loop stands about 1.5 in (3.8 cm) tall. Weave the tail down through the base of the loop and into the back of the disc to make the join stronger.
Final Blocking
- Weave in any remaining green ends on the back, working through the sc fabric only.
- Spray the ornament lightly until damp, not soaked.
- Lay it face up on a blocking mat. Gently pat the disc into a true circle 4 in (10.2 cm) across at the outer edge of Round 12.
- Pin out each of the 21 scallops so the full width measures 4.75 in (12.1 cm). Put a pin at each sc between shells so the dc shells stay rounded.
- Run a finger along each cream arm to settle the cord evenly.
- Pin the loop straight up, measuring 1.5 in (3.8 cm).
- Let it dry completely, at least 8 hours, before unpinning.
For a stiffer ornament, you can mist the back with a diluted fabric stiffener before drying.
Final Quality-Control Checklist
- Round 12 has exactly 84 sts, and the disc measures 4 in (10.2 cm) across.
- The disc lies flat with no cupping or ruffling.
- There are 7 cream arms, each with 9 surface sl sts.
- All arms curve in the same direction and are evenly spaced.
- The center has a small green gap, and Round 12 is plain green.
- There are 21 even scallops, and the finished width is 4.75 in (12.1 cm).
- The loop is about 1.5 in (3.8 cm) tall, fully covered in sc, and secure.
- There are no visible tails on the front.
Troubleshooting
The disc is cupping. Your tension is too tight or your hook is too small. Go up 0.25 mm and restart.
The disc is wavy. Your stitches are too loose. Go down 0.25 mm, or check that you didn’t add extra increases.
Your stitch count is off at the border. Count Round 12 again; it must be 84. If you have 83 or 85, fix Round 12 rather than fudging the scallops.
The arms pucker the fabric. Your surface sl sts are too tight. Undo the arm and redo it with a slightly larger hook, such as 4 mm (G-6), for the cream only.
The arms look thin. Make sure Color B is held double, or use a slightly thicker cream yarn.
The arms bunch up or overlap. You have shifted more than 1 st per round, or started a round too early. Follow the 2 straight + 7 shifted pattern exactly.
The ornament hangs crooked. Move the loop to the sc directly above an arm end, opposite the seam.
The scallops flip forward. Block them flat with a pin at every sc between shells.
Care
Hand wash cold with mild soap, press out the water in a towel, and dry flat, re-shaping the scallops. Store flat or hanging, away from direct sunlight, so the sage doesn’t fade.

Final Notes
The whole ornament follows one measurement chain. Round 3 measures 1 in (2.5 cm), Round 6 measures 2 in (5.1 cm), Round 9 measures 3 in (7.6 cm), and Round 12 measures 4 in (10.2 cm) with exactly 84 sts. Those 84 sts make 21 scallops, which bring the ornament to 4.75 in (12.1 cm). The 1.5 in (3.8 cm) loop brings the total height to 6.25 in (15.9 cm).
The seven cream arms use 63 surface sl sts in all, 9 per arm. If you hit each checkpoint, the swirl and the scallops will line up on their own.
Once you have made one, you can make a whole set for the tree, or swap in other color pairs for gift tags. Happy crocheting!