

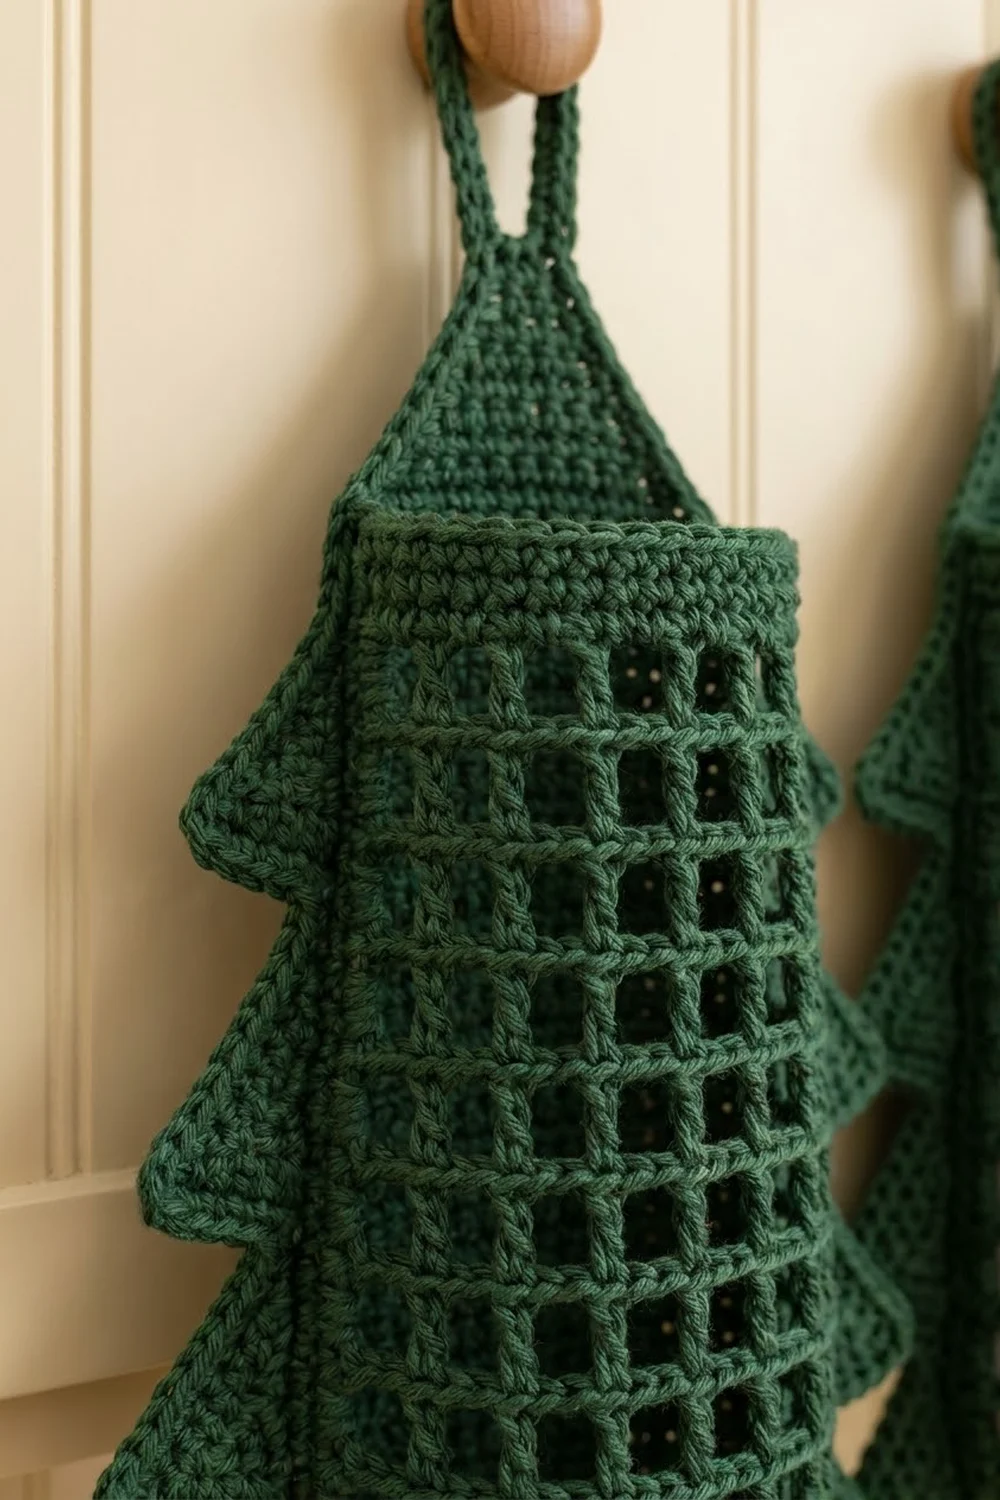
This holder keeps your plastic grocery bags in one tidy place and doubles as a holiday decoration. It has a flat, three-tier tree panel with a hanging loop, and a mesh tube sewn to the front. You push bags in at the top and pull them out one at a time at the bottom, right above the little trunk.
The whole piece uses one deep forest green. The squares of the open mesh let the white bags show through, so the tube looks like a checkered pattern against the solid green tree. The look is clean, graphic, and a bit farmhouse.
This pattern uses US crochet terms. The finished holder measures 9.25 in (23.5 cm) wide by 16.5 in (41.9 cm) tall, not counting the hanging loop, which adds about 2.5 in (6.4 cm).
Here’s how it comes together. First you work the tree panel from the bottom up in filet crochet: solid blocks on the sides, a column of mesh down the center, and simple decreases and step-outs that form the tiers. Next you add the trunk to the bottom edge. Then you crochet the tube in joined rounds, give the panel a single crochet border, add the loop, and sew the tube in place.
Finished Size and Construction
- Finished size: 9.25 in (23.5 cm) wide x 16.5 in (41.9 cm) tall, plus a 2.5 in (6.4 cm) loop
- Skill level: Intermediate (filet shaping, foundation double crochet)
- Terminology: US
- Yarn weight: #4 worsted, cotton
- Hook: 5.0 mm (H-8)
- Number of pieces: 2 (tree panel and mesh tube); the trunk, border, and loop are worked onto the panel
- Layout: Tube centered on the front of the panel, sitting over panel Rows 1–20
- Panel size before border: 8.75 in (22.2 cm) wide x 16 in (40.6 cm) tall
- Tube size: 8 in (20.3 cm) around, which is 4 in (10.2 cm) wide when flattened, x about 10 in (25.4 cm) long
- Border depth: 0.25 in (0.6 cm) on every edge
Materials
Use a smooth worsted-weight cotton or cotton blend. Cotton holds the tree shape, doesn’t stretch out under the weight of the bags, and keeps the mesh squares crisp. Acrylic will work, but the tube will sag more over time.
- Forest green: 130 g / 220 m in total
- Panel, border, and loop: about 65 g / 110 m
- Tube: about 35 g / 60 m
These quantities include a margin of about 30 g / 50 m for your gauge swatch and small tension differences. The photo shows two holders; the amounts above are for one.
Tools:
– 5.0 mm (H-8) crochet hook
– Tapestry needle
– 4–6 locking stitch markers
– Ruler or tape measure
– Scissors
– Rustproof pins and a blocking mat
Abbreviations (US Terms)
- ch: chain
- sl st: slip stitch
- sc: single crochet
- dc: double crochet
- sk: skip
- sp: space
- st(s): stitch(es)
- tch: turning chain
- RS: right side
Foundation double crochet (fdc): Yarn over and insert your hook into the base of the last stitch: the “chain” at the bottom of the dc you just made. Yarn over and pull up a loop (3 loops on hook). Yarn over and pull through 1 loop; this makes the new base chain. Then [yarn over, pull through 2 loops] twice. This adds one dc to the end of a row without a chain.
Turning chain: Throughout the panel, ch 3 at the start of a row counts as 1 dc.
Gauge and Checkpoints
- Double crochet: 16 dc and 8 rows = 4 in (10.2 cm)
- Filet mesh: 8 mesh squares = 4 in (10.2 cm), so each square is 0.5 in (1.3 cm) wide and tall
- Single crochet: 16 sts and 18 rows = 4 in (10.2 cm)
Before starting the panel, work the tube’s first 4 rounds as your gauge test. Lay it flat. It should measure 4 in (10.2 cm) across. If it’s too wide, go down half a hook size; if it’s too narrow, go up half a size.
Panel checkpoints:
– After Row 2: 8.75 in (22.2 cm) wide, 1 in (2.5 cm) tall
– After Row 8: 4 in (10.2 cm) tall
– After Row 16: 8 in (20.3 cm) tall
– After Row 28: 14 in (35.6 cm) tall
– With the trunk: 16 in (40.6 cm) tall
If you’re more than 0.25 in (0.6 cm) off at any checkpoint, change hooks and rework from the last checkpoint. Small errors grow with every tier.
Tree Panel
How the filet rows work
Each row has a column of 7 mesh squares in the center (15 sts) with solid dc blocks on both sides. Call the number of solid squares on each side s. The row then has 2s solid sts on each side, so its total is 4s + 15.
Straight row: Ch 3, dc in next (2s − 1) sts, dc in next st, (ch 1, sk next st or ch-1 sp, dc in next dc) 7 times, dc in next (2s − 1) sts, dc in top of tch.
Decrease row (removes 2 sts at each end): Sl st in first 3 sts, ch 3 (this counts as a dc in the 3rd st), dc in next (2s − 1) sts, dc in next st, (ch 1, sk next st or ch-1 sp, dc in next dc) 7 times, dc in next 2s sts, leave last 2 sts unworked.
Each decrease leaves a 2-stitch ledge at each end. These ledges form the slanted sides of each tier.
Tier 1
Row 1 (RS): Ch 37. Dc in 4th ch from hook (the skipped 3 ch count as a dc) and in next 8 ch, dc in next ch, (ch 1, sk next ch, dc in next ch) 7 times, dc in last 10 ch. Turn. (35 sts: 10 solid + 15 mesh + 10 solid; s = 5)
Row 2: Straight row with s = 5. (35 sts)
Row 3: Decrease row with s = 4. (31 sts)
Row 4: Straight row, s = 4. (31 sts)
Row 5: Decrease row, s = 3. (27 sts)
Row 6: Straight row, s = 3. (27 sts)
Row 7: Decrease row, s = 2. (23 sts)
Row 8: Straight row, s = 2. (23 sts)
Checkpoint: Tier 1 is 4 in (10.2 cm) tall and 8.75 in (22.2 cm) wide at the bottom.
Tier 2
Row 9 (step-out, s = 4): Ch 6. Dc in 4th ch from hook and in next 2 ch; these are 4 new sts, counting the ch-3. Dc in first st and in next 3 sts (8 solid sts). Dc in next st, (ch 1, sk ch-1 sp, dc in next dc) 7 times, dc in next 3 sts, dc in top of tch, then work 4 fdc. (31 sts)
This row works all 23 sts of Row 8 and adds 4 sts at each end, so 23 + 8 = 31.
Row 10: Straight row, s = 4. (31 sts)
Row 11: Decrease row, s = 3. (27 sts)
Row 12: Straight row, s = 3. (27 sts)
Row 13: Decrease row, s = 2. (23 sts)
Row 14: Straight row, s = 2. (23 sts)
Row 15: Decrease row, s = 1. (19 sts)
Row 16: Straight row, s = 1. (19 sts)
Checkpoint: the panel is 8 in (20.3 cm) tall. Tier 2 is 7.75 in (19.7 cm) wide at its base.
Tier 3 and Solid Top
Row 17 (step-out, s = 3): Ch 6. Dc in 4th ch from hook and in next 2 ch (4 new sts). Dc in first st and next st (6 solid sts). Dc in next st, (ch 1, sk ch-1 sp, dc in next dc) 7 times, dc in next st, dc in top of tch, then work 4 fdc. (27 sts)
That’s 19 sts from Row 16 plus 8 new sts.
Row 18: Straight row, s = 3. (27 sts)
Row 19: Decrease row, s = 2. (23 sts)
Row 20: Straight row, s = 2. (23 sts)
This is the last mesh row; the tube will cover Rows 1–20.
From here on the rows are solid. Work a dc into every dc and every ch-1 sp.
Row 21: Sl st in first 3 sts, ch 3, dc in each st across, leaving last 2 sts unworked. (19 sts)
Row 22: Ch 3, dc in each st across. (19 sts)
Rows 23–24: Repeat Rows 21–22. (15 sts)
Rows 25–26: Repeat Rows 21–22. (11 sts)
Rows 27–28: Repeat Rows 21–22. (7 sts)
Fasten off. Checkpoint: 14 in (35.6 cm) tall. The top edge is 1.75 in (4.4 cm) wide, and Tier 3 is 6.75 in (17.1 cm) wide at its base.
Trunk
Turn the panel upside down so the free loops of the foundation chain face you. Counting from the edge, the 35 base sts split into 11 + 13 + 11.
Row 1: Join yarn in base st 12. Ch 1, sc in same st and in next 12 sts. Turn. (13 sc)
Rows 2–9: Ch 1, sc in each st across. Turn. (13 sc)
Fasten off. The trunk is 3.25 in (8.3 cm) wide and 2 in (5.1 cm) long. The panel now measures 8.75 in x 16 in (22.2 x 40.6 cm).
Mesh Tube
Rnd 1: Ch 32 loosely and sl st to the first ch to make a ring, taking care not to twist it. Ch 1, sc in each ch around, then sl st to first sc to join. (32 sc)
Rnd 2: Ch 4 (counts as dc + ch 1), sk next sc, (dc in next sc, ch 1, sk next sc) 15 times, then sl st to 3rd ch of beginning ch-4 to join. (16 dc + 16 ch-1 sps = 32 sts; 16 mesh squares)
Rnds 3–20: Ch 4 (counts as dc + ch 1), (dc in next dc, ch 1) 15 times, then sl st to 3rd ch of ch-4 to join. (32 sts each round)
Rnd 21 (trim): Ch 1, sc in each dc and in each ch-1 sp around, then sl st to join. (16 sc in dc + 16 sc in sps = 32 sc)
Fasten off and leave a 40 in (101.6 cm) tail for sewing. The tube has 19 mesh rounds, about 9.5 in (24.1 cm), plus two sc rims, for a total length of about 10 in (25.4 cm).
Make All Pieces
For one holder:
– 1 tree panel with trunk (green, about 60 g)
– 1 mesh tube (green, about 35 g)
– Border and loop (green, about 5 g), worked after joining
          [ loop ]
        [ solid top ]
  [tier 3][ TUBE ][tier 3]
 [ tier 2 ][ TUBE ][ tier 2 ]
[  tier 1  ][ TUBE ][  tier 1  ]
           [ trunk ]
Joining the Tube to the Panel
Flatten the tube so the round joins run down one fold line. This puts 8 mesh squares on the front and 8 on the back. Lay it RS up over the panel, with the bottom rim along the bottom edge of Row 1 and the top rim along the top of Row 20.
The flattened tube is 4 in (10.2 cm) wide and the panel’s mesh column is 3.75 in (9.5 cm) wide. That extra 0.25 in (0.6 cm) gives the bags room to slide through. Each fold line of the tube sits on the outer dc of the panel’s mesh column, the first dc beside the solid blocks.
Use the tail to whipstitch each fold to that column of dc. Make one stitch per row end: 20 stitches along each side, plus 1 anchor stitch through each rim corner. Sew only through the back layer of the tube and the panel. Leave both rims open.
Keep your stitches snug but not puckered. The tube should lie flat without pulling the panel inward. Checkpoint: the panel should still measure 8.75 in (22.2 cm) at Row 1.
Border
Border gauge: 1 sc for every 0.25 in (0.6 cm) of edge. In practice:
– 2 sc in each dc row end (each row is 0.5 in)
– 1 sc in each exposed ledge or base stitch (each is 0.25 in)
– 8 sc along the 9 sc rows of each trunk side (2 in)
Rnd 1: With RS facing, join yarn in the first of the 7 sts on the top edge of Row 28. Ch 1 and work:
- Top: 1 sc in each of 7 sts. (7 sc) Then ch 1 for the corner.
- Left side, going down:
- Tier 3 (12 row ends and 5 ledges): 34 sc. Ch 1 at the tier tip, then 4 sc under the step.
- Tier 2 (8 row ends and 3 ledges): 22 sc. Ch 1 at the tip, then 4 sc under the step.
- Tier 1 (8 row ends and 3 ledges): 22 sc. Ch 1 at the tip.
- That’s 86 sc down this side.
- Base and trunk:
- 11 sc in the free foundation loops
- 8 sc down the trunk side, ch 1, 13 sc across the trunk bottom, ch 1, 8 sc up the other trunk side
- 11 sc in the foundation loops
- Ch 1 at the Tier 1 tip
- Right side, going up: 22 sc, 4 sc under the step, ch 1 at the tip, 22 sc, 4 sc, ch 1 at the tip, 34 sc. That’s 86 sc. Ch 1 for the corner, then sl st to the first sc to join.
Total: 7 + 86 + 22 + 29 + 86 = 230 sc, plus 10 ch-1 corner spaces
Rnd 2: Sl st in each sc and in each ch-1 sp around. (240 sl sts) Don’t fasten off.
Why the math works: Every edge gets exactly 1 sc per 0.25 in (0.6 cm). A 0.5 in dc row end gets 2 sc, a 2-stitch ledge gets 2 sc, and the trunk’s 2 in sides get 8 sc. Because the density is the same everywhere, the border lies flat without ruffling or cupping. The ch-1 spaces let the sharp tips turn without adding stitches to the side counts.
The border adds 0.25 in (0.6 cm) to every edge, so the panel finishes at 9.25 in (23.5 cm) wide and 16.5 in (41.9 cm) tall.
Hanging loop: Sl st along the border to the center (4th) sc of the top edge. Ch 20, then sl st in the same st. Work 26 sc into the chain loop, then sl st in the base. Fasten off. The loop hangs about 2.5 in (6.4 cm) above the top.
Final Blocking
- Mist the holder until it’s evenly damp, or soak it and roll it in a towel.
- Pin the panel flat on a mat, face down, at 9.25 in (23.5 cm) wide and 16.5 in (41.9 cm) tall.
- Pin each tier tip to a sharp point and straighten the slanted sides.
- Turn it face up and slip a rolled towel inside the tube so it dries round and the squares stay even.
- Let it dry completely before you add any bags.
Final Quality-Control Checklist
- Panel is 9.25 in x 16.5 in (23.5 x 41.9 cm)
- Each tier has 3 even ledges per side (Tier 3 has 5), and both sides match
- The mesh column runs straight from Row 1 to Row 20
- The tube shows 8 squares on the front and both rims are open
- Border Rnd 1 has 230 sc and 10 ch-1 spaces
- The loop is centered and securely anchored
- All ends are woven in along the solid blocks
Troubleshooting
- The tiers lean to one side: You missed a decrease at one end. Count the ledges on each side.
- The mesh squares look tall and narrow: Your dc are too loose vertically. Pull each loop snug before you yarn over.
- The step-out edge is tight: Make your ch 6 and fdc looser, or go up half a hook size just for those stitches.
- The border ruffles at the inner corners: Work the 4 step stitches a little tighter. Don’t add extra stitches.
- Bags jam in the tube: Re-sew the fold lines right on the outer mesh dc so you keep the full 0.25 in (0.6 cm) of ease.
Care
Hand wash in cool water, press out the excess, and dry flat with the tube stuffed so it keeps its shape. Don’t tumble dry.

Final Notes
The measurement chain runs like this:
1. Gauge: 0.5 in (1.3 cm) mesh squares
2. Panel: 8.75 in x 14 in (22.2 x 35.6 cm)
3. Trunk adds 2 in (5.1 cm), bringing the panel to 16 in (40.6 cm) tall
4. The 4 in (10.2 cm) flattened tube sits over the 3.75 in (9.5 cm) mesh column
5. The border adds 0.25 in (0.6 cm) on every edge, for a finished size of 9.25 in x 16.5 in (23.5 x 41.9 cm)
If each checkpoint matches, the holder will come out the right size. Happy crocheting!