

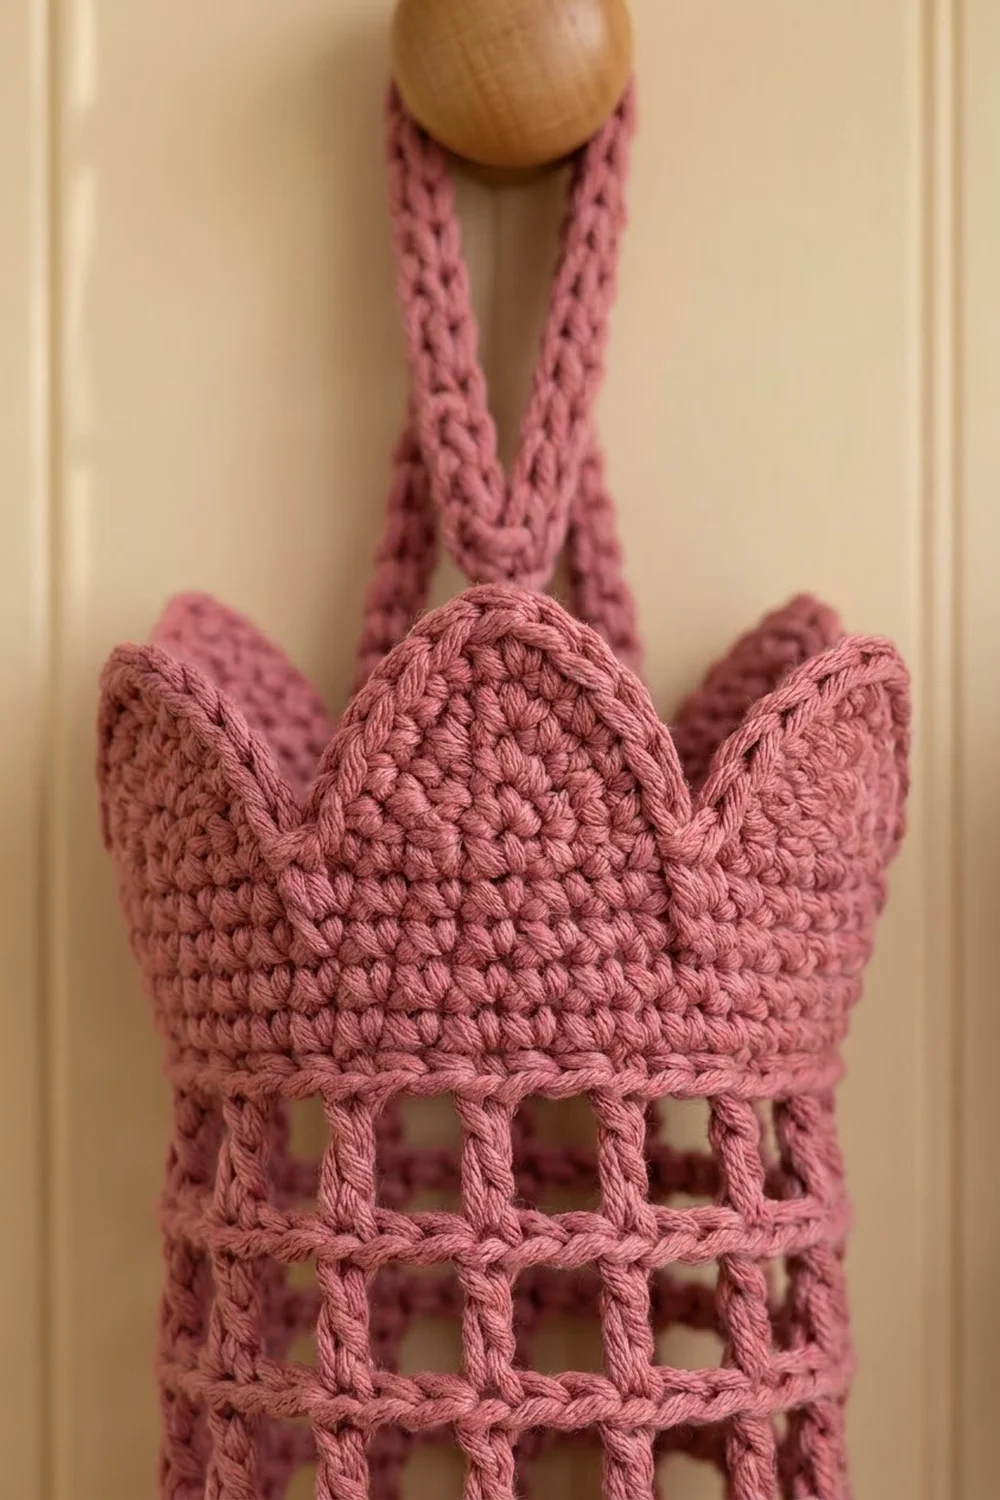
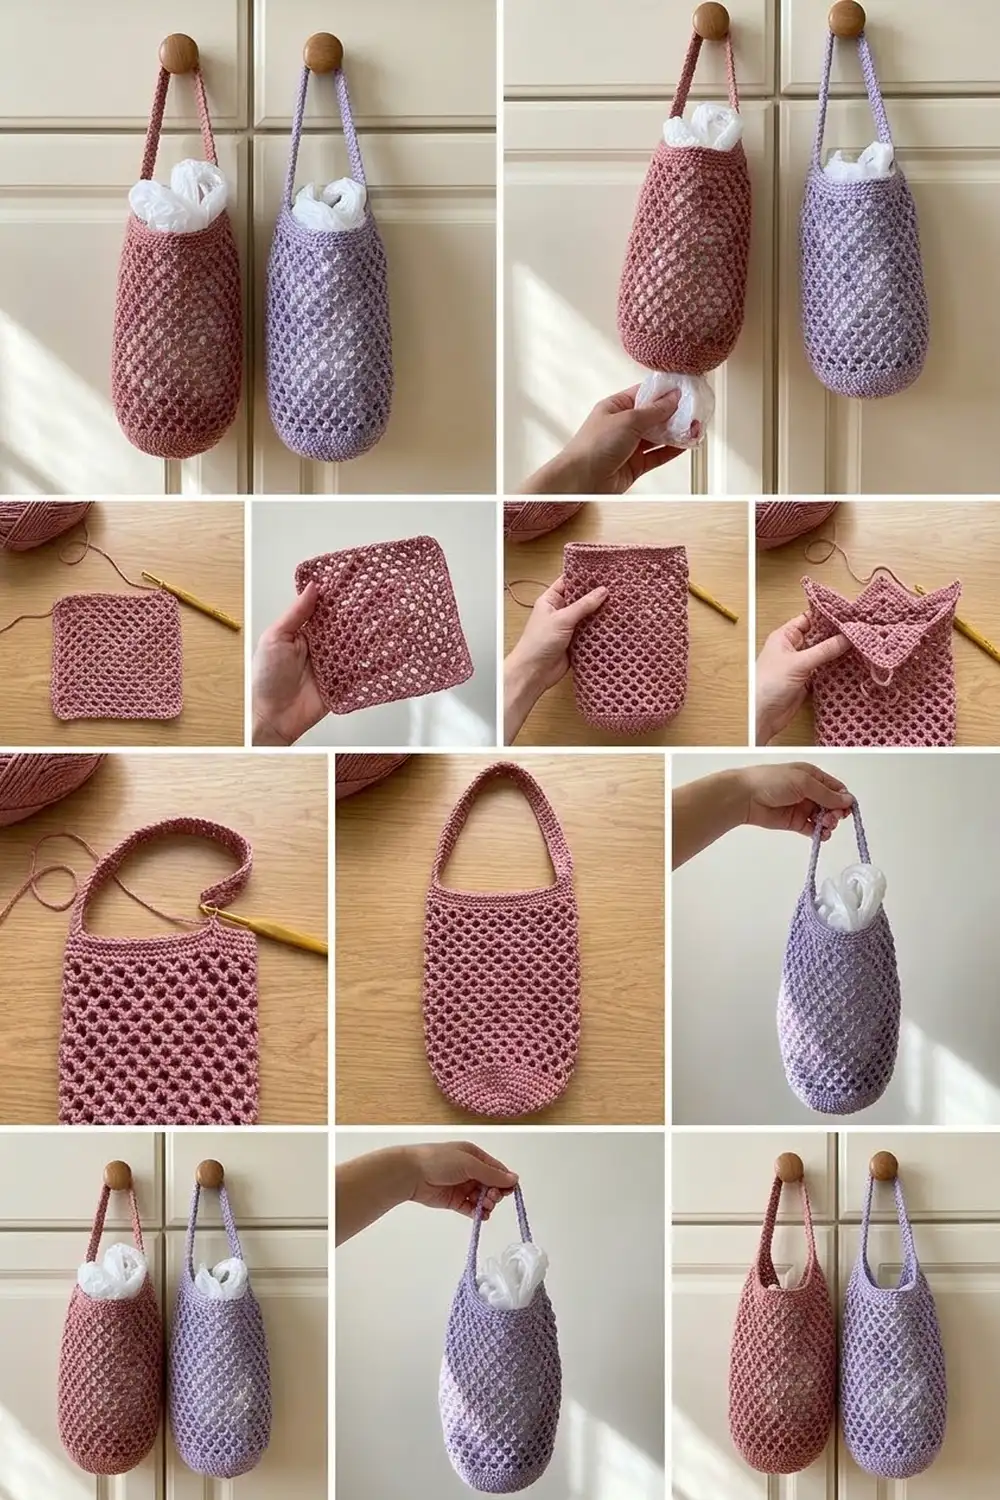
This plastic bag holder is a tall, open-grid tube that keeps loose grocery bags tidy and easy to see. Bags go in through the top and pull out one at a time from a small, firm opening at the bottom. A crown of pointed petals finishes the top edge, and a sturdy strap rises from two of the petals so you can hang the holder on a peg or knob.
The sample is worked in one solid color, a soft dusty rose. A second holder in lavender shows that the design works in any calm, matte cotton. The square mesh looks bold and graphic, and the solid bands at the top and bottom give the tube enough structure to keep its shape when full.
This pattern uses US crochet terms. The finished holder measures about 6 in (15.2 cm) wide when laid flat, 12 in (30.5 cm) around, and 19 in (48.3 cm) tall from the bottom edge to the petal tips, not counting the strap.
The holder is one single piece, worked in joined rounds from the bottom up. You start with a narrow single crochet band, increase to full width, work a filet-style mesh body and a solid top band, then add six petals in short rows and a strap. A two-round edging on the bottom opening finishes it.
Finished Size and Construction
- Finished size: 6 in (15.2 cm) wide flat x 19 in (48.3 cm) tall; 12 in (30.5 cm) circumference
- Skill level: Easy / Advanced Beginner
- Terminology: US crochet terms
- Yarn weight: Worsted (#4), cotton or cotton blend
- Hook: US H-8 (5.0 mm)
- Number of pieces: 1 (the strap is worked directly onto the holder)
- Layout: single seamless tube, worked bottom up in joined rounds
- Piece size: 12 in (30.5 cm) around at the body; 8 in (20.3 cm) around at the bottom opening
- Size before border: 18.75 in (47.6 cm) tall
- Border depth: 0.25 in (0.6 cm), on the bottom opening only
Materials
Yarn: Choose a worsted-weight cotton or cotton blend. Cotton keeps the mesh squares crisp and stretches very little under the weight of bags. Avoid very fuzzy or very stretchy acrylics, which blur the grid and let the tube sag.
- Main color (dusty rose in the sample): 90 g, about 165 m (180 yd)
- Optional second holder (lavender in the sample): another 90 g, about 165 m (180 yd)
These quantities include a margin of about 15 percent for your gauge swatch and small differences in tension.
Tools:
- US H-8 (5.0 mm) crochet hook
- 2 stitch markers
- Tapestry needle
- Scissors
- Measuring tape
- Rust-proof pins and a cylinder for blocking (a rolled towel works)
Abbreviations (US Terms)
- ch – chain
- sl st – slip stitch
- sc – single crochet
- dc – double crochet
- sc2tog – single crochet 2 together
- sp – space
- st(s) – stitch(es)
- beg – beginning
- rep – repeat
- rnd(s) – round(s)
Special stitch – sc2tog: Insert the hook in the next st, yarn over, and pull up a loop (2 loops on hook). Insert the hook in the following st, yarn over, and pull up a loop (3 loops on hook). Yarn over and pull through all 3 loops. This decreases 1 stitch.
Mesh square: One dc post plus the ch-2 space beside it. Each mesh square uses 3 sts of the round below.
Gauge and Checkpoints
Gauge matters here because the mesh body is long. A small error in each round adds up over 18 rounds.
- Single crochet: 16 sc and 16 rows = 4 in (10.2 cm)
- Mesh: 4 mesh squares wide and 4 mesh rounds tall = 3 in (7.6 cm), so each square is 0.75 in (1.9 cm)
Test first: Chain 25. Work 8 rows of sc (24 sc per row). Then work 4 rows of mesh: ch 5, skip the first 2 sts, dc in the next st, then (ch 2, skip 2, dc in next) across, for 8 mesh squares. Measure the sc section and the mesh section separately.
Checkpoints while you work the holder:
- After Rnd 4: 8 in (20.3 cm) around
- After Rnd 8: 12 in (30.5 cm) around, 2 in (5.1 cm) tall
- After Mesh Rnd 9: 6.75 in (17.1 cm) of mesh, 8.75 in (22.2 cm) total
- After Mesh Rnd 18: 15.5 in (39.4 cm) total
- After the top band: 17 in (43.2 cm) total
- After the petals: 18.75 in (47.6 cm) total
If your piece is too big, go down one hook size (4.5 mm). If it is too small, go up one hook size (5.5 mm). If only the mesh height is off, you can add or remove mesh rounds. Each round changes the height by 0.75 in (1.9 cm). Do not change the stitch counts, because the petals depend on 48 sts.
Pattern
Join every round with a sl st and work with the right side facing. Do not turn unless the pattern tells you to. The beg ch 1 does not count as a stitch. In mesh rounds, the beg ch 5 counts as 1 dc plus 1 ch-2 sp.
Bottom Band
Ch 32. Without twisting the chain, sl st in the first ch to form a ring. Place a marker in the foundation ring so you can find it later for the border.
Rnd 1: Ch 1, sc in each ch around, sl st in the first sc to join. (32 sc)
Rnds 2–4: Ch 1, sc in each st around, join. (32 sc)
Checkpoint: the ring measures 8 in (20.3 cm) around and about 2.5 in (6.4 cm) across. This narrow section becomes the dispensing opening.
Rnd 5 (growth round): Ch 1, *sc in next st, 2 sc in next st; rep from * 16 times, join. (48 sc)
Rnds 6–8: Ch 1, sc in each st around, join. (48 sc)
Checkpoint: 12 in (30.5 cm) around and 2 in (5.1 cm) tall. The band flares gently from the opening to full width.
Mesh Body
Mesh Rnd 1 (conversion round): Ch 5 (counts as dc and ch-2 sp), skip next 2 sts, *dc in next st, ch 2, skip next 2 sts; rep from * 15 times, sl st in 3rd ch of beg ch-5. (16 dc + 16 ch-2 sps = 16 mesh squares, 48 sts)
Here is how the count works. The beg ch-5 sits on st 1 and skips sts 2–3. Each repeat places a dc on sts 4, 7, 10, and so on up to st 46, and the last ch 2 skips sts 47–48. That accounts for every stitch.
Mesh Rnds 2–18: Ch 5 (counts as dc and ch-2 sp), *dc in next dc, ch 2; rep from * 15 times, sl st in 3rd ch of beg ch-5. (16 mesh squares)
Place each dc directly on top of the dc below so the vertical bars run straight up the tube. Make the ch 2 snug but not tight. It should be as wide as the dc is tall so the squares stay square.
Checkpoint: the 18 mesh rounds measure 13.5 in (34.3 cm). The holder is now 15.5 in (39.4 cm) tall and 12 in (30.5 cm) around.
Top Band
Rnd 1 (conversion round): Ch 1, sc in same st as join, 2 sc in next ch-2 sp, *sc in next dc, 2 sc in next ch-2 sp; rep from * 15 times, join. (16 sc worked 1 per dc + 32 sc worked 2 per ch-2 sp = 48 sc)
Rnds 2–6: Ch 1, sc in each st around, join. (48 sc)
Fasten off after Rnd 6. Checkpoint: the top band is 1.5 in (3.8 cm) tall and the holder is 17 in (43.2 cm) tall.
Petal Crown
You work the six petals one at a time in short rows, over 8 sts each (6 x 8 = 48). Lay the tube flat and choose 8 sts at the center front for Petal 1. Mark its first stitch, then mark the base of every petal before you start (8 sts per petal). Petal 4 will then sit at the center back.
Petal 1: Join yarn with a sl st in the first marked st.
- Row 1: Ch 1, sc in the same st and the next 7 sts, turn. (8 sc)
- Row 2: Ch 1, sc2tog, sc in next 4 sts, sc2tog, turn. (6 sc)
- Row 3: Ch 1, sc in each st across, turn. (6 sc)
- Row 4: Ch 1, sc2tog, sc in next 2 sts, sc2tog, turn. (4 sc)
- Row 5: Ch 1, sc in each st across, turn. (4 sc)
- Row 6: Ch 1, sc2tog twice, turn. (2 sc)
- Row 7: Ch 1, sc2tog. (1 sc)
Fasten off.
Petals 2–6: Join yarn with a sl st in the next unworked st of Top Band Rnd 6. Repeat Rows 1–7, beginning Row 1 with “ch 1, sc in the same st and the next 7 sts.” Fasten off after each petal.
Each petal is 1.75 in (4.4 cm) tall and 2 in (5.1 cm) wide at the base. The petals touch at the base, which gives the crown its scalloped, pointed outline. Checkpoint: the holder is 18.75 in (47.6 cm) tall at the petal tips.
Hanging Strap
Row 1: Join yarn with a sl st in the tip of Petal 1. Ch 36. Sl st in the tip of Petal 4, directly opposite. Ch 1, turn.
Row 2: Sc in each ch across, sl st in the tip of Petal 1. (36 sc) Ch 1, turn.
Row 3: Sc in each sc across, sl st in the tip of Petal 4. (36 sc)
Fasten off. The strap is 9 in (22.9 cm) long and about 0.5 in (1.3 cm) wide. When the holder hangs, the strap rises in a V about 4 in (10.2 cm) above the petals. The open top stays easy to fill with bags from either side of the strap.
Border
You work the border only around the bottom opening, into the foundation chain. It firms the edge so bags pull out cleanly without stretching the ring.
Border gauge: 4 sc per 1 in (2.5 cm), the same as the body’s sc gauge. With the tube laid flat, each side of the opening measures 4 in (10.2 cm) and holds 16 sts.
Border Rnd 1: With the bottom of the holder facing you, join yarn in any unused loop of the foundation chain. Ch 1, sc in each foundation ch around, join. (32 sc: 16 across the front + 16 across the back)
Border Rnd 2: Ch 1, sl st loosely in each sc around, join. (32 sl sts: 16 front + 16 back)
Fasten off and weave in all ends.
Why the math works: The foundation ring has 32 ch, and the border places exactly 1 st in each one. No stitches are added, so the opening stays 8 in (20.3 cm) around and does not ruffle or pull in. The flattened opening has no true corners, so there are no corner stitches to count twice. The 16 + 16 split is simply the front and back halves. Border Rnd 1 adds 0.25 in (0.6 cm), and the sl st round lies flat. That brings the final height to 19 in (48.3 cm).
Final Blocking
- Weave in every end along a solid band, never through the mesh bars, where it would show.
- Soak the holder in cool water for 10 minutes, then gently press out the water. Do not wring it.
- Roll it in a dry towel to remove excess moisture.
- Slide a cylinder about 3.8 in (9.7 cm) across into the tube, such as a rolled towel or a paper towel holder wrapped in a towel.
- Straighten the dc bars so they run vertically, and nudge each square open to 0.75 in (1.9 cm) on each side.
- Pin each petal into a clean point, with the tips standing straight up.
- Lay the strap flat and let everything dry completely before hanging.
Final Quality-Control Checklist
- Total height is 19 in (48.3 cm) to the petal tips.
- Circumference is 12 in (30.5 cm) through the mesh body.
- The bottom opening is 8 in (20.3 cm) around and holds its shape.
- Every mesh round has 16 squares, and the vertical bars are straight.
- There are 18 mesh rounds.
- All six petals end in a single stitch and are the same height.
- The strap is attached at two opposite petal tips (Petals 1 and 4).
- All ends are woven into solid areas and trimmed.
Troubleshooting
The mesh bars spiral around the tube. You are working the dc into the ch-2 sp or the wrong st. Work each dc into the top of the dc below, under both loops.
The squares are tall rectangles. Your ch 2 is too tight. Chain more loosely, or use a hook 0.5 mm larger for the chains only.
The squares are wide rectangles. Your dc is too short. Pull up the first loop of each dc a little taller.
The top band ruffles. You worked 3 sc into a ch-2 sp somewhere. Recount Top Band Rnd 1; it must have 48 sc.
The petals are uneven. Count the 8 base sts for each petal and mark them all before you start Petal 1.
Bags fall out of the bottom. The opening is too loose. Rework the border with a smaller hook, or work Border Rnd 2 more firmly.
The holder sags when full. Use cotton rather than acrylic, and check that your mesh gauge is not too loose.
Care
Hand wash in cool water and dry flat over a cylinder. You can also machine wash cotton holders on a gentle cycle in a mesh laundry bag, then reshape them while damp.
Final Notes
Each stage builds on the measurements of the one before:
- The 32-st bottom band makes an 8 in (20.3 cm) opening and stands 1 in (2.5 cm) tall.
- One growth round brings it to 48 sts and 12 in (30.5 cm) around, and the full bottom band reaches 2 in (5.1 cm).
- Eighteen mesh rounds of 16 squares add 13.5 in (34.3 cm), for a total of 15.5 in (39.4 cm).
- The top band adds 1.5 in (3.8 cm), for 17 in (43.2 cm).
- Six petals of 8 sts each add 1.75 in (4.4 cm), for 18.75 in (47.6 cm).
- The bottom border adds 0.25 in (0.6 cm), for a finished height of 19 in (48.3 cm).
Check your gauge and count your 16 squares in every round, and you will end up with a holder that is both practical and pretty.
Happy crocheting!