

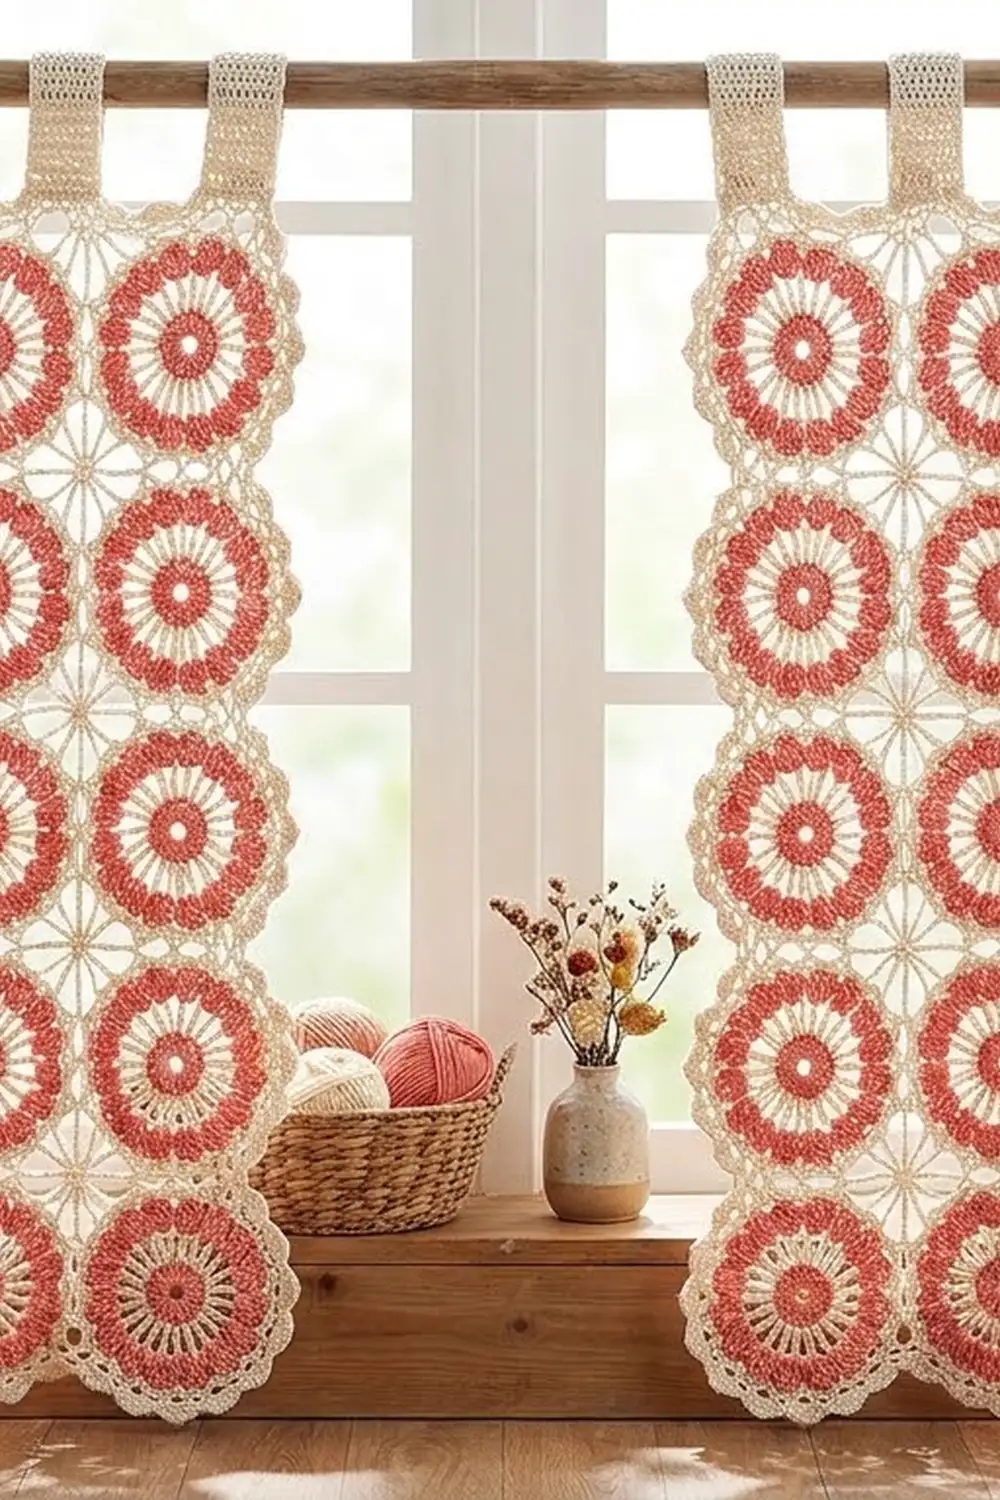
The Rosewater Bloom curtain panel is made of soft salmon-pink and cream flower motifs joined in a straight grid. Each flower has a solid pink center, cream spokes, eight pink shell petals and a scalloped cream outline. A lacy cream frame squares off each flower so the motifs join cleanly, and the open lace lets light through when the panel hangs in a window.
The look is cottage-style and airy. Light comes through the open spokes and frame windows, while the pink petals keep the flowers easy to see from across the room. The panel hangs from five wide cream tabs.
This pattern uses US crochet terms. One finished panel measures 30.5 in × 79.5 in (77.5 cm × 201.9 cm) before the tabs. To make a pair like the one in the photo, make two panels.
Construction is simple to follow. You crochet 44 identical square-framed flower motifs, whipstitch them together in a grid 4 wide by 11 tall, work a three-round border, then sew on five tabs.
Finished Size and Construction
- Finished panel size: 30.5 in × 79.5 in (77.5 cm × 201.9 cm), not counting tabs
- Skill level: Intermediate
- Terminology: US crochet terms
- Yarn weight: Worsted (#4) cotton or cotton blend
- Hook: 5.0 mm (H-8)
- Number of pieces per panel: 44 flower motifs + 5 tabs
- Layout: 4 motifs wide × 11 motifs tall
- Motif size: 7 in × 7 in (17.8 cm × 17.8 cm) square
- Size before border: 28 in × 77 in (71.1 cm × 195.6 cm)
- Border depth: 1.25 in (3.2 cm) on each side
Materials
Choose a smooth mercerized or combed cotton in worsted weight. Cotton hangs straight, holds its stitch definition and stands up to sunlight better than acrylic. The amounts below assume about 180 m per 100 g.
Yarn, per panel:
– Color A – Salmon Pink: 320 g / 576 m (motif centers, petals, border Round 2)
– Color B – Cream: 740 g / 1,332 m (spokes, edging, frames, joining, border, tabs)
For a pair of panels, double both amounts: 640 g / 1,152 m of pink and 1,480 g / 2,664 m of cream.
All quantities include a margin of about 15% for tails, a test swatch and small differences in tension.
Tools:
– 5.0 mm (H-8) crochet hook
– Tapestry needle
– Stitch markers
– Scissors
– Measuring tape
– Blocking mats and rust-proof pins
– Spray bottle
Abbreviations (US Terms)
- ch – chain
- sl st – slip stitch
- sc – single crochet
- hdc – half double crochet
- dc – double crochet
- tr – treble crochet (yarn over twice)
- sp(s) – space(s)
- st(s) – stitch(es)
- sk – skip
- RS / WS – right side / wrong side
Special stitch – Shell: Work 7 dc in the same space.
Special stitch – Tip: Work (sc, ch 2, sc) in the same stitch. This makes the small point at the top of each petal.
Gauge and Checkpoints
Make one complete motif before you start production, and measure it after each stage. If every round matches, the joined panel and border will come out at the right size.
- After Round 1: center ring measures 1.75 in (4.4 cm) across
- After Round 2: 3.75 in (9.5 cm) across, spoke tip to spoke tip
- After Round 3: 5.25 in (13.3 cm) across the petals
- After Round 4: 6 in (15.2 cm) across, petal tip to petal tip
- After Round 6: 7 in × 7 in (17.8 cm × 17.8 cm) square, with 19 dc per side
If the motif is too big, go down to a 4.5 mm hook. If it is too small, go up to a 5.5 mm hook. Change the hook, not the stitch counts, because the joining and border math depends on exactly 19 stitches per side.
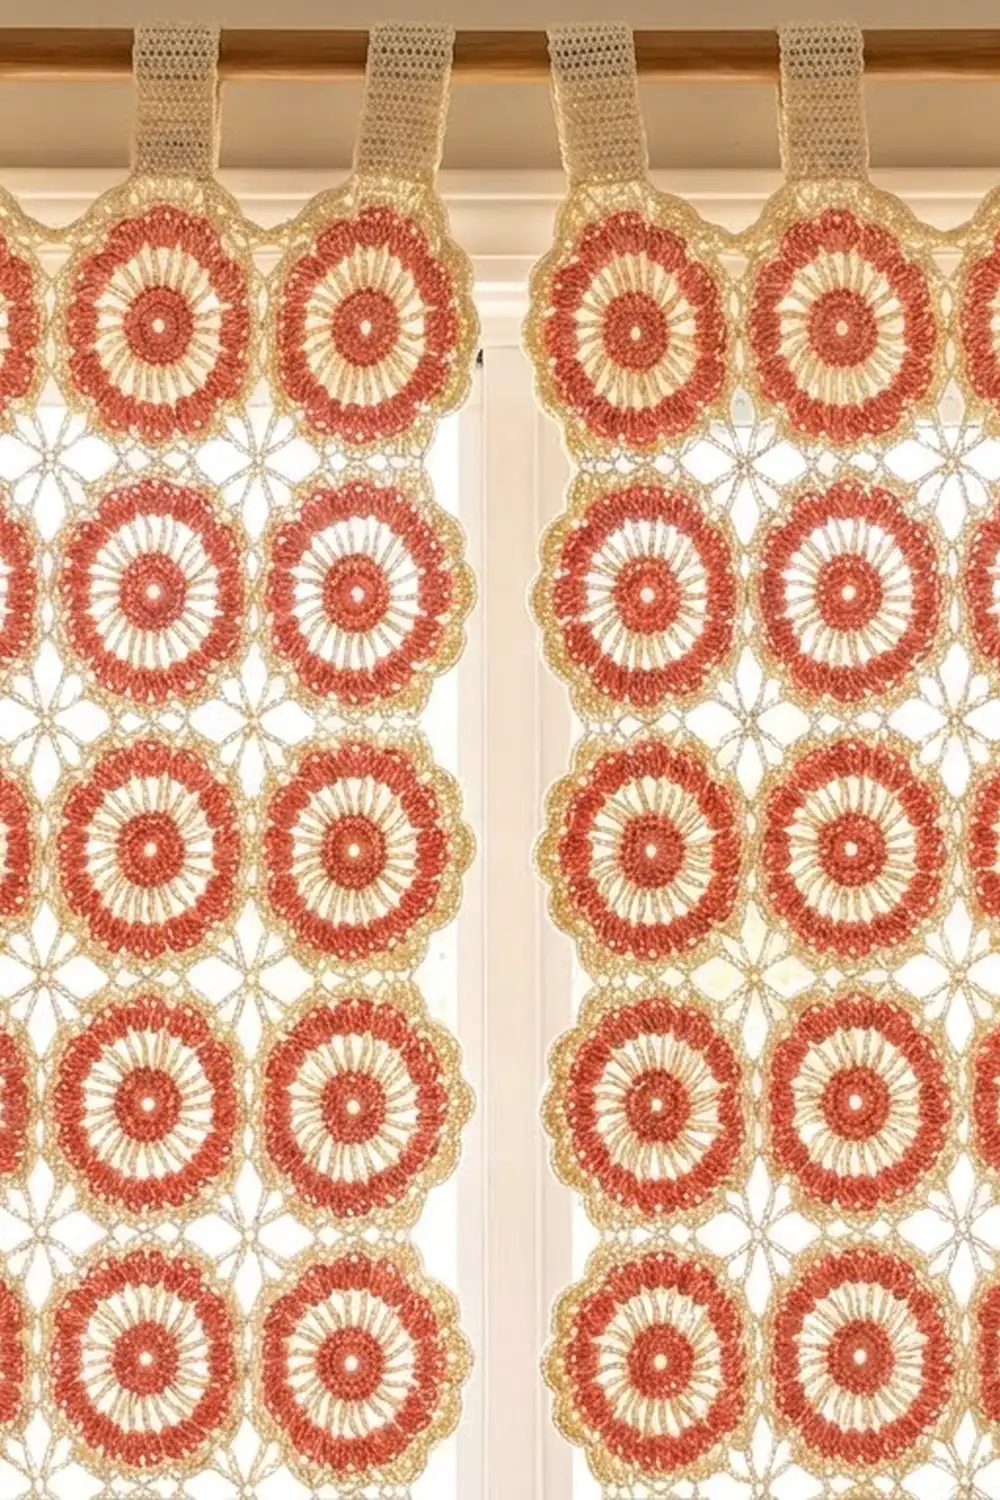
Flower Motif (Make 44 per Panel)
Round 1 (Color A – Pink)
Make a magic ring. Ch 3 (counts as dc), work 15 dc into the ring, then pull it closed so a small hole remains in the center. Sl st to the top of the beginning ch-3. (16 dc) Fasten off.
Round 2 (Color B – Cream)
Join cream in any dc. Ch 5 (counts as tr + ch 1). Tr in the next dc, ch 1; repeat from * 14 more times. Sl st to the 4th ch of the beginning ch-5. (16 tr, 16 ch-1 sps)*
These tall stitches form the cream spokes. Fasten off.
Round 3 (Color A – Pink)
Join pink in any ch-1 sp. Ch 1, sc in the same sp. Shell (7 dc) in the next ch-1 sp, sc in the next ch-1 sp; repeat from * 6 more times, then work a shell in the last ch-1 sp. Sl st to the first sc. (8 shells: 56 dc + 8 sc = 64 sts)*
Each shell sits between two spokes and makes one fan-shaped petal. The sc between the petals holds the pink round tight against the spokes. Fasten off.
Round 4 (Color B – Cream) – Scalloped Edging
Join cream with a sc in the center (4th) dc of any shell, ch 2, sc in the same st (first Tip made). *Sc in each of the next 3 dc, sk the sc between petals, sc in each of the next 3 dc, Tip in the next dc; repeat from * 6 more times. Then sc in each of the next 3 dc, sk the sc, sc in each of the next 3 dc, and sl st to the first sc.
(64 sc, 8 ch-2 tip sps). That is 8 sc per petal: 3 + Tip (2 sc) + 3.
Skipping the sc between petals pulls the edging into a dip, which makes the scallop. Do not fasten off.
Round 5 (Color B – Cream) – Lace Frame
Sl st into the next ch-2 tip sp. That tip becomes a frame corner.
Ch 4 (counts as tr), (ch 3, tr) in the same sp. Ch 5, sc in the next tip sp, ch 5*, (tr, ch 3, tr) in the next tip sp. Repeat from * 2 more times, then from * to ** once. Sl st to the top of the beginning ch-4.
(8 tr, 4 sc, 8 ch-5 sps, 4 ch-3 corner sps)
Tips 1, 3, 5 and 7 become the frame corners, and tips 2, 4, 6 and 8 touch the middle of each side. The ch-5 loops pass over the scallop dips and leave open lace windows.
Round 6 (Color B – Cream) – Squaring Round
Sl st into the first ch-3 corner sp. Ch 3 (counts as dc), (dc, ch 2, 2 dc) in the same sp.
Dc in the next tr, 6 dc in the next ch-5 sp, dc in the next sc, 6 dc in the next ch-5 sp, dc in the next tr*, (2 dc, ch 2, 2 dc) in the next corner sp. Repeat from * 2 more times, then from * to ** once. Sl st to the top of the beginning ch-3. Fasten off and leave a 24 in (61 cm) cream tail for joining on some motifs.
Conversion count: (12 dc worked into the 8 tr and 4 sc) + (48 dc in the ch-5 sps) + (16 corner dc) = 76 dc, 4 ch-2 corner sps.
Per side: 2 corner dc + 1 + 6 + 1 + 6 + 1 + 2 corner dc = 19 dc. These 19 stitches already include the corner dc at both ends of the side.
Weave in all ends on the WS. Lightly steam or wet-block the test motif to 7 in × 7 in (17.8 cm × 17.8 cm) and check it against the gauge checkpoints.
Make All Pieces
Per panel:
– 44 flower motifs. Each uses pink for Rounds 1 and 3 and cream for Rounds 2, 4, 5 and 6.
– 5 tabs in cream (instructions below)
For a pair: 88 motifs and 10 tabs.
Tab (Make 5 per Panel, Color B – Cream):
Ch 10.
Row 1: Dc in the 4th ch from the hook and in each ch across. (8 dc + turning ch = 9 sts)
Rows 2–16: Ch 3 (counts as dc), turn, dc in each st across. (9 sts)
Each tab measures about 3.25 in × 8 in (8.3 cm × 20.3 cm). Fasten off and leave a 12 in (30.5 cm) tail.
Layout grid (4 wide × 11 tall):
Row 1:  [M] [M] [M] [M]   <- top (tabs)
Row 2:  [M] [M] [M] [M]
Row 3:  [M] [M] [M] [M]
Row 4:  [M] [M] [M] [M]
Row 5:  [M] [M] [M] [M]
Row 6:  [M] [M] [M] [M]
Row 7:  [M] [M] [M] [M]
Row 8:  [M] [M] [M] [M]
Row 9:  [M] [M] [M] [M]
Row 10: [M] [M] [M] [M]
Row 11: [M] [M] [M] [M]   <- bottom
Every motif is identical, and any side of a motif can face up.
Joining
Method: Whipstitch through the outer loops in cream with the RS facing up.
Stitch-to-stitch logic: Place two motifs side by side. Start in the matching corner ch-2 sps and make 1 stitch through both corner sps. Then work 1 stitch through each of the 19 pairs of matching dc, and finish with 1 stitch through the next pair of corner sps. That is 21 stitches per motif side. Because every side has exactly 19 dc, the stitches always line up one to one.
Order:
1. Join the 4 motifs of each row into a horizontal strip.
2. Join the strips together along their long edges, working across all 4 motifs in one continuous seam.
3. Where four corners meet, pass the needle through all four corner sps once to close the gap.
Tension: Pull each stitch just snug enough to close the seam, without bunching it. The seam should lie flat and stretch the same amount as the motifs. If a seam ripples, it is too loose. If it puckers, it is too tight.
Size checkpoint: One joined row of 4 motifs should measure 28 in (71.1 cm). Two joined rows should measure 14 in (35.6 cm) tall. The full joined panel should be 28 in × 77 in (71.1 cm × 195.6 cm).
Border
Border gauge: The motif sides measure 19 sts per 7 in (17.8 cm), or about 2.7 sts per inch. Round 1 keeps this same ratio, so the edge does not stretch or pull in.
Round 1 (Color B – Cream)
Join cream in any panel-corner ch-2 sp. Ch 1, (sc, ch 2, sc) in the same sp.
Along each side, work sc in each dc. At each seam, work 1 sc through both joined corner sps together. At each panel corner, work (sc, ch 2, sc). Sl st to the first sc.
Per side (counting the corner sc at both ends):
– Short sides (top/bottom): 1 corner sc + (4 motifs × 19 = 76) + 3 seam sc + 1 corner sc = 81 sc
– Long sides: 1 corner sc + (11 motifs × 19 = 209) + 10 seam sc + 1 corner sc = 221 sc
The 1 sc at each seam is the only extra stitch. It covers the width of the two joined corner sps, which are not part of the 19 counted dc on either motif.
Round 2 (Color A – Pink)
Sl st into the corner sp. Ch 3 (counts as dc), (dc, ch 2, dc)… Instead: ch 3 (counts as dc), (ch 2, dc) in the same sp. Dc in each sc along every side, and work (dc, ch 2, dc) in each corner sp. Sl st to the top of the ch-3.
Per side: (81 or 221 dc worked one per sc) + 2 corner dc = 83 dc on the short sides, 223 dc on the long sides.
Round 3 (Color B – Cream) – Scallops
Join cream in any corner ch-2 sp and work (sc, ch 3, sc) in it.
Along each side, hdc in the first dc, sc in the next dc, then sk 1, 5 dc in the next dc, sk 1, sc in the next dc. Repeat from * across: 20 times on the short sides and 55 times on the long sides. Hdc in the last dc of the side. At each corner, work (sc, ch 3, sc). Sl st to the first sc and fasten off.
Why the math works: Each scallop uses 4 sts. On a short side, 1 hdc + 1 sc + (20 × 4 = 80) + 1 hdc = 83. On a long side, 1 + 1 + (55 × 4 = 220) + 1 = 223. Every side comes out exactly, and the edge stitches are mirror images, so each side is symmetrical.
Attach the Tabs
Number the 83 Round 2 dc along the top edge from left to right. The motif seams fall at sts 22, 42 and 62.
Place the tabs over these sts:
– Outer tabs: sts 1–9 and 75–83
– Center tabs: sts 18–26, 38–46 and 58–66
Fold each tab in half toward the WS. Overlap each end 0.75 in (1.9 cm) onto the WS of border Rounds 1–2 and whipstitch it in place. This leaves a loop about 3.25 in (8.3 cm) deep.
Final Blocking
- Wet the panel in cool water and gently squeeze it out. Do not wring it.
- Roll it in towels to remove most of the water.
- Lay it flat on mats and pin it to 30.5 in × 79.5 in (77.5 cm × 201.9 cm).
- Pin the tip of every border scallop. Then open each lace window in the motif frames.
- Lift and round each pink petal with your fingertips so the scallops look even.
- Let it dry completely, which takes 24–48 hours. Then unpin it.
Final Quality-Control Checklist
- Each motif has 16 spokes, 8 shells and 8 cream tips.
- Each motif side has 19 dc.
- The panel is 4 motifs wide and 11 tall, with no motifs missing or turned the wrong way.
- Every seam lies flat, and the four-corner meeting points are closed.
- Border sides have 81/221 sc in Round 1 and 83/223 dc in Round 2.
- Tabs are evenly spaced and the same depth.
- All ends are woven in securely on the WS.
- The finished size is 30.5 in × 79.5 in (77.5 cm × 201.9 cm).
Troubleshooting
Petals cup or ruffle: Round 2 spokes are too short. Use a looser yarn over on the tr, or go up a hook size for Round 2 only.
The center hole is too large: Pull the magic ring tighter before you join Round 1.
The frame bows inward at the sides: The ch-5 loops are too tight. Chain more loosely.
A side count is not 19: Check Round 6 for a missed dc in a tr or sc. Fix it before you join the motif.
The panel is wider at one end: Some seams are tighter than others. Re-sew them with even tension.
Border corners curl: Make sure you worked the ch-2 or ch-3 corner sps exactly as written.
Tabs pull the top edge down: Sew across the full overlap, not just the corners of the tab.
Care
Hand wash or machine wash on a gentle cycle in a mesh bag in cool water, then reshape and lay flat to dry. Avoid long periods of direct midday sun to keep the pink from fading.
Final Notes
The measurement chain is simple. Each motif is 7 in (17.8 cm) square with 19 dc per side. Four motifs make 28 in (71.1 cm) across, and eleven make 77 in (195.6 cm) tall. The 1.25 in (3.2 cm) border on each side brings the panel to 30.5 in × 79.5 in (77.5 cm × 201.9 cm). If your first motif matches the gauge checkpoints, every later step will come out the right size. Make a second panel for a matching pair, hang them on your rod, and enjoy the light through the lace.
Happy crocheting!