

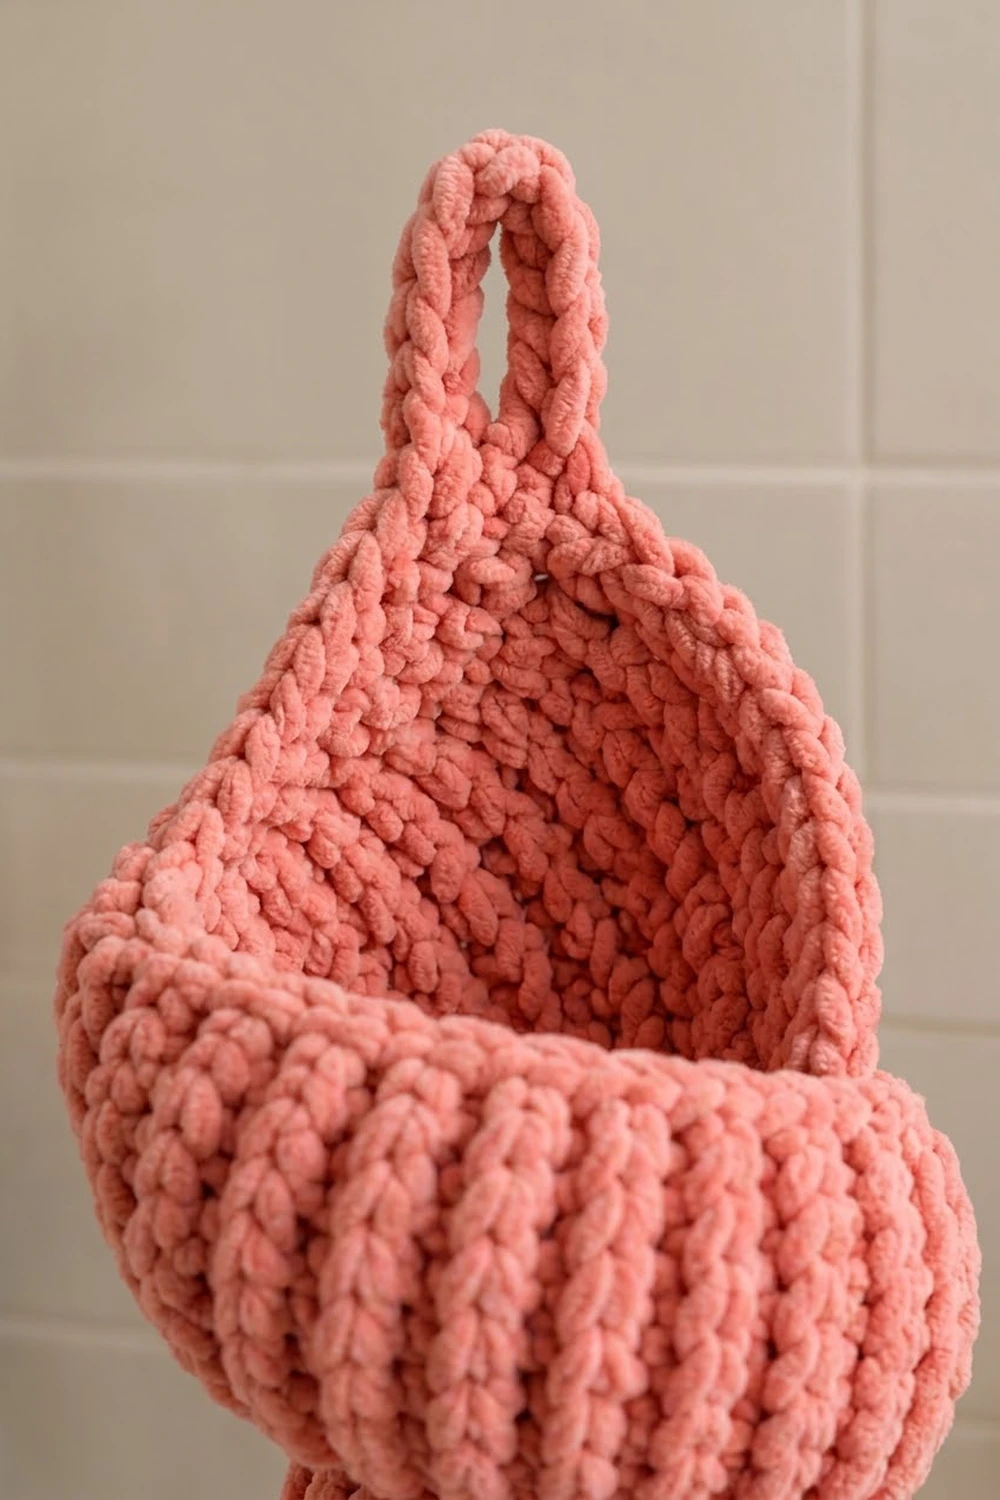
This Coral Conch Hanging Wall Basket is a seashell you can actually use. Four stacked whorls rise from a pointed tip into a roomy top pocket. A tapered back panel climbs to a peak with a sturdy hanging loop, ready for a hook by the sink.
The design uses one warm coral pink in a soft bulky yarn. Close columns of waistcoat stitch give the shell its knit-look vertical ribs. A rolled reverse single crochet edge gives the opening a rope-like rim. The style is coastal and cozy, and it suits bathrooms, nurseries, or an entryway for keys and small rolled towels.
The pattern uses US crochet terms. The finished basket measures about 12.5 in (31.8 cm) from tip to peak, plus a 2 in (5.1 cm) loop, and 5.8 in (14.7 cm) across the widest whorl.
Construction is simple. You crochet one piece, starting at the tip, in a continuous spiral. Increase sections make each whorl bulge and a decrease round pinches the groove between whorls. Then you work a back panel in turned rows that narrows to a point. You finish with a two-round edging around the mouth and a hanging loop at the peak. There is no sewing.
Finished Size and Construction
- Finished size: about 12.5 in (31.8 cm) long from tip to peak, plus a 2 in (5.1 cm) loop
- Widest whorl: 50 sts around = 18.2 in (46.2 cm) circumference, about 5.8 in (14.7 cm) diameter
- Skill level: Intermediate (shaping in spiral rounds, waistcoat stitch, reverse sc)
- Terminology: US
- Yarn weight: Bulky (#5)
- Hook: 6.0 mm (US J-10)
- Number of pieces: 1
- Layout: single 3D shell, worked bottom-up
- Body height before panel (Rnds 1–27): 9 in (22.9 cm)
- Back panel height (11 rows): about 3.7 in (9.4 cm)
- Size before border: about 12 in (30.5 cm) tip to peak
- Border depth: about 0.5 in (1.3 cm)
Materials
Pick a smooth bulky yarn with good body. Soft velvet or chenille-style yarns give the plush look in the photo, but a firm acrylic or cotton blend holds the shell shape best. Avoid very loose, airy yarns, because the basket needs to stand up on its own.
- Coral Pink: 150 g, about 165 m (180 yd)
The quantity includes a margin of about 25% over the expected use. That covers a gauge swatch, a few frogged rounds, and the weaving in of ends.
Tools:
– 6.0 mm (US J-10) crochet hook
– 1 locking stitch marker for the start of the round, plus 2 extra markers
– Tapestry needle with a large eye
– Scissors
– Measuring tape
– A balloon or a rolled towel for blocking
– Spray bottle or steamer
– Optional: a small handful of polyester fiberfill for the tip
Abbreviations (US Terms)
- ch – chain
- sl st – slip stitch
- sc – single crochet
- inc – 2 sts in the same stitch
- sc2tog – single crochet 2 together (a decrease)
- sc3tog – single crochet 3 together
- rev sc – reverse single crochet (crab stitch)
- st(s) – stitch(es)
- Rnd – round
- RS – right side
Special stitch – Waistcoat Stitch (ws): Look at the sc below. It has two vertical legs that form a V on the outside. Insert the hook between those two legs, right through the center of the V and out the back of the fabric. Yarn over, pull up a loop, yarn over, and pull through both loops on the hook. The fabric is thick and firm, and the stitches stack into vertical knit-look columns.
- ws inc: 2 ws in the same stitch.
- ws2tog: insert into the center of the next st and pull up a loop, insert into the center of the following st and pull up a loop, then yarn over and pull through all 3 loops.
Waistcoat stitch is tight. If it is hard to insert the hook, loosen only your pull-up loops, not your whole gauge.
Gauge and Checkpoints
Gauge: 11 sts and 12 rnds = 4 in (10.2 cm) in waistcoat stitch worked in the round. Plain sc rows (used for the back panel) should match: 11 sts and 12 rows = 4 in (10.2 cm).
Test one piece first. The first whorl (Rnds 1–8) is your swatch. Work it, then check it against the first checkpoint below before you go on.
Checkpoints:
– After Rnd 7 (18 sts): circumference 6.5 in (16.5 cm), diameter about 2.1 in (5.3 cm). Height from the tip about 2.3 in (5.8 cm).
– After Rnd 12 (30 sts): circumference 10.9 in (27.7 cm), diameter about 3.5 in (8.9 cm).
– After Rnd 18 (40 sts): circumference 14.5 in (36.8 cm), diameter about 4.6 in (11.7 cm).
– After Rnd 26 (50 sts): circumference 18.2 in (46.2 cm), diameter about 5.8 in (14.7 cm).
– After Rnd 27: body height about 9 in (22.9 cm), measured straight along the side without pulling the grooves open.
If your piece is too big: use a hook 0.5 mm smaller. A loose shell will slump on the wall.
If your piece is too small: use a hook 0.5 mm larger, or relax your pull-up loops. Don’t add stitches, because the shaping repeats depend on these exact counts.
The Shell Body
Work in a continuous spiral. Do not join the rounds. Move the marker up to the first stitch of each round as you go.
Whorl 1 (the tip)
Rnd 1: Make a magic ring, 6 sc in the ring. Pull it tight. (6 sts)
Rnd 2: Sc in next st, inc; repeat 3 times. (9 sts)
From here on, every stitch is waistcoat stitch (ws), and every inc or decrease is the ws version.
Rnd 3: Ws in each st around. (9 sts)
Rnd 4: Ws in next 2 sts, ws inc; repeat 3 times. (12 sts)
Rnd 5: Ws in next 3 sts, ws inc; repeat 3 times. (15 sts)
Rnd 6: Ws in next 4 sts, ws inc; repeat 3 times. (18 sts)
Rnd 7: Ws in each st around. (18 sts)
Rnd 8 (pinch): Ws in next 4 sts, ws2tog; repeat 3 times. (15 sts)
The decrease round pulls the fabric in and forms the first groove. Optional: if your yarn is very soft, tuck a small pinch of fiberfill into the tip now so it stays rounded.
Whorl 2
Rnd 9: Ws in next 2 sts, ws inc; repeat 5 times. (20 sts)
Rnd 10: Ws in next 3 sts, ws inc; repeat 5 times. (25 sts)
Rnd 11: Ws in next 4 sts, ws inc; repeat 5 times. (30 sts)
Rnd 12: Ws in each st around. (30 sts)
Rnd 13 (pinch): Ws in next 4 sts, ws2tog; repeat 5 times. (25 sts)
Whorl 3
Rnd 14: Ws in next 4 sts, ws inc; repeat 5 times. (30 sts)
Rnd 15: Ws in next 5 sts, ws inc; repeat 5 times. (35 sts)
Rnd 16: Ws in next 6 sts, ws inc; repeat 5 times. (40 sts)
Rnds 17–18: Ws in each st around. (40 sts)
Rnd 19 (pinch): Ws in next 6 sts, ws2tog; repeat 5 times. (35 sts)
Whorl 4 (the pocket)
Rnd 20: Ws in next 6 sts, ws inc; repeat 5 times. (40 sts)
Rnd 21: Ws in next 7 sts, ws inc; repeat 5 times. (45 sts)
Rnd 22: Ws in next 8 sts, ws inc; repeat 5 times. (50 sts)
Rnds 23–26: Ws in each st around. (50 sts each round)
Rnd 27 (mouth shaping): Ws in next 8 sts, ws2tog; repeat 5 times. (45 sts)
This last decrease curves the mouth in a little so the pocket hugs its contents. Do not fasten off.
Mark the mouth: Count back from your hook. Put a marker in the 21st st back from the last st you worked. The last 21 sts of Rnd 27 will hold the back panel. The other 24 sts form the front lip. 21 + 24 = 45, which matches the Rnd 27 count.
The Back Panel
You work the panel in turned rows of plain sc. Each row decreases once at each end, so the panel narrows evenly to a point.
Row 1: Ch 1, turn. Sc in each of the last 21 sts worked, ending at the marker. (21 sts)
Row 2: Ch 1, turn. Sc2tog, sc in next 17 sts, sc2tog. (19 sts)
Row 3: Ch 1, turn. Sc2tog, sc in next 15 sts, sc2tog. (17 sts)
Row 4: Ch 1, turn. Sc2tog, sc in next 13 sts, sc2tog. (15 sts)
Row 5: Ch 1, turn. Sc2tog, sc in next 11 sts, sc2tog. (13 sts)
Row 6: Ch 1, turn. Sc2tog, sc in next 9 sts, sc2tog. (11 sts)
Row 7: Ch 1, turn. Sc2tog, sc in next 7 sts, sc2tog. (9 sts)
Row 8: Ch 1, turn. Sc2tog, sc in next 5 sts, sc2tog. (7 sts)
Row 9: Ch 1, turn. Sc2tog, sc in next 3 sts, sc2tog. (5 sts)
Row 10: Ch 1, turn. Sc2tog, sc in next st, sc2tog. (3 sts)
Row 11: Ch 1, turn. Sc3tog. (1 st)
Fasten off. The panel should be about 3.7 in (9.4 cm) tall and 7.6 in (19.3 cm) wide at its base, which is 21 sts at gauge.
Border
Border gauge: the same as the body, 11 sc = 4 in (10.2 cm). On the row-end edges, work 1 sc per row end. Because the panel’s gauge is almost square (11 sts and 12 rows per 4 in), 1 sc per row end lies flat without rippling or pulling.
The border goes all the way around the opening in 4 sections: front lip, right panel edge, peak, and left panel edge.
Rnd 1: With the RS (outside) facing, join the yarn in the first front-lip st next to the panel.
– Front lip: sc in each of the 24 front-lip sts. (24 sts)
– First panel edge: sc in each row end of Rows 1–11. (11 sts)
– Peak: 3 sc in the single st of Row 11. (3 sts)
– Second panel edge: sc in each row end of Rows 11–1. (11 sts)
– Sl st to the first sc. Total: 24 + 11 + 3 + 11 = 49 sts.
Rnd 2: Ch 1. Work rev sc in each st around: 24 across the front lip, 11 up the first edge, 3 around the peak, and 11 down the second edge. Sl st to the first st. Total: 49 sts.
Why the math works: The front lip uses exactly the 24 sts left over from Rnd 27, at 1 sc per st. Each panel edge has 11 rows, so it gets 11 sc at 1 per row end. The 3 sc at the peak turn the point the same way a corner does, so it stays sharp and doesn’t cup. Rnd 2 is worked 1-to-1, so every section keeps its count. The rev sc rolls into the rope-like rim, about 0.5 in (1.3 cm) deep.
Hanging Loop
Join the yarn in the middle st of the 3 peak sts. Ch 14, then sl st in the same st to form the loop. Work 20 sc around the chain (into the loop, not into the chains), then sl st at the base. Fasten off, leaving a 10 in (25.4 cm) tail. Use the tail to stitch through the base of the loop and the top of the panel 2–3 times to reinforce it. The loop should measure about 2 in (5.1 cm) long.
Weave in all ends on the inside of the shell.
Final Blocking
- Lightly mist the whole shell with water, or hover a steamer over it. Don’t press the iron onto the fabric, especially with chenille or velvet yarns.
- Push a small inflated balloon or a tightly rolled towel into the pocket (Whorl 4) until it fills out to about 5.8 in (14.7 cm) across.
- Pinch each groove (Rnds 8, 13, and 19) with your fingers so the whorls stand out as separate bulges.
- Roll the tip between your palms to point it.
- Smooth the back panel flat and straight up, and shape the peak to a clean point.
- Fold the rev sc rim outward slightly so it rolls evenly around the mouth.
- Let it dry completely with the form in place, usually 12–24 hours.
- Take out the form and hang the basket to check that it sits straight.
Final Quality-Control Checklist
- Stitch counts: Rnd 7 = 18, Rnd 12 = 30, Rnd 18 = 40, Rnd 26 = 50, Rnd 27 = 45
- 4 whorls, each with a clear groove between them
- The back panel is centered over 21 sts and the front lip has 24 sts
- The panel narrows evenly from 21 sts to 1 st over 11 rows
- Border Rnds 1 and 2 each have 49 sts (24 + 11 + 3 + 11)
- Length is about 12.5 in (31.8 cm) tip to peak, plus a 2 in (5.1 cm) loop
- The loop is reinforced and doesn’t stretch under a light load
- All ends are woven in on the inside
Troubleshooting
The whorls lean or twist to one side. Spiral waistcoat stitch can drift. Block the shell straight on a form, and make sure you insert the hook through the exact center of each V.
The grooves are faint. Work the ws2tog stitches in the pinch rounds firmly, or go down 0.5 mm in hook size just for those rounds.
The panel edges ruffle. You may have added extra sc on the row ends. Work exactly 11 per side.
The panel edges pull in. Your border tension is too tight. Loosen the row-end stitches, or use a hook 0.5 mm larger for Rnd 1 only.
The peak cups forward. Make sure you worked 3 sc into the Row 11 st, then steam the peak flat.
The basket sags on the wall. The gauge is too loose. Rework the piece with a smaller hook, or keep only light items in it.
Waistcoat stitch is too hard to work. Pull each loop up a little taller before you finish the stitch.
Care
Hand wash in cool water with mild soap. Press out the water in a towel, and reshape the basket over a form to dry flat. Don’t wring it or tumble dry it.

Final Notes
The measurement chain is easy to follow. Whorl 1 checks your gauge at 18 sts, or 6.5 in (16.5 cm) around. The whorls grow through 30 and 40 sts to the 50-st pocket at 18.2 in (46.2 cm) around. Rnd 27 brings the mouth to 45 sts, which split into a 21-st back panel and a 24-st front lip. The panel rises 11 rows to a point, and the 49-st border wraps around 24 + 11 + 3 + 11 sts before the loop goes on top.
If your checkpoints match, your conch will hang straight and hold its shape. Happy crocheting!