

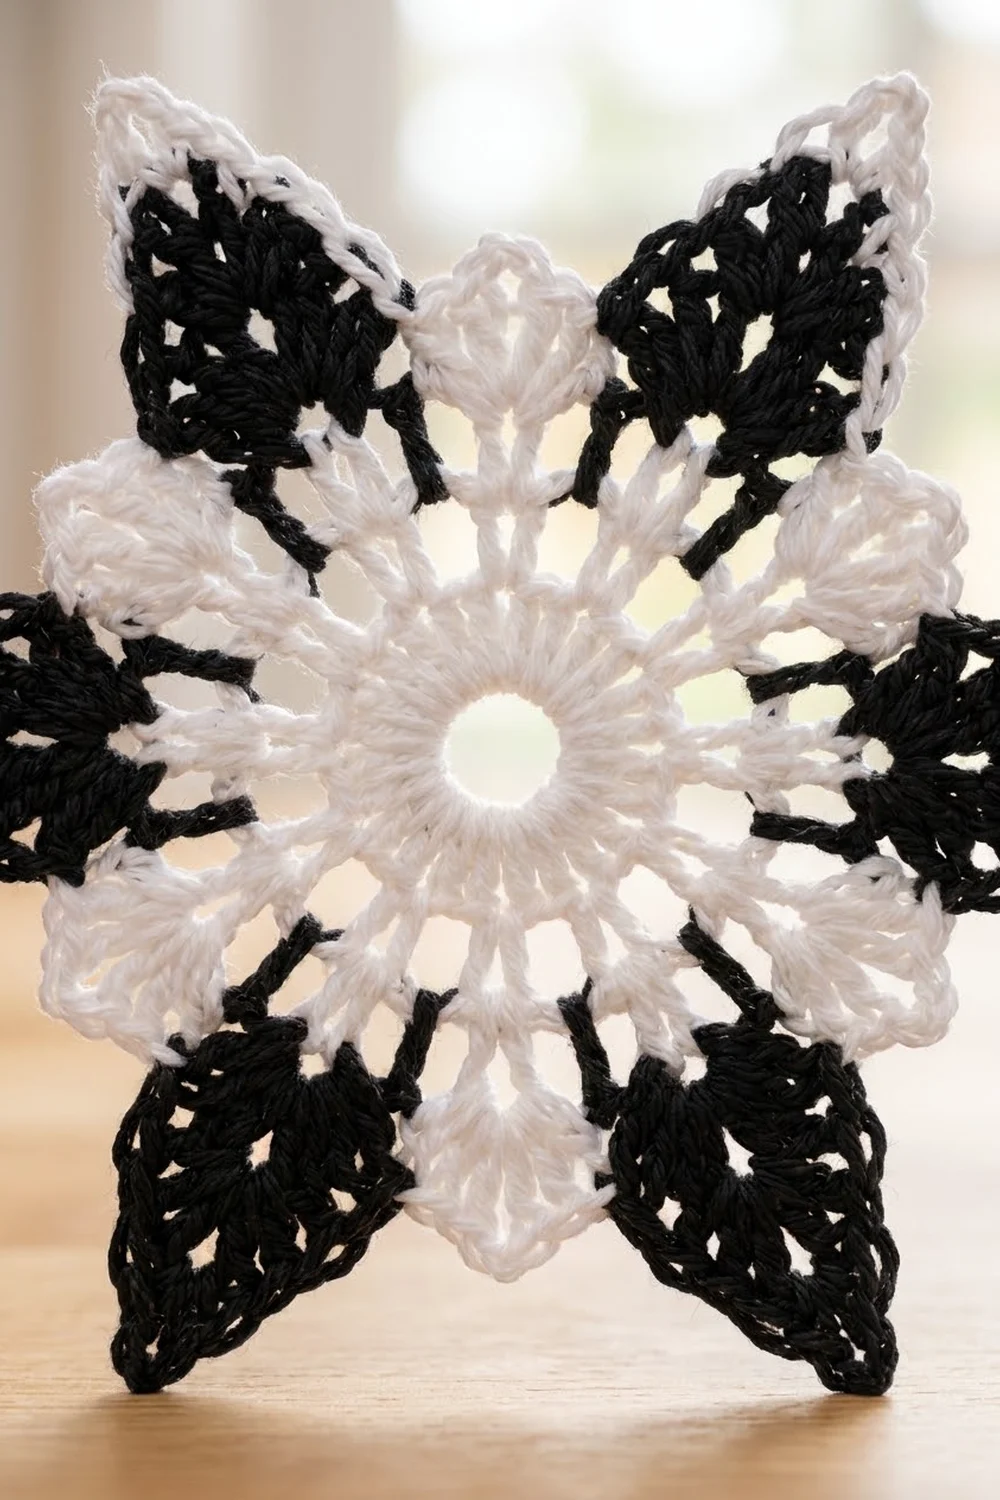
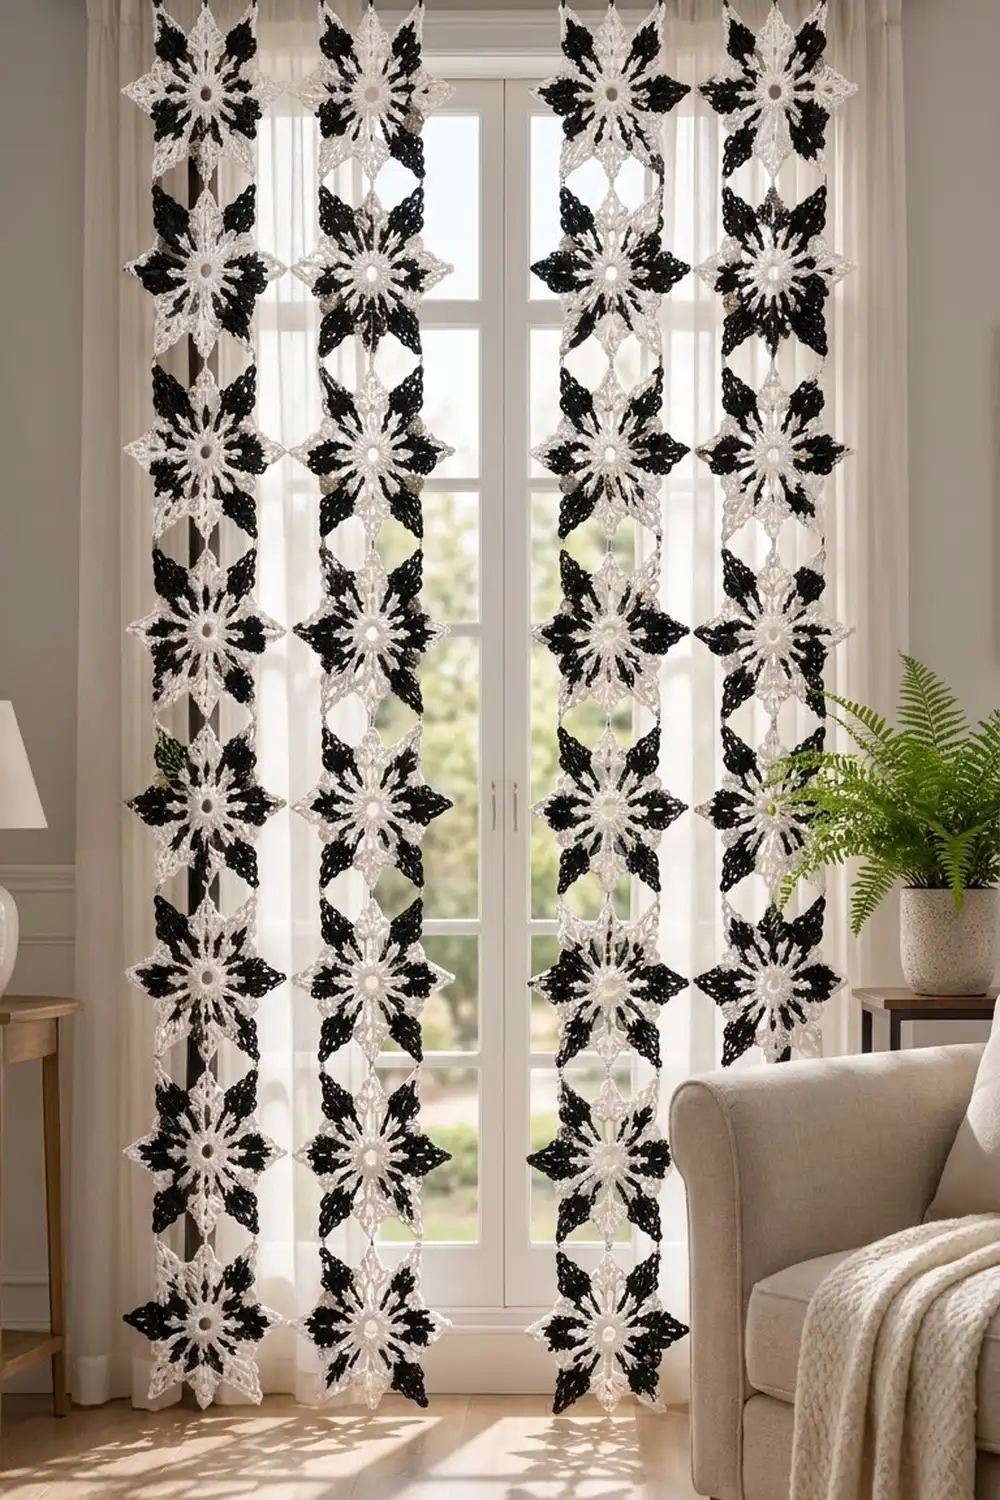
This curtain is made of six-pointed snowflake stars joined tip to tip into long hanging strands. Each star has a solid white center ring, a round of white spokes, and twelve small white petal shells. Six black leaf-shaped points grow out from there. A crisp white outline traces every point, so the black reads like a bold silhouette against the window light.
The palette is only black and white. That gives the strands a graphic, modern look that suits Scandinavian, farmhouse, or monochrome rooms. Light passes through the open center and the gaps between points, so the curtain decorates the window without blocking it.
This pattern uses US crochet terms. Each motif measures 6 in (15.2 cm) from top tip to bottom tip and 5.2 in (13.2 cm) across. A strand of 12 motifs is 72 in (182.9 cm) long. A 2 in (5.1 cm) hanging loop brings the total hanging length to 74 in (188.0 cm).
Construction is simple. You work each star in the round in 7 rounds. From the second motif on, you join each new star to the bottom tip of the one before it while you work the last round. When a strand is finished, you add a hanging loop to its top tip. Four strands make one curtain panel.
Finished Size and Construction
- Motif size: 6 in (15.2 cm) tip to tip, 5.2 in (13.2 cm) across
- Size before border (hanging loop): 72 in (182.9 cm) per strand
- Border depth: 2 in (5.1 cm) hanging loop at the top of each strand
- Finished strand length: 74 in (188.0 cm)
- Skill level: Intermediate
- Terminology: US
- Yarn weight: DK / light (3) cotton
- Hook: 4.0 mm (US G-6)
- Number of pieces: 48 motifs (4 strands × 12 motifs)
- Layout: 4 separate vertical strands, hung as 2 pairs
- Panel width: about 20.8 in (52.8 cm) of motifs, plus the gaps you leave between strands
Materials
Use a smooth mercerized or combed cotton in DK weight. Cotton keeps the tips sharp after blocking and does not stretch much under its own weight, which matters for a hanging piece. Avoid fuzzy yarns, because they blur the white outline.
- White: 250 g / about 625 m (684 yd), 5 balls of 50 g / 125 m
- Black: 200 g / about 500 m (547 yd), 4 balls of 50 g / 125 m
One motif uses about 4.5 g of White and 3.5 g of Black. The quantities above include a margin of roughly 15% for gauge differences, your test motif, and the hanging loops.
Tools:
- 4.0 mm (US G-6) crochet hook
- Tapestry needle
- Scissors
- Stitch marker
- Blocking mats and rust-proof pins
- Spray bottle
- Measuring tape
- Curtain rod (the loops fit a rod up to 1.25 in / 3.2 cm in diameter)
Abbreviations (US Terms)
- ch – chain
- sl st – slip stitch
- sc – single crochet
- hdc – half double crochet
- dc – double crochet
- sp – space
- st(s) – stitch(es)
- sk – skip
- rnd – round
Shell: (2 dc, ch 2, 2 dc) all in the same space.
Point shell: (3 dc, ch 2, 3 dc) all in the same space.
Joining tip: ch 1, sl st in the tip ch-3 sp of the previous motif, ch 1. This replaces the ch 3 at a tip, so the tip keeps its normal length.
Gauge and Checkpoints
Make one complete motif first, then block it and measure it. Gauge matters more here than in most decor pieces, because any difference is multiplied by 12 along each strand.
- After Rnd 1: 1.5 in (3.8 cm) across
- After Rnd 2: 2.25 in (5.7 cm) across
- After Rnd 3: 3.5 in (8.9 cm) across. This is the main gauge checkpoint.
- After Rnd 5: about 5 in (12.7 cm) tip to tip
- After Rnd 7, blocked: 6 in (15.2 cm) tip to tip
If Rnd 3 is larger than 3.5 in (8.9 cm), go down to a 3.75 mm hook. If it is smaller, go up to a 4.5 mm hook. A difference of 0.25 in (0.6 cm) per motif changes the strand length by 3 in (7.6 cm), so fix it now rather than later.
Motif Pattern
Make 48 motifs in total. The first motif of each strand is worked plain. Every later motif is joined in Rnd 7.
Rnd 1 (White): Ch 6, sl st in first ch to form a ring. Ch 3 (counts as dc), 23 dc in ring, sl st in top of ch-3. (24 dc)
The chain ring leaves a small open hole about 0.4 in (1.0 cm) wide in the center. Keep it open, because it is part of the look.
Rnd 2 (White): Ch 5 (counts as dc + ch 2), sk next dc, dc in next dc, ch 2, sk next dc; repeat from * 10 more times, sl st in 3rd ch of beginning ch-5. (12 dc, 12 ch-2 sps)*
These are the spokes.
Rnd 3 (White): Sl st in first ch-2 sp, ch 3 (counts as dc), (dc, ch 2, 2 dc) in same sp, shell in next ch-2 sp; repeat from * 10 more times, sl st in top of ch-3. (12 shells: 48 dc, 12 ch-2 sps)*
Fasten off White. Check gauge: 3.5 in (8.9 cm) across.
Rnd 4 (Black): Join Black in the ch-2 sp of any shell. Ch 3 (counts as dc), (2 dc, ch 2, 3 dc) in same sp, ch 1, sc in ch-2 sp of next shell, ch 1, point shell in ch-2 sp of next shell, ch 1, sc in ch-2 sp of next shell, ch 1; repeat from * 4 more times, sl st in top of ch-3. (6 point shells: 36 dc, 6 ch-2 sps; 6 sc; 12 ch-1 sps)*
The point shells sit on every other white shell. A single sc anchors each of the other white shells, so their dc legs stay visible as white petals between the black points.
Rnd 5 (Black): Ch 3 (counts as dc), dc in next 2 dc, (2 dc, ch 3, 2 dc) in ch-2 sp, dc in next 3 dc, sk ch-1 sp, sc in sc, sk ch-1 sp, dc in next 3 dc, (2 dc, ch 3, 2 dc) in ch-2 sp, dc in next 3 dc, sk ch-1 sp, sc in sc, sk ch-1 sp; repeat from * 4 more times, sl st in top of ch-3. (60 dc, 6 sc, 6 ch-3 sps)*
Each point now has 10 dc, 5 on each side of its ch-3 tip. The sc between points pulls inward and forms the first valley.
Rnd 6 (Black): Ch 1, sc in first dc, hdc in next 2 dc, dc in next 2 dc, (2 dc, ch 3, 2 dc) in ch-3 sp, dc in next 2 dc, hdc in next 2 dc, sc in next dc, sl st in valley sc; repeat from * 5 more times, sl st in first sc to join. (84 sts: 6 × 14; 6 valley sl sts; 6 ch-3 sps)*
Fasten off Black. The graded sc–hdc–dc sequence keeps each point low at the valley and tall at the tip, which makes the leaf shape. Each side of a point now has 7 stitches: 5 graded stitches plus the 2 dc of the tip group.
Before Rnd 7, choose one point as the top and the opposite point as the bottom, and mark both. Joins always happen at these two points, so the strand hangs straight.
Rnd 7 (White outline, first motif of a strand): Join White in any valley sl st. Sc in valley sl st, sc in next 7 sts, (2 sc, ch 3, 2 sc) in ch-3 sp, sc in next 7 sts; repeat from * 5 more times, sl st in first sc. (114 sc: 6 × 19; 6 ch-3 tip sps)*
Fasten off. Each side of a point has 9 sc from valley to tip (7 + 2), and neighboring points share the valley sc.
Make All Pieces
Each motif uses White for Rnds 1–3 and 7, and Black for Rnds 4–6.
- Motifs per strand: 12
- Strands: 4
- Total motifs: 48
- White per strand: about 54 g
- Black per strand: about 42 g
Layout of one panel, seen from the front (each M is one motif, each | is a tip-to-tip join):
Strand 1   Strand 2      Strand 3   Strand 4
  Loop       Loop          Loop       Loop
   M          M             M          M
   |          |             |          |
   M          M             M          M
   |          |             |          |
  ...        ...           ...        ...
   M          M             M          M
(12 each) (12 each)     (12 each) (12 each)
 \__ pair 1 __/          \__ pair 2 __/
The strands are not joined to each other. Hang strands 1 and 2 about 0.5 in (1.3 cm) apart, then leave a wider gap before strands 3 and 4.
Joining
Join the motifs as you go, tip to tip, during Rnd 7.
Work motifs 2 through 12 of each strand exactly like the first motif through Rnd 6. In Rnd 7, join White at the valley just after the top point, so the top tip is the last tip you work. Work Rnd 7 as written until you reach the top tip’s ch-3 sp. There, work (2 sc, joining tip, 2 sc) in the ch-3 sp. Hold the new motif directly below the previous one and slip stitch into the previous motif’s bottom tip ch-3 sp. Then finish the round.
Stitch logic: The joining tip (ch 1, sl st, ch 1) replaces the ch 3 at that tip, so each motif still has 114 sc and 6 tip spaces. No stitches are added or removed at the seam. The two tips meet point to point with no gap, so the strand length is simply 12 × 6 in = 72 in (182.9 cm).
Tension: Keep the joining sl st snug but not tight. A tight join pulls both tips into a dent, and a loose one lets the motifs sag and twist. Before you slip stitch, check that the new motif is not twisted: the right sides of both motifs must face you.
Checkpoint: Laid flat without stretching, 3 joined motifs should measure 18 in (45.7 cm) and 6 motifs should measure 36 in (91.4 cm).
Border: Hanging Loop
This piece has no border around the outside. The white outline of Rnd 7 is the finished edge of every motif, with 9 sc on each side of each point. Another round would blunt the points. The “border” is a hanging loop on the top tip of each strand.
Border gauge: 6 sc = 1 in (2.5 cm); 18 ch = 4 in (10.2 cm).
Loop Rnd 1: With White, join in the ch-3 sp at the top tip of motif 1. Ch 18, sl st in the same tip sp. (1 loop of 18 ch)
Loop Rnd 2: Turn, work 24 sc into the loop (around the chain, not into the chain stitches), sl st in the tip sp. (24 sc) Fasten off and weave in the ends.
Why the math works: The 18-ch loop measures 4 in (10.2 cm) around. At 6 sc per inch, 24 sc also cover 4 in (10.2 cm), so the sc fill the loop evenly without ruffling or squeezing it. Folded over the rod, a 4 in (10.2 cm) loop hangs 2 in (5.1 cm) deep and fits a rod up to 1.25 in (3.2 cm) in diameter. Each panel uses 4 loops, one per strand. For a thicker rod, lengthen the loop in steps of 3 ch and 4 sc to keep the 3:4 ratio.
Final Blocking
- Weave in all ends before blocking. Hide white ends in white stitches and black ends in black stitches.
- Lay one strand flat on the blocking mats with the motifs in a straight line.
- Spray each motif evenly until it is damp but not dripping.
- Pin the center ring of each motif open into a round shape.
- Pin each of the 6 tips out to a sharp point, so each motif measures 6 in (15.2 cm) tip to tip.
- Pin the valleys inward slightly to sharpen the star shape.
- Check the full strand length: 72 in (182.9 cm) before the loop.
- Let the strand dry completely, at least 12 hours. Unpin it and repeat with the other strands.
Final Quality-Control Checklist
- Every motif has 6 black points with a complete white outline.
- Each motif measures 6 in (15.2 cm) tip to tip.
- Every Rnd 7 has 114 sc and 6 tip spaces.
- Every join connects a top tip to a bottom tip, and no motif is twisted.
- Each strand has 12 motifs and measures 72 in (182.9 cm).
- All 4 strands are the same length within 0.5 in (1.3 cm).
- Each hanging loop has 24 sc and slides onto the rod easily.
- All ends are woven in and invisible from both sides.
Troubleshooting
Center ring cups or ruffles: If Rnd 1 cups, your dc are too short, so loosen your tension. If it ruffles, rework Rnd 1 with a 3.75 mm hook.
Points are rounded, not sharp: Check that Rnd 6 uses the full sc–hdc–dc sequence and that the tip is (2 dc, ch 3, 2 dc). When blocking, pin right at the ch-3 tip.
Black points look short and stubby: Your Rnd 5 dc are too tight. Pull up the loops a little more, or use a 4.5 mm hook for Black only.
Strands twist when hung: A motif was joined with its wrong side facing. Undo that motif’s Rnd 7 and rework it.
Strands are different lengths: Measure each motif and re-block any short ones, pinning the tips out fully.
White petals are hidden: Make sure each Rnd 4 sc goes into the ch-2 sp of the white shell, not around the whole shell.
Care
Hand wash in cool water with mild detergent, roll the strands in a towel to remove water, and dry flat, reshaping the tips. Do not tumble dry, because heat and agitation can fuzz the outline and make the black dye bleed into the white.
Final Notes
The measurement chain for this curtain is short. Rnd 3 measures 3.5 in (8.9 cm), and a finished motif measures 6 in (15.2 cm) tip to tip. Twelve joined motifs make a 72 in (182.9 cm) strand, and the 2 in (5.1 cm) hanging loop brings each strand to 74 in (188.0 cm). If your first motif hits its checkpoints, every strand will come out the right length.
For a longer or shorter curtain, add or remove motifs in 6 in (15.2 cm) steps. Each extra motif needs about 4.5 g of White and 3.5 g of Black.
Happy crocheting!