

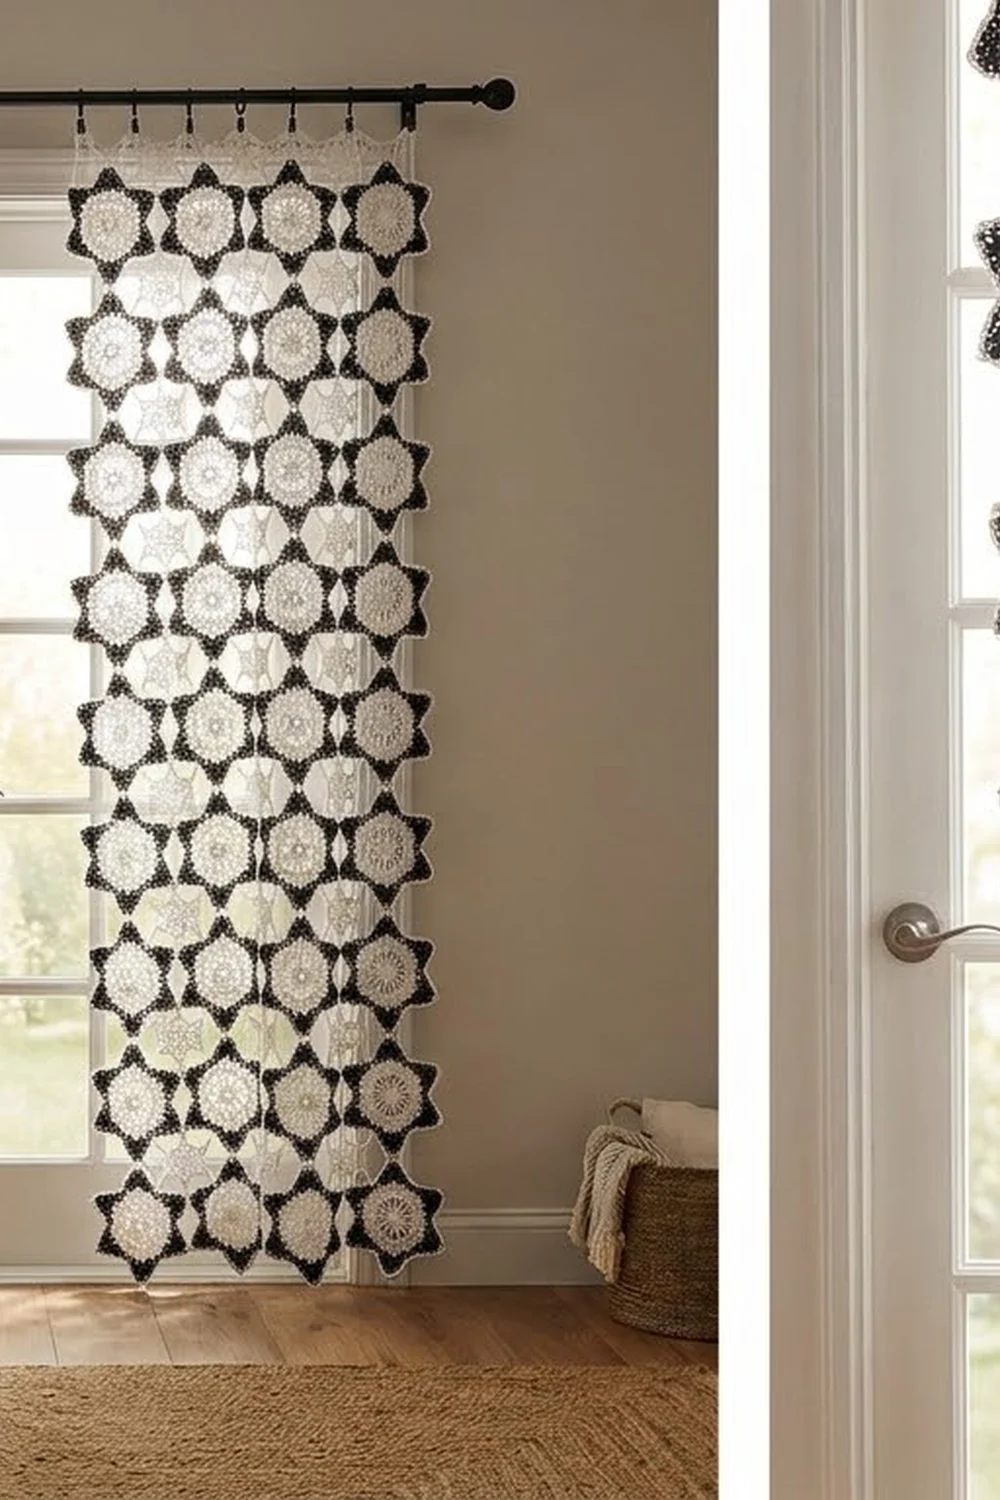
The Midnight Snowstar Curtain is a graphic lace curtain made from six-pointed star motifs. Each star has a crisp white snowflake center with an open ring and a burst of 12 spokes. A bold black outline and solid black tips finish it off. When the stars are joined tip to tip, the gaps between them form a second lattice of star and hexagon shapes that the light shows clearly.
There are only two colors, white and black. The look is modern and graphic, but it still has a vintage doily feel. This pattern uses US crochet terms throughout.
Each finished panel measures about 26 in (66.0 cm) wide by 84 in (213.4 cm) long at the tallest columns, before the hanging tabs. The pattern makes two panels, as shown. Each star measures 6 in (15.2 cm) from point to point.
Construction is simple. You crochet four white rounds, then a black round. In that black round, you join each new star to its neighbors as you go, so there is no sewing. Small black tabs at the top let the panel hang straight from a rod.
Finished Size and Construction
- Finished panel size: 26 in (66.0 cm) wide x 84 in (213.4 cm) long (tall columns)
- Skill level: Intermediate
- Terminology: US
- Yarn weight: DK / light (3) cotton
- Hook: 3.5 mm (E-4)
- Number of pieces: 68 stars per panel; 136 stars for the pair
- Layout per panel: 5 offset columns, alternating 14 and 13 stars
- Piece size: 6 in (15.2 cm) point to point
- Size before border: 26 in x 84 in (66.0 cm x 213.4 cm)
- Border depth: about 2 in (5.1 cm) of hanging tabs above the tall columns; there is no border on the sides or bottom
Materials
Use a smooth mercerized or combed cotton in DK weight. Cotton keeps the points sharp and holds its shape when it hangs. Pick a bright white and a true black from the same yarn line so both colors behave the same way.
- White (Rounds 1-4): 650 g, about 1,495 m (325 g, about 748 m per panel)
- Black (Round 5 and tabs): 500 g, about 1,150 m (250 g, about 575 m per panel)
These yardages assume about 115 m per 50 g. Each star uses about 4 g of white and 3 g of black. The quantities above include a margin for gauge differences and swatching.
Tools:
– 3.5 mm (E-4) crochet hook
– Tapestry needle
– Scissors
– Stitch markers
– Rust-proof pins and a blocking board or foam mats
– Spray bottle
– Measuring tape
Abbreviations (US Terms)
- ch – chain
- sl st – slip stitch
- sc – single crochet
- dc – double crochet
- sp – space
- st(s) – stitch(es)
- dc3tog – double crochet 3 together
Special stitch – dc3tog over a valley: Yarn over and insert the hook in the next dc. Pull up a loop, then yarn over and pull through 2 loops. Repeat that sequence in the next ch-1 sp, then in the next dc. Finish with yarn over and pull through all 4 loops on the hook. This makes one stitch that pulls the valley inward and creates the dark block.
Join-point (used in Round 5): Ch 1, then sl st into the ch-3 sp of the neighboring star’s point. Ch 1. This replaces the ch-3 at that point.
Gauge and Checkpoints
Make one complete star before you start the panel, and block it lightly. Every measurement in this pattern depends on that first star.
Checkpoints (measured flat, unblocked):
– After Round 1: 1.25 in (3.2 cm) across
– After Round 2: 2.25 in (5.7 cm) across
– After Round 3: 3.5 in (8.9 cm) across, spoke tip to spoke tip
– After Round 4: 5 in (12.7 cm) point to point
– After Round 5: 6 in (15.2 cm) point to point after blocking
If your star is too big: Go down to a 3.25 mm hook, or work the dc stitches a little shorter.
If your star is too small: Go up to a 3.75 mm hook.
Even a 0.25 in (0.6 cm) error per star adds up to 3.5 in (8.9 cm) over a 14-star column, so check your gauge before you go on.
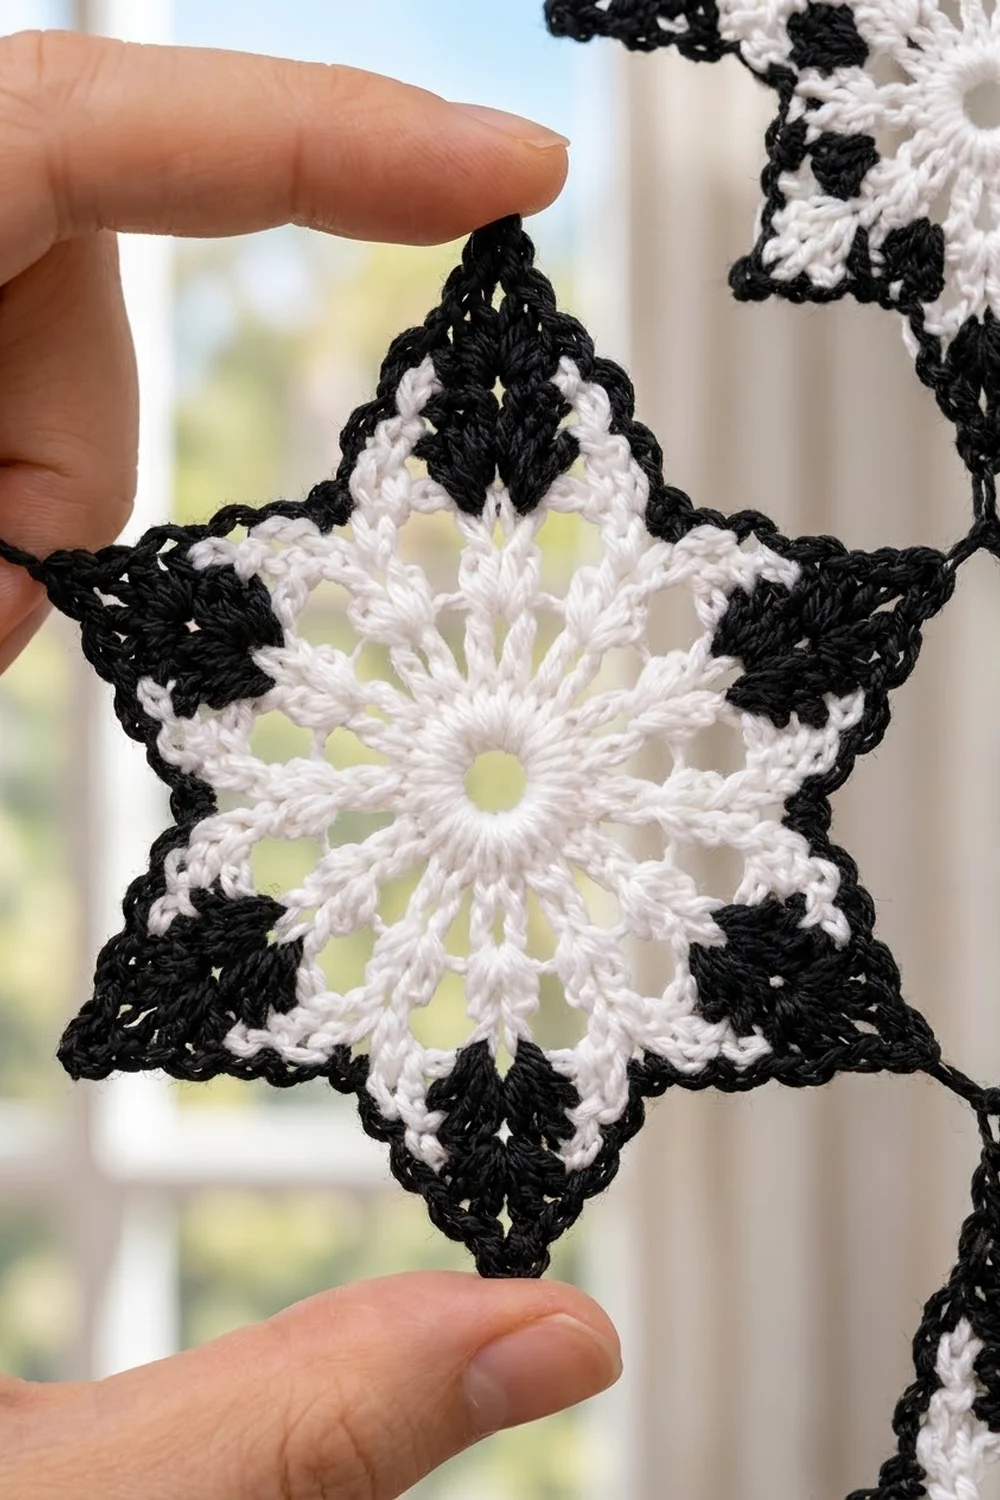
Star Motif
Rounds 1-4 (White)
With white, ch 8 and sl st in the first ch to form a ring. The center opening should be about 0.5 in (1.3 cm) across.
Round 1: Ch 1. Work 24 sc in the ring, then sl st to the first sc to join. (24 sc)
Round 2: Ch 3 (this counts as a dc). Dc in the next st, ch 2. Dc in each of the next 2 sts, ch 2. Repeat from * 10 more times. Sl st to the top of the beginning ch-3. (24 dc, 12 ch-2 sps)
Round 3: Sl st in the next dc and into the ch-2 sp. Work ch 3, then (dc, ch 2, 2 dc) in the same sp, then ch 1. (2 dc, ch 2, 2 dc) in the next ch-2 sp, ch 1. Repeat from * 10 more times. Sl st to the top of the beginning ch-3. (12 shells: 48 dc, 12 ch-2 sps, 12 ch-1 sps)
These 12 shells are the white spokes. The V shape at each spoke tip comes from the ch-2 sp at the top of each shell.
Round 4 (shaping the points): Sl st in the next dc and into the ch-2 sp of the first shell. This shell becomes a point.
Ch 3, then (2 dc, ch 3, 3 dc) in the same sp. Ch 2, sc in the next ch-1 sp, ch 2. Work (dc, ch 1, dc) in the ch-2 sp of the next shell, which becomes a valley. Ch 2, sc in the next ch-1 sp, ch 2.
(3 dc, ch 3, 3 dc) in the ch-2 sp of the next shell (point). Ch 2, sc in the next ch-1 sp, ch 2. (Dc, ch 1, dc) in the next shell (valley). Ch 2, sc in the next ch-1 sp, ch 2. Repeat from * 4 more times. Sl st to the top of the beginning ch-3. Fasten off white.
Count for Round 4: 6 repeats of (8 dc, 2 sc, 1 ch-3 sp, 4 ch-2 sps, 1 ch-1 sp). That totals 48 dc, 12 sc, 6 ch-3 sps, 24 ch-2 sps and 6 ch-1 sps.
The star now has 6 points, with the plain dc pairs sitting lower in between. Measure it: it should be 5 in (12.7 cm) point to point.
Round 5 (Black Outline)
Join black with a sl st in any point ch-3 sp.
Point: Ch 3 (counts as a dc), then (2 dc, ch 3, 3 dc) in the same sp. These 6 black dc stack over the white point to make the solid black tip.
Side A: Sc in each of the next 3 dc (3 sc). Work 2 sc in the ch-2 sp, 1 sc in the sc, and 2 sc in the next ch-2 sp.
Valley: Work dc3tog over the next dc, ch-1 sp and dc.
Side B: Work 2 sc in the ch-2 sp, 1 sc in the sc, and 2 sc in the next ch-2 sp. Sc in each of the next 3 dc.
Work a point, Side A, a valley and Side B. Repeat from * 4 more times, using a 3-dc start in place of the ch-3. Sl st to the top of the beginning ch-3.
Count for Round 5: 6 repeats of (6 dc, 16 sc, 1 dc3tog, 1 ch-3 sp). That totals 36 dc, 96 sc, 6 dc3tog and 6 ch-3 sps (138 sts plus the 6 point sps).
Weave in the ends on the back, inside matching color only, so the black does not show through the white.
Make All Pieces
Each panel needs 68 stars:
- Tall columns (columns 1, 3 and 5): 14 stars each, 42 stars total
- Short columns (columns 2 and 4): 13 stars each, 26 stars total
- For two panels: 136 stars
Make every star through Round 4 in white first. That gives you 68 white centers per panel, using about 272 g of white. Then work Round 5 in black as you join.
Layout grid (one panel, each step down = 3 in / 7.6 cm):
Step   C1   C2   C3   C4   C5
 0     T         T         T
 1          S         S
 2     T         T         T
 3          S         S
 ...  (continue alternating)
 26    T         T         T
 27         S         S
 28     (tall columns end; short columns end at step 27)
T is a tall-column star and S is a short-column star. In each column, star centers are 6 in (15.2 cm) apart. Column centers are 5.2 in (13.2 cm) apart, because 6 in × 0.866 = 5.196 in.
The short columns start 3 in (7.6 cm) lower than the tall columns. Their bottom points end at 81 in (205.7 cm), while the tall columns end at 84 in (213.4 cm).
Joining
Method: Join as you go while working Round 5. Each point meets exactly one point of a neighboring star, and never more than one.
Stitch logic: When you reach a point that touches a finished star, work 3 dc, then the join-point (ch 1, sl st in the neighbor’s ch-3 sp, ch 1), then 3 dc. The ch 1, sl st, ch 1 takes the place of the ch-3. This keeps all counts the same: 6 dc per point and 16 sc per point-to-point section. No extra stitches are added at a seam.
Which points to join:
– Each star has points at the top, upper right, lower right, bottom, lower left and upper left.
– Column 1: Join each star’s top point to the bottom point of the star above it.
– Column 2: Join each star’s top point to the star above it. Join its upper-left point to the lower-right point of the Column 1 star above it, and its lower-left point to the upper-right point of the Column 1 star below it.
– Columns 3-5: Work the same way, always joining to the left and above.
Tension: Keep the join ch-1 stitches the same size as your normal chains. If they are tight, the points pucker and the panel narrows. If they are loose, the points twist. Lay the work flat after every few joins to check.
Size checkpoint: After you finish Columns 1 and 2, measure from the outer left point to the outer right point of Column 2. It should be 10.4 in (26.4 cm). Two stacked stars should measure 12 in (30.5 cm) top point to bottom point. The finished panel, before tabs, should be 26 in (66.0 cm) wide and 84 in (213.4 cm) long.
Border (Hanging Tabs)
The design keeps the star silhouette on the side and bottom edges. The only border is a set of hanging tabs along the top: one tab per column, at that column’s free top point, for 5 tabs per panel.
Border gauge: 14 sc = 3 in (7.6 cm) in black, worked into a chain.
Tall-column tab (make 3 per panel): Join black with a sl st in the top point ch-3 sp of the first star in Columns 1, 3 and 5. Ch 20. Sc in the 2nd ch from the hook and in each ch across (19 sc). Fold the strip into a loop and sl st into the same point sp. Fasten off.
The 19 sc strip is about 4 in (10.2 cm) long. Folded, it makes a 2 in (5.1 cm) loop.
Short-column tab (make 2 per panel): Join black with a sl st in the top point ch-3 sp of the first star in Columns 2 and 4. Ch 34. Sc in the 2nd ch from the hook and in each ch across (33 sc: 19 loop sc + 14 strap sc). Fold the first 19 sc into a loop and sl st the loop end to the 14th sc from the star, at the top of the strap. Fasten off.
Why the math works: The short columns start 3 in (7.6 cm) lower than the tall columns. At the border gauge, 14 sc equals exactly 3 in (7.6 cm), so the strap makes up that difference. All 5 loops end at the same height, 2 in (5.1 cm) above the tall-column tips, and the panel hangs level.
Final Blocking
- Weave in all remaining ends and trim them.
- Soak the panel in cool water for 10 minutes. Press out the water gently. Do not wring it.
- Roll the panel in towels to remove more water.
- Lay it flat on mats in sections. Pin the corner tips of the panel to 26 in x 84 in (66.0 cm x 213.4 cm).
- Pin every star point. Each tip-to-tip join should sit straight, and the points should be 6 in (15.2 cm) apart in each column.
- Pin the valleys lightly inward so the star shape stays crisp.
- Let it dry completely before you unpin it. Block the second panel the same way.
Final Quality-Control Checklist
- Every star measures 6 in (15.2 cm) point to point
- Each Round 5 has 36 dc, 96 sc and 6 dc3tog
- No black ends show on the white sections
- Every join uses ch 1, sl st, ch 1, with no missed points
- Each column is straight and the columns line up evenly
- The panel is 26 in (66.0 cm) wide and 84 in (213.4 cm) long at the tall columns
- All 5 tab loops end at the same height
- Both panels match in size
Troubleshooting
- The stars cup: Your Round 4 dc are too short. Go up a hook size, or loosen your stitches.
- The stars ruffle: Your tension is too loose. Go down a hook size.
- The points are rounded: Re-pin them during blocking. Check that the point has 3 dc on each side of the ch-3 sp.
- The panel leans: A join probably went into the wrong point. Count the joins along that column.
- The tabs are uneven: Recount the strap. It must have exactly 14 sc.
- White looks gray: Black fibers have rubbed off onto the white. Wash before blocking, and weave in black ends only through black stitches.
Care
Hand wash in cool water with a mild detergent. Then reshape the panels and dry them flat. Rehang them only when they are completely dry so the points keep their shape.
Final Notes
The measurement chain is short and reliable. One star measures 6 in (15.2 cm). Stars stacked in a column sit 6 in (15.2 cm) apart, and columns sit 5.2 in (13.2 cm) apart. That gives a panel 26 in (66.0 cm) wide and 84 in (213.4 cm) long. The tabs add a level 2 in (5.1 cm) at the top. If your first star is accurate, every other measurement will follow.
Happy crocheting!