

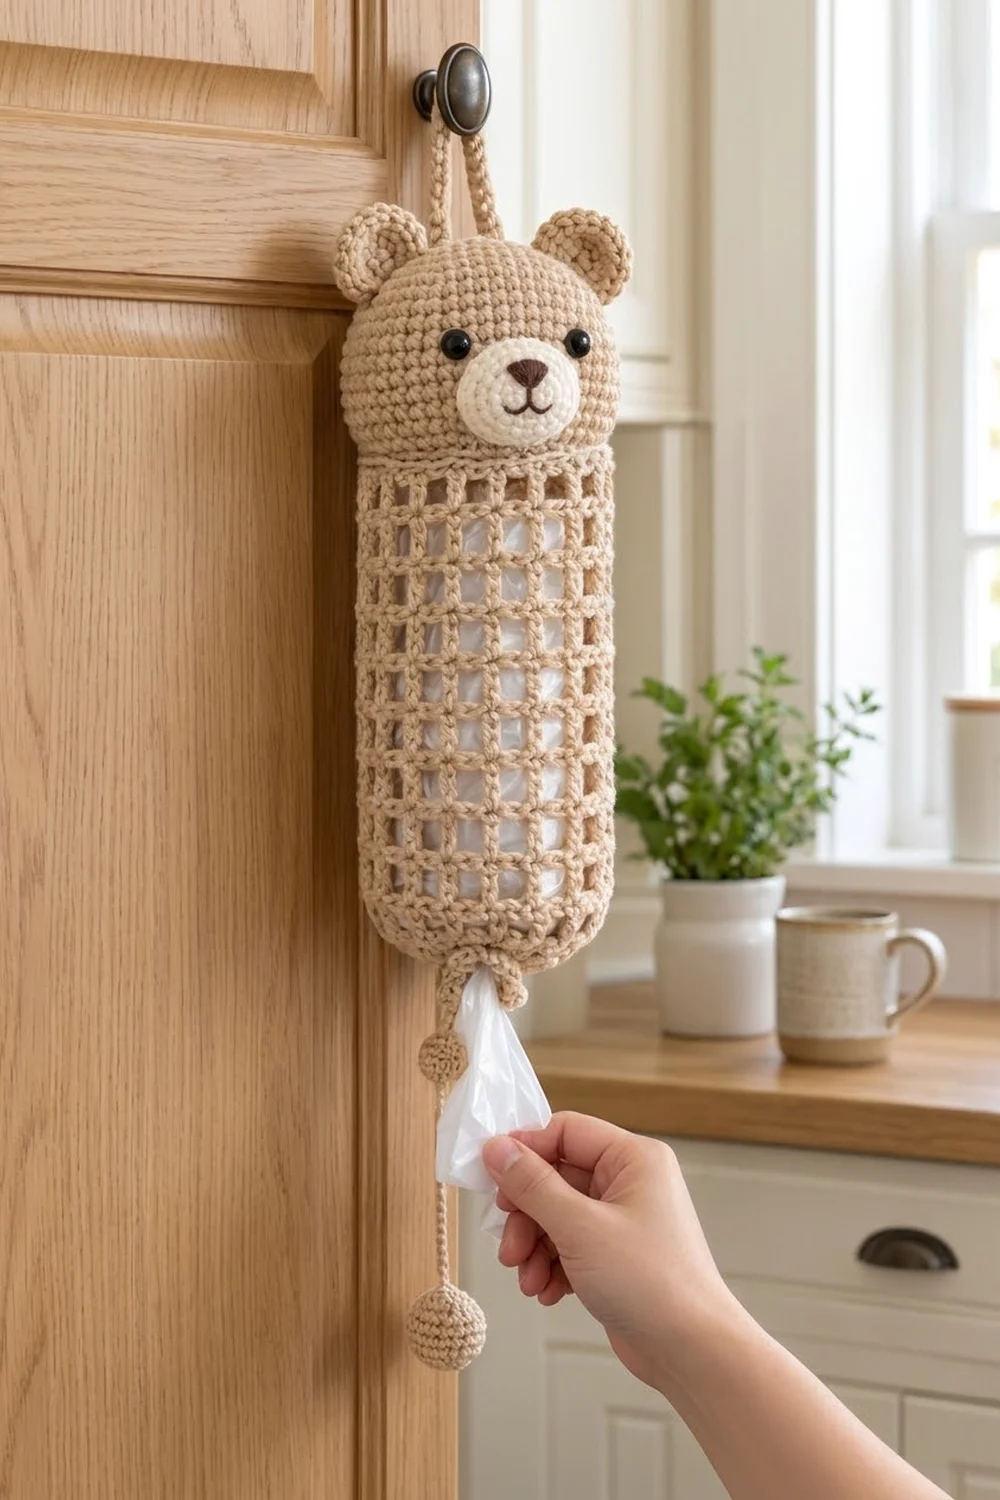
Bramble Bear is a teddy-bear bag holder that hangs from a cabinet knob. It holds a full stash of plastic shopping bags. The body is an open mesh tube, so you can see at a glance how many bags are left. A round, stuffed bear head sits on top.
The whole holder is worked in one warm tan cotton, with a cream muzzle and a dark brown embroidered nose and mouth. Black safety eyes, small round ears, a hanging loop, and a little ball pull finish the look.
This pattern uses US crochet terms. The finished holder is 17.5 in (44.5 cm) tall from the top of the head to the bottom edge, not counting the loop and ball. The tube measures 10 in (25.4 cm) around and lies flat at 5 in (12.7 cm) wide.
The tube is worked from the bottom up in joined rounds. You start at the small bag-dispensing opening, increase to full width, work 18 mesh rounds, and finish with a solid top band. The head, ears, muzzle, loop, and ball are made separately and sewn on.
Finished Size and Construction
- Finished size: 17.5 in (44.5 cm) tall without loop and ball; tube 10 in (25.4 cm) around, 5 in (12.7 cm) flat
- Skill level: Intermediate (amigurumi shaping plus mesh in the round)
- Terminology: US
- Yarn weight: Worsted (#4) cotton
- Hooks: 4.0 mm (G-6) for the tube, loop, and ball; 3.5 mm (E-4) for the head, ears, and muzzle
- Number of pieces: One finished holder made from 8 parts: tube, head, 2 ears, muzzle, hanging loop, ball, and ball cord
- Layout: Single vertical holder. The head sits on the tube, the loop is on top of the head, and the ball hangs below.
- Tube size before top band: 13.4 in (34.0 cm) tall
- Top band depth: 0.6 in (1.5 cm), which brings the tube to 14 in (35.6 cm)
- Head: about 3.5 in (8.9 cm) across after stuffing
Materials
Use a smooth cotton or cotton blend. It holds the mesh squares crisply, and the head won’t fuzz with handling. Avoid stretchy acrylic for the tube, because it sags when the holder is full.
- Tan (main color): 130 g / 220 m (about 240 yd)
- Cream (muzzle): 5 g / 9 m
- Dark brown (nose and mouth): 2 g / 4 m
These amounts are based on a yarn of about 170 m per 100 g. All quantities include a small margin for your gauge swatch and sewing tails.
Tools:
- 4.0 mm and 3.5 mm crochet hooks
- 2 black safety eyes, 10 mm (0.4 in)
- Polyester fiberfill, about 25 g
- Stitch markers
- Tapestry needle
- Scissors
- Pins
- Measuring tape
Abbreviations (US Terms)
- ch – chain
- sl st – slip stitch
- sc – single crochet
- dc – double crochet
- inc – 2 sc in the same stitch
- sc2tog / dec – single crochet 2 together (use the invisible decrease on the head)
- MR – magic ring
- sp – space
- beg – beginning
- st(s) – stitch(es)
Special stitch – mesh square: one dc post followed by ch 2. Each square takes up 3 stitches of width: the dc plus the 2 chains.
Gauge and Checkpoints
Tube, 4.0 mm hook:
- Single crochet: 9 sc and 10 rounds = 2 in (5.1 cm)
- Mesh: 3 squares wide by 3 rounds tall = 2 in (5.1 cm), so each square is about 0.67 in (1.7 cm)
Head, 3.5 mm hook: 10 sc and 10 rounds = 2 in (5.1 cm)
Your sc gauge and mesh gauge match: 3 mesh squares are 9 stitches, and 9 sc is 2 in. Because of this, the tube keeps the same width going from solid rounds to mesh and back.
Test first: work the tube through Round 11 (the first 4 mesh rounds), then check your size.
- After Round 1: the opening ring is 4.4 in (11.2 cm) around.
- After Round 7: the tube is 10 in (25.4 cm) around. The bottom section is 1.4 in (3.6 cm) tall.
- After Round 11: the 4 mesh rounds measure 2.7 in (6.9 cm) tall.
If your tube is too big, go down one hook size. If it’s too small, go up one hook size. Don’t change the stitch counts, because the mesh needs a multiple of 3.

Tube (Tan, 4.0 mm Hook)
Work in joined rounds and don’t turn. The beginning ch-1 doesn’t count as a stitch.
Bottom Section
Round 1: Ch 20 and join with a sl st to the first ch to form a ring. Be careful not to twist the chain. Ch 1, then sc in each ch around. Join. (20 sc)
Round 2: Ch 1. Sc 3, inc; repeat 5 times. Join. (25 sc)
Round 3: Ch 1. Sc 4, inc; repeat 5 times. Join. (30 sc)
Round 4: Ch 1. Sc 5, inc; repeat 5 times. Join. (35 sc)
Round 5: Ch 1. Sc 6, inc; repeat 5 times. Join. (40 sc)
Round 6: Ch 1. Sc 7, inc; repeat 5 times. Join. (45 sc)
Round 7: Ch 1, then sc in each st around. Join. (45 sc)
You add only 5 stitches per round, which is fewer than a flat circle needs. That is what makes the bottom curve inward into the rounded, tapered end.
Mesh Section
Round 8 (setup): Ch 5; this counts as dc + ch 2. Skip the next 2 sts. Dc in the next st, ch 2, skip 2; repeat 14 times. Join with a sl st to the 3rd ch of the beg ch-5. (15 dc posts, 15 ch-2 sps = 45 sts)
Check the math: the beginning post plus its skipped stitches uses 3 sts, and 14 repeats use 42 sts, for 45 in total.
Rounds 9–25: Ch 5 (counts as dc + ch 2). Dc in the next dc, ch 2; repeat 14 times. Join to the 3rd ch of the beg ch-5. (15 dc, 15 ch-2 sps in each round)
Stack each dc directly on top of the dc below so the windows stay square. After Round 25 you have 18 mesh rounds, 12 in (30.5 cm) tall. The whole tube is now 13.4 in (34.0 cm) tall. Don’t fasten off; the top band follows in the Border section.
Head (Tan, 3.5 mm Hook)
Work in continuous spirals. Mark the first stitch of each round.
- R1: 6 sc in MR (6)
- R2: Inc in each st (12)
- R3: Sc 1, inc × 6 (18)
- R4: Sc 2, inc × 6 (24)
- R5: Sc 3, inc × 6 (30)
- R6: Sc 4, inc × 6 (36)
- R7: Sc 5, inc × 6 (42)
- R8: Sc 6, inc × 6 (48)
- R9: Sc 7, inc × 6 (54)
- R10–17: Sc in each st (54). That is 8 rounds.
Eyes: insert the safety eyes between Rounds 13 and 14, with 9 sts between them, centered on the face. Lock the backs before you continue.
- R18: Sc 7, dec × 6 (48)
- R19: Sc 6, dec × 6 (42)
- R20: Sc 5, dec × 6 (36)
- R21: Sc 4, dec × 6 (30)
- R22: Sc 3, dec × 6 (24). Stuff the head firmly.
- R23: Sc 2, dec × 6 (18)
- R24: Sc 1, dec × 6 (12). Top up the stuffing.
- R25: Dec × 6 (6)
Fasten off and close the hole. The head should measure about 3.5 in (8.9 cm) across. Press the bottom slightly flat so it sits well on the tube.
Ears (Make 2; Tan, 3.5 mm Hook)
- R1: 6 sc in MR (6)
- R2: Inc in each st (12)
- R3: Sc 1, inc × 6 (18)
- R4: Sc in each st (18)
Fasten off and leave a long tail. Each ear is a shallow round cup about 1.4 in (3.6 cm) across. Don’t stuff the ears.
Muzzle (Cream, 3.5 mm Hook)
- R1: Ch 5. Starting in the 2nd ch from the hook, sc 3, then 3 sc in the last ch. Working along the other side of the chain, sc 2, then 2 sc in the last ch. (10)
- R2: Inc, sc 2, inc × 3, sc 2, inc × 2 (16)
- R3: Sc 1, inc × 8 (24)
Sl st in the next st and fasten off, leaving a long tail. The muzzle is an oval about 1.75 in (4.4 cm) wide and 1.25 in (3.2 cm) tall.
Embroidery: with dark brown, satin-stitch a small rounded triangle nose in the upper center of the muzzle. Then make a short vertical straight stitch down from the nose, and two angled stitches to form the “Y” mouth.
Hanging Loop (Tan, 4.0 mm Hook)
Ch 36. Sc in the 2nd ch from the hook and in each ch across. (35 sc)
Fasten off. The strip is about 7.8 in (19.8 cm) long. Folded in half, it makes a loop about 3.75 in (9.5 cm) tall.
Ball and Cord (Tan, 4.0 mm Hook)
Ball:
- R1: 6 sc in MR (6)
- R2: Inc in each st (12)
- R3–4: Sc in each st (12). Stuff the ball.
- R5: Dec × 6 (6)
Close the hole. The ball is about 0.9 in (2.3 cm) across.
Cord: Ch 20. Sl st in the 2nd ch from the hook and in each ch across. (19 sl st)
Fasten off. The cord is about 3.5 in (8.9 cm) long, or 1.75 in (4.4 cm) when doubled.
Assembly
- Muzzle: pin it centered below the eyes, with its top edge at Round 14 of the head. Whip-stitch it on all the way around, adding a little stuffing before you close it.
- Ears: sew the open edge of each ear across Rounds 5–9 on either side of the head, cupped slightly forward.
- Loop: fold the loop strip in half. Sew both ends side by side to the top center of the head, over Rounds 1–3.
- Ball: fold the cord in half. Sew the fold to the top of the ball, and sew both cord ends to the back of the bottom opening at Round 1.
The head is attached after the top band is finished (see below).
Border: Top Band and Opening Edge
The border is worked in the same sc gauge as the tube: 4.5 sc per in (2.5 cm).
Top Band (Continue from Round 25)
Round 26 (conversion round): Ch 1. Sc in the same st as the join. 2 sc in the next ch-2 sp, sc in the next dc; repeat around, ending with 2 sc in the last ch-2 sp. Join.
That gives 45 sc: 15 worked into the dc posts, plus 30 added in the 15 ch-2 spaces.
Rounds 27–28: Ch 1, then sc in each st around. Join. (45 sc)
Fasten off. The band is 0.6 in (1.5 cm) deep and the tube is now 14 in (35.6 cm) tall.
Why the math works: each mesh square is 3 stitches wide in both forms. As mesh, it is 1 dc + 2 ch. As band stitches, it is 1 sc + 2 sc. So 15 squares become exactly 45 sc, the same count you had in Round 7. The band neither flares nor pulls in.
Opening Edge
Join tan in any foundation ch at the bottom of the tube. Sl st in each foundation ch around. (20 sl st)
Fasten off. This firms the edge of the opening so bags pull through without stretching it.
Attaching the Head
Mark the center front of Round 28. The back half is 22 sts and the front half is 23 sts. Set the head on top of the band with its face lined up with the center front. Whip-stitch the lower head (around Rounds 20–22) to the 22 back stitches only.
Leave the 23 front stitches unattached. This gap under the chin is where you push bags in. Your total height is now 17.5 in (44.5 cm).
Final Blocking
- Lightly mist the tube with water. Don’t wet the head.
- Slide a rolled towel, about 3 in (7.6 cm) thick, inside the tube.
- Ease each mesh window square and line up the dc posts vertically.
- Check that the tube lies flat at 5 in (12.7 cm) wide and is 14 in (35.6 cm) long.
- Let it dry completely with the towel still inside.
- Gently reshape the head and ears by hand.
Final Quality-Control Checklist
- Rounds 7, 26, 27, and 28 each have 45 sc.
- Every mesh round has 15 dc and 15 ch-2 spaces, with no slanting.
- The bottom opening has 20 sl sts and is about 1.4 in (3.6 cm) across.
- The eyes are locked and level, 9 sts apart.
- The muzzle is centered and its stitching is hidden.
- The head is sewn on at the back only, and the front gap is open.
- The loop and ball cord are anchored securely, with tails woven in.
Troubleshooting
- Mesh twists in a spiral: you are skipping or adding a chain at the join. Always join to the 3rd ch of the beg ch-5.
- Windows are taller than wide: your dc is loose. Pull up a shorter loop, or go down a hook size for the mesh only.
- Top band ruffles: you worked 3 sc in a space. Use exactly 2 per ch-2 space.
- Bottom is too flat or too pointed: check that you add 5 increases per round, not 6 or 4.
- Bags fall out the bottom: tighten the opening edge with a second, firmer round of sl sts.
- Head flops forward: extend the back seam by 2 sts on each side.
Care
Hand wash in cool water with mild soap. Press out the water in a towel and dry flat, reshaping the head and mesh while damp.
Final Notes
Here is the measurement chain to follow. The 20-stitch opening is 4.4 in (11.2 cm) around. It grows to 45 stitches, or 10 in (25.4 cm). Next come 18 mesh rounds, adding 12 in (30.5 cm) of height. The 3-round top band brings the tube to 14 in (35.6 cm). The 3.5 in (8.9 cm) head on top brings the finished holder to 17.5 in (44.5 cm). If each checkpoint matches, your bear will hang straight, hold plenty of bags, and dispense them one at a time.
Happy crocheting!