

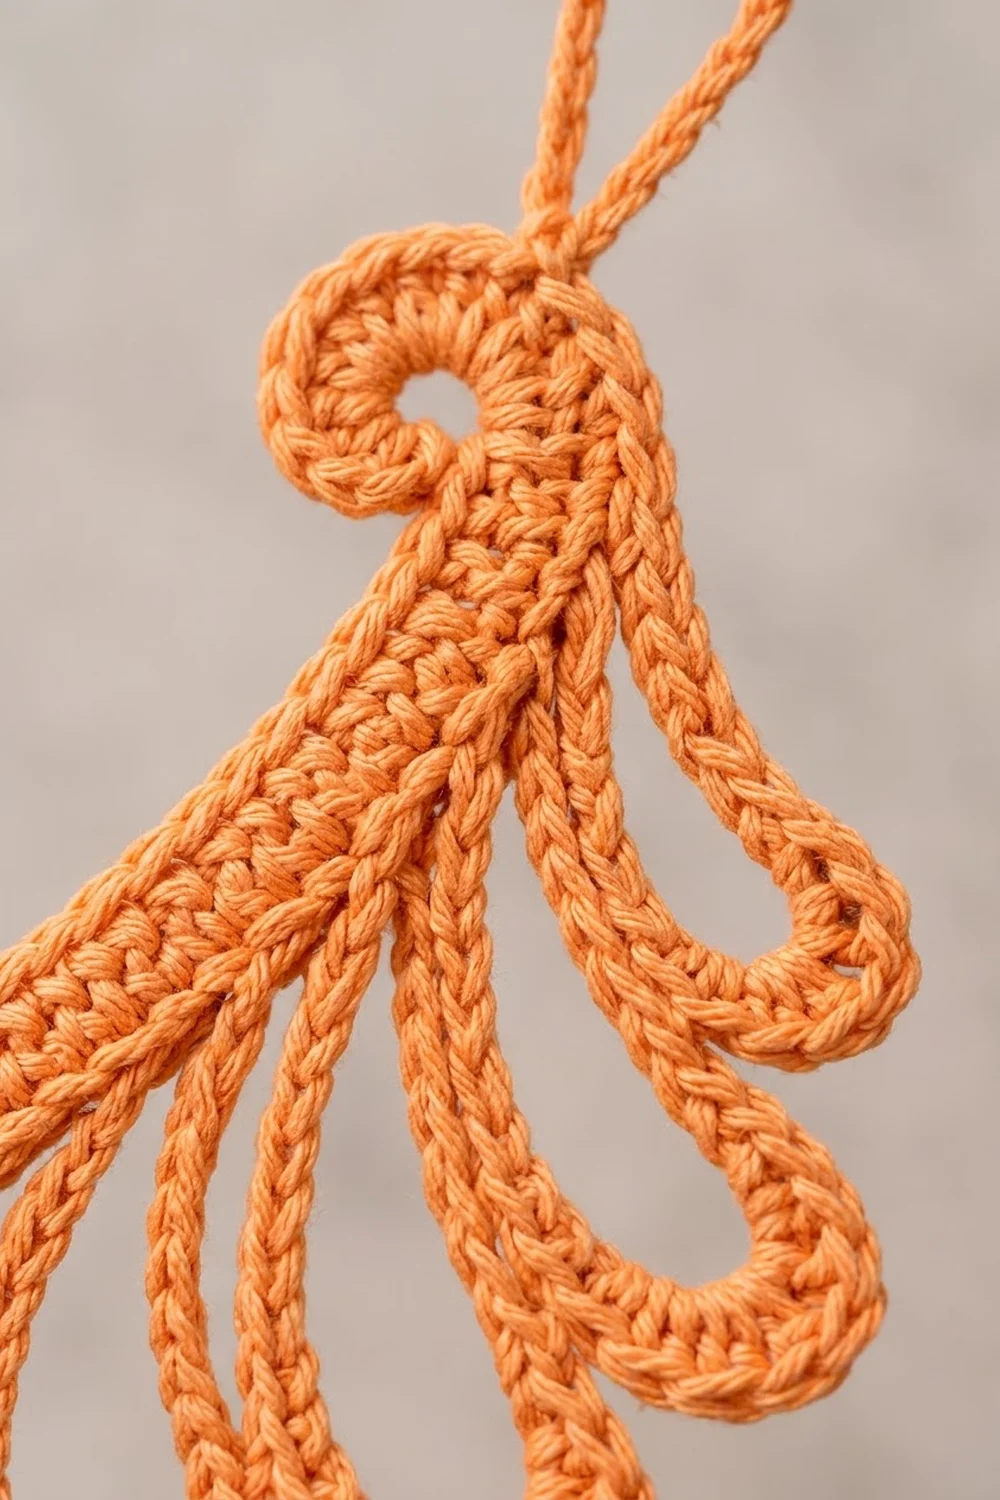
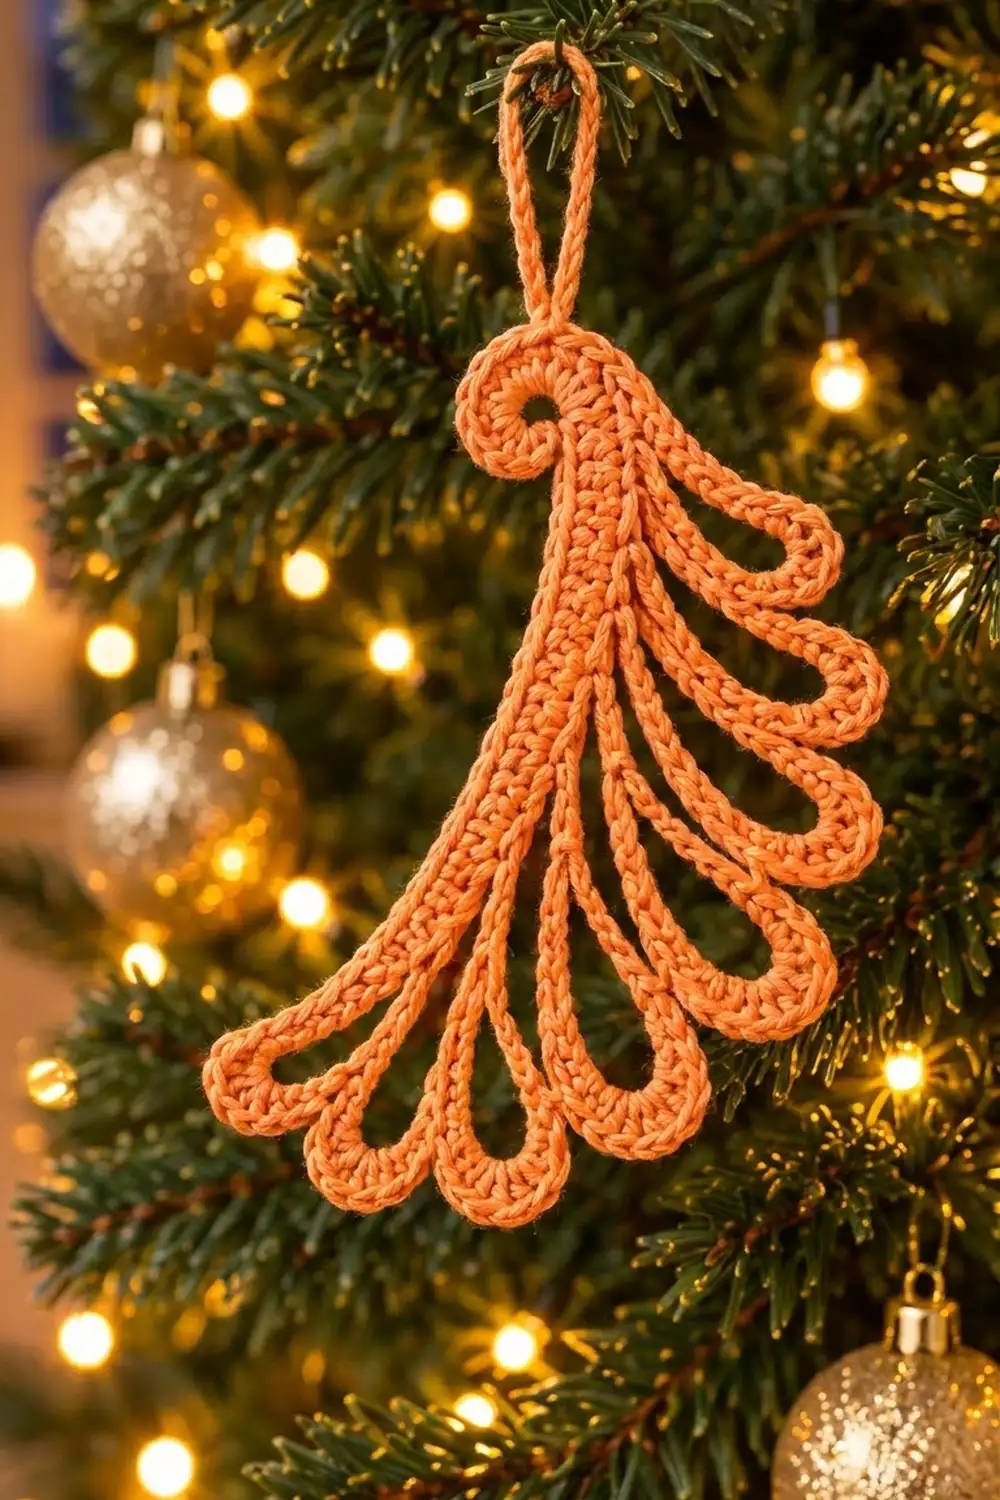
The Amber Plume is a single lacy feather worked in one warm orange yarn. It has a solid curved spine, a small round scroll with an open eye at the top, and six open teardrop fronds that sweep down one side and fan out at the base. A chain hanging loop sits on top of the scroll, so the piece goes straight onto a tree branch, a gift tag, or a window hook.
The look sits somewhere between Irish crochet lace and a vintage peacock plume. With only one color, the texture does all the work: firm single crochet outlines, a smooth spine, and a crisp slip-stitch edge that makes every frond stand out against greenery and lights.
This pattern uses US crochet terms. The finished ornament is about 6 in (15.2 cm) tall from the top of the scroll to the lowest frond tip and about 3.5 in (8.9 cm) wide. The hanging loop adds about 1.25 in (3.2 cm) on top.
Construction is simple and fast. You work a three-row spine on a foundation chain and add the scroll and hanging loop at the top. Then you make six chain arches along one long edge, outline those arches with single crochet, and finish with one slip-stitch round around the whole piece. It is made in one piece, with only two ends to weave in.
Finished Size and Construction
- Finished size: 6 in (15.2 cm) tall x 3.5 in (8.9 cm) wide, plus a 1.25 in (3.2 cm) hanging loop
- Skill level: Intermediate (you work into chain arches and keep careful counts)
- Terminology: US crochet terms
- Yarn weight: Fine / sport (#2), cotton or cotton blend
- Hook: 3.0 mm (between US C/2 and D/3)
- Number of pieces: 1 single ornament, worked in one piece
- Layout: Vertical plume; spine on the left, scroll and loop at the top, six fronds on the right and along the base
- Piece size (spine after Row 3): 5.5 in (14.0 cm) long x 0.625 in (1.6 cm) wide
- Size before border: 5.75 in (14.6 cm) x 3.25 in (8.3 cm)
- Border depth: about 0.125 in (0.3 cm) on each edge
Materials
Choose a smooth, tightly plied cotton in fine/sport weight. Mercerized cotton gives clean stitch definition and a slight sheen, and it holds its shape after starching. Avoid fuzzy or very soft yarns, because the fronds lose their outline.
Yarn:
- Orange (apricot / soft tangerine): 6 g, about 20 m (22 yd), for one ornament
Quantities include a margin of about 20 percent for a test piece, tails, and any ripping back. If you plan to make several ornaments, multiply by the number you want.
Tools:
- 3.0 mm crochet hook
- Tapestry needle
- Scissors
- 1 stitch marker
- Rustproof pins and a foam blocking mat
- Spray starch or diluted fabric stiffener
- Ruler or tape measure
Abbreviations (US Terms)
- ch = chain
- sl st = slip stitch
- sc = single crochet
- hdc = half double crochet
- sk = skip
- st(s) = stitch(es)
Special technique – sc into a chain arch: Insert the hook under the top loop and back bump of each chain in the arch, not into the space under the arch. Work 1 sc in each chain. This keeps the counts exact. It also gives each frond a neat, even outline on its outer edge, while the chain itself forms the open inner edge.
Special technique – free loops of the foundation chain: This is the single loop left on the underside of the foundation chain after Row 1. You will slip stitch into these loops during the border.
Gauge and Checkpoints
Gauge: 22 sc and 22 rows = 4 in (10.2 cm) in sc, worked flat with the 3.0 mm hook.
Make one full test ornament before you make more. It uses only a few grams and tells you more than a flat swatch, because the tension in the fronds matters as much as the tension in the spine.
Checkpoint 1 – after Row 1: 30 sc should measure 5.5 in (14.0 cm).
Checkpoint 2 – after Row 3: The spine should be 5.5 in (14.0 cm) long and 0.625 in (1.6 cm) wide, slightly wider at the hdc end.
Checkpoint 3 – after the scroll: The scroll should be about 0.75 in (1.9 cm) across, with an open eye of about 0.25 in (0.6 cm).
Checkpoint 4 – after Row 5: Lightly smoothed, the piece should measure about 5.75 in (14.6 cm) x 3.25 in (8.3 cm). The top frond should stick out about 0.75 in (1.9 cm) from the spine, and the bottom frond about 2 in (5.1 cm).
If your piece is too big: Go down to a 2.75 mm hook, or tighten your chains, which tend to run loose.
If your piece is too small: Go up to a 3.25 mm hook. Don’t add chains to the arches, because the outline counts depend on them.
Pattern Instructions
Part 1: Spine
The slip-knot end of the foundation chain becomes the top of the feather. Row 1 starts at the bottom.
Ch 31. Keep the chain even and not too tight. You will work into its free loops later.
Row 1: Sc in 2nd ch from hook and in each ch across. Turn. (30 sc)
Row 2: Ch 1 (does not count as a st), sc in each st across. Turn. (30 sc)
Row 3: Ch 1, sc in first 12 sts, hdc in next 18 sts. Do not turn. (12 sc + 18 hdc = 30 sts)
The hdc section widens the upper spine so it flows into the scroll. You are now at the top corner of the spine. Place a marker in the last hdc.
Part 2: Scroll and Hanging Loop
Scroll ring: Ch 6, sl st in the first of these 6 ch to form a ring.
Scroll round: Ch 1, work 6 sc into the ring. Ch 16, then sl st in the last sc made to form the hanging loop. Work 6 more sc into the ring. (12 sc in the ring + one ch-16 loop)
Sl st in the marked hdc to anchor the scroll to the spine. Remove the marker.
Ease the scroll so it sits slightly to the left, above the foundation-chain edge. The eye in the center stays open; that open curl is the signature detail.
Part 3: Fronds
Now work back along Row 3, from the top of the spine to the bottom.
Row 4: Ch 1, turn. Sc in first 2 sts, ch 10, sk next st, sc in next 4 sts, ch 14, sk next st, sc in next 4 sts, ch 18, sk next st, sc in next 4 sts, ch 22, sk next st, sc in next 4 sts, ch 24, sk next st, sc in next 4 sts, ch 26, sk next st, sc in last 2 sts. Turn.
Count: 24 sc + 6 ch-arches (10, 14, 18, 22, 24, 26).
Check: 2 + 5 x (1 skipped + 4 sc) + (1 skipped + 2 sc) = all 30 sts of Row 3 used.
Each arch starts and ends only one stitch apart, so every frond has a narrow base and a round tip, which makes the teardrop shape. Let the arches hang down; the longest ones end up at the base of the feather.
Keep the chains loose and even. Your chain should be about as wide as a sc, or the arches will be too short to outline smoothly. Before you go on, check that no arch is twisted.
Part 4: Frond Outline
Now work from the bottom of the spine back up to the top.
Row 5: Ch 1. Sc in first 2 sc, then work the arches and spacers in this order:
- Arch 6 (26 ch): sc in each ch, working 2 sc in the 13th ch. (27 sc)
- Sc in next 4 sc.
- Arch 5 (24 ch): sc in each ch, with 2 sc in the 12th ch. (25 sc)
- Sc in next 4 sc.
- Arch 4 (22 ch): sc in each ch, with 2 sc in the 11th ch. (23 sc)
- Sc in next 4 sc.
- Arch 3 (18 ch): sc in each ch, with 2 sc in the 9th ch. (19 sc)
- Sc in next 4 sc.
- Arch 2 (14 ch): sc in each ch, with 2 sc in the 7th ch. (15 sc)
- Sc in next 4 sc.
- Arch 1 (10 ch): sc in each ch, with 2 sc in the 5th ch. (11 sc)
- Sc in last 2 sc.
This is a conversion row. Count: 144 sc = 138 sc worked 1-per-existing-stitch (24 over sc + 114 over chains) + 6 extra sc (one tip increase per frond).
The extra stitch at each tip lets the outline curve around the teardrop point without pulling. Don’t fasten off; you are now at the top of the spine, next to the scroll.
Border
The border is one round of slip stitches around the whole outer edge. It firms up every curve and gives the raised, rope-like outline seen on the finished plume.
Border gauge: 1 sl st per st or row end. Work loosely, at the same tension as your sc. If the edge pulls in, go up 0.5 mm for this round only.
Border Round: Continue from the top of Row 5 and work around in this order:
- Scroll: sl st in each of the 8 exposed sc of the scroll, passing behind the hanging loop. Skip the 4 sc that sit against the spine. (8 sl st)
- Left spine edge: sl st in the free loop of each foundation ch, down to the bottom. (30 sl st)
- Bottom end: sl st in the end of each of Rows 1 through 5. (5 sl st)
- Frond edge: sl st in each sc of Row 5, back up to the top. (144 sl st)
Join with a sl st to the first sl st. Total: 8 + 30 + 5 + 144 = 187 sl st. Fasten off and weave both ends through the spine.
Why the math works: Every side gets exactly one slip stitch per existing stitch or row end, so no side is stretched or gathered. Slip stitches add almost no height. The border adds only about 0.125 in (0.3 cm) per edge, taking the piece from 5.75 in (14.6 cm) x 3.25 in (8.3 cm) to 6 in (15.2 cm) x 3.5 in (8.9 cm).
Final Blocking
- Soak the ornament in cool water for 5 minutes, then press the water out in a towel. Don’t wring it.
- Lay it right side up on a foam mat.
- Curve the spine into a gentle S, bending the lower end slightly to the left so the fronds fan out to the right.
- Pin the scroll into a round curl with the eye open. A pin through the eye holds it.
- Open each frond into a teardrop. Pin at the tip and at both sides of the widest point. Space the tips evenly; the bottom three should fan out like fingers.
- Pin the hanging loop straight up from the scroll, about 1.25 in (3.2 cm) long.
- Check the size: 6 in (15.2 cm) tall x 3.5 in (8.9 cm) wide.
- Spray with starch, let it soak in, and let the piece dry completely, at least 8 hours.
- Unpin. If the fronds still feel soft, add one more light coat of starch.
Final Quality-Control Checklist
- Spine is 30 sts long and lies smooth, with no twist.
- Scroll is round, with an open eye of about 0.25 in (0.6 cm).
- Hanging loop is firmly anchored and about 1.25 in (3.2 cm) long.
- There are six fronds, from shortest at the top to longest at the base.
- Each frond outline has the right count: 11, 15, 19, 23, 25, 27 sc.
- Row 5 totals 144 sc; the border totals 187 sl st.
- Border lies flat, with no ruffling or puckering.
- Finished size is 6 in (15.2 cm) x 3.5 in (8.9 cm).
- Both ends are woven into the spine and trimmed close.
- The piece is fully dry and holds its shape when hung.
Troubleshooting
Fronds twist or flip over. The chain arch twisted before you outlined it. Rip back to that arch and keep the chain flat as you work Row 5.
Frond tips are pointed or puckered. You missed the 2-sc tip increase. Count the arch and work the increase in the center chain.
Fronds ruffle. Your chains are tighter than your sc. Chain more loosely, or use a hook 0.25 mm larger just for the arches.
Spine curls into a C. Row 5 is pulling on the frond side. Block firmly into an S curve with extra starch, and work the outline row more loosely next time.
Scroll eye closes up. The 12 sc are packed too tightly. Spread them evenly around the ring before anchoring, and pin the eye open while blocking.
Gaps where the fronds meet the spine. The skipped stitch under each arch is showing. Pull the 4-sc spacers snug in Row 5. The border slip stitches will close any small gap.
Border edge pulls in. The slip stitches are too tight. Rework the border with a larger hook.
Care
Hand wash in cool water with mild soap, press dry in a towel, and re-block with starch to restore the shape. Store flat or hanging, away from anything heavy that could crush it.
Final Notes
The measurements are easy to check at each step. Thirty sc in Row 1 give a 5.5 in (14.0 cm) spine, and three rows make it 0.625 in (1.6 cm) wide. Row 4 uses all 30 sts of Row 3 to place 24 sc and six arches. Row 5 turns those into 144 sc by adding one stitch at each frond tip. The border adds 187 slip stitches, one per stitch or row end. It takes the plume from 5.75 in (14.6 cm) x 3.25 in (8.3 cm) to its finished 6 in (15.2 cm) x 3.5 in (8.9 cm).
Check your size at each stage and every ornament will come out the same. Make one in orange first, then a few more for gifts or tags.
Happy crocheting!