

This bag charm is a bold capital H worked in a small burgundy and blush-pink check, then edged in a crisp burgundy outline. Three little cream daisies with golden centers and sage leaves add a soft, cottage-style finish, and a gold keyring lets you clip it onto a tote, backpack, or set of keys.
The checkered texture comes from tapestry single crochet. Every stitch is worked in the opposite color of the stitch below it, so after the first row the pattern mostly runs itself. All instructions use US crochet terms.
The finished charm measures 4.4 in (11.2 cm) wide by 4.4 in (11.2 cm) tall, flowers excluded. It is one flat piece worked in rows from the bottom up. You make the two lower legs separately, join them with the crossbar, and then split again for the two upper legs. A single border round finishes the edge, and the flowers and hardware are sewn on last.
Finished Size and Construction
- Finished size: 4.4 in × 4.4 in (11.2 cm × 11.2 cm)
- Skill level: Intermediate (two-color tapestry crochet, simple shaping)
- Terminology: US crochet terms
- Yarn weight: DK (light worsted / #3), cotton or cotton blend
- Hook: 3.5 mm (E-4)
- Number of pieces: 1 letter, plus 3 flower appliqués and 6 leaves
- Layout: Single letter H, worked in rows from the bottom up
- Piece size: 20 sts × 20 rows
- Size before border: 4 in × 4 in (10.2 cm × 10.2 cm)
- Border depth: 0.2 in (0.5 cm) on every edge, 1 round
Materials
Use a smooth mercerized or matte cotton in DK weight. Cotton holds the checks crisply and stays flat on a bag. Avoid fuzzy yarns, because they blur the 1-stitch checks.
- Color A, burgundy: 10 g / 21 m (23 yd)
- Color B, light pink: 8 g / 17 m (19 yd)
- Color C, cream (petals): 3 g / 6 m (7 yd)
- Color D, golden yellow (centers): 1 g / 2 m (2 yd)
- Color E, sage green (leaves): 2 g / 4 m (4 yd)
All quantities include about a 20% margin for swatching and tails.
Tools:
– 3.5 mm (E-4) crochet hook
– Tapestry needle
– 1 in (2.5 cm) gold split keyring with a 1.25 in (3.2 cm) chain and jump ring
– Small pliers for the jump ring
– Scissors, stitch markers, and pins for blocking
Abbreviations (US Terms)
- ch: chain
- sc: single crochet
- sc2tog: single crochet 2 together
- dc: double crochet
- hdc: half double crochet
- sl st: slip stitch
- st(s): stitch(es)
- RS / WS: right side / wrong side
Special technique: Tapestry color change. Work the sc in the current color until 2 loops remain on the hook. Yarn over with the new color and pull through. Lay the unused color along the tops of the stitches below and work over it, so it is carried inside the stitches.
Checker rule: Work every sc in the opposite color of the stitch directly below it. For increases and decreases, work the edge stitch in the opposite color of its neighbor.
Gauge and Checkpoints
Gauge: 20 sts and 20 rows of checkered tapestry sc = 4 in (10.2 cm). That works out to 5 sts and 5 rows per inch.
Because carrying yarn makes the stitches tight, make Leg A first and measure it before you go on. It works as your gauge test.
Checkpoints:
– After Row 3: each foot is 9 sts = 1.8 in (4.6 cm) wide and 0.6 in (1.5 cm) tall.
– After Row 8: each leg is 7 sts = 1.4 in (3.6 cm) wide, and the leg is 1.6 in (4.1 cm) tall.
– After Row 12: the crossbar is 18 sts = 3.6 in (9.1 cm) wide, and the piece is 2.4 in (6.1 cm) tall.
– After Row 20: the piece is 4 in × 4 in (10.2 cm × 10.2 cm).
– After the border: the piece is 4.4 in × 4.4 in (11.2 cm × 11.2 cm).
If the piece is too big: go down to a 3.25 mm (D-3) hook. If it is too small: go up to a 3.75 mm (F-5) hook. Rows that come out noticeably taller than stitches are wide usually mean the carried strand is too loose. Snug it along the row as you work.
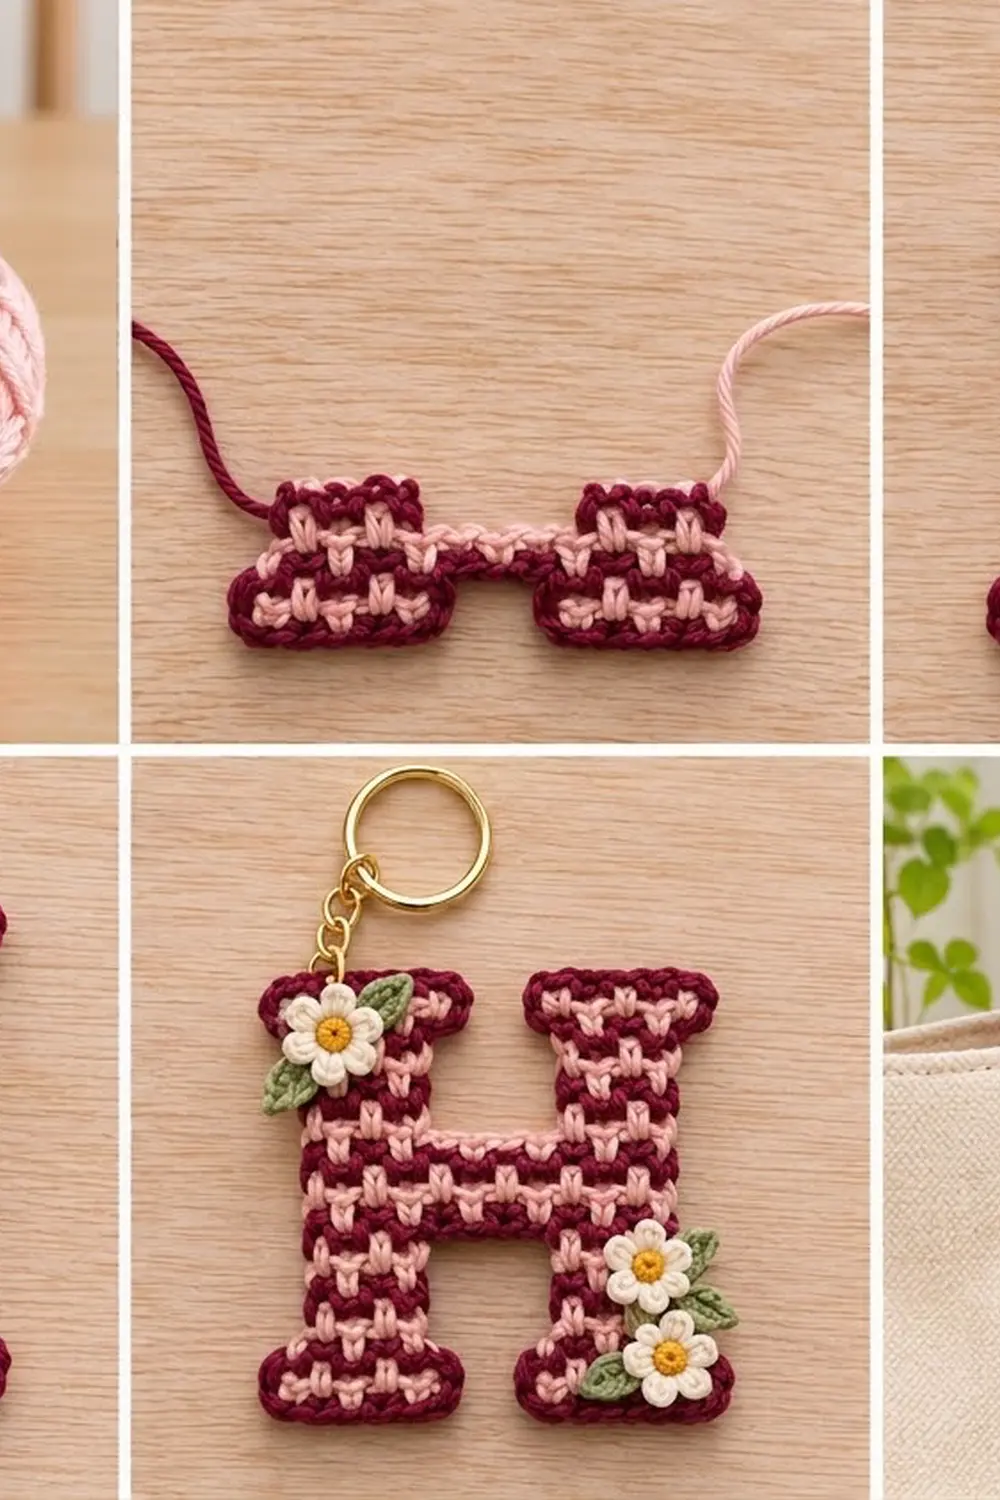
Lower Legs (make 2)
Each lower leg includes its flared foot. Make Leg A and Leg B the same way.
With A, ch 10.
Row 1: Starting in the 2nd ch from the hook and alternating A, B, A, B…, sc in each ch across. Turn. (9 sts) You start and end with A.
Row 2: Ch 1 (does not count as a st). Following the checker rule, sc in each st across. Turn. (9 sts)
Row 3: Ch 1, sc in each st across in checker. Turn. (9 sts)
Rows 1–3 form the foot, which measures 1.8 in (4.6 cm) wide.
Row 4 (decrease row): Ch 1, sc2tog, sc in next 5 sts, sc2tog. Turn. (7 sts) This row narrows the foot by 1 stitch on each side and makes the flare.
Rows 5–8: Ch 1, sc in each st across in checker. Turn. (7 sts per row)
Leg A: Fasten off both colors and leave 6 in (15.2 cm) tails.
Leg B: Do not fasten off. Keep both colors attached.
Crossbar
Lay both legs side by side with the same side facing up. Place Leg B so its working yarn sits at its outer edge. The two feet should be 2 sts apart, so the legs are 4 sts apart.
Row 9 (joining row): Ch 1. Sc across the 7 sts of Leg B in checker. Then ch 4, alternating B, A, B, A. Without twisting, sc across the 7 sts of Leg A in checker, starting at its inner edge. Turn. (14 sc + 4 ch)
Row 10: Ch 1. Sc in each of the 7 sts, sc in each of the 4 ch, then sc in each of the 7 sts. Keep to the checker rule, with the chains taking the opposite color of the stitch before them. Turn. (18 sts)
Rows 11–12: Ch 1, sc in each st across in checker. Turn. (18 sts per row)
The crossbar is 4 rows = 0.8 in (2.0 cm) tall. Its 4 center stitches form the 0.8 in (2.0 cm) opening between the legs.
Upper Legs
First upper leg
Row 13: Ch 1, sc in the first 7 sts only. Turn and leave the remaining 11 sts unworked. (7 sts)
Rows 14–17: Ch 1, sc in each st across in checker. Turn. (7 sts per row)
Row 18 (increase row): Ch 1, 2 sc in the first st, sc in next 5 sts, 2 sc in the last st. Turn. (9 sts)
Rows 19–20: Ch 1, sc in each st across in checker. Turn. (9 sts per row) Fasten off both colors.
Second upper leg
Row 13: Skip the next 4 unworked sts of Row 12. Join both colors in the next st with a standing sc in the correct checker color. Sc in each of the remaining 6 sts. Turn. (7 sts) Check: 7 + 4 + 7 = 18.
Rows 14–20: Repeat Rows 14–20 of the first upper leg. (9 sts at Row 20) Fasten off both colors.
Weave in all tails along matching-color stitches on the WS. Close the small gaps at the inner edges of the crossbar with the Leg A tails.
Border
Border gauge: 5 sc per inch along stitch edges and 5 sc per inch along row-end edges. This matches the body gauge, so the border lies flat.
Join A with a sl st in the first foundation st at the bottom-left corner of the left foot. Ch 1. Then work the following segments in order:
- Bottom of left foot: 3 sc in the corner st, sc in the next 7 sts, 3 sc in the corner st. (13 sc)
- Inner side of left lower leg: 1 sc in each row end of Rows 1–8. (8 sc)
- Underside of crossbar: 1 sc in each of the 4 ch. (4 sc)
- Inner side of right lower leg: 1 sc in each row end of Rows 8–1. (8 sc)
- Bottom of right foot: 3 sc in the corner, 7 sc, 3 sc in the corner. (13 sc)
- Right outer side: 1 sc in each row end of Rows 1–20. (20 sc)
- Top of right upper leg: 3 sc in the corner, 7 sc, 3 sc in the corner. (13 sc)
- Inner side of right upper leg: 1 sc in each row end of Rows 20–13. (8 sc)
- Top of crossbar: 1 sc in each of the 4 center sts of Row 12. (4 sc)
- Inner side of left upper leg: 1 sc in each row end of Rows 13–20. (8 sc)
- Top of left upper leg: 3 sc in the corner, 7 sc, 3 sc in the corner. (13 sc)
- Left outer side: 1 sc in each row end of Rows 20–1. (20 sc)
Sl st to the first sc to join. (132 sc total)
Why the math works: The perimeter has 116 edge positions: four serif edges of 9 sts each (36), four inner-leg sides of 8 row ends each (32), two outer sides of 20 row ends each (40), and two crossbar edges of 4 each (8). The 8 outer serif corners each get 3 sc, which adds 2 extra per corner (16). That gives 116 + 16 = 132.
The two inner sides plus the crossbar height equal one outer side: 8 + 4 + 8 = 20. Inner corners get no extra stitches, so the concave angles stay sharp. One round adds 0.2 in (0.5 cm) on every edge, which brings 4 in (10.2 cm) up to 4.4 in (11.2 cm).
Flowers and Leaves
Flower (make 3)
With D, make a magic ring.
Round 1: Ch 1, 5 sc in the ring, sl st to the first sc. Pull the ring closed and fasten off D. (5 sc)
Round 2: Join C in any sc. (Ch 2, 2 dc, ch 2, sl st) all in the same sc, then sl st in the next sc. Repeat from * 4 more times. (5 petals)
Fasten off and leave a 12 in (30.5 cm) tail. Each flower is about 0.8 in (2.0 cm) across.
Leaf (make 6)
With E, ch 5. Working in the back bumps, sl st in the 2nd ch from the hook, then sc, hdc, sc in the next 3 ch. (4 sts) Fasten off with a long tail. Each leaf is about 0.6 in (1.5 cm) long.
Placement
- Top flower: Sew 1 flower over the top-left serif corner, with 1 leaf peeking out to the upper right and 1 to the lower left.
- Bottom flowers: Stack 2 flowers on the right foot, the upper one slightly overlapping the lower one. Tuck 4 leaves around them: 2 on the right edge, 1 at the lower left, and 1 between the flowers.
Sew each leaf down first, then sew the flowers over the leaf bases.
Attaching the Hardware
Open the jump ring with pliers. Pass it through 2 border stitches at the top-left corner of the left serif, right behind the top flower. Thread on the chain and close the ring fully.
Final Blocking
- Lightly mist the charm with water, or soak it for 5 minutes and press out the water in a towel.
- Lay it flat with the RS up on a blocking mat.
- Pin the 8 serif corners first so the 4.4 in × 4.4 in (11.2 cm × 11.2 cm) outline is square.
- Pin the inner corners and the crossbar edges straight. Both crossbar edges should measure 0.8 in (2.0 cm).
- Keep the flowers off the mat, or block the letter before you sew them on.
- Let it dry completely. Then remove the pins and attach the hardware.
Final Quality-Control Checklist
- [ ] The letter measures 4.4 in × 4.4 in (11.2 cm × 11.2 cm).
- [ ] Every stitch contrasts with the stitch below it, and no colors are stacked.
- [ ] Carried strands do not show through on the RS.
- [ ] The border has 132 sc with 3 sc at each of the 8 outer corners.
- [ ] Both legs are 7 sts wide and both serifs are 9 sts wide.
- [ ] The crossbar is level and centered.
- [ ] The flowers are sewn securely and the petals are not puckered.
- [ ] The jump ring is fully closed and the tails are hidden.
Troubleshooting
- The piece curls into a cup: The carried yarn is too tight. Stretch each row gently before you turn.
- Pink shows through the burgundy: Keep the carried strand lying flat along the tops of the stitches, not on the back loops.
- The checks form vertical stripes: You followed the color of the stitch to the left instead of the stitch below. Recheck the checker rule.
- The border ruffles: You are working more than 1 sc per row end. Count each segment against the border list.
- The border pulls in: Go up 0.25 mm for the border round only.
- The crossbar sits crooked: The chains in Row 9 were twisted. Rework Row 9.
Care
Hand wash in cool water and lay flat to dry. Remove the metal keyring before washing so it doesn’t tarnish or snag the stitches.

Final Notes
The measurement chain is simple: 5 sts and 5 rows per inch turn into 20 sts × 20 rows = 4 in × 4 in (10.2 cm × 10.2 cm). One 132-stitch border round then brings the charm to 4.4 in × 4.4 in (11.2 cm × 11.2 cm). Get the gauge right on Leg A and the rest follows. Once you know the method, it adapts easily to other block letters for initials or gifts.
Happy crocheting!