

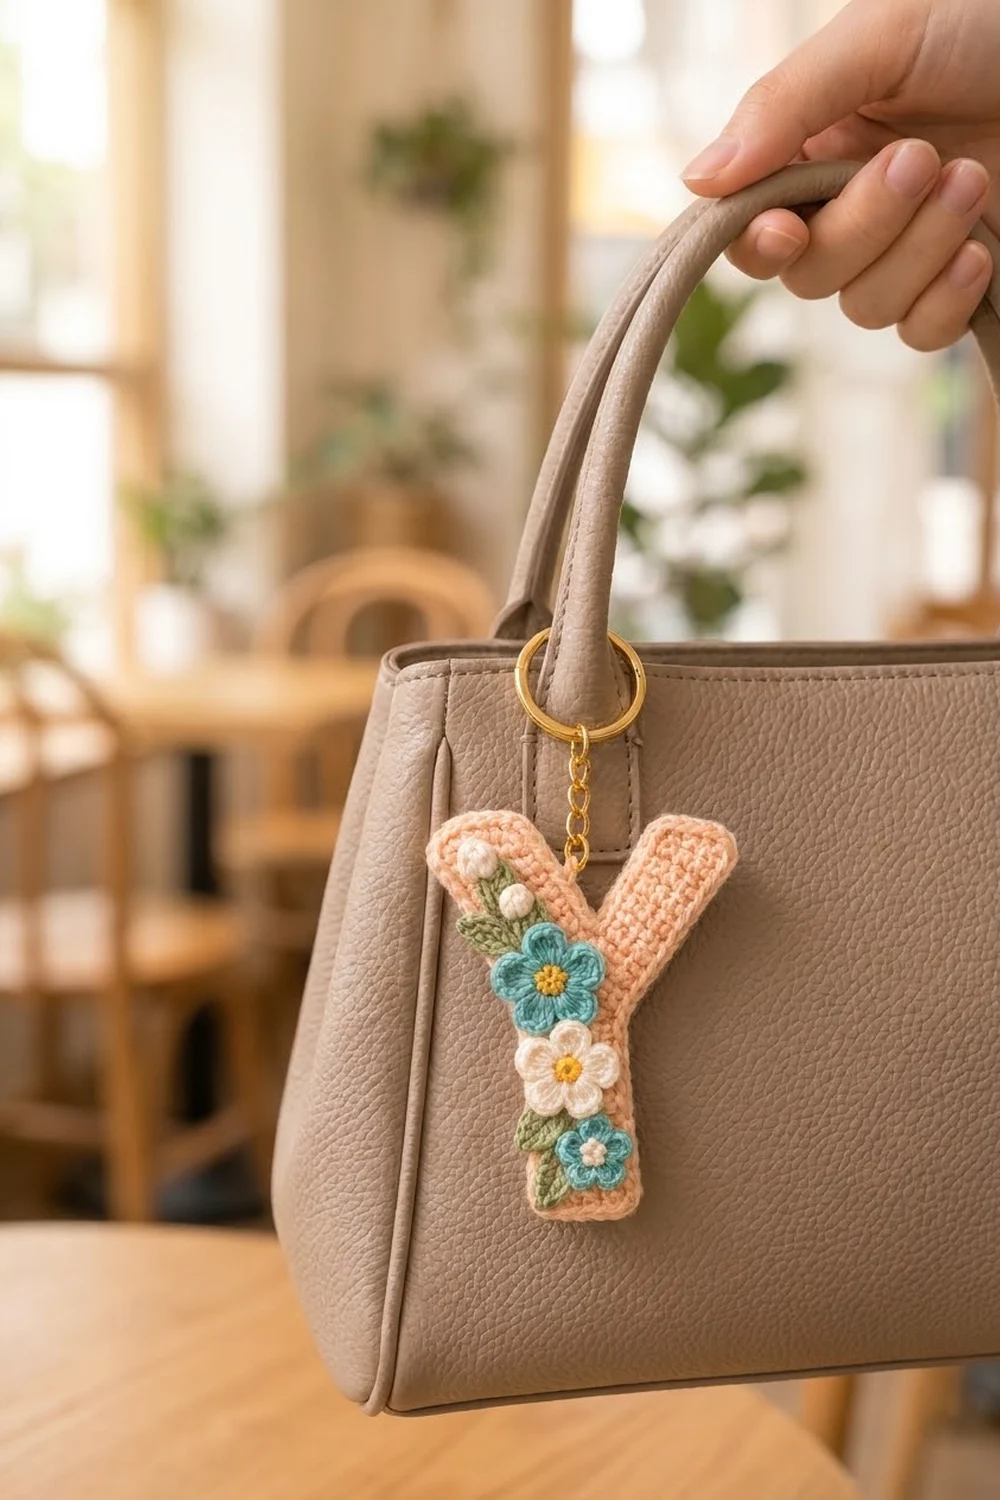
The Blossom Initial Y is a small, sturdy letter keychain covered with a little cluster of flowers. The base is a soft peach letter “Y” in tight single crochet, outlined with a neat raised border. Down one side runs a spray of teal and cream blossoms with mustard-yellow centers, sage-green leaves, and a tiny cream bud.
The palette is warm and fresh, and it looks good on a handbag, backpack, or set of house keys. It also makes a thoughtful personalized gift.
This pattern uses US crochet terms. The finished letter measures about 3.6 in (9.1 cm) wide by 4.25 in (10.8 cm) tall, not counting the hardware.
You crochet the letter flat in one piece. First work the stem in rows, then widen it, then split it into two slanted arms. A single round of single crochet borders the whole shape. Finally, make the small flowers, bud, and leaves separately and sew them on.
Finished Size and Construction
- Finished size: about 3.6 in (9.1 cm) wide × 4.25 in (10.8 cm) tall
- Skill level: Easy (advanced beginner)
- Terminology: US crochet terms
- Yarn weight: Sport / #2 cotton
- Hook: 2.5 mm (US B-1/C-2)
- Number of pieces: 1 letter base plus 9 small appliqués (2 teal flowers, 1 cream flower, 1 bud, 5 leaves)
- Layout: a single letter; the appliqués run in a diagonal line down the left arm and stem
- Letter size before border: 3.33 in (8.5 cm) wide × 4 in (10.2 cm) tall
- Border depth: about ⅛ in (0.3 cm) on every edge
Materials
Use a smooth, mercerized sport-weight cotton or cotton blend. Cotton gives clear stitches and a firm fabric, so the keychain holds its shape. Avoid fuzzy or very stretchy yarns.
Yarn:
– Peach (main color): 8 g, about 25 m
– Teal: 3 g, about 9 m
– Cream: 2 g, about 6 m
– Sage green: 2 g, about 6 m
– Mustard yellow: 1 g, about 3 m
All quantities include a comfortable margin for swatching and tails.
Tools:
– 2.5 mm (US B-1/C-2) crochet hook
– Tapestry needle
– Sharp sewing needle and matching thread (optional, for appliqués)
– Gold split ring, 1 in (2.5 cm), with a 1.5 in (3.8 cm) chain
– 1 small jump ring and 2 pairs of flat-nose pliers
– Stitch markers
– Blocking mat and rust-proof pins
– Spray bottle with water
Abbreviations (US Terms)
- ch – chain
- sl st – slip stitch
- sc – single crochet
- hdc – half double crochet
- dc – double crochet
- sc2tog – single crochet 2 together
- st(s) – stitch(es)
- RS / WS – right side / wrong side
- MR – magic ring
Special stitch, puff bud: Work this in a magic ring. Ch 2, then work 4 dc into the ring. Pull the ring fully closed so the dc curl into a ball, and sl st to the top of the ch-2.
Gauge and Checkpoints
Gauge: 24 sc and 28 rows = 4 in (10.2 cm) in sc worked in rows. This works out to 6 sts and 7 rows per 1 in (2.5 cm).
Make the stem section first (Rows 1–13) and treat it as your swatch. Measure it before you go on.
Checkpoints:
– After Row 13: 1 in (2.5 cm) wide × about 1.9 in (4.8 cm) tall
– After Row 18: 2 in (5.1 cm) wide at the top edge × about 2.6 in (6.6 cm) tall
– After the arms (Row 28): 4 in (10.2 cm) tall; 3.33 in (8.5 cm) across the arm tips
– After the border: about 3.6 in (9.1 cm) × 4.25 in (10.8 cm)
If your piece is too big, go down to a 2.25 mm hook. If it is too small, go up to a 2.75 mm hook. The fabric should feel firm and dense, with no gaps between stitches. A keychain gets handled a lot, so err on the tight side.

Letter Base
Work in peach. Turn at the end of every row. The ch 1 at the start of a row does not count as a stitch. Row 1 is a RS row.
Stem
Foundation: Ch 7.
Row 1 (RS): Sc in the 2nd ch from the hook and in each ch across, turn. (6 sts)
Rows 2–13: Ch 1, sc in each st across, turn. (6 sts)
Checkpoint: The stem is 1 in (2.5 cm) wide and about 1.9 in (4.8 cm) tall.
Fork (Widening)
Row 14 (WS): Ch 1, 2 sc in the first st, sc in the next 4 sts, 2 sc in the last st, turn. (8 sts)
Row 15: Ch 1, sc in each st across, turn. (8 sts)
Row 16: Ch 1, 2 sc in the first st, sc in the next 6 sts, 2 sc in the last st, turn. (10 sts)
Row 17: Ch 1, sc in each st across, turn. (10 sts)
Row 18 (WS): Ch 1, 2 sc in the first st, sc in the next 8 sts, 2 sc in the last st, turn. (12 sts)
Checkpoint: The top edge measures 2 in (5.1 cm), and the piece is about 2.6 in (6.6 cm) tall.
Right Arm
Hold the piece RS facing. You will work over the first 6 sts only, which are on the right side of the piece. Each “shift row” adds a stitch on the outer edge and removes one on the inner edge. The count stays at 6, but the arm leans outward.
Row 19 (RS, shift): Ch 1, 2 sc in the first st, sc in the next 3 sts, sc2tog, turn. Leave the remaining 6 sts unworked. (6 sts)
Row 20: Ch 1, sc in each st across, turn. (6 sts)
Rows 21, 23, and 25 (shift): Ch 1, 2 sc in the first st, sc in the next 3 sts, sc2tog, turn. (6 sts)
Rows 22, 24, and 26–28: Ch 1, sc in each st across, turn. (6 sts)
Fasten off. The arm has 4 shift rows, so its tip has moved 4 sts outward.
Left Arm
Row 19 (RS, shift): With RS facing, join peach in the first unworked st of Row 18, next to the right arm. Ch 1, sc2tog, sc in the next 3 sts, 2 sc in the last st, turn. (6 sts)
Row 20: Ch 1, sc in each st across, turn. (6 sts)
Rows 21, 23, and 25 (shift): Ch 1, sc2tog, sc in the next 3 sts, 2 sc in the last st, turn. (6 sts)
Rows 22, 24, and 26–28: Ch 1, sc in each st across, turn. (6 sts)
Fasten off.
Checkpoint: The letter is 4 in (10.2 cm) tall. The arm tips span 20 sts, or 3.33 in (8.5 cm): 12 sts at the fork plus 4 sts of shift on each side. The opening between the arm tips is 8 sts, or 1.33 in (3.4 cm). Weave in the ends now.
Border
Border gauge: Work 1 sc per sc row-end along the sides and 1 sc per stitch along the top and bottom edges. Rows are slightly shorter than stitches are wide, so 1 sc per row-end lies flat in this firm fabric.
Edge row-end counts:
– Each outer side: Rows 1–13 of the stem (13), plus Rows 14–18 of the fork (5), plus the arm’s Rows 19–28 (10) = 28 row-ends
– Each inner arm edge: 10 row-ends (Rows 19–28)
Border Round (RS): With RS facing, join peach in the bottom-left corner st of the foundation edge. Work as follows:
- Bottom edge: 3 sc in the corner st, sc in the next 4 sts, 3 sc in the last st. (10 sts)
- Right outer side: Sc in each of the 28 row-ends up to the right arm tip. (28 sts)
- Right arm top: 3 sc in the first st, sc in the next 4 sts, 3 sc in the last st. (10 sts)
- Right inner edge: Sc in each of the next 9 row-ends down toward the fork. (9 sts)
- Fork point: Sc2tog, working across the last row-end of the right arm and the first row-end of the left arm. (1 st)
- Left inner edge: Sc in each of the next 9 row-ends. (9 sts)
- Left arm top: 3 sc in the first st, sc in the next 4 sts, 3 sc in the last st. (10 sts)
- Left outer side: Sc in each of the 28 row-ends down to the start. (28 sts)
Sl st to the first sc to join. Total: 105 sts.
Why the math works: The top and bottom counts include their corner groups, and the side counts do not, so no stitch is counted twice:
10 + 28 + 10 + 9 + 1 + 9 + 10 + 28 = 105
Each 3-sc corner group adds the extra 2 sts a 90° turn needs. The single sc2tog at the fork pulls the inner V in so it doesn’t flare. The border adds about ⅛ in (0.3 cm) on every edge. That brings 3.33 in to about 3.6 in (9.1 cm) and 4 in to 4.25 in (10.8 cm).
Fasten off and weave in the ends.
Appliqués
Leave a 6 in (15.2 cm) tail on every appliqué for sewing.
Large Teal Flower (make 1)
Rnd 1 (yellow): MR, 10 sc in the ring. Sl st to the first sc. Fasten off. (10 sts)
Rnd 2 (teal): Join teal in any st. (Hdc, 3 dc, hdc) in the next st, sl st in the next st; repeat from * 4 more times. (5 petals, 30 sts)
Fasten off. The flower measures about 1⅛ in (2.9 cm) across.
Cream Flower (make 1)
Work exactly as the Large Teal Flower, but use cream for Rnd 2. (5 petals, 30 sts, about 1⅛ in / 2.9 cm)
Small Teal Flower (make 1)
Rnd 1 (cream): MR, 5 sc in the ring. Sl st to the first sc. Fasten off. (5 sts)
Rnd 2 (teal): Join teal in any st. (Ch 2, 2 dc, ch 2, sl st) all in the next st; repeat from * 4 more times. (5 petals)
Fasten off. With yellow, work 1 French knot in the center. The flower measures about ¾ in (1.9 cm) across.
Bud (make 1)
Using cream, work 1 puff bud (see Special Stitch). Fasten off. The bud is about ⅜ in (1 cm) across.
Leaves (make 5 in sage green)
Large leaf (make 4): Ch 6. Working into the chain: sc in the 2nd ch from the hook, hdc, dc, hdc, sc in the last ch. (5 sts) Ch 1 and rotate. Working along the other side of the chain, sc, hdc, dc, hdc, sc. (5 sts) Sl st to the first sc.
This gives 10 sts and a ridge down the center that looks like a vein. Each leaf is about ⅞ in (2.2 cm) long.
Small leaf (make 1): Ch 4. Working into the chain: sc in the 2nd ch from the hook, hdc, sc. (3 sts) Ch 1 and rotate. Working along the other side of the chain, sc, hdc, sc. (3 sts) Sl st to the first sc.
This gives 6 sts. The leaf is about ½ in (1.3 cm) long.
Placement and Sewing
Pin the pieces before you sew. Work from the top of the left arm down along the left half of the stem:
- Bud: at the top of the left arm, ¼ in (0.6 cm) below the border. Tuck the small leaf behind its lower-left side.
- Large teal flower: directly below the bud, centered on the arm where it meets the fork. Tuck 1 large leaf behind its upper-left petals.
- Cream flower: directly below the teal flower, with the petals touching. Tuck 1 large leaf behind its left side.
- Small teal flower: about 1 in (2.5 cm) above the bottom border, slightly to the right. Tuck 2 large leaves behind it, one on each side.
Tack the leaves down first, then the flowers over them, so the leaves look tucked underneath. Use small stitches around each flower center and petal base, and keep the petal tips free.
Hardware
Open the jump ring with the pliers by twisting the ends apart sideways. Pass it through the border at the top inner corner of the left arm, then through the end link of the chain. Close it securely.
Final Blocking
- Lightly mist the letter until it is damp, not soaked.
- Lay it flat on the blocking mat, RS up.
- Pin the 4 outer arm-tip corners so the span is 3.6 in (9.1 cm).
- Pin the 2 bottom corners square, 4.25 in (10.8 cm) below the arm tips.
- Pin along the outer sides to keep them straight, and pin the fork point.
- Press the flowers gently with your fingertips so the petals spread evenly.
- Let it dry completely before removing the pins.
If possible, block the letter before sewing on the appliqués, then just mist the flowers afterward.
Final Quality-Control Checklist
- [ ] Stem is 6 sts wide and 13 rows tall
- [ ] Fork ends with 12 sts at Row 18
- [ ] Each arm has 6 sts and 10 rows, with 4 shift rows
- [ ] Border round totals 105 sts
- [ ] Finished letter is about 3.6 in (9.1 cm) × 4.25 in (10.8 cm)
- [ ] Each 5-petal flower has evenly sized petals
- [ ] Leaves are tucked behind the flowers, not on top
- [ ] All ends are woven in securely on the WS
- [ ] Jump ring is fully closed and the split ring is attached
Troubleshooting
Arms curve or lean unevenly. Check that each arm has exactly 4 shift rows, worked on Rows 19, 21, 23, and 25 only.
Fork V puckers or flares. Make sure you worked the sc2tog at the fork point, and check that each inner edge has 9 sc.
Border ruffles. Your row-ends are shorter than expected. Work sc2tog once every 10 row-ends along the outer sides, then re-check the total.
Border pulls tight. Go up 0.25 mm for the border round only.
Letter is floppy. Remake it with a smaller hook, or sew a peach felt backing cut to the blocked shape.
Petals look lopsided. Make sure each petal sits in its own stitch, with a sl st between petals.
Care
Hand wash in cool water with mild soap and lay flat to dry. Remove the metal hardware before washing if possible, so it does not tarnish.
Final Notes
The measurement chain is simple to follow:
- A 6-st stem = 1 in (2.5 cm)
- The fork widens it to 2 in (5.1 cm)
- Two 6-st arms, each shifted 4 sts, span 3.33 in (8.5 cm) at 4 in (10.2 cm) tall
- A 105-st border brings it to about 3.6 in (9.1 cm) × 4.25 in (10.8 cm)
Check your gauge on the stem, count the stitches at each checkpoint, and the flowers will sit just right.
Happy crocheting!