

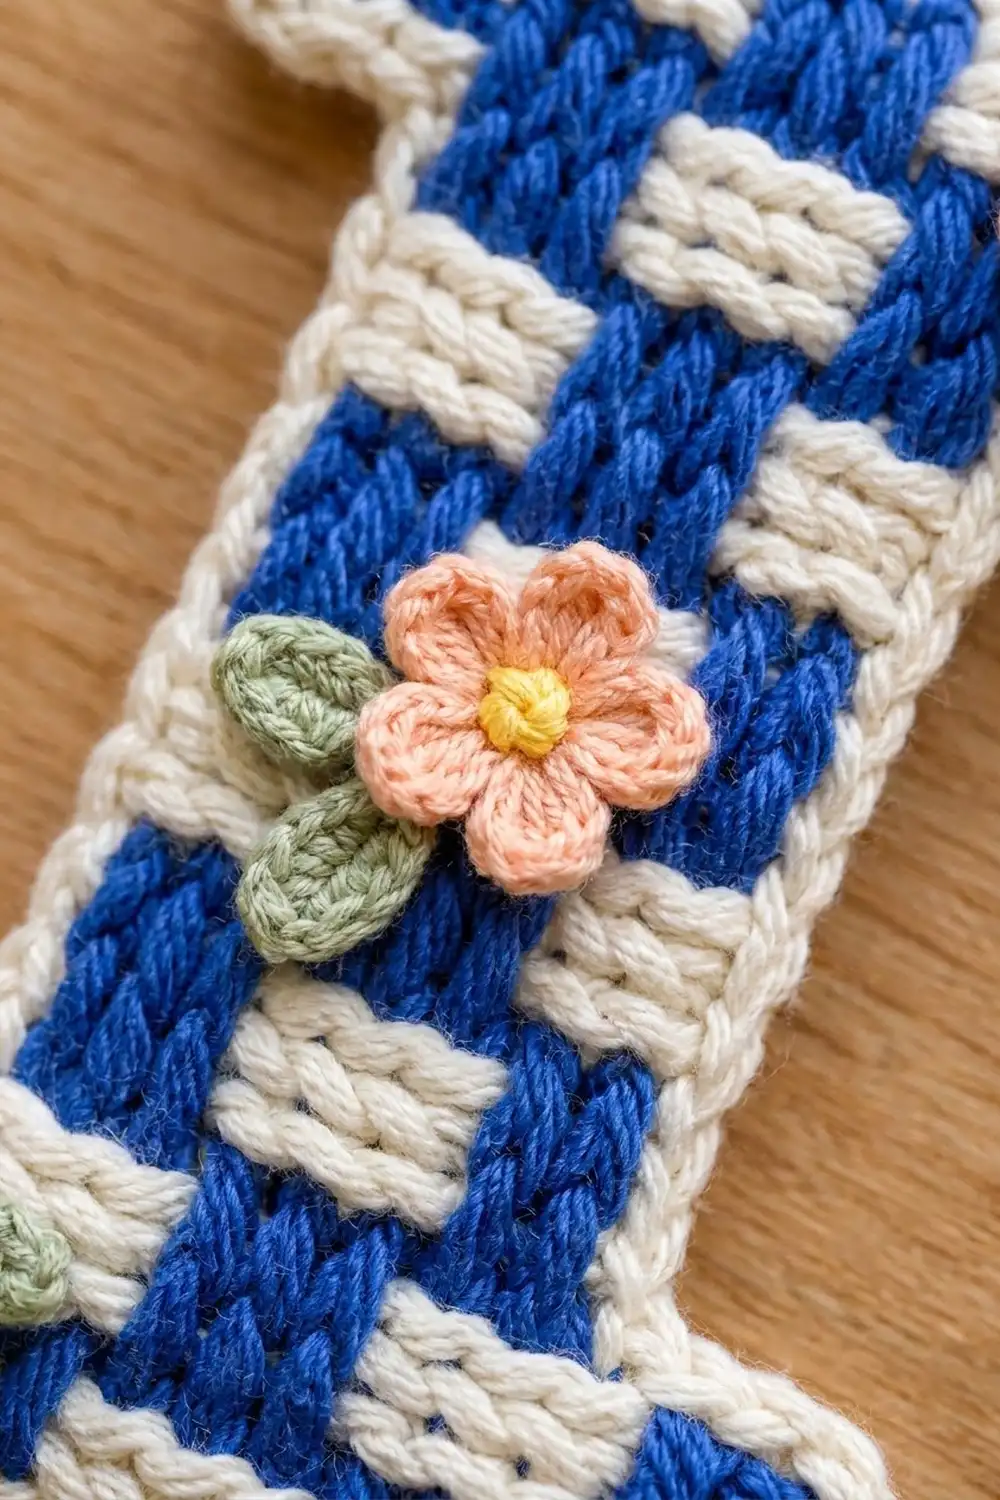
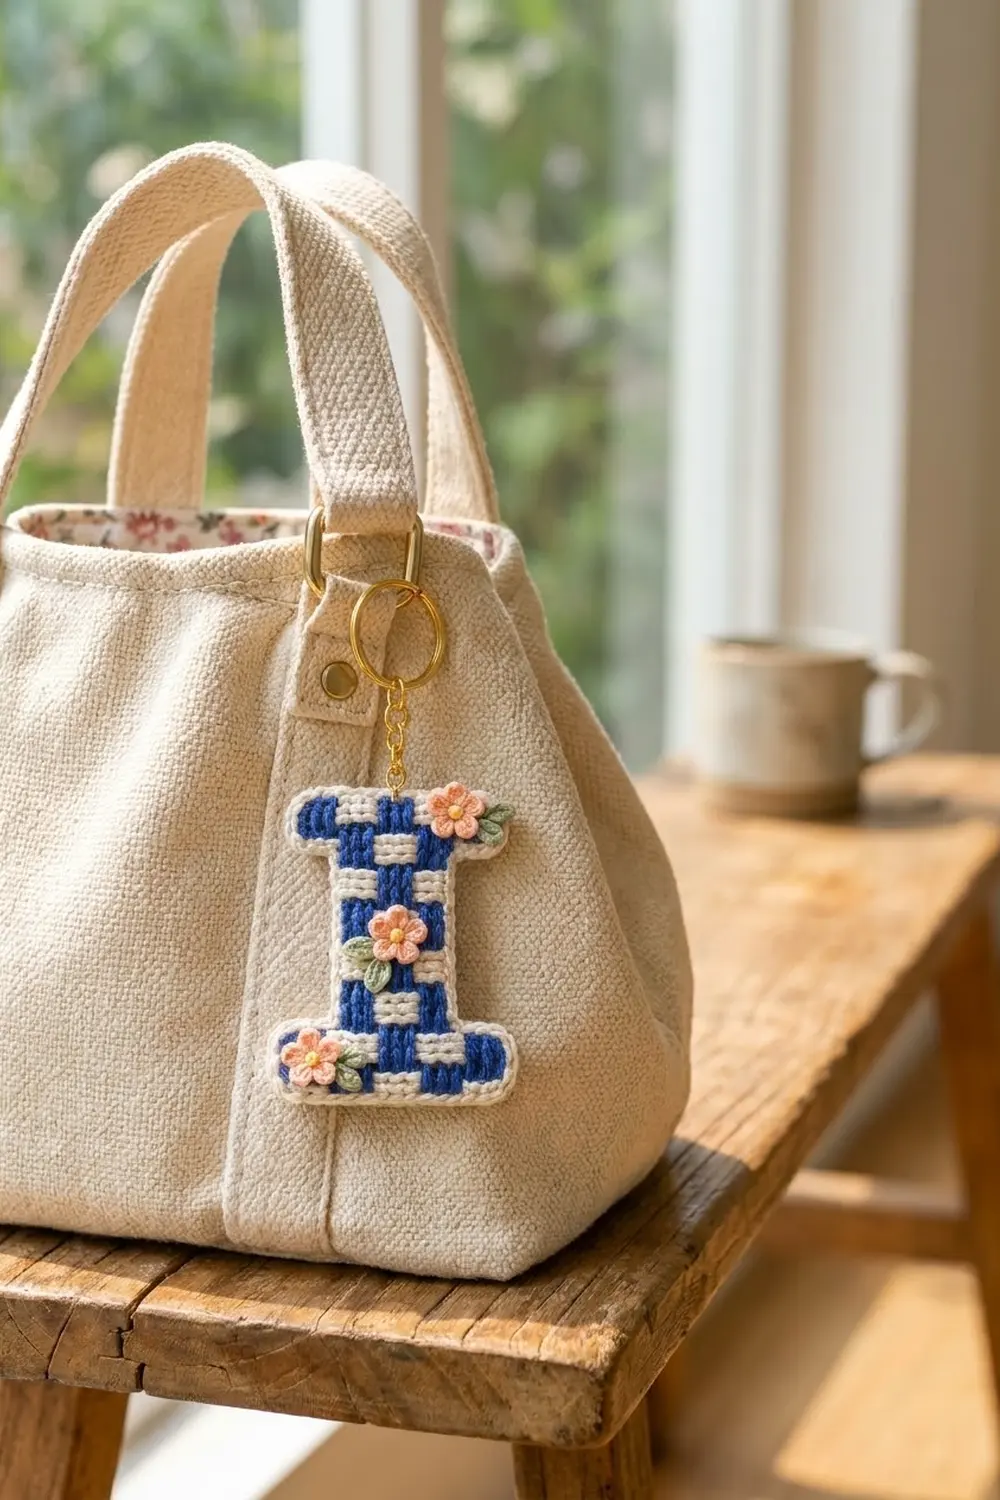
This little letter “I” is a bag charm with a fresh, cottage-garden look. Royal blue and cream blocks make a crisp checkerboard. A cream border with a twisted crab-stitch edge frames the letter, and three tiny peach flowers with sage leaves soften the graphic pattern.
The finished keychain measures 3 in (7.6 cm) wide by 4 in (10.2 cm) tall. It is a quick project for one evening. It is a good way to practice tapestry color changes on a small piece that keeps its shape. This pattern uses US crochet terms throughout.
The letter is worked as one flat piece, from the bottom up, in rows of tapestry single crochet. You start with the bottom bar, narrow to the stem, then extend out again for the top bar. Next, two border rounds go all the way around. Finally, you sew on the flowers and add the keyring hardware.
Finished Size and Construction
- Finished size: 3 in (7.6 cm) wide x 4 in (10.2 cm) tall
- Skill level: Intermediate (tapestry color changes)
- Terminology: US crochet terms
- Yarn weight: Sport-weight cotton (#2 Fine)
- Hook: 2.75 mm (US C/2) for the letter; 2.25 mm (US B/1) for the flowers and leaves
- Number of pieces: 1 letter, plus 3 small flowers and 5 leaves sewn on as appliqué
- Layout: Letter “I”: a 15-stitch bottom bar, a 9-stitch stem and a 15-stitch top bar
- Piece size before border: 2.5 in (6.4 cm) wide x 3.5 in (8.9 cm) tall
- Border depth: 0.25 in (0.6 cm) on every edge (2 rounds)
Materials
Use a smooth, mercerized sport-weight cotton, about 150 m per 50 g. Cotton gives clear stitch definition, and a keychain needs a firm fabric that won’t stretch. Avoid fuzzy or very stretchy yarns.
- Royal blue: 4 g (12 m)
- Cream: 6 g (18 m)
- Peach: 2 g (6 m)
- Yellow: 1 g (3 m)
- Sage green: 1 g (3 m)
All quantities include a safety margin. Tapestry crochet carries the unused color inside every stitch, so it uses more yarn than plain single crochet.
Tools:
– 2.75 mm (US C/2) and 2.25 mm (US B/1) crochet hooks
– Tapestry needle
– Scissors
– Stitch markers
– 1 gold split keyring, 1 in (2.5 cm) across, with a short chain
– 1 gold jump ring, 6 mm, and 2 pairs of flat-nose pliers
– Pins and a blocking mat
Abbreviations (US Terms)
- ch – chain
- sl st – slip stitch
- sc – single crochet
- hdc – half double crochet
- dc – double crochet
- sc2tog – single crochet 2 together
- fsc – foundation single crochet
- rev sc – reverse single crochet (crab stitch)
- st(s) – stitch(es)
- B – blue; C – cream
Tapestry color change: Work the last stitch in the old color until 2 loops remain on the hook. Yarn over with the new color and pull through. Lay the unused color along the tops of the stitches and work over it, so it is hidden inside the stitches.
Foundation single crochet (fsc): Insert the hook into the base of the last stitch, yarn over and pull up a loop. Yarn over and pull through 1 loop (this is the “chain”). Yarn over and pull through both loops.
Reverse single crochet (rev sc): Work from left to right. Insert the hook into the next stitch to the right, pull up a loop, yarn over and pull through both loops.
Gauge and Checkpoints
Gauge: 12 sc and 12 rows of tapestry sc = 2 in (5.1 cm) square on a 2.75 mm hook. That is 6 sts and 6 rows per inch (2.5 cm).
Because this is a single piece, the letter itself works as your test piece. Measure it at each checkpoint below:
- After Row 6: 2.5 in (6.4 cm) wide x 1 in (2.5 cm) tall
- After Row 15: 2.5 in (6.4 cm) tall in total; stem 1.5 in (3.8 cm) wide
- After Row 21: 2.5 in (6.4 cm) wide x 3.5 in (8.9 cm) tall
- After the border: 3 in (7.6 cm) wide x 4 in (10.2 cm) tall
If the piece is too big: Go down to a 2.5 mm hook, and keep the carried strand snug.
If the piece is too small: Go up to a 3.0 mm hook.
Check at Row 6. It’s easy to rip back that early.
The Color Chart Logic
The letter is built from blocks that are 3 sts wide x 3 rows tall. Each bar is 5 blocks wide and 2 blocks tall. The stem is 3 blocks wide (the 3 center columns) and 3 blocks tall. Neighboring blocks always alternate between blue and cream, which creates the checkerboard.
Letter Pattern
With the 2.75 mm hook, carry both colors on every row. Work every stitch over the unused color.
Bottom Bar
Row 1 (RS): With B, ch 14. Sc in the 2nd ch from the hook and in each ch across. Colors: 2 B, 3 C, 3 B, 3 C, 2 B. Turn. (13 sts)
Row 2: Ch 1. 2 sc in the first st, then sc in the next 11 sts, then 2 sc in the last st. Colors: 3 B, 3 C, 3 B, 3 C, 3 B. Turn. (15 sts)
The short first row and these increases round off the bottom corners.
Row 3: Ch 1. Sc in each st across: 3 B, 3 C, 3 B, 3 C, 3 B. Turn. (15 sts)
Rows 4–6: Ch 1. Sc in each st across: 3 C, 3 B, 3 C, 3 B, 3 C. Turn. (15 sts)
Checkpoint: The piece should be 2.5 in (6.4 cm) wide x 1 in (2.5 cm) tall.
Stem
Row 7: With C, sl st loosely in the first 3 sts. Ch 1, then sc in the next 9 sts: 3 C, 3 B, 3 C. Leave the last 3 sts unworked. Turn. (9 sc)
Rows 8–9: Ch 1. Sc in each st: 3 C, 3 B, 3 C. Turn. (9 sts)
Rows 10–12: Ch 1. Sc in each st: 3 B, 3 C, 3 B. Turn. (9 sts)
Rows 13–14: Ch 1. Sc in each st: 3 C, 3 B, 3 C. Turn. (9 sts)
Row 15: Ch 1. Sc in each st: 3 C, 3 B, 3 C. Change to B on the last yarn over of the last st. With B, ch 4. Turn. (9 sts, plus ch-4)
Checkpoint: The piece should be 2.5 in (6.4 cm) tall, with a stem 1.5 in (3.8 cm) wide.
Top Bar
Row 16: Sc in the 2nd ch from the hook and in the next 2 ch (3 B). Sc across the 9 stem sts: 3 C, 3 B, 3 C. Then work 3 fsc in B. Turn. (3 + 9 + 3 = 15 sts)
Rows 17–18: Ch 1. Sc in each st: 3 B, 3 C, 3 B, 3 C, 3 B. Turn. (15 sts)
Rows 19–20: Ch 1. Sc in each st: 3 C, 3 B, 3 C, 3 B, 3 C. Turn. (15 sts)
Row 21: Ch 1. Sc2tog in C, then 1 sc in C, 3 B, 3 C, 3 B, 1 sc in C, and sc2tog in C. (1 + 11 + 1 = 13 sts)
The decreases round off the top corners. Fasten off B. Keep C attached.
Checkpoint: The piece should be 2.5 in (6.4 cm) wide x 3.5 in (8.9 cm) tall.
Border
Border gauge: One sc per stitch or row end matches the body gauge of 6 per inch. This keeps every straight edge flat. Extra stitches go only at the 8 outer corners, with 2 sc in one stitch at each.
The border is worked in 7 segments per half of the letter (A–G), going counterclockwise. Segment A is the bottom edge and segment G is the top edge. Segments B–F are the left-side segments, and B′–F′ are the matching right-side segments.
Round 1: With C and the RS facing, ch 1. Work around the letter as follows:
- Top edge (G), 13 sts: 2 sc in the first st, sc in the next 11 sts, 2 sc in the last st. (15)
- Top bar side (F), rows 21–16: 1 sc in each row end. (6)
- Underside of the top bar (E), 3 free loops: Sc in the next 2 loops, then 2 sc in the last loop at the outer corner. (4)
Note: E is easier to describe from the stem outward, so it is written in mirror order. On this side you work the corner stitches first: 2 sc in the first loop, then sc in the next 2.
– Stem side (D), rows 15–7: 1 sc in each row end. (9)
– Top of the bottom bar (C), 3 unworked sts: Sc in the next 2 sts, then 2 sc in the outer-corner st. (4)
– Bottom bar side (B), rows 6–1: 1 sc in each row end. (6)
– Bottom edge (A), 13 free loops of the foundation ch: 2 sc in the first, sc in the next 11, 2 sc in the last. (15)
– Second side: Work B′ (6), C′ (4), D′ (9), E′ (4) and F′ (6) the same way. On the side where Row 7 has sl sts, work into the sl sts.
Join with a sl st to the first sc. (15 + 15 + 2 × (6 + 4 + 9 + 4 + 6) = 88 sts)
Round 2: Ch 1. Rev sc in each st around. Join and fasten off. (88 sts)
Why the math works: The body has 80 edge stitches and row ends in total: 13 + 13 + 2 × (6 + 3 + 9 + 3 + 6). Each of the 8 outer corners adds exactly 1 extra stitch, so 80 + 8 = 88.
The 4 inner corners, where the stem meets the bars, get no extra stitches. This keeps those angles crisp instead of letting them ruffle.
Each round adds about 0.125 in (0.3 cm) per edge, for 0.25 in (0.6 cm) in total. That gives 2.5 + 0.5 = 3 in (7.6 cm) wide and 3.5 + 0.5 = 4 in (10.2 cm) tall.
Flowers and Leaves
Use the 2.25 mm hook.
Flower (make 3)
Round 1: With yellow, make a magic ring. Work 5 sc into the ring, pull it closed and join. Fasten off. (5 sts)
Round 2: Join peach in any sc. (Sl st, ch 2, 2 dc, ch 2, sl st) in the same st. Repeat from * in each of the next 4 sts. Fasten off and leave a 6 in (15.2 cm) tail. (5 petals)*
Each flower measures about 0.6 in (1.5 cm) across.
Leaf (make 5)
With sage, ch 5. Sl st in the 2nd ch from the hook, sc in the next ch, hdc in the next ch, then sl st in the last ch. Fasten off and leave a 6 in (15.2 cm) tail.
Each leaf is about 0.5 in (1.3 cm) long.
Placement
- Top right corner of the top bar: 1 flower, with 2 leaves on its outer side
- Middle of the stem: 1 flower, with 2 leaves angled down to the left
- Bottom left of the bottom bar: 1 flower, with 1 leaf on its right
Sew the flowers and leaves through the front loops only, so the stitches don’t show on the back.
Hardware
- Find the center stitch of the top edge (stitch 8 of 15 in segment G).
- Open the jump ring sideways with two pliers. Never pull it open outward.
- Pass the jump ring under both loops of that Round 1 stitch.
- Add the bottom link of the keyring chain, then close the ring until its ends meet flush.
Final Blocking
- Weave in all the ends along matching color sections before blocking.
- Spray the letter lightly with water until it is damp, not dripping.
- Pin it face up to 3 in (7.6 cm) x 4 in (10.2 cm).
- Pin each inner corner square, and ease the outer corners into smooth curves.
- Check that the stem is centered and measures 1.5 in (3.8 cm) across before the border.
- Let it dry completely, then sew on the flowers.
Final Quality-Control Checklist
- [ ] Row stitch counts were 13, then 15 (Rows 2–6), 9 (Rows 7–15), 15 (Rows 16–20) and 13 (Row 21).
- [ ] The blocks alternate cleanly, and each block is 3 sts x 3 rows.
- [ ] The carried yarn doesn’t show through on the front.
- [ ] Border Round 1 and Round 2 each have 88 sts.
- [ ] The finished size is 3 in (7.6 cm) x 4 in (10.2 cm).
- [ ] The flowers are secure and the leaves lie flat.
- [ ] The jump ring is fully closed.
Troubleshooting
Blue peeks through the cream blocks: Hold the carried strand tighter and close to the stitch tops. Going down a hook size also helps.
The letter leans or slants: This is normal for tapestry sc. Turning every row, as written, keeps most of it in check, and blocking fixes the rest.
The border ruffles: Check that you worked 1 sc per row end and no extras at the inner corners.
The border cups: Your tension is too tight. Work the rev sc a little looser.
The corners look pointy: Make sure Row 1 and Row 21 have 13 sts, and pin the curves well while blocking.
Care
Hand wash in cool water with a mild soap, then press it flat in a towel. Reshape it and let it dry flat. Remove the keyring before washing.
Final Notes
Here is the full measurement chain:
- Each block is 3 sts x 3 rows, and the gauge is 6 sts per 1 in (2.5 cm).
- The bars are 15 sts, or 2.5 in (6.4 cm) wide. The stem is 9 sts, or 1.5 in (3.8 cm) wide.
- The 21 rows make the letter 3.5 in (8.9 cm) tall.
- 80 edge stitches plus 8 corner extras give the 88-stitch border.
- The two border rounds add 0.25 in (0.6 cm) on each edge, for a final size of 3 in (7.6 cm) x 4 in (10.2 cm).
Measure at each checkpoint, and your charm will turn out crisp and flat.
Happy crocheting!