

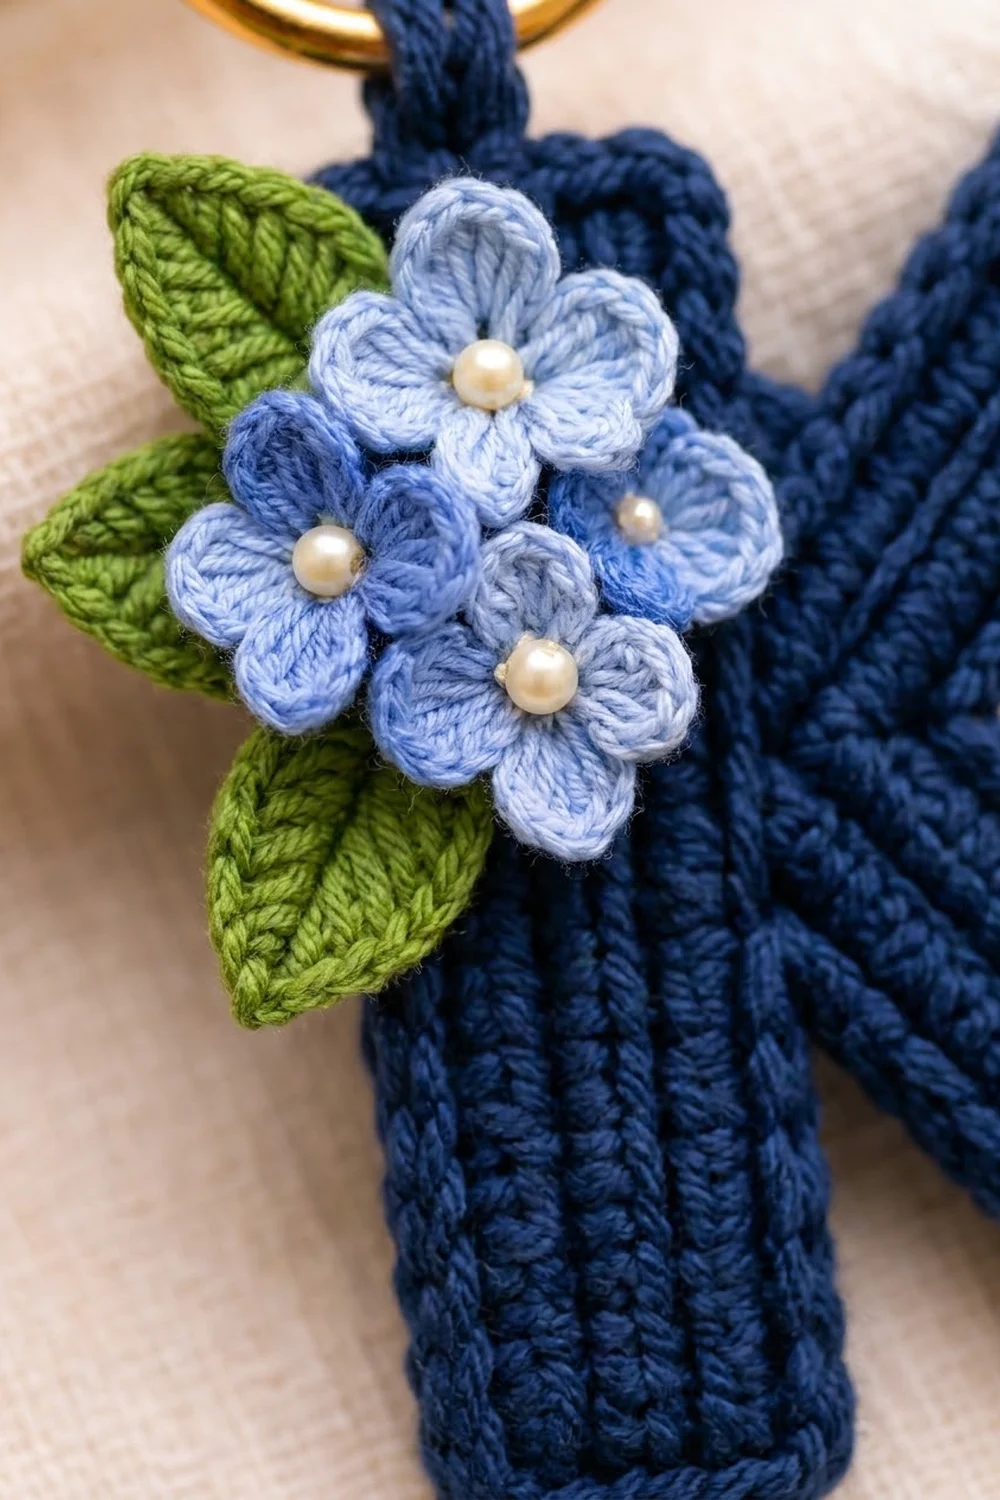
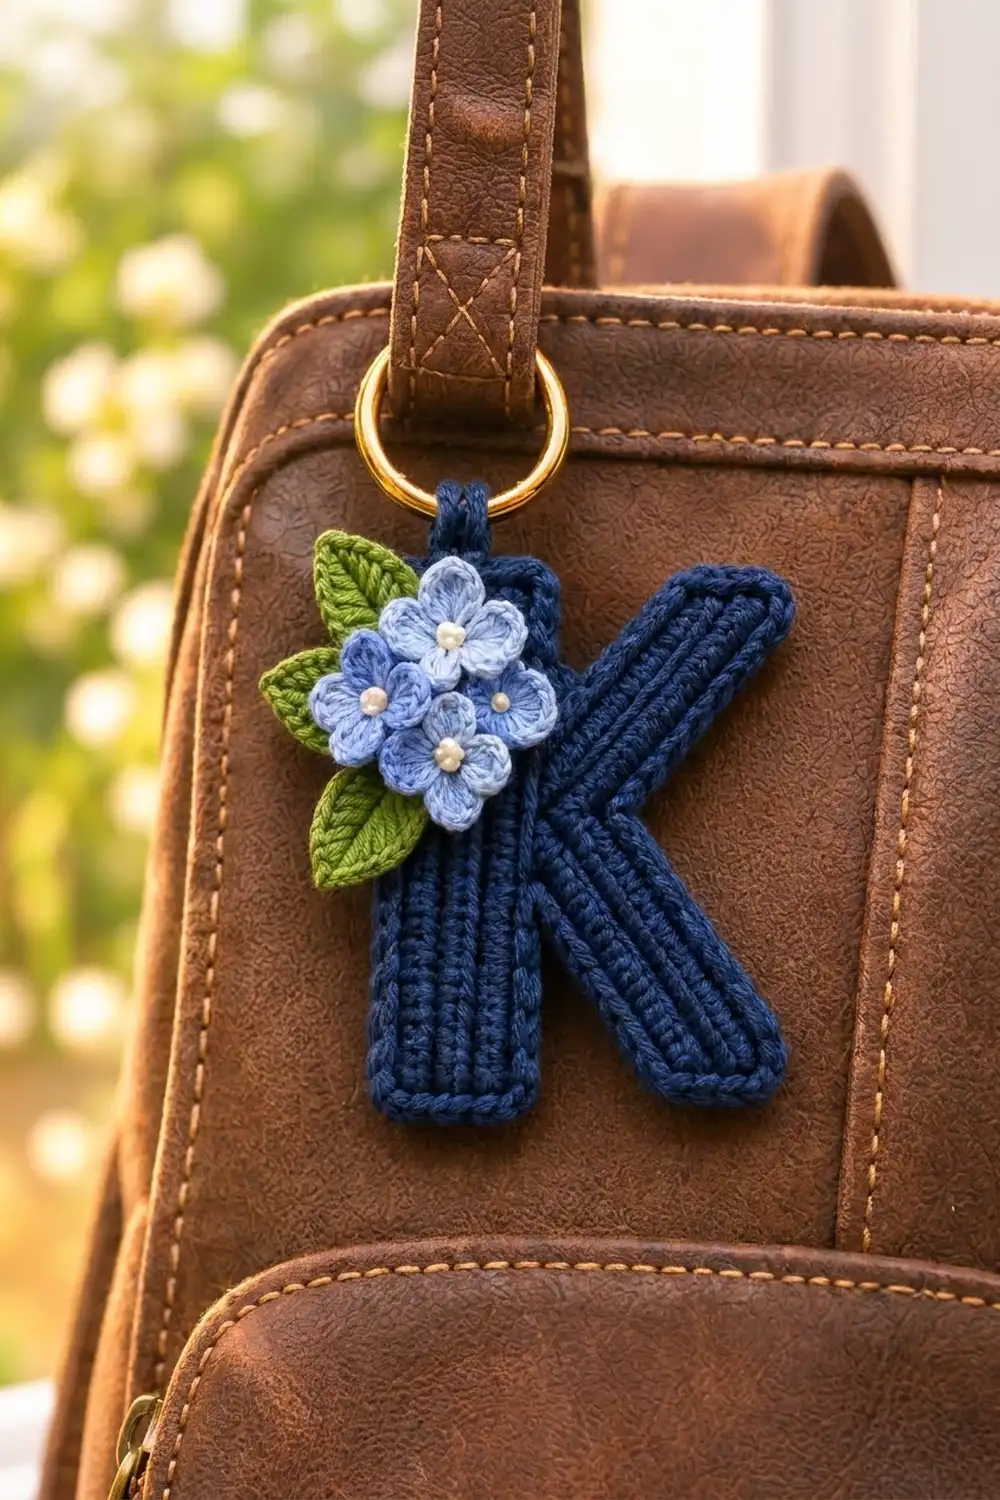
This keychain is a navy letter K with a soft, ribbed texture and a raised corded outline. A little bouquet of blue flowers and green leaves sits at its upper left corner. It’s small enough to finish in an evening and makes a personal gift for a bag, a backpack or a set of keys.
The palette is calm: deep navy for the letter, two shades of blue for the flowers, fresh green for the leaves and cream pearl beads for the flower centers. The ribs come from single crochet worked in the back loop only, and the outline is one round of single crochet followed by one round of slip stitch.
This pattern uses US crochet terms. The finished letter measures 4.25 in (10.8 cm) tall and 3.5 in (8.9 cm) wide, not counting the ring.
Here’s how it comes together. You crochet three flat ribbed strips (the stem and two arms), sew them into a K, and work the edging around the whole shape so it reads as one solid piece. Then you add the key-ring tab, four flowers and three leaves.
Finished Size and Construction
- Finished size: 4.25 in (10.8 cm) tall × 3.5 in (8.9 cm) wide
- Skill level: Easy to intermediate
- Terminology: US
- Yarn weight: Sport weight (#2) cotton
- Hook: 2.5 mm (US B/1 or C/2)
- Number of pieces: One finished letter (built from 3 strips), plus 1 tab, 4 flowers and 3 leaves
- Layout: A single letter K with the flower cluster on the upper left of the stem
- Strip sizes: Stem 4 in × 1 in (10.2 × 2.5 cm); upper arm 2.5 in × 1 in (6.4 × 2.5 cm); lower arm 3 in × 1 in (7.6 × 2.5 cm)
- Size before edging: 4 in (10.2 cm) tall × 3.25 in (8.3 cm) wide
- Edging depth: About 1/8 in (0.3 cm) on every side
Materials
Use a smooth mercerized or combed cotton in sport weight. Cotton holds the ribs crisply and doesn’t stretch out of shape on a keychain. Choose a tight-plied yarn so the slip stitch outline looks like a neat chain.
- Navy: 10 g / 30 m (letter, edging and tab)
- Light periwinkle: 4 g / 12 m (3 flowers)
- Cornflower blue: 2 g / 6 m (1 flower)
- Green: 3 g / 9 m (3 leaves)
All quantities include a safety margin of about 30%.
Tools:
– 2.5 mm crochet hook
– Tapestry needle
– Sewing needle and navy and light blue thread
– 4 cream pearl beads, 4 mm
– 1 gold split ring, 1.25 in (3.2 cm) across
– Rust-proof pins and a blocking board or foam mat
– Stitch markers and scissors
Abbreviations (US Terms)
- ch: chain
- sl st: slip stitch
- sc: single crochet
- hdc: half double crochet
- dc: double crochet
- BLO: back loop only
- sc2tog: single crochet 2 together
- st(s): stitch(es)
- RS / WS: right side / wrong side
Special stitch – sc BLO: Insert the hook under the back loop only of the stitch, yarn over, pull up a loop, yarn over and pull through both loops. Working back and forth in rows, this makes the raised ridges that run along each strip.
Gauge and Checkpoints
Gauge: 24 sc × 32 rows in sc BLO = 4 in (10.2 cm) square. That works out to 6 sts and 8 rows per 1 in (2.5 cm).
Make the stem first and treat it as your gauge piece. Check these points:
- After Row 1 of the stem: the strip is 4 in (10.2 cm) long.
- After Row 8 of the stem: the strip is 4 in × 1 in (10.2 × 2.5 cm).
- After assembly: the letter is 4 in (10.2 cm) tall and about 3.25 in (8.3 cm) wide.
- After edging: the letter is 4.25 in (10.8 cm) tall and 3.5 in (8.9 cm) wide.
If your stem is too long (more than 4.25 in / 10.8 cm), go down to a 2.25 mm hook. If it’s too short (under 3.75 in / 9.5 cm), go up to a 2.75 mm hook. If only the width is off, check that you’re working every row in the back loop only, and don’t tug on the turning chain.
Stem
Ch 25.
Row 1 (RS): Sc in 2nd ch from hook and in each ch across, turn. (24 sc)
Rows 2–8: Ch 1 (does not count as a st), sc BLO in each st across, turn. (24 sc in each row)
Fasten off and leave a 12 in (30.5 cm) tail for sewing.
Checkpoint: 4 in × 1 in (10.2 × 2.5 cm), with 4 ridges showing on each face.
Upper Arm
Ch 16.
Row 1: Sc in 2nd ch from hook and in each ch across, turn. (15 sc)
Rows 2–8: Ch 1, sc BLO in each st across, turn. (15 sc in each row)
Fasten off and leave a 10 in (25.4 cm) tail.
Checkpoint: 2.5 in × 1 in (6.4 × 2.5 cm).
Lower Arm
Ch 19.
Row 1: Sc in 2nd ch from hook and in each ch across, turn. (18 sc)
Rows 2–8: Ch 1, sc BLO in each st across, turn. (18 sc in each row)
Fasten off and leave a 10 in (25.4 cm) tail.
Checkpoint: 3 in × 1 in (7.6 × 2.5 cm).
Assemble the Letter
- Lay the stem upright with the RS facing you. The ridges should run up and down.
- Place the upper arm at roughly 45 degrees, running up and to the right. Butt one short end (8 row ends) against the right edge of the stem. The top corner of that end should sit 1.5 in (3.8 cm) below the top of the stem, which leaves 9 stem sts showing above it.
- Place the lower arm running down and to the right. Tuck its top short end just under the lower long edge of the upper arm, about 0.5 in (1.3 cm) out from the stem. Its outer end should line up with the bottom of the stem.
- Pin all the pieces flat. Turn the letter over and whipstitch every edge where two strips touch, using the navy tails. Catch only the back loops so the stitches don’t show on the front.
- Weave in all the tails on the WS.
Checkpoint: The letter measures 4 in (10.2 cm) tall and about 3.25 in (8.3 cm) at its widest. On the right edge of the stem you should see 9 sts above the junction, 8 sts hidden by the arms and 7 sts below.
Key-Ring Tab
With navy, ch 4.
Row 1: Sc in 2nd ch from hook and in each ch across, turn. (3 sc)
Rows 2–10: Ch 1, sc BLO in each st across, turn. (3 sc in each row)
Fasten off and leave a 10 in (25.4 cm) tail. The tab measures 0.5 in × 1.25 in (1.3 × 3.2 cm). You’ll attach it after the edging.
Edging (Border)
Edging gauge: Work 1 sc in each st along stitch edges. Along row-end edges, work 3 sc for every 4 rows, which is 6 sc across each 8-row end. Both rates give 6 sc per 1 in (2.5 cm), the same as the main gauge, so the outline lies flat without ruffling or cupping.
Corner rules:
– Outer corners: Work 1 extra sc into the corner point. There are 8 outer corners: 2 at the stem top, 2 at the stem bottom and 2 at each arm tip.
– Inner angles: Work the last st of one segment and the first st of the next together as sc2tog. There are 3 inner angles: stem/upper arm on top, the crotch between the arms, and lower arm/stem underneath.
Round 1: With the RS facing, join navy at the top-left corner of the stem. Work clockwise around the letter with the following sc counts per segment:
| Segment | Edge | Sc |
|---|---|---|
| A | Stem top (row ends) | 6 |
| B | Stem right, top to upper arm | 9 |
| C | Upper arm, top long edge | 13 |
| D | Upper arm tip (row ends) | 6 |
| E | Upper arm, under edge to crotch | 6 |
| F | Lower arm, outer long edge | 14 |
| G | Lower arm tip (row ends) | 6 |
| H | Stem bottom (row ends) | 6 |
| I | Stem left, full length | 24 |
| J | Stem right, below the arms | 7 |
| K | Lower arm, inner edge | 10 |
Segments J and K sit in the lower notch between the stem and the lower arm. Work them in this order: after G, go along the lower arm’s inner edge (K) up to the stem, then down the stem (J) to the bottom-right corner. Then continue with H and I.
The 11 segments add up to 107 sc. Join with a sl st to the first sc.
Round 1 count: 107 sc + 8 corner extras − 3 sc2tog merges = 112 sts.
Round 2: Ch 1, then sl st in the BLO of each st around. Keep the sl sts loose enough that your hook slides in easily. Join to the first sl st. (112 sl sts)
This round makes the raised chain-like cord that frames the letter. Fasten off and weave in the ends.
Why the math works: The edge counts match the 6-sts-per-inch gauge on every side. The 8 corner extras give the turns enough room to round off without pulling. The 3 sc2tog keep the inner angles crisp instead of bunching. Round 1 adds one sc row of 1/8 in (0.3 cm) on each side, so 4 in + 0.25 in = 4.25 in (10.2 cm + 0.6 cm = 10.8 cm). The sl st round lies on top and adds no measurable size.
Checkpoint: 4.25 in × 3.5 in (10.8 × 8.9 cm).
Attach the tab: Thread the tab through the gold split ring and fold it in half. Center both ends on the back of the stem top so they overlap it by 0.25 in (0.6 cm), then sew them down securely.
Flowers (Make 4: 3 Light Periwinkle, 1 Cornflower Blue)
Make a magic ring.
Round 1: Ch 1, work 5 sc into the ring, pull the ring tight and sl st to the first sc. (5 sc)
Round 2: In each sc around work (ch 2, 2 dc, ch 2, sl st). (5 petals)
Fasten off and leave an 8 in (20.3 cm) tail. Each flower measures about 1 in (2.5 cm) across.
Sew one cream pearl bead to the center of each flower with thread, passing through the bead twice.
Leaves (Make 3 in Green)
Ch 8.
Side 1: Starting in the 2nd ch from hook, work sc, hdc, dc, dc, hdc, sc. That uses 6 ch.
Tip: Work (sc, ch 2, sc) in the last ch.
Side 2: Working along the other side of the foundation chain, work sc, hdc, dc, dc, hdc, sc. Sl st to the first sc.
Leaf count: 6 sts + (sc, ch-2 space, sc) + 6 sts = 14 sts plus 1 ch-2 tip.
Vein: Surface sl st down the center of the leaf, from the tip to the base, in the same green.
Fasten off and leave a tail. Each leaf is about 1.25 in (3.2 cm) long.
Arrange and Sew the Flower Cluster
- Set the leaves behind the upper left of the stem: one pointing up and to the left, one pointing straight left and one pointing down and to the left. Their tips should stick out about 0.5 in (1.3 cm) past the stem edge.
- Arrange the four flowers in a diamond over the leaves: one at the top, two in the middle and one at the bottom. Put the cornflower flower in the middle on the right.
- The cluster should measure about 2 in (5.1 cm) square and sit about 0.5 in (1.3 cm) below the top of the stem.
- Sew each leaf at its base. Then sew each flower around its center ring and tack down two petals so they don’t flip up. Keep the stitches inside the ribs so they don’t show.
Final Blocking
- Lay the keychain face up on a blocking board.
- Shape the letter to 4.25 in × 3.5 in (10.8 × 8.9 cm).
- Pin one outer corner of each stroke, which is four pins in total. Keep the pins off the flowers.
- Lightly mist the letter and the leaves. Keep the flowers dry so their petals stay puffy.
- Run a finger along each strip so the ridges lie straight.
- Let it dry completely, usually 2–3 hours, before you take the pins out.
Final Quality-Control Checklist
- The letter measures 4.25 in (10.8 cm) tall and 3.5 in (8.9 cm) wide.
- The ribs run lengthwise on the stem and on both arms.
- The edging has 112 sts all the way around, and the corded outline is even.
- All 8 outer corners are rounded and all 3 inner angles are crisp.
- There are no gaps at the arm seams.
- The tab is secure and the ring turns freely.
- Each flower has its bead, and the leaf tips stick out to the left.
- There are no loose tails on the back.
Troubleshooting
- The edging ruffles: You’ve added too many sts on a row-end side. Rework that segment at 3 sc per 4 rows.
- The edging cups or pulls: Use a hook 0.25 mm larger for Round 2, or loosen up your slip stitches.
- Gaps at the arm junction: Add one or two extra whipstitches on the WS before you start the edging.
- The ridges look flat: Check that every row from Row 2 on is worked in the BLO.
- The flowers droop: Tack each one down at two more petals.
- The letter curls: Block it again with a bit more moisture and a pin at every corner.
Care
Spot clean with mild soap and cool water, then press flat and let it dry. Don’t put it in the dryer, because heat can loosen the beads and flatten the petals.
Final Notes
The measurements build on each other in a clear chain. Gauge is 6 sts and 8 rows per inch. The stem is 4 in × 1 in (10.2 × 2.5 cm), and the arms are 2.5 in (6.4 cm) and 3 in (7.6 cm) long. The assembled letter is 4 in (10.2 cm) tall. One round of edging brings it to 4.25 in (10.8 cm) tall and 3.5 in (8.9 cm) wide, and the flower cluster is 2 in (5.1 cm) across. Check each stage before moving on and your K will come out neat and even. Happy crocheting!