

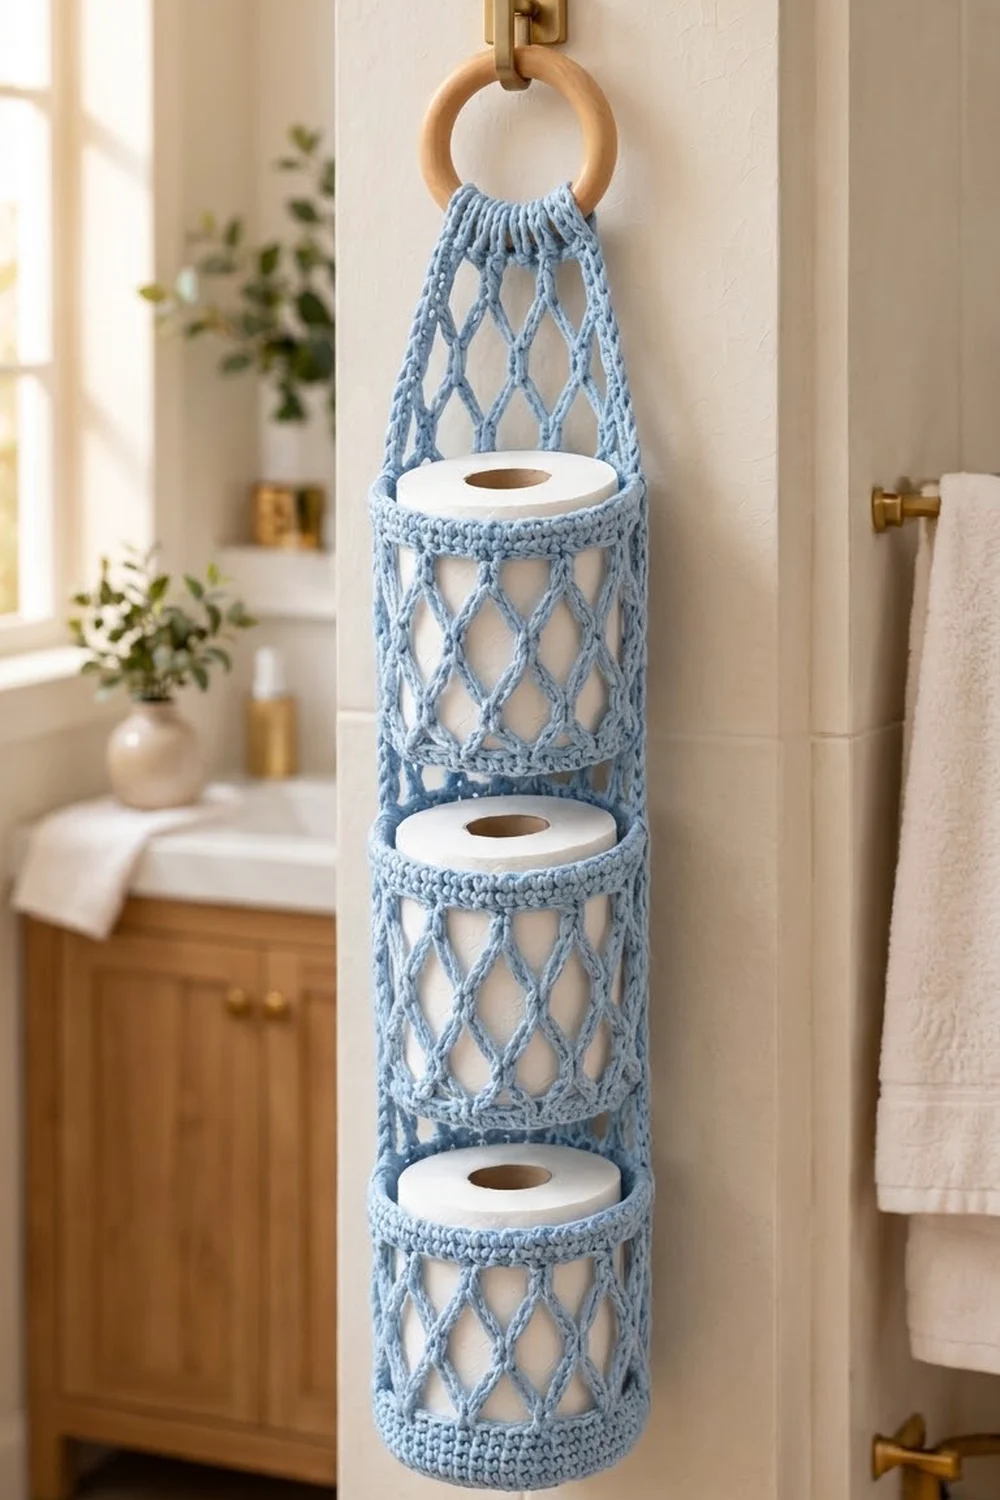
This hanging holder keeps three spare toilet rolls tidy and in view. A long diamond-net panel hangs from a natural wooden ring. Three round mesh pockets are stacked down its front, and each one holds one standard roll.
The design uses a single soft light blue for a calm, airy look. Each pocket has solid single-crochet bands at the bottom and rim, with open diamond net in between, so you can see the rolls through the mesh. Above the top pocket the net panel narrows and gathers into a short solid tab that wraps around the ring.
The pattern uses US crochet terms. The finished holder is about 5.75 in (14.6 cm) wide and 21.5 in (54.6 cm) long from the bottom edge to the base of the ring, or 24.5 in (62.2 cm) including the ring. Each pocket is about 4.75 in (12.1 cm) across and 4.8 in (12.2 cm) tall.
Construction is simple. You work the back panel flat in rows of diamond net, shortening the chain loops near the top to taper it. Then you work three pockets in the round from a flat base. Finally you wrap the tab around the ring, sew the pockets on, and add a single-crochet border to the panel’s side and bottom edges.
Finished Size and Construction
- Finished size: 5.75 in (14.6 cm) wide × 21.5 in (54.6 cm) long, plus a 3 in (7.6 cm) ring
- Skill level: Easy–Intermediate
- Terminology: US crochet terms
- Yarn weight: Worsted (#4), cotton or cotton blend
- Hook: 5.0 mm (H-8)
- Number of pieces: 4 (1 back panel + 3 pockets), plus a wooden ring
- Layout: 3 pockets stacked vertically on one panel, with 0.5 in (1.3 cm) gaps between them
- Pocket size: 4.75 in (12.1 cm) diameter × 4.8 in (12.2 cm) tall
- Panel width before border: 5.25 in (13.3 cm)
- Border depth: about 0.25 in (0.6 cm) on each long side
Materials
Yarn: Use a smooth worsted-weight cotton or cotton blend. Cotton holds its shape under the weight of the rolls and copes well with bathroom humidity. Avoid very stretchy acrylic, because the pockets may sag.
- Light blue: 150 g / about 276 m (3 balls of 50 g / 92 m). The holder uses about 95 g, so this amount leaves a comfortable margin.
Tools:
– 5.0 mm (H-8) crochet hook
– Wooden ring, 3 in (7.6 cm) outer diameter
– 4 locking stitch markers
– Tapestry needle
– Scissors
– Measuring tape
– Rustproof pins and a blocking mat
All quantities include roughly a 50% margin for gauge differences and swatching.
Abbreviations (US Terms)
- ch – chain
- sl st – slip stitch
- sc – single crochet
- dc – double crochet
- sk – skip
- st(s) – stitch(es)
- BLO – back loop only
- sc2tog – single crochet 2 together
- rnd(s) – round(s)
- RS / WS – right side / wrong side
Special stitch: sc2tog. Insert the hook in the next st, yarn over and pull up a loop. Insert the hook in the following st, yarn over and pull up a loop (3 loops on hook). Yarn over and pull through all 3 loops.
Net loop: A ch-5 loop anchored with a sc. Stacked rows of these loops form the diamond mesh.
Gauge and Checkpoints
- Solid sc gauge: 16 sc × 18 rnds = 4 in (10.2 cm)
- Mesh gauge: 5 rows or rnds of ch-5 net = 3 in (7.6 cm), so each row is about 0.6 in (1.5 cm)
Make one pocket first. It works as your gauge test, and you need it anyway.
Checkpoints:
– Pocket base after Rnd 10: 4.75 in (12.1 cm) across
– Pocket after Rnd 14: bottom band about 0.9 in (2.3 cm) tall
– Finished pocket: 4.8 in (12.2 cm) tall, and a roll slides in easily
– Panel Row 1: 5.25 in (13.3 cm) wide
– Panel after Row 28: about 16.45 in (41.8 cm) long
If the base is too big, go down 0.5 mm in hook size. If it’s too small, go up 0.5 mm. If a roll won’t fit, check your base first, because the base sets the pocket’s circumference.
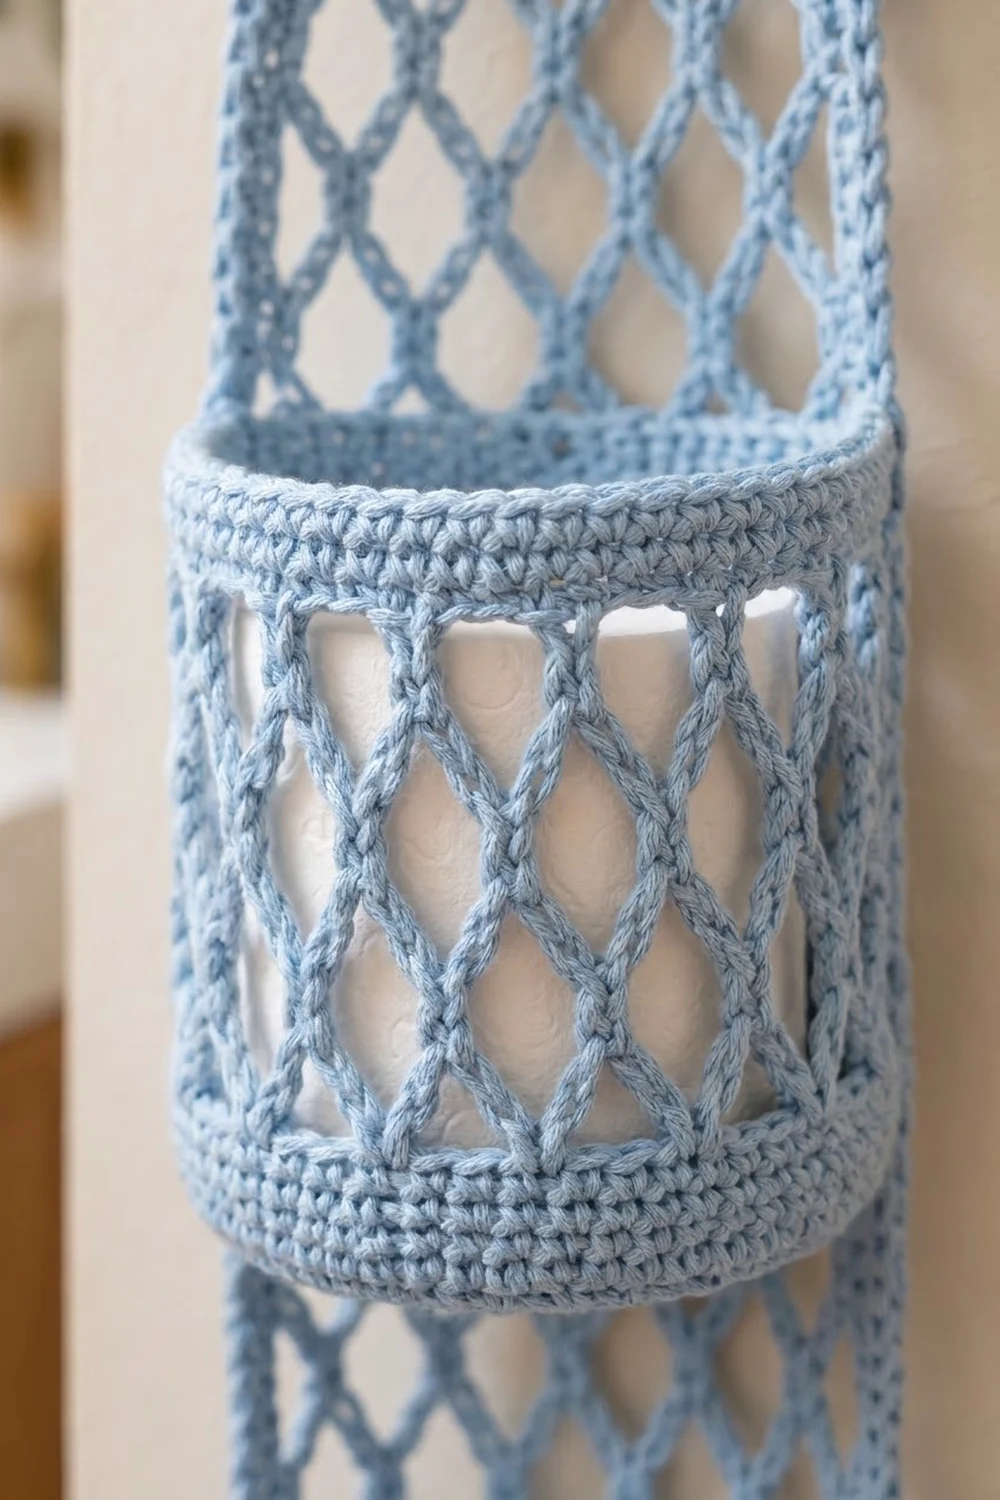
Pocket (Make 3)
Each pocket is worked in joined rounds. Do not turn.
Base
Rnd 1: Make a magic ring, ch 1, 6 sc in the ring, sl st to the first sc. (6 sts)
Rnd 2: Ch 1, 2 sc in each st around, sl st to the first sc. (12 sts)
Rnd 3: Ch 1, sc in next st, 2 sc in next st; repeat from * around, sl st to the first sc. (18 sts)
Rnd 4: Ch 1, sc in next 2 sts, 2 sc in next st; repeat around, join. (24 sts)
Rnd 5: Ch 1, sc in next 3 sts, 2 sc in next st; repeat around, join. (30 sts)
Rnds 6–10: Keep increasing 6 sts evenly in each rnd, working 1 more sc between increases each time. Rnd 6 has 36 sts, Rnd 7 has 42 sts, Rnd 8 has 48 sts, Rnd 9 has 54 sts and Rnd 10 has 60 sts.
Checkpoint: The base lies flat and measures 4.75 in (12.1 cm) across. The 60 sts give a circumference of 15 in (38.1 cm).
Bottom Band
Rnd 11: Ch 1, sc in BLO of each st around, join. (60 sts) This turns the edge up into the pocket wall.
Rnds 12–14: Ch 1, sc in each st around, join. (60 sts)
Mesh
Rnd 15: Ch 1, sc in the first st, ch 5, sk 4 sts, sc in next st; repeat from * 10 more times, ch 5, sk 4, sl st to the first sc. (12 ch-5 loops)
To check the math: the sc land in sts 1, 6, 11 and so on up to 56, which is 12 sc. The last ch 5 skips sts 57–60.
Rnds 16–19: Sl st in the first 3 ch of the next loop, ch 1, sc in the same loop, ch 5, sc in next loop; repeat 10 more times, ch 5, sl st to the first sc. (12 ch-5 loops each rnd)
Rim
Rnd 20 (conversion): Ch 1, sc in the same sc as the join, 4 sc in the next ch-5 loop, sc in next sc, 4 sc in next loop; repeat 10 more times, join. That’s 12 sc worked into sc plus 48 sc worked into loops. (60 sts)
Rnds 21–23: Ch 1, sc in each st around, join. (60 sts)
Fasten off and leave a 24 in (61.0 cm) tail for sewing.
Checkpoint: The pocket is 4.8 in (12.2 cm) tall: about 0.9 in (2.3 cm) of bottom band, 3 in (7.6 cm) of mesh and 0.9 in (2.3 cm) of rim. The rim has 60 sts, the same as the base edge, so the walls stand straight.
Back Panel
The panel is worked flat in rows, from the bottom up.
Foundation: Ch 22.
Row 1 (RS): Sc in the 2nd ch from the hook and in each ch across. Turn. (21 sts)
Row 2 (A row): Ch 1, sc in the first st, ch 5, sk 4, sc in next st; repeat from * 3 more times. Turn. (5 sc, 4 ch-5 loops)
Row 3 (B row): Ch 5 (counts as dc + ch 2), sc in the first ch-5 loop, ch 5, sc in next loop; repeat 2 more times, ch 2, dc in the last sc. Turn. (3 full loops + 2 half loops)
Row 4 (A row): Ch 1, sc in the first dc, ch 5, sc in next full loop; repeat 2 more times, ch 5, sc in the 3rd ch of the turning ch-5. Turn. (5 sc, 4 ch-5 loops)
Rows 5–28: Repeat Rows 3 and 4 twelve more times, ending with an A row.
Checkpoint: The panel is 5.25 in (13.3 cm) wide and about 16.45 in (41.8 cm) long: 0.25 in (0.6 cm) for Row 1 plus 16.2 in (41.1 cm) for 27 mesh rows.
Taper, part 1 (ch-4 loops)
Row 29 (B): Ch 4 (counts as dc + ch 1), sc in the first loop, ch 4, sc in next loop; repeat 2 more times, ch 1, dc in the last sc. Turn.
Row 30 (A): Ch 1, sc in the first dc, ch 4, sc in next full loop; repeat 2 more times, ch 4, sc in the 3rd ch of the turning ch-4. Turn. (5 sc, 4 ch-4 loops)
Rows 31–33: Repeat Rows 29, 30 and 29.
Taper, part 2 (ch-3 loops)
Row 34 (A): Same as Row 30, but make each ch-4 a ch-3. (5 sc, 4 ch-3 loops)
Row 35 (B): Same as Row 29, but make each full ch-4 loop a ch-3. Keep the ch-4 turning chain and the final ch 1, dc.
Rows 36–38: Repeat Rows 34, 35 and 34.
The shorter loops pull the net narrower row by row. This creates the tapered top seen above the top pocket. The ch-4 section adds about 2.5 in (6.4 cm) and the ch-3 section adds about 2 in (5.1 cm).
Gather and Tab
Row 39 (conversion): Ch 1, sc in the first sc, 2 sc in next ch-3 loop, sc in next sc; repeat 3 more times. Turn. That’s 5 sc worked into sc plus 8 sc worked into loops. (13 sts)
Row 40: Ch 1, sc in the first st, sc2tog 6 times. Turn. That’s 1 sc plus 6 decreases, using 1 + 12 = 13 sts. (7 sts)
Rows 41–48: Ch 1, sc in each st across. Turn. (7 sts)
Fasten off and leave a 12 in (30.5 cm) tail.
Checkpoint: The tab is 1.75 in (4.4 cm) wide and about 1.8 in (4.6 cm) long. The panel measures about 21.4 in (54.4 cm) from the bottom edge to the top of Row 40.
Make All Pieces
- Pockets: 3 in light blue (60 sts at the rim and base edge)
- Back panel: 1 in light blue (21 sts wide)
- Wooden ring: 1
Layout, top to bottom:
        ( ring )
        [ tab  ]       Rows 41–48
       /  taper \      Rows 29–40
      | net ~1 in |    top of straight mesh
      [ Pocket C ]     4.8 in / 12.2 cm
        gap 0.5 in
      [ Pocket B ]     4.8 in / 12.2 cm
        gap 0.5 in
      [ Pocket A ]     4.8 in / 12.2 cm, level with the bottom edge
The pocket zone is 3 × 4.8 in + 2 × 0.5 in = 15.4 in (39.1 cm). That fits inside the straight mesh section and leaves about 1 in (2.5 cm) of open net above Pocket C.
Joining
Ring: Fold the tab over the ring toward the WS so that Row 48 meets Row 40. Whipstitch the 7 sts of Row 48 to the 7 sts of Row 40, one stitch to one stitch. Pull snugly so the ring is held tight.
Pockets: Lay the panel flat with the RS up. On each pocket, put a marker in the joining stitch of Rnd 23. Count 15 sts centered on that marker, using sts 53–60 and 1–7. These 15 sts are the pocket’s back. At gauge they make a 3.75 in (9.5 cm) arc, which sits centered on the 5.25 in (13.3 cm) panel with 0.75 in (1.9 cm) of panel free on each side.
- Pin Pocket A so its base edge lines up with the panel’s bottom edge.
- Whipstitch the 15 back sts of Rnd 11 (the BLO ridge) to the panel. Catch the sc of the mesh rows, or the Row 1 sts, as you go.
- Whipstitch the 15 back sts of Rnd 23 to the panel 4.8 in (12.2 cm) above the base.
- Leave a 0.5 in (1.3 cm) gap, then attach Pocket B the same way. Repeat for Pocket C.
Tension: Stitch firmly, but don’t pucker the net. The panel should stay flat behind each pocket.
Checkpoint: The top of Pocket C sits 15.4 in (39.1 cm) above the bottom edge.
Border
Border gauge: One rnd of sc, worked at about 3.6–5 sc per inch along the row ends. The border adds about 0.25 in (0.6 cm) to each long side.
With the RS facing, join yarn at the right-hand end of Row 40, next to the tab.
Border Rnd:
– Right side, down to the bottom: 1 sc around the row end of Row 40 and 1 sc around the row end of Row 39. Then work 2 sc around each row-end post (dc or sc) of Rows 38–2, and 1 sc in the end of Row 1. (77 sts, not counting the corner)
– Bottom edge: 3 sc in foundation ch 21, 1 sc in each of chs 20–2 (19 sts), and 3 sc in ch 1. (25 sts including both corner groups)
– Left side, up to the tab: Work in reverse order: 1 sc in Row 1, 2 sc around each row end of Rows 2–38, then 1 sc each in Rows 39 and 40. (77 sts)
Fasten off. (179 sts total)
Why the math works:
– Each long side has 1 sc for Row 1, 54 sc for 27 ch-5 rows, 20 sc for 10 taper rows and 2 sc for Rows 39–40, which adds up to 77.
– Spread over about 21.4 in (54.4 cm), that’s slightly under the solid gauge. The edge stays snug, so the net hangs straight without waving.
– The bottom edge uses each of the 21 foundation chains once, with 2 extra sts at each corner (3 sts in each corner chain), which gives 19 + 6 = 25.
– After the border, the panel is 5.75 in (14.6 cm) wide.
Final Blocking
- Wet the holder in cool water and gently squeeze it out. Don’t wring it.
- Roll it in a towel to remove the extra water.
- Pin the panel flat at 5.75 in (14.6 cm) wide and 21.5 in (54.6 cm) long. Open the diamonds evenly.
- Stuff each pocket with a dry toilet roll wrapped in a plastic bag, or a rolled towel 4.5 in (11.4 cm) across, so the pockets dry round.
- Let it dry completely before hanging.
Final Quality-Control Checklist
- Each pocket has 60 sts at the base edge and at the rim
- Each pocket has 12 ch-5 loops per mesh rnd
- The panel has 21 sts in Row 1, 4 loops in each A row and 7 sts in the tab
- The pockets are evenly spaced with 0.5 in (1.3 cm) gaps
- The ring tab is sewn securely and doesn’t twist
- The border has 77 / 25 / 77 sts
- All ends are woven in through solid stitches, not through the net
Troubleshooting
- The roll won’t fit: The base is too small. Go up a hook size or check your increases.
- The pocket flares at the rim: You worked more than 4 sc per loop in Rnd 20. Recount to 60.
- The panel edges wave: You worked too many border sc. Keep it to 2 per row end.
- The panel twists: Check that every A row has exactly 4 loops.
- The pockets sag forward: Add a few extra whipstitches along the back.
Care
Hand wash in cool water, or machine wash on gentle inside a laundry bag. Reshape and dry flat.
Final Notes
The measurements build on each other. A base of 60 sts and 4.75 in (12.1 cm) gives a pocket 4.8 in (12.2 cm) tall. Three pockets plus two gaps take up 15.4 in (39.1 cm) of a panel that is 5.25 in (13.3 cm) wide. After tapering and the border, the holder finishes at 5.75 × 21.5 in (14.6 × 54.6 cm), hanging from a 3 in (7.6 cm) ring. Check each stage as you go and the finished piece will fit together neatly.
Happy crocheting!