

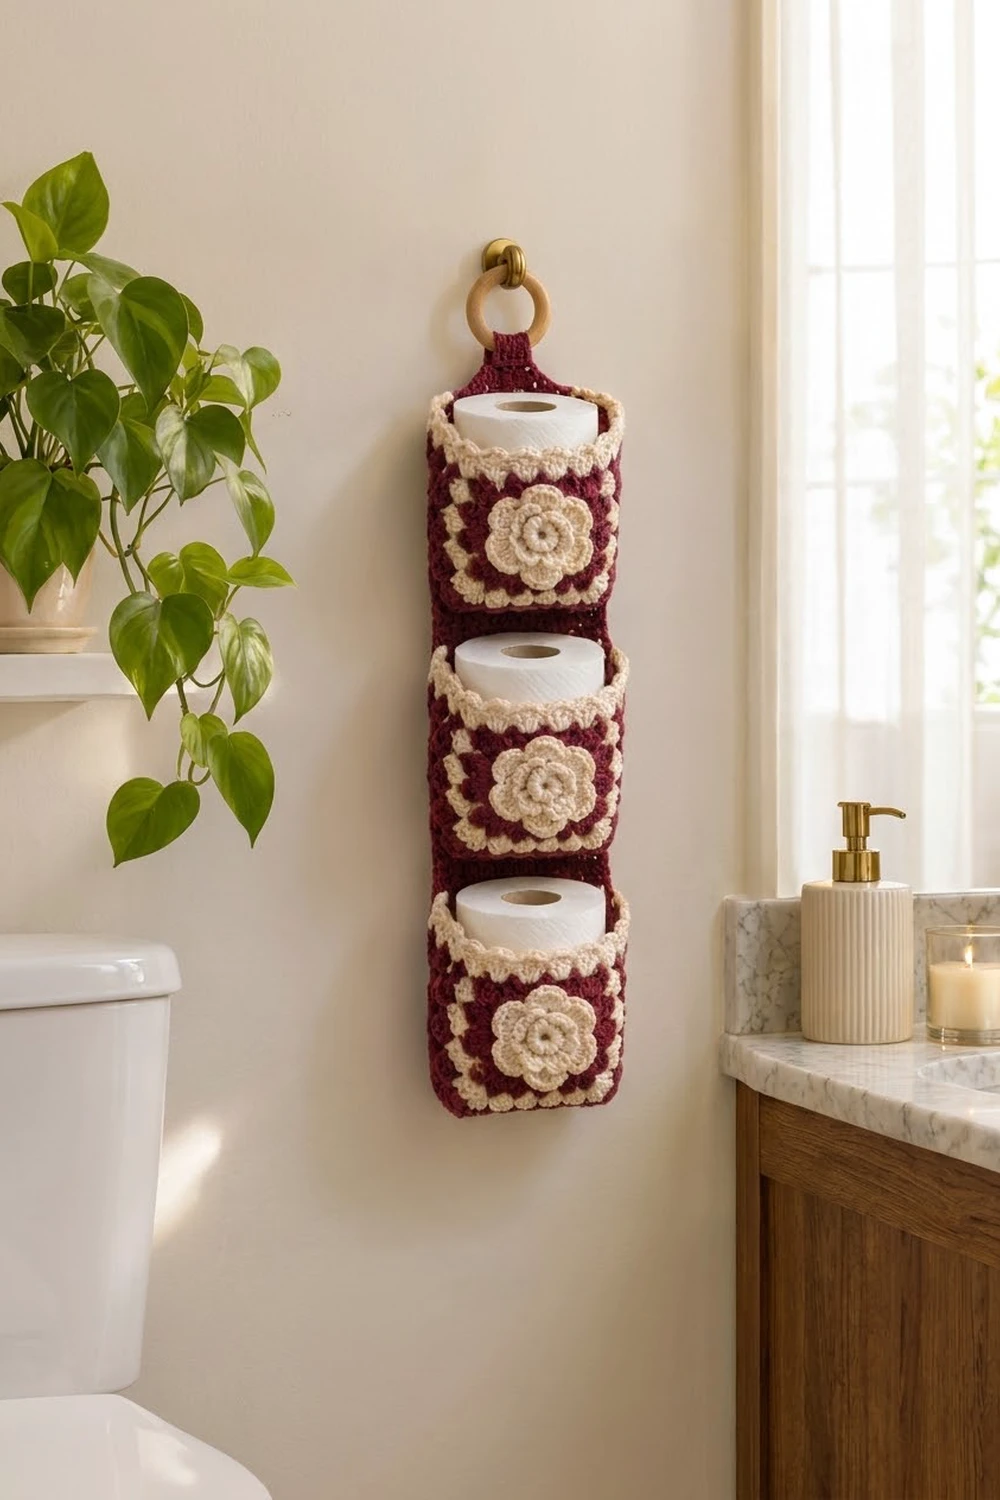
The Burgundy Bloom holder is a vertical column of three crocheted pockets. Each one holds a spare roll of toilet paper. Every pocket front is a granny square with a raised, two-layer cream flower in the center, framed by alternating burgundy and cream cluster rounds. A cream shell edge scallops around each opening, and a burgundy tab hangs the column from a wooden ring.
This pattern uses only two colors: a deep burgundy and a soft cream. The look is cottage-style and a little vintage, and it works well in a bathroom with warm wood or brass accents.
This pattern uses US crochet terms. The finished holder is 6 in (15.2 cm) wide, 3.8 in (9.7 cm) deep and 18.75 in (47.6 cm) tall from the bottom of the lowest pocket to the top of the uppermost rim. The tab and ring add a little more height above that.
Each pocket has three parts: a flower granny square for the front, a solid single crochet back panel, and one long striped gusset that wraps the left side, bottom and right side. You join the gusset to the front and back stitch-to-stitch, add the shell rim, stack the three pockets, and sew on the tab.
Finished Size and Construction
- Finished size: 6 in (15.2 cm) wide × 18.75 in (47.6 cm) tall × 3.8 in (9.7 cm) deep
- Skill level: Intermediate
- Terminology: US
- Yarn weight: Medium / worsted (#4)
- Hook: 5.0 mm (H-8)
- Number of pieces: 10 (3 front squares, 3 back panels, 3 gussets, 1 tab)
- Layout: 1 column × 3 pockets
- Pocket front size: 6 in × 6 in (15.2 cm × 15.2 cm)
- Front square before final sc round: 5.5 in (14.0 cm)
- Rim (border) depth: 0.75 in (1.9 cm)
Materials
Use a smooth worsted-weight cotton or cotton blend. These keep their shape in a humid bathroom and show the shell edges clearly. Acrylic also works but gives a softer, floppier pocket.
- Color A, Burgundy: 150 g / approx. 270 m
- Color B, Cream: 100 g / approx. 180 m
- 5.0 mm (H-8) crochet hook
- One wooden ring, 2 in (5.1 cm) inner diameter
- Tapestry needle
- 4 locking stitch markers
- Scissors
- Pins and a blocking mat
These quantities include a margin of about 25% for gauge swatches and differences in tension.
Abbreviations (US Terms)
- ch: chain
- sl st: slip stitch
- sc: single crochet
- hdc: half double crochet
- dc: double crochet
- sp: space
- sk: skip
- st(s): stitch(es)
- BPsc (back post single crochet): Insert the hook from back to front to back around the post of the stitch, yarn over, pull up a loop, then yarn over and pull through both loops.
- Shell: 5 dc in the same stitch.
Gauge and Checkpoints
Sc gauge: 11 sc and 11 rows = 3 in (7.6 cm), worked in rows.
Granny gauge: each 3-dc cluster round adds 0.75 in (1.9 cm) to the width of the square.
Make one front square first and measure it at each stage:
- After Round 5 (flower): 2.75 in (7.0 cm) across
- After Round 7: 3.25 in (8.3 cm)
- After Round 8: 4 in (10.2 cm)
- After Round 9: 4.75 in (12.1 cm)
- After Round 10: 5.5 in (14.0 cm)
- After Round 11: 6 in (15.2 cm)
If the finished square is larger than 6.25 in (15.9 cm), go down to a 4.5 mm hook. If it is smaller than 5.75 in (14.6 cm), go up to a 5.5 mm hook. Then check that the back panel is also 6 in (15.2 cm) square. Both pieces must match because the gusset joins to each of them with the same 64 stitches.

Front Flower Square (make 3)
Flower (Color B, Cream)
Round 1: Make a magic ring, ch 1, work 16 sc into the ring, then sl st to the first sc. (16 sts)
Round 2: Ch 1, sc in the first st, ch 3, sk 1. Sc in the next st, ch 3, sk 1. Repeat from * 6 more times, then sl st to the first sc. (8 sc, 8 ch-3 sps)
Round 3 (front petals): Work (sc, hdc, 2 dc, hdc, sc) in each ch-3 sp, then sl st to the first sc. (8 petals, 48 sts)
Round 4: Fold the petals forward. Working behind them, ch 1, BPsc around the first Round 2 sc, ch 4. BPsc around the next Round 2 sc, ch 4. Repeat from * 6 more times, then sl st to the first BPsc. (8 BPsc, 8 ch-4 sps)
Round 5 (back petals): Work (sc, hdc, 4 dc, hdc, sc) in each ch-4 sp, then sl st to the first sc. (8 petals, 64 sts) Fasten off.
The Round 3 petals sit in front of the larger Round 5 petals, which gives the flower its two layers.
Square Rounds
Round 6 (Color A): Working behind the back petals, join Color A with a BPsc around any Round 4 BPsc, then ch 4. BPsc around the next Round 4 BPsc, ch 4. Repeat from * 6 more times, then sl st to the first BPsc. (8 BPsc, 8 ch-4 sps)
Round 7 (Color A): Sl st into the first ch-4 sp. Ch 3 (counts as a dc), then work (2 dc, ch 2, 3 dc) in the same sp for the corner. Work 3 dc in the next sp. Work (3 dc, ch 2, 3 dc) in the next sp, then 3 dc in the next sp. Repeat from * 2 more times, then sl st to the top of the ch-3. (36 dc: 9 per side, plus 4 ch-2 corners) Fasten off.
Round 8 (Color B): Join in any ch-2 corner. Work ch 3, (2 dc, ch 2, 3 dc) in that corner. Work 3 dc in each sp between groups along the side, and (3 dc, ch 2, 3 dc) in each corner. Sl st to join. (48 dc: 12 per side) Fasten off.
Round 9 (Color A): Repeat Round 8. (60 dc: 15 per side) Fasten off.
Round 10 (Color B): Repeat Round 8. (72 dc: 18 per side) Fasten off.
Round 11 (Color A): Join in any dc, ch 1. Work sc in each dc and 3 sc in each ch-2 corner. Do not work into the gaps between groups. Sl st to the first sc. (84 sts total: 72 + 12 corner sts)
Mark the center stitch of each 3-sc corner. Each side has 22 sts, counting the corner center stitches at both ends (4 × 22 − 4 shared corners = 84). Fasten off and weave in the ends.
Back Panel (make 3)
Use Color A.
Foundation: Ch 23.
Row 1: Sc in the 2nd ch from the hook and in each ch across. (22 sc)
Rows 2–22: Ch 1, turn, then sc in each st across. (22 sc)
The panel should measure 6 in × 6 in (15.2 cm × 15.2 cm). Row 22 is the top edge. Fasten off.
Gusset (make 3)
Foundation (Color A): Ch 65.
Row 1: Sc in the 2nd ch from the hook and in each ch across. (64 sc)
Rows 2–14: Ch 1, turn, then sc in each st across. (64 sc)
Follow this color sequence:
- Rows 1–4: Color A
- Row 5: Color B
- Rows 6–9: Color A
- Row 10: Color B
- Rows 11–14: Color A
Change color on the last yarn-over of the previous row. Carry the unused yarn up the side because it will be hidden inside the seam.
The gusset measures 3.8 in (9.7 cm) wide and about 17.5 in (44.5 cm) long. Fasten off.
Hanging Tab (make 1)
Use Color A.
Foundation: Ch 9.
Row 1: Sc in the 2nd ch from the hook and in each ch across. (8 sc)
Rows 2–24: Ch 1, turn, then sc in each st across. (8 sc)
The tab measures 2.2 in × 6.5 in (5.6 cm × 16.5 cm). Fasten off and leave a 12 in (30.5 cm) tail.
Make All Pieces
Make these pieces in total:
- Front squares: 3. Each uses Color B for Rounds 1–5, 8 and 10, and Color A for Rounds 6, 7, 9 and 11.
- Back panels: 3, in Color A.
- Gussets: 3, in Color A with Color B stripes.
- Tab: 1, in Color A.
Layout, viewed from the front:
      [ RING ]
      [ TAB  ]
[ Pocket 1: Flower ]   <- top
[ Pocket 2: Flower ]
[ Pocket 3: Flower ]   <- bottom
Joining
Building Each Pocket
Gusset to front: Hold the front square and gusset Row 1 wrong sides together, so the seam ridge faces outward. With Color A, join at the top-left corner center stitch of the square. Work sc through both layers, matching 1 gusset stitch to 1 square stitch:
- 22 sts down the left side
- 21 more sts across the bottom (the bottom-left corner is shared)
- 21 more sts up the right side (the bottom-right corner is shared)
That is 22 + 21 + 21 = 64 sts, which matches the 64 gusset stitches exactly. No stitches are added or skipped.
Gusset to back: Hold gusset Row 14 against the back panel. Join down the left edge (22 row ends), across the foundation edge (22 sts) and up the right edge (22 row ends). With the 2 bottom corners shared, that is 22 + 22 + 22 − 2 = 64 sts.
Work in sc with even, relaxed tension. If you pull the seam tight, the pocket will tilt forward. Each finished pocket should measure 6 in (15.2 cm) wide and 3.8 in (9.7 cm) deep at the top opening.
Stacking the Pockets
Add the rim to every pocket first (see the next section). Then lay Pocket 2 face down and place Pocket 1 above it.
Whipstitch the 22 foundation stitches of Pocket 1’s back panel to the 22 Row 22 stitches of Pocket 2’s back panel, one stitch to one stitch. Insert the needle just below the rim on the wall side. Repeat to join Pocket 3 under Pocket 2.
Tack the bottom corners of each upper gusset to the rim of the pocket below.
Size checkpoint: the column should measure 18 in (45.7 cm) from the bottom of Pocket 3 to the top of Pocket 1’s back panel, before the top rim.
Tab
Thread the tab through the ring and fold it in half. Center both short ends on the wall side of Pocket 1’s back panel, over stitches 8–15 of the 22 top stitches. Overlap them 1 in (2.5 cm) down, then sew through all layers with the tail.
Border: Shell Rim (make 1 per pocket)
Border gauge: Round 1 adds 0.25 in (0.6 cm) and the shell round adds 0.5 in (1.3 cm), for a total of 0.75 in (1.9 cm).
Round 1 (Color B): Join at the top-left corner stitch of the front, then ch 1. Work sc around the opening:
- 22 sc across the front top
- 12 sc in the gusset row ends of Rows 2–13
- 22 sc across the back panel’s Row 22
- 12 sc in the other gusset’s row ends
Sl st to the first sc. (68 sts: front 22, gusset 12, back 22, gusset 12)
Rows 1 and 14 of the gusset are skipped because they are already joined to the corner stitches of the front and back.
Round 2 (Color B): Ch 1, sc in the first st. Sk 1, shell in the next st, sk 1, sc in the next st. Repeat from * around, ending with sk 1 and a sl st to the first sc. (17 shells, 17 sc) This places:
- 5 shells on the front
- 3 shells on the first gusset
- 6 shells on the back
- 3 shells on the second gusset
Fasten off.
Why the math works: the shell repeat uses 4 stitches, and 68 ÷ 4 = 17 exactly. Starting at the front corner puts shells beside each corner seam, so the scallops look even all the way around.
Final Blocking
- Weave in all remaining tails along the seams.
- Lightly mist the whole holder with water.
- Stuff each pocket with a roll of toilet paper or a rolled towel 4.5 in (11.4 cm) in diameter.
- Pin the front squares flat to 6 in (15.2 cm).
- Shape the shells with your fingers so each scallop stands upright.
- Fluff the flower petals forward, then let everything dry completely.
- Hang the holder by the ring and check that it hangs straight.
Final Quality-Control Checklist
- Every front square measures 6 in (15.2 cm) with 22 sts per side.
- Each gusset seam has 64 sts on both the front and the back.
- Each rim has 68 sts in Round 1 and 17 shells in Round 2.
- The flower petals are raised, with the Round 3 petals sitting in front of the Round 5 petals.
- The pockets are stacked straight, and the column measures 18.75 in (47.6 cm) including the top rim.
- The tab is centered, and the ring hangs level.
- All ends are hidden inside the seams.
Troubleshooting
The square ripples: your granny rounds are too loose. Use a smaller hook for Rounds 7–10 only.
The square cups: too few stitches or tight tension. Re-count each round against the totals given.
The gusset is too long for the square: recount the square’s Round 11. Each side must have 22 sts with the corners counted at both ends.
The pocket leans forward: the back seam was worked tighter than the front seam. Redo it with looser tension.
The shells crowd at a corner: check that Round 1 has exactly 12 sts on each gusset end.
The roll is a snug fit: a standard roll is 4.25 in (10.8 cm) wide. Insert it at an angle and let the gusset stretch slightly.
Care
Hand wash in cool water, press out the water in a towel, and dry flat with a roll inside each pocket. Do not tumble dry, because the shells can lose their shape.
Final Notes
The measurement chain runs like this:
- The flower measures 2.75 in (7.0 cm), and the square grows to 6 in (15.2 cm) with 22 sts per side.
- That makes 64 sts around three sides, matching the 64-st gusset and the 64-st back seam.
- The 68-st rim divides into 17 shells.
- Three 6 in (15.2 cm) pockets plus a 0.75 in (1.9 cm) rim give a column 18.75 in (47.6 cm) tall.
Check each link in the chain as you go, and the holder will come together cleanly.
Happy crocheting!