

This hanging basket is made to hold a spare toilet paper roll on a bathroom wall. It has a solid round base, an open diamond lattice wall, a band of small scallops around the middle and a scalloped top edge. Two narrow straps meet over a wall knob or hook.
The sample uses one soft butter-yellow (cream) yarn. A single light color shows off the lattice and goes with most bathroom colors. The look is clean and a little vintage. It would also work in sage, white or blush.
The pattern uses US crochet terms. The finished basket is about 5.75 in (14.6 cm) across and 4.25 in (10.8 cm) tall. Each strap is about 13 in (33.0 cm) long.
You’ll work the base as a flat spiral of single crochet. Then you turn up the wall with a back-loop round and add two lattice bands with a scallop round between them, plus a scalloped top edge. The two straps are made separately and sewn to opposite sides of the rim.
Finished Size and Construction
- Finished size: 5.75 in (14.6 cm) diameter × 4.25 in (10.8 cm) tall
- Skill level: Easy–Intermediate
- Terminology: US
- Yarn weight: Bulky (#5)
- Hook: 6.0 mm (J-10)
- Number of pieces: 3 (1 basket body, 2 straps)
- Layout: One basket with one strap at each side, 9 scallops apart
- Piece size: Base 5.75 in (14.6 cm) across; strap 13 in × 0.75 in (33.0 cm × 1.9 cm)
- Size before the top edge: 3.75 in (9.5 cm) tall
- Top edge (border) depth: about 0.5 in (1.3 cm)
Materials
Yarn: Use a smooth bulky cotton or cotton blend. Cotton holds its shape and stands up to bathroom humidity. Avoid fuzzy yarns, because they blur the lattice.
- Butter yellow / cream: 130 g (about 170 m)
The basket body uses about 95 g (about 125 m), and the two straps use about 20 g (about 25 m) together. The listed amount includes a margin of about 15 g for gauge differences and swatching.
Tools:
– 6.0 mm (J-10) crochet hook
– Tapestry needle
– Stitch marker
– Measuring tape
– Rust-proof pins and a blocking mat
– An empty toilet roll or a jar 4.5–5 in (11.4–12.7 cm) wide, for shaping
Abbreviations (US Terms)
- ch – chain
- sl st – slip stitch
- sc – single crochet
- hdc – half double crochet
- dc – double crochet
- BLO – back loop only
- sp – space
- st(s) – stitch(es)
- rnd – round
Special stitches:
– Small scallop: (sc, hdc, dc, hdc, sc) all in the same ch-5 sp. That’s 5 sts.
– Large scallop: (sc, hdc, 3 dc, hdc, sc) all in the same ch-5 sp. That’s 7 sts.
Gauge and Checkpoints
Gauge: 12 sc and 13 rnds = 4 in (10.2 cm), worked in rounds.
Your test piece is the base itself. Work Rnds 1–9, then measure before you start the wall. Check these points along the way:
- After Rnd 3 (18 sts): about 1.9 in (4.8 cm) across
- After Rnd 6 (36 sts): about 3.8 in (9.7 cm) across
- After Rnd 9 (54 sts): 5.75 in (14.6 cm) across, with a circumference of about 18 in (45.7 cm)
- After Rnd 17: about 3.75 in (9.5 cm) tall, measured from the base
- Finished: 4.25 in (10.8 cm) tall
Too big? Go down to a 5.5 mm (I-9) hook. Too small? Go up to a 6.5 mm (K-10.5) hook. Change the hook rather than the stitch counts, because the lattice needs exactly 54 sts at the base.
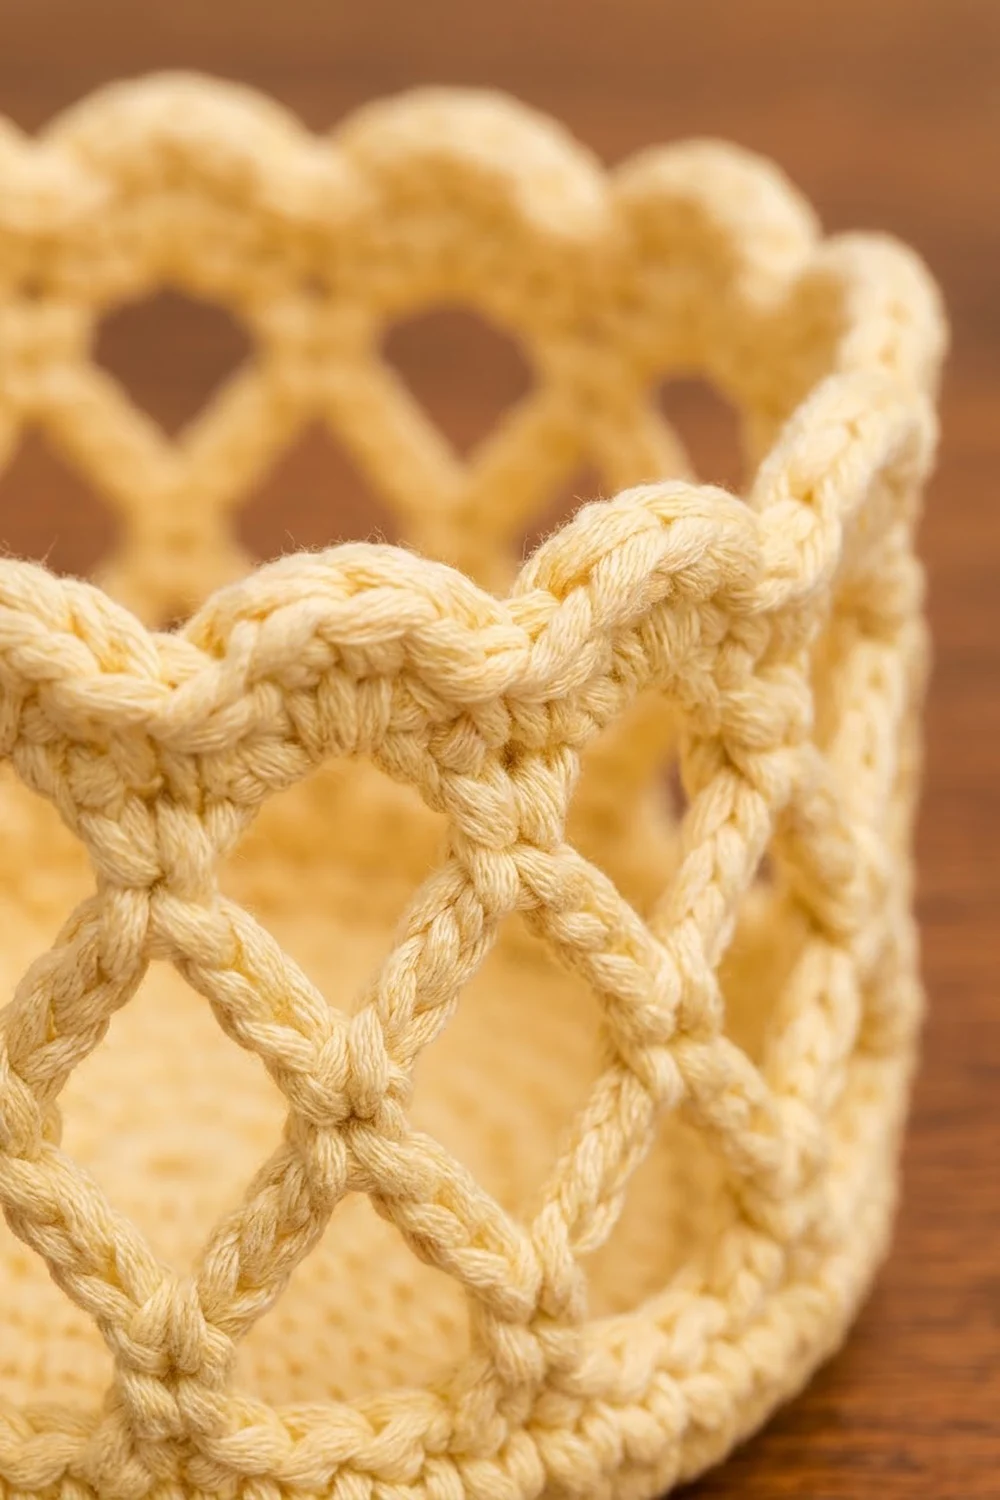
Basket Body
Base
Work in joined rounds. Join each round with a sl st to the first sc, and start each round with ch 1, which doesn’t count as a stitch.
Rnd 1: Make a magic ring and work 6 sc into it. Join. (6 sts)
Rnd 2: 2 sc in each st around. (12 sts)
Rnd 3: Sc in next st, 2 sc in next st; rep from * around. (18 sts)*
Rnd 4: Sc in next 2 sts, 2 sc in next st; rep from * around. (24 sts)*
Rnd 5: Sc in next 3 sts, 2 sc in next st; rep from * around. (30 sts)*
Rnd 6: Sc in next 4 sts, 2 sc in next st; rep from * around. (36 sts)*
Rnd 7: Sc in next 5 sts, 2 sc in next st; rep from * around. (42 sts)*
Rnd 8: Sc in next 6 sts, 2 sc in next st; rep from * around. (48 sts)*
Rnd 9: Sc in next 7 sts, 2 sc in next st; rep from * around. (54 sts)*
Check that the base lies flat and measures 5.75 in (14.6 cm) across. If it ruffles, your tension is loose. If it cups, it’s tight.
Solid Wall Band
Rnd 10: Sc in BLO of each st around. (54 sts) This makes the turning ridge, and the work starts to rise.
Rnds 11–12: Sc in each st around. (54 sts)
The solid band should be about 0.9 in (2.3 cm) tall.
Lower Lattice
Rnd 13 (conversion round): Ch 1, sc in the first st, ch 5, skip 2 sts. Sc in next st, ch 5, skip 2 sts; rep from * 16 more times. Join with a sl st to the first sc. (18 sc + 18 ch-5 sps)*
Count check: 54 sts ÷ 3 = 18. Each repeat uses 1 sc worked into an existing stitch, then skips 2.
Rnd 14: Sl st in the first 2 ch of the next ch-5 sp to move to the center of the loop. Ch 1, sc in the same sp. Ch 5, sc in next ch-5 sp; rep from * 16 more times, ch 5. Join to the first sc. (18 sc + 18 ch-5 sps)*
Each sc lands in the middle of a loop from the round below, so the loops offset and form diamonds.
Middle Scallop Band
Rnd 15 (trim round): Sl st into the next ch-5 sp. Ch 1, and work a small scallop in each ch-5 sp around. Join to the first sc. (18 scallops × 5 sts = 90 sts)
Upper Lattice
Rnd 16: Sl st in the next hdc and the next dc, so you’re at the center dc of the first scallop. Ch 1, sc in the same dc. Ch 5, sc in the center dc of the next scallop; rep from * 16 more times, ch 5. Join to the first sc. (18 sc + 18 ch-5 sps)*
Rnd 17: Repeat Rnd 14. (18 sc + 18 ch-5 sps)
Checkpoint: the basket should now be about 3.75 in (9.5 cm) tall. Don’t fasten off. The top edge comes next.
Make All Pieces
This item has three pieces, all in the same color:
- Basket body: 1 (Rnds 1–18, made above and in the Top Edge section)
- Straps: 2
Strap (make 2)
Foundation: Ch 37.
Rnd 1: Sc in the 2nd ch from the hook and in each of the next 35 ch (36 sc). Ch 4 for the first eyelet. Working along the opposite side of the foundation chain, sc in each of the 36 ch, then ch 4 for the second eyelet. Join to the first sc. (72 sc + 2 ch-4 eyelets)
Rnd 2: Ch 1. Sl st in each of the next 36 sc, work 6 sc into the ch-4 eyelet, sl st in each of the next 36 sc, and work 6 sc into the second eyelet. Join. (72 sl st + 12 sc = 84 sts)
The slip stitches give the strap its firm, braided look and stop it from stretching. Each finished strap measures about 13 in × 0.75 in (33.0 cm × 1.9 cm), and each eyelet opening is about 0.5 in (1.3 cm).
Layout (seen from above, with the 18 scallops numbered around the rim):
          [Strap A top eyelet] + [Strap B top eyelet]
                      (stacked on the knob)
                     /                      \
              Strap A                         Strap B
                 |                               |
           Scallop 1  ...  9 scallops  ...  Scallop 10
                 \__________ basket rim __________/
Joining
Method: Whipstitch with the yarn tail and a tapestry needle.
Placement: Lay the basket flat and mark scallop 1 and scallop 10 of the top edge. They sit exactly opposite each other, with 9 scallops on each side.
Stitch-to-stitch logic: Place the lower eyelet end of a strap on the outside of the wall, centered under the marked scallop. Overlap the strap 1.5 in (3.8 cm) down the wall so that it covers Rnds 16–18. Whipstitch both long edges of that 1.5 in (3.8 cm) overlap, taking 1 stitch into each strap stitch and catching the matching sc or chain of the basket behind it. Then sew around the lower eyelet to secure it. Repeat for the second strap at scallop 10.
Tension: Pull each stitch snug but not tight. If you over-tighten, the lattice puckers inward.
Size checkpoint: Hold the basket up by both top eyelets. The straps should rise in an even V, and the rim should hang level. If it tilts, re-center the strap that sits lower.
Top Edge (Border)
Border gauge: One large scallop spans one ch-5 sp, about 1 in (2.5 cm) wide. That gives 18 scallops around an 18 in (45.7 cm) rim.
Rnd 18 (trim round): Sl st into the next ch-5 sp. Ch 1, and work a large scallop in each ch-5 sp around. Join to the first sc and fasten off. (18 scallops × 7 sts = 126 sts)
Per side: Split the rim into two halves at the strap points. Each half has 9 scallops × 7 sts = 63 sts, and 63 + 63 = 126.
Why the math works: The 54 base stitches divide evenly by 3, which gives 18 loops. Every lattice round keeps those 18 loops, so the top edge gets exactly 18 scallops. Because 18 is even, the two straps land exactly opposite each other, with 9 scallops on each side. The edge adds about 0.5 in (1.3 cm), for a finished height of 4.25 in (10.8 cm).
Final Blocking
- Weave in all ends along the solid stitches, not through the chain loops.
- Soak the basket and straps in cool water for 10 minutes, then gently squeeze them out in a towel.
- Slide the empty roll or jar inside the basket.
- Pull the lattice evenly upward so every diamond is the same height.
- Pin each top scallop so it stands upright and looks rounded.
- Lay the straps flat and pin them straight at 13 in (33.0 cm).
- Let everything dry completely, which takes about 24 hours, and then remove the form.
Final Quality-Control Checklist
- The base lies flat at 5.75 in (14.6 cm) across.
- The BLO ridge makes a crisp turn from base to wall.
- Each lattice round has 18 loops, with no skipped or doubled loops.
- There are 18 scallops in the middle band and 18 on the top edge.
- The basket is 4.25 in (10.8 cm) tall.
- Both straps measure 13 in (33.0 cm), with open eyelets.
- The straps are sewn exactly opposite each other, 9 scallops apart.
- The basket hangs level and holds a roll without sagging.
- All ends are woven in and hidden.
Troubleshooting
- The base ruffles: Use a smaller hook or tighten your increases. You may also have miscounted a round.
- The base cups: Use a larger hook and check that each increase round adds exactly 6 sts.
- The lattice leans or spirals: Make sure each sc goes into the center of the loop below. Join every round; don’t work in a continuous spiral.
- The loops look stretched: Chain more firmly, or change to ch 4 throughout the basket. Keep in mind that this shortens the height a little.
- The scallops lie flat: Block them upright over the form.
- The basket tilts: Recheck the strap positions and the depth of the overlaps.
- The straps stretch: Make sure Rnd 2 is worked in sl st and not sc.
Care
Hand wash in cool water and lay flat to dry, reshaped over a roll. Don’t tumble dry, because the heat can distort the lattice.

Final Notes
Everything in this basket follows one measurement chain. A 54-stitch base gives an 18 in (45.7 cm) rim. That divides into 18 lattice loops, which give 18 middle scallops and 18 top scallops. The top edge splits into two halves of 9 scallops, one strap on each side. If you hit your gauge on the base, the 5.75 in (14.6 cm) by 4.25 in (10.8 cm) size follows.
Happy crocheting!