

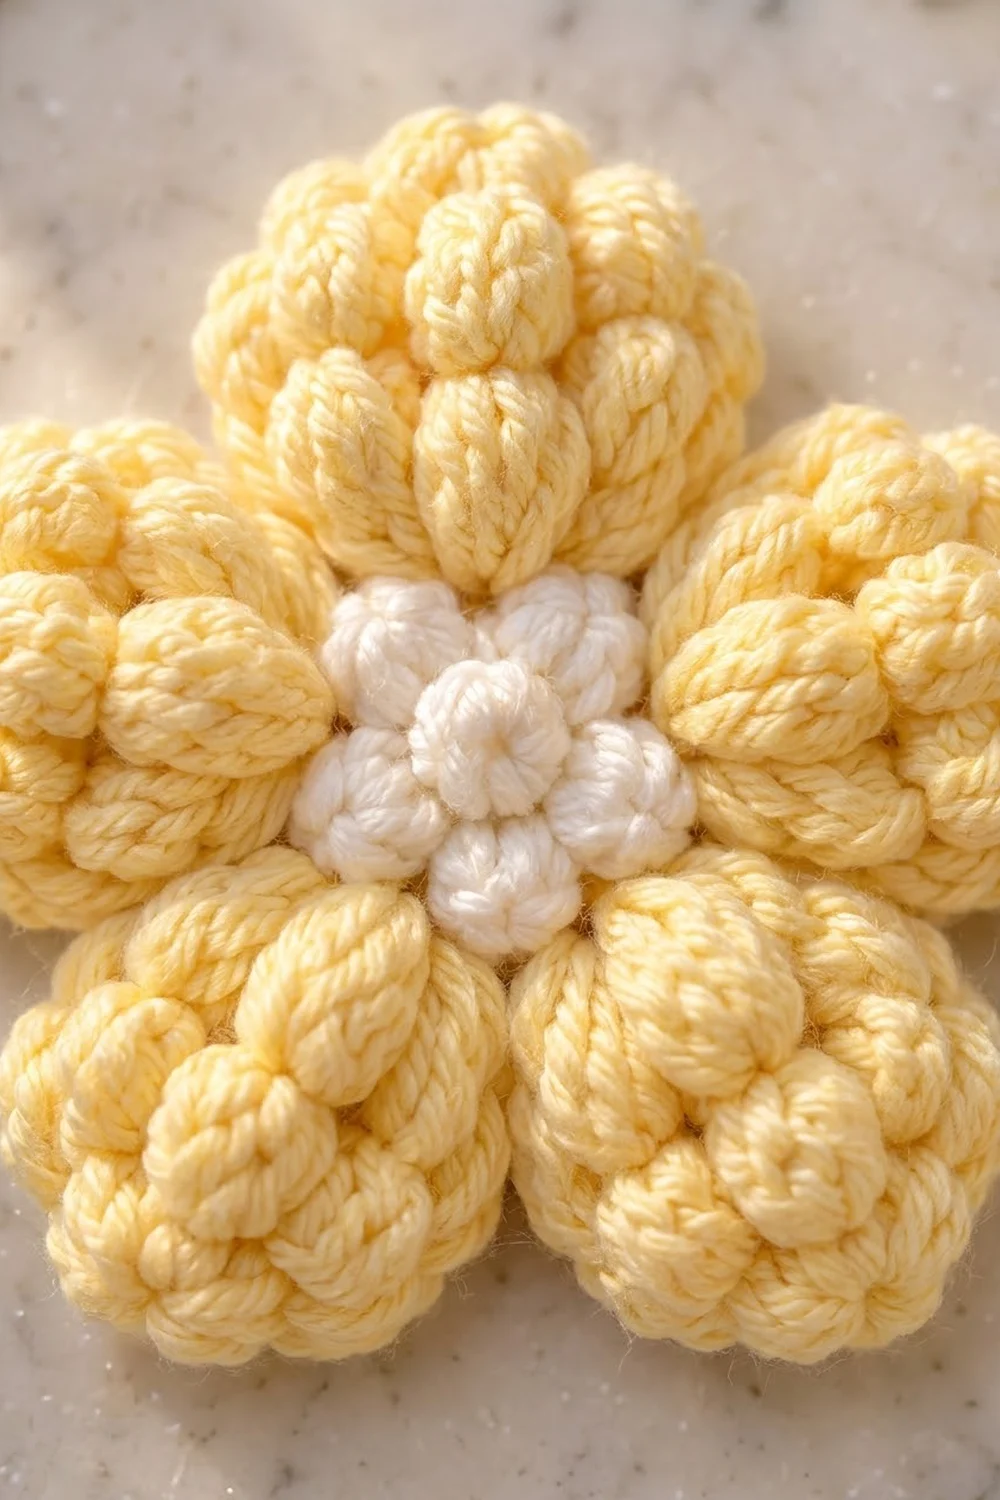
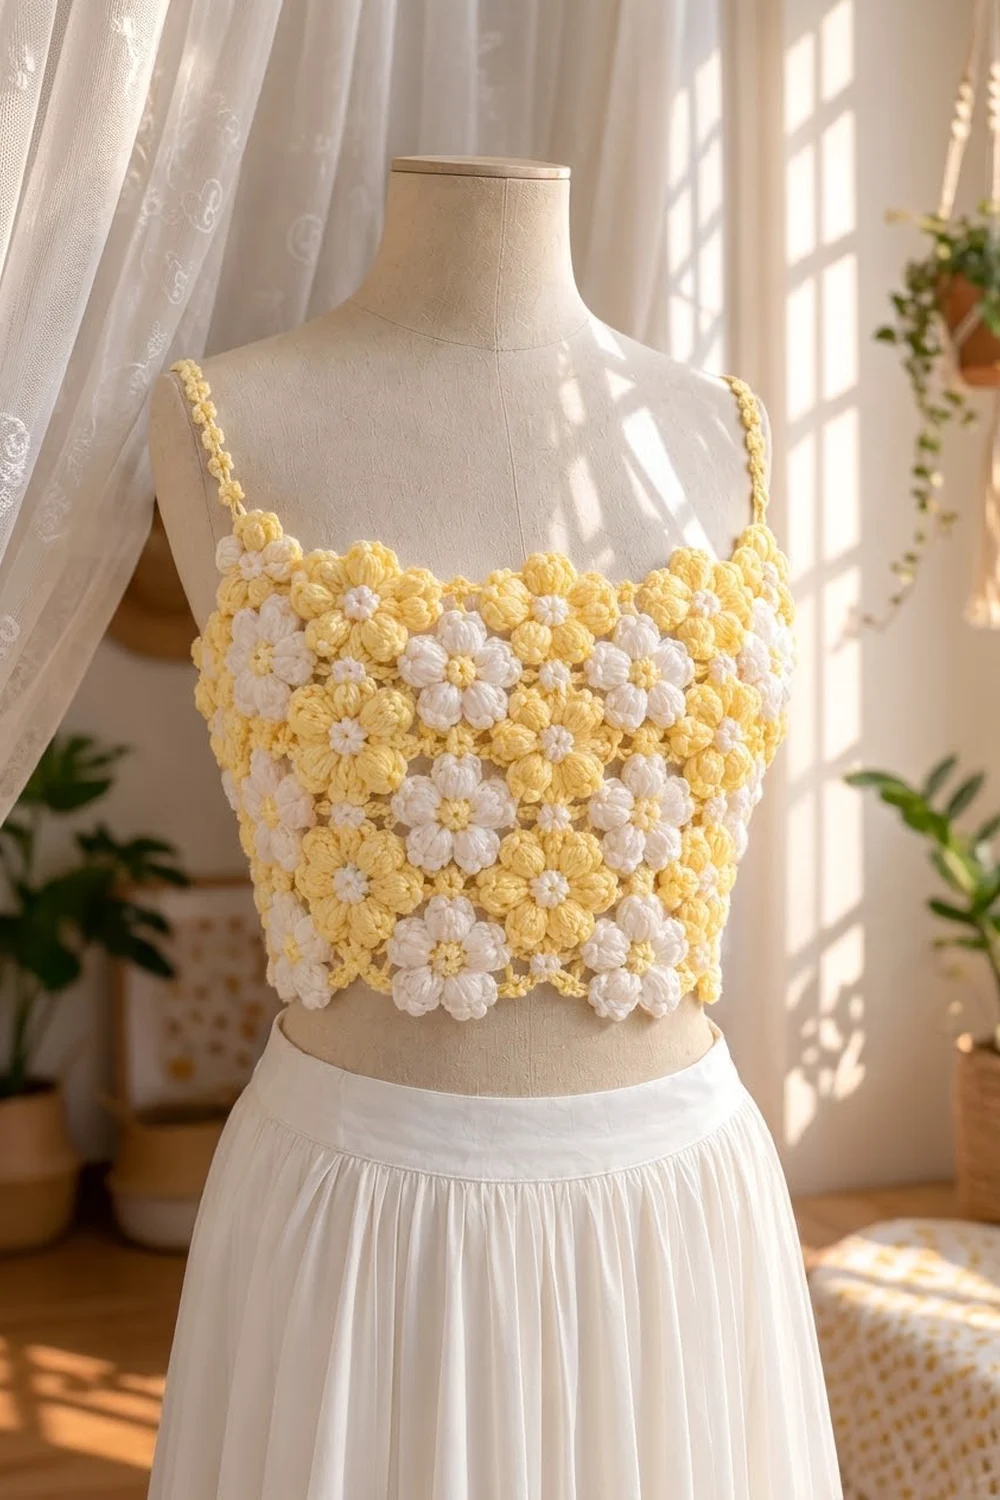
The Buttercup Puff Flower Crop Top is a soft, sunny summer top made from small five-petal flowers. Each petal is a cluster of stacked puff stitches, so the flowers look plump and almost three-dimensional against a light chain-lace background.
You use two colors, butter yellow and white, in two motif colorways. Motif A has yellow petals and a white center. Motif B has white petals and a yellow center. They alternate in a checkerboard, and every motif shares the same yellow lace frame. That shared frame is what makes the finished top look like a single piece of fabric.
This pattern uses US crochet terms. The finished top measures 32.5 in (82.6 cm) around and 14 in (35.6 cm) tall, plus the straps. It fits a bust of about 31–33 in (78.7–83.8 cm).
Construction is simple. You work 40 square-framed flower motifs and join them as you go into a tube 10 motifs around and 4 motifs tall. Then you add a three-round picot edging to the top and bottom edges and sew on two picot straps. There are no side seams to sew.
Finished Size and Construction
- Finished size: 32.5 in (82.6 cm) circumference × 14 in (35.6 cm) height, straps not included
- Skill level: Intermediate
- Terminology: US crochet terms
- Yarn weight: DK (#3), cotton or cotton blend
- Hook: 4.0 mm (G-6)
- Number of pieces: 40 motifs (20 Motif A, 20 Motif B), plus 2 straps
- Layout: 10 motifs around × 4 motifs tall, worked as a tube
- Motif size: 3.25 in (8.3 cm) square after the frame round, blocked
- Size before border: 32.5 in (82.6 cm) around × 13 in (33.0 cm) tall
- Border depth: 0.5 in (1.3 cm) on the top edge and on the bottom edge
Materials
Pick a smooth, mercerized or combed cotton DK. Cotton shows off the puff stitches clearly and holds the petals’ shape after blocking. Avoid fuzzy yarns, because they blur the puffs.
Yarn (DK, about 113 m per 50 g):
– Butter Yellow: 200 g / 452 m (4 balls). Used for Motif A petals, Motif B centers, every frame, the edging and the straps.
– White: 100 g / 226 m (2 balls). Used for Motif B petals and Motif A centers.
These amounts include a margin of about 15–20% for gauge swatches and small differences in tension.
Tools:
– 4.0 mm (G-6) crochet hook
– 3.5 mm and 4.5 mm hooks for adjusting gauge
– Tapestry needle
– Stitch markers (at least 10)
– Scissors
– Measuring tape
– Blocking mats, rust-proof pins and a spray bottle
Abbreviations (US Terms)
- ch – chain
- sl st – slip stitch
- sc – single crochet
- sc2tog – single crochet 2 together
- sk – skip
- sp(s) – space(s)
- st(s) – stitch(es)
- yo – yarn over
- rnd(s) – round(s)
Puff stitch (puff): (Yo, insert hook in the stitch or space, pull up a loop to about 0.25 in / 0.6 cm) 3 times, so you have 7 loops on the hook. Yo and pull through all 7 loops, then ch 1 to close. The closing ch 1 is part of the puff and is never counted as a separate stitch.
Picot: Ch 3, then sl st in the 3rd ch from the hook.
Gauge and Checkpoints
Before you make the full set, make one complete Motif A and block it. Every measurement in this pattern depends on that one test motif.
Motif checkpoints (all after light blocking):
– After Rnd 2: the center is about 1 in (2.5 cm) across.
– After Rnd 5: the flower is about 2.75 in (7.0 cm) across, measured from petal tip to petal tip.
– After Rnd 6: the frame of chain loops is about 3 in (7.6 cm) across.
– After Rnd 7: the motif is a 3.25 in (8.3 cm) square.
Edging gauge: about 5 sc = 1 in (2.5 cm). Each motif side takes exactly 16 edging sc, and 16 sc over 3.25 in (8.3 cm) works out to about 4.9 sc per inch.
If your motif is too big (more than 3.4 in / 8.6 cm), change to a 3.5 mm hook. If it is too small (under 3.1 in / 7.9 cm), change to a 4.5 mm hook. Being 0.15 in (0.4 cm) off on each motif adds up to 1.5 in (3.8 cm) across 10 motifs, so check carefully.
Motif Pattern
The colors change partway through each motif:
– Motif A: Rnds 1–2 in White, Rnds 3–5 in Yellow, Rnds 6–7 in Yellow.
– Motif B: Rnds 1–2 in Yellow, Rnds 3–5 in White, Rnds 6–7 in Yellow.
Flower Center
Rnd 1 (center color): Make a magic ring. Ch 1, then work 10 sc into the ring. Join with a sl st to the first sc. Pull the ring closed tightly. (10 sc)
Rnd 2: Ch 1, then work 2 sc in each st around. Join with a sl st to the first sc. (20 sc) Fasten off.
Petal Base
Rnd 3 (petal color): Join with a standing sc in any st. Ch 3, sk 2 sts, sc in the next st. Sc in the next st, ch 3, sk 2 sts, sc in the next st. Repeat from * 4 more times. Join with a sl st to the first sc.
(10 sc and 5 ch-3 sps)
Each repeat uses 4 stitches of Rnd 2, and 5 repeats × 4 sts = 20 sts. Between neighboring ch-3 sps there are now 2 sc side by side. These pairs become the dips between the petals.
Puff Petals, First Layer
Rnd 4: Sl st into the next ch-3 sp, then ch 2 (this does not count as a stitch). In the same sp, work (puff, ch 1) 4 times, then 1 more puff. That is one petal. Sc2tog over the next 2 sc, then work one petal in the next ch-3 sp. Repeat from * 3 more times. Finish with sc2tog over the last sc and the first sc of Rnd 3. Join with a sl st to the top of the first puff.
(25 puffs, 20 ch-1 sps, 5 sc2tog)
Five puffs packed into one ch-3 space make each petal cup up slightly.
Puff Petals, Second Layer
Rnd 5: Work (puff, ch 1, puff) in each of the next 4 ch-1 sps, then sc in the next sc2tog. Repeat from * 4 more times. Join with a sl st to the first puff. Fasten off.
(40 puffs + 5 sc = 45 sts)
This round is a growth round. Each petal now has 8 puffs (4 pairs) stacked on top of the 5 puffs below. That stacking gives the rounded, bumpy petals in the photo. The sc in each dip pulls the petals apart so they stay distinct.
Checkpoint: 2.75 in (7.0 cm) across from petal tip to petal tip.
Frame Round 1
Rnd 6 (Yellow): Join with a standing sc in the sc between any two petals. Ch 4. Sc in the space between the 1st and 2nd puff pairs. Ch 4. Sc between the 2nd and 3rd pairs. Ch 4. Sc between the 3rd and 4th pairs. Ch 4. Sc in the next dip sc. Repeat from * 4 more times. On the last repeat, skip the final sc and join with a sl st to the first sc instead.
(20 sc and 20 ch-4 loops)
Each petal gets 4 loops, so 5 petals × 4 = 20 loops. Since 20 divides evenly by 4, the five-petal flower can sit inside a square frame.
Frame Round 2: Squaring Round
Rnd 7: Sl st into the first ch-4 loop. Ch 1, then work (sc, ch 5, sc) in the same loop. This is a corner. Ch 3, then (sc in the next loop, ch 3) 4 times. Work (sc, ch 5, sc) in the next loop for a corner, ch 3, then (sc in the next loop, ch 3) 4 times. Repeat from * 2 more times. Join with a sl st to the first sc. Fasten off.
(24 sc, 4 ch-5 corner sps, 20 ch-3 sps, so 5 ch-3 sps per side)
Each side uses 5 loops (1 corner loop and 4 side loops), and 4 sides × 5 = 20 loops. Block the test motif to 3.25 in (8.3 cm) square. Only the first motif is worked all the way through Rnd 7 on its own. Every other motif is joined to its neighbors during Rnd 7.
Make All Pieces
- Motif A (yellow petals, white center): 20
- Motif B (white petals, yellow center): 20
- Total: 40 motifs
Work Rnds 1–6 for all 40 motifs first. Rnd 7 is worked during joining.
Columns 1–5 are the front of the top and columns 6–10 are the back. Column 10 joins to column 1 to close the tube. Row 1 is the top row, at the bust.
ROW 1: A B A B A B A B A B
ROW 2: B A B A B A B A B A
ROW 3: A B A B A B A B A B
ROW 4: B A B A B A B A B A
Because there are 10 columns, an even number, the checkerboard still alternates correctly where column 10 meets column 1.
Joining
Method: Join as you go during Rnd 7, one motif at a time, working left to right along each row.
How each stitch joins: On any side that meets a motif you have already finished, change the chains as follows:
– Corner: Instead of ch 5, work ch 2, sl st in the neighbor’s corner ch-5 sp, ch 2.
– Each ch-3 sp: Instead of ch 3, work ch 1, sl st in the neighbor’s matching ch-3 sp, ch 1.
Each joined side therefore has 2 corner joins and 5 side joins, and they line up space for space. Where four motifs meet, sl st into the existing join instead of a new space so the corner stays flat.
Order:
1. Row 1: Finish motif 1 as normal. Join motifs 2–9 to the motif on their left along one side. Join motif 10 on two sides, to motif 9 and to motif 1. This closes the tube. Make sure the tube is not twisted before you join motif 10.
2. Rows 2–4: Join the first motif of each row to the motif above it. Join each later motif to the motif above and the motif on its left. Join the last motif of the row on three sides: above, left, and to the first motif of the same row.
Tension: Keep the joining chains at the same tension as your normal Rnd 7 chains. Joins that are too tight pull the lace into puckers, and joins that are too loose leave gaps between motifs.
Size checkpoint: Lay row 1 flat before you join motif 10. It should measure 32.5 in (82.6 cm) long. When all 4 rows are done, the tube should be 13 in (33.0 cm) tall.
Border (Top and Bottom Edging)
Work the same edging around the top edge (along row 1) and the bottom edge (along row 4). The edging is worked in rounds because the body is a tube.
Border gauge: 16 sc per motif side, about 5 sc per 1 in (2.5 cm).
Rnd 1 (Yellow): Join with a standing sc in the free corner ch-5 sp of any motif, right next to a join. For each motif along the edge, work:
– 3 sc in its first corner sp (the standing sc counts as the first of these),
– 2 sc in each of its 5 ch-3 sps,
– 3 sc in its second corner sp.
That makes 3 + 10 + 3 = 16 sc per motif. Join with a sl st to the first sc.
(10 motifs × 16 sc = 160 sc)
Rnd 2: Ch 1, then sc in each st around. Join. (160 sc)
Rnd 3: Ch 1. Sc in each of the next 4 sts, then work a picot. Repeat from * 39 more times. Join and fasten off.
(160 sc and 40 picots)
Why the math works: The motifs have no extra stitches at the joins. Each motif side holds exactly 16 edging sc, and 10 × 16 = 160. Picots don’t use up any stitches, and 160 ÷ 4 = 40, so the picots spread evenly with one more picot every 0.8125 in (2.1 cm). The tube has no corners, so there are no corner stitches to add. The three rounds together are 0.5 in (1.3 cm) deep.
Straps (Make 2)
Row 1 (Yellow): Ch 61. Sc in the 2nd ch from the hook and in each ch across. (60 sc)
Row 2: Ch 1, then sc in each of the next 3 sts, picot 20 times. Without turning, rotate the strap and work along the other side of the foundation chain: sc in each of the next 3 ch, picot 20 times. Fasten off, leaving a long tail.
(120 sc and 40 picots)
Each strap is 12 in (30.5 cm) long, because 60 sc ÷ 5 sc per in = 12 in.
Attaching the straps: Sew one strap from the front join between columns 1 and 2 to the back join between columns 9 and 10. Sew the other strap from the front join between columns 4 and 5 to the back join between columns 6 and 7. Sew each end to the inside of edging Rnd 1. The strap ends are 9.75 in (24.8 cm) apart on the front and on the back. Try the top on before you sew the second end of each strap, and shorten or lengthen the straps if needed.
Final Blocking
- Weave in all ends inside the puffs on the wrong side of the same color.
- Soak the top in cool water for 15 minutes, then press the water out gently. Don’t wring it.
- Lay the tube flat on the blocking mats. Flattened, it should measure 16.25 in (41.3 cm) wide × 14 in (35.6 cm) tall.
- Pin the corner of every motif to a straight grid, so each motif is 3.25 in (8.3 cm).
- Shape each petal gently with your fingertips so the puffs stand up and stay round.
- Pin out the picots along the top and bottom edges.
- Let it dry completely, at least 24 hours, then unpin it and flip it over to check that the flattened sides have dried evenly.
Final Quality-Control Checklist
- 40 motifs in total, with A and B alternating correctly in every row and column
- Every petal has 5 puffs in the first layer and 8 in the second
- No twist in the tube, and column 10 joins cleanly to column 1
- Every four-motif corner is joined into a single point
- 160 sc in each edging round on both the top and the bottom edge, with 40 picots on each edge
- Circumference is 32.5 in (82.6 cm) and height is 14 in (35.6 cm)
- Straps are the same length and sewn securely at the column joins
- All ends are woven in and invisible from the right side
Troubleshooting
Petals look flat: Pull up taller puff loops, about 0.25 in (0.6 cm), and close each puff firmly with its ch 1.
The motif cups instead of lying flat: The Rnd 6 chains are too tight. Try ch 5 instead of ch 4, or go up a hook size for Rnds 6–7 only.
The motif ruffles: The Rnd 6 chains are too loose. Try ch 3, or go down a hook size for Rnds 6–7.
Corners are uneven: Check that each corner has 5 loops between it and the next corner, and count the loops again before you start Rnd 7.
The edging ripples: Your tension is loose. Stay at 16 sc per motif and go down a hook size for the edging.
The top is too snug: Add 2 columns (one A and one B) to each row. That makes 12 columns, 39 in (99.1 cm) around, and 192 sc in each edging round, which still divides by 4 for the picots.
Care
Hand-wash in cool water with a mild detergent, press out the water, and dry flat in shape. Don’t tumble dry or hang it while wet, because the puffs will stretch.
Final Notes
The measurements chain together like this:
– One motif: 2.75 in (7.0 cm) after Rnd 5, 3 in (7.6 cm) after Rnd 6, and 3.25 in (8.3 cm) square after Rnd 7.
– Ten motifs around: 32.5 in (82.6 cm).
– Four rows tall: 13 in (33.0 cm).
– Plus two 0.5 in (1.3 cm) edgings: 14 in (35.6 cm) in total.
Each edge has 160 sc, which is 16 sc per motif × 10 motifs, and each strap is 60 sc long, or 12 in (30.5 cm). If your first motif blocks to the right size, every number after it will work out.
Happy crocheting!