
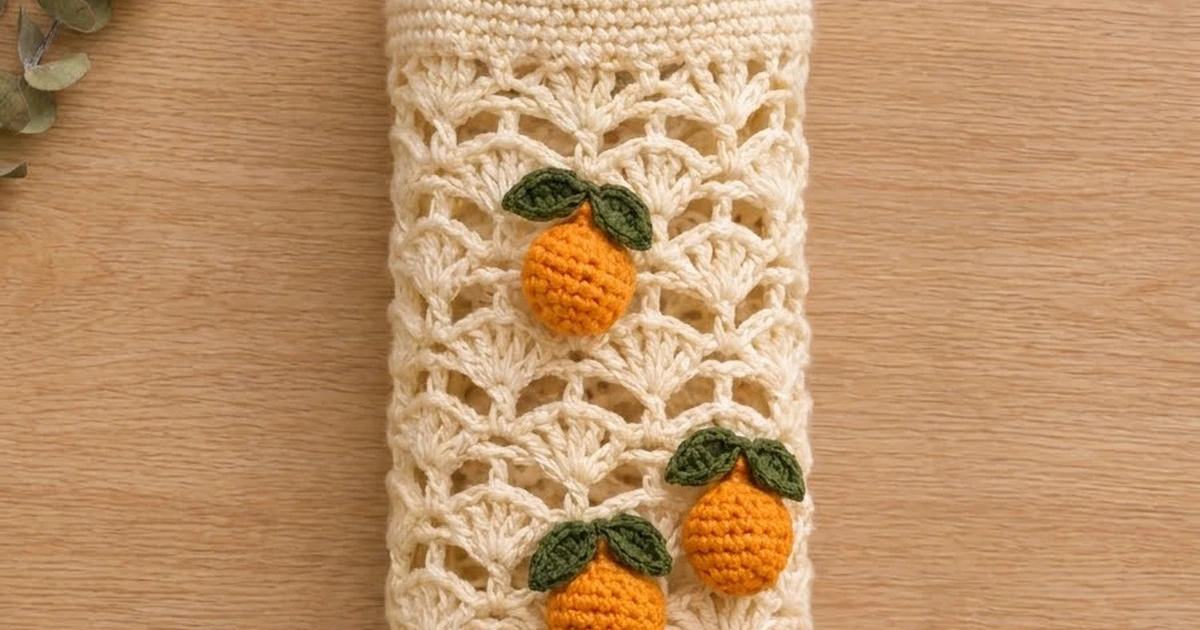
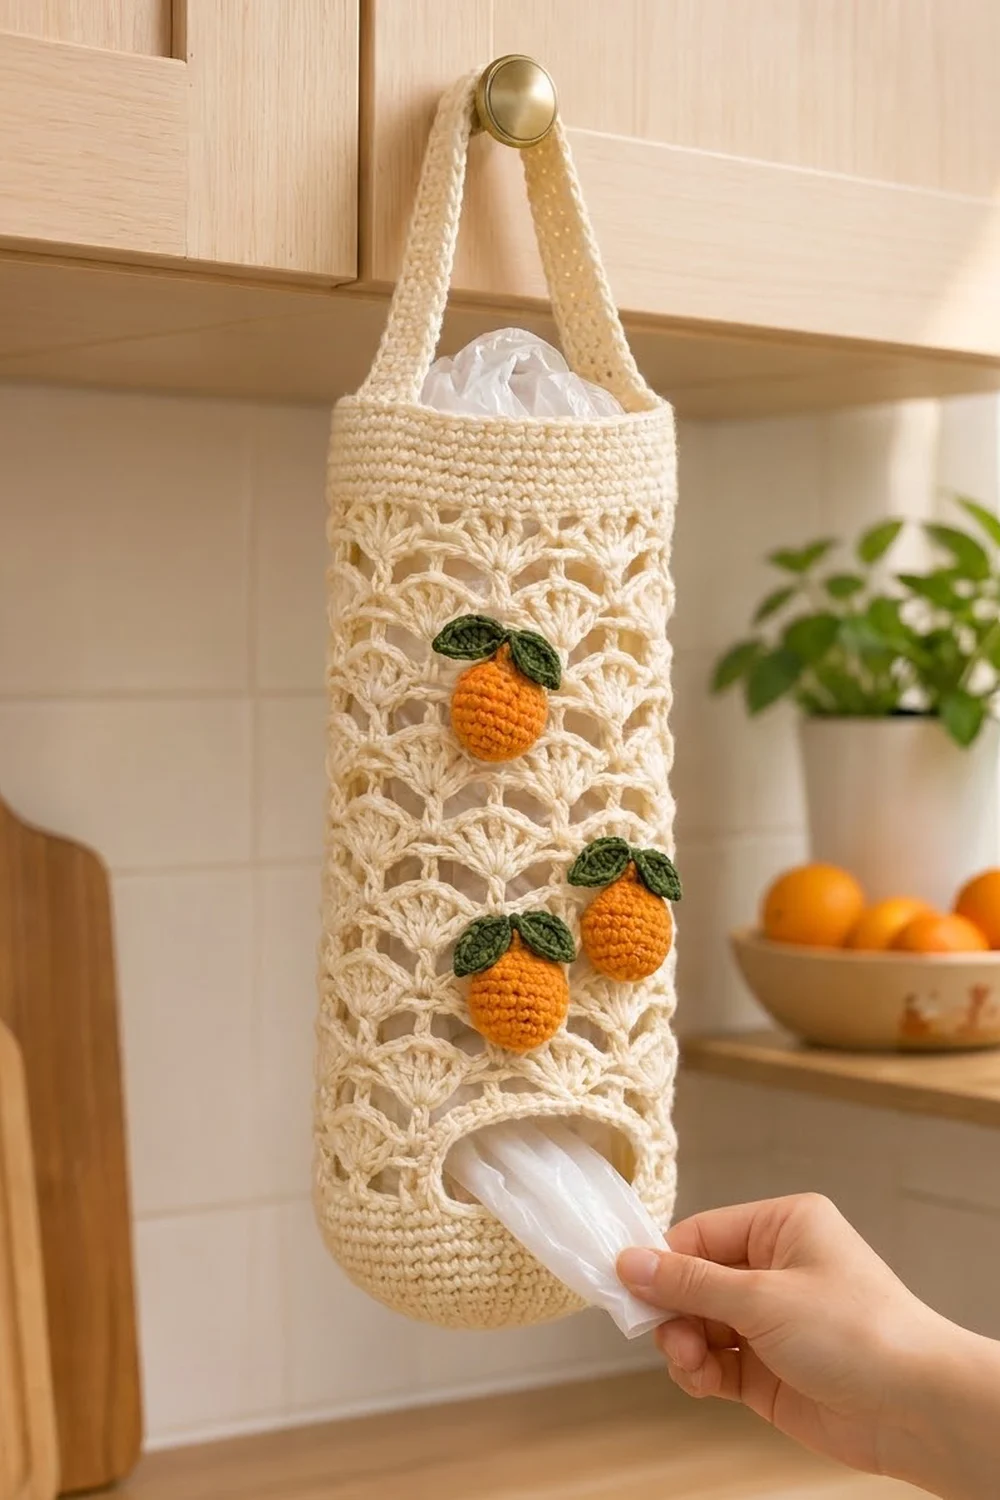
This bag holder has a tall, open lace body that keeps plastic grocery bags tidy and lets you see when it’s time to refill. Bags go in at the top and come out one at a time through an oval opening near the bottom.
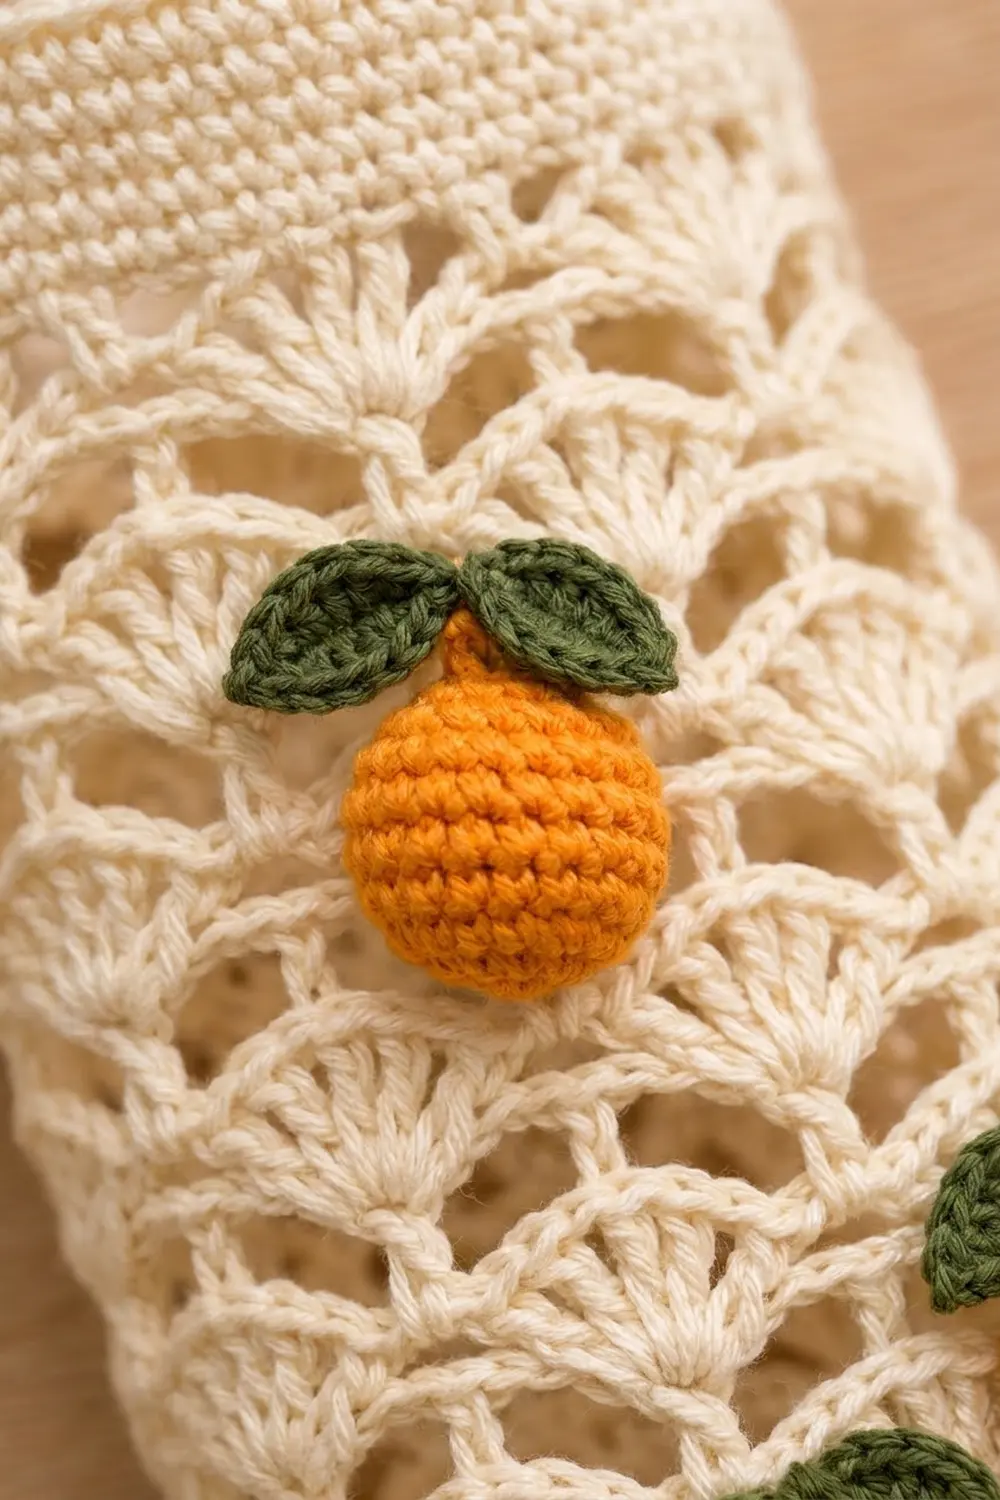
It is worked in a soft cream cotton with three small orange appliqués with olive-green leaves on the front. The look is light and fresh, and works well in a farmhouse or bright modern kitchen. The lace is a classic shell-and-arc stitch: rows of fans set between the fans of the row below.
The pattern uses US crochet terms. The finished holder is 6 in (15.2 cm) wide when laid flat and 15 in (38.1 cm) tall, plus a hanging loop that rises about 8 in (20.3 cm) above the rim.
You work the body in one piece from the bottom up. You start with a flat round base, build solid sides with the dispenser opening, switch to the lace, level the top, and finish with a solid band. Then you make the strap and three oranges and sew them on.
Finished Size and Construction
- Finished size: 6 in (15.2 cm) wide flat x 15 in (38.1 cm) tall; circumference 12 in (30.5 cm)
- Skill level: Easy-intermediate
- Terminology: US
- Yarn weight: Worsted (#4) cotton
- Hook: 4.5 mm (US 7)
- Number of pieces: 1 body, 1 strap, 3 oranges, 6 leaves
- Layout: One tube; strap ends sewn inside the top band at opposite sides; oranges on the front
- Base size: 3.8 in (9.7 cm) diameter
- Size before top band: 13.5 in (34.3 cm) tall
- Top band depth: 1.5 in (3.8 cm)
Materials
Choose a smooth, firm worsted cotton or cotton blend. Cotton holds the lace shape and won’t sag under a full load of bags. The amounts below assume skeins of about 50 g / 85 m.
- Cream: 120 g / 204 m (body and strap)
- Orange: 15 g / 26 m (three oranges)
- Olive green: 5 g / 9 m (six leaves)
Tools:
- 4.5 mm (US 7) crochet hook
- Tapestry needle
- 4 stitch markers
- A small handful of fiberfill
- Measuring tape
- Rust-proof pins and a blocking surface
All quantities include roughly a 15% margin for your gauge swatch and tension differences.
Abbreviations (US Terms)
- ch – chain
- sl st – slip stitch
- sc – single crochet
- hdc – half double crochet
- dc – double crochet
- tr – treble crochet
- BLO – back loop only
- sp – space
- st(s) – stitch(es)
- MR – magic ring
Special stitch:
- Shell: 5 dc in the same stitch.
Gauge and Checkpoints
Gauge: 16 sc and 16 rounds = 4 in (10.2 cm) in sc worked in the round.
Lace gauge: One shell repeat (6 sts) = 1.5 in (3.8 cm) wide. One shell round plus one arc round = 1.25 in (3.2 cm) tall.
Use the base as your swatch. Work Rounds 1–8 and measure before going further.
Checkpoints:
- After Round 8: base diameter 3.8 in (9.7 cm)
- After Round 22: side height 3.5 in (8.9 cm), measured up from the base edge
- After Round 37: total height 13 in (33.0 cm)
- After Round 38: total height 13.5 in (34.3 cm)
- After Round 44: total height 15 in (38.1 cm), flat width 6 in (15.2 cm)
Too big? Go down a hook size (4 mm). Too small? Go up a hook size (5 mm). Don’t add or remove stitches: the lace needs a multiple of 6 and the strap placement relies on 48 stitches.
Body
Work in joined rounds without turning, except in Rows 15–20. Ch 1 at the start of a round does not count as a stitch.
Base
Round 1: With cream, make a MR, ch 1, 6 sc in the ring, join with sl st to first sc. (6 sts)
Round 2: Ch 1, 2 sc in each st around, join. (12 sts)
Round 3: Ch 1, sc in next st, 2 sc in next st, repeat around, join. (18 sts)
Round 4: Ch 1, sc in next 2 sts, 2 sc in next st, repeat around, join. (24 sts)
Round 5: Ch 1, sc in next 3 sts, 2 sc in next st, repeat around, join. (30 sts)
Round 6: Ch 1, sc in next 4 sts, 2 sc in next st, repeat around, join. (36 sts)
Round 7: Ch 1, sc in next 5 sts, 2 sc in next st, repeat around, join. (42 sts)
Round 8: Ch 1, sc in next 6 sts, 2 sc in next st, repeat around, join. (48 sts)
The base should lie flat and measure 3.8 in (9.7 cm) across.
Solid Sides
Round 9: Ch 1, sc in BLO of each st around, join. (48 sts)
Working in back loops makes the clean fold where the base turns upward.
Rounds 10–14: Ch 1, sc in each st around, join. (48 sts)
Dispenser Opening
Now you work back and forth over 32 sts, leaving 16 sts unworked for the bottom edge of the opening.
Row 15: Ch 1, sc in next 32 sts, turn. Leave the last 16 sts unworked. (32 sts)
Rows 16–20: Ch 1, sc in each st across, turn. (32 sts)
Round 21: Ch 1, sc in next 32 sts, ch 16, join with sl st to first sc. (32 sc + 16 ch = 48 sts)
The ch-16 bridges the gap and forms the top edge of the opening. The opening is 4 in (10.2 cm) wide and 1.5 in (3.8 cm) tall.
Round 22: Ch 1, sc in each sc and in each ch around, join. (48 sts)
Checkpoint: the sides measure 3.5 in (8.9 cm) from the base edge.
Lace Body
Round 23 (first shell round): Ch 1, sc in first st, skip 2 sts, shell in next st, skip 2 sts, sc in next st, repeat 6 more times, skip 2 sts, shell in next st, skip 2 sts, join to first sc. (8 shells + 8 sc = 48 sts)
Round 24 (arc round): Ch 5 (counts as dc + ch 2), sc in center (3rd) dc of next shell, ch 2, dc in next sc, ch 2, sc in center dc of next shell, ch 2, repeat 6 more times, join to 3rd ch of beginning ch-5. (8 dc + 8 sc + 16 ch-2 sps = 48 sts)
Round 25 (shell round): Sl st in next 2 ch and in next sc, ch 1, sc in same sc, skip ch-2, shell in next dc, skip ch-2, sc in next sc, repeat 6 more times, skip ch-2, shell in 3rd ch of beginning ch-5 of the previous round, skip ch-2, join to first sc. (8 shells + 8 sc = 48 sts)
Each shell now sits above a sc from Round 23, which gives the offset fan pattern.
Rounds 26–37: Repeat Rounds 24 and 25 six more times, ending with a shell round. (48 sts each round)
That gives 8 shell rounds and 7 arc rounds. Checkpoint: total height 13 in (33.0 cm).
Leveling Round
Round 38: Ch 4 in the joining sc (counts as tr), dc in next dc, hdc in next dc, sc in center dc, hdc in next dc, dc in next dc, tr in next sc, repeat 6 more times, dc in next dc, hdc in next dc, sc in center dc, hdc in next dc, dc in last dc, join to top of ch-4. (8 repeats x 6 sts = 48 sts)
The taller stitches fill the dips between shells so the top edge is straight. Checkpoint: 13.5 in (34.3 cm).
Strap
With cream, ch 89.
Row 1: Sc in 2nd ch from hook and in each ch across, turn. (88 sts)
Rows 2–5: Ch 1, sc in each st across, turn. (88 sts)
Fasten off and leave a 12 in (30.5 cm) tail. The strap measures 22 in (55.9 cm) long and 1.25 in (3.2 cm) wide.
Oranges (Make 3)
With orange:
Round 1: MR, ch 1, 6 sc in ring, join. (6 sts)
Round 2: Ch 1, 2 sc in each st, join. (12 sts)
Round 3: Ch 1, sc in next st, 2 sc in next st, repeat around, join. (18 sts)
Round 4: Ch 1, sc in each st around, join. (18 sts)
Round 4 has no increases, so the circle cups into a shallow dome 1.4 in (3.6 cm) across. Fasten off and leave a 10 in (25.4 cm) tail.
Leaves (Make 6)
With olive green, ch 5.
Leaf round: Sc in 2nd ch from hook, hdc in next ch, dc in next ch, (sc, ch 2, sc) in last ch for the tip. Rotate and work along the other side of the chain: dc in next ch, hdc in next ch, sc in last ch, sl st to first sc. (8 sts + ch-2 tip)
The leaf is about 1 in (2.5 cm) long. Fasten off and leave a 6 in (15.2 cm) tail.
Assembly
- Flatten the body with the opening centered on the front. Place markers in Round 44 at the two side folds. They should be 24 sts apart.
- Lay each strap end inside the band at a marker, with 1.5 in (3.8 cm) of strap overlapping the band. Make sure the strap isn’t twisted.
- Whipstitch around all four sides of each overlap. Stitch through the band only, so no stitches show on the outside.
- Sew two leaves to the top of each orange in a V, with the tips angled outward.
- Pin the oranges to the front lace: one centered across the 2nd and 3rd shell rounds below the band, and two lower down, around the 5th–6th shell rounds below the band. Set the right orange half a shell round higher than the left.
- Whipstitch each orange around its edge, adding a little fiberfill before closing so it stays domed. Sew into the shell stitches, not across the arcs, so the lace isn’t pulled out of shape.
Top Band and Opening Edging (Border)
Border gauge: 16 sc = 4 in (10.2 cm); 4 rounds = 1 in (2.5 cm).
Top Band
Round 39: Ch 1, sc in each st around, join. (48 sts)
Rounds 40–44: Ch 1, sc in each st around, join. (48 sts)
When flat, that’s 24 sts across the front and 24 across the back. Fasten off.
Why the math works: The leveling round gives back exactly 48 sts, the same as the base. At 4 sc per inch, 48 sts = 12 in (30.5 cm) around, or 6 in (15.2 cm) flat. Six rounds at 4 rounds per inch = 1.5 in (3.8 cm), so 13.5 in + 1.5 in = 15 in (38.1 cm).
Opening Edging
Join cream at a bottom corner of the opening.
Edging round: Ch 1, sc in the 16 unworked front loops along the bottom edge, 6 sc down the first side (one per row end), sc in the underside of each of the 16 chains along the top edge, 6 sc down the second side, join. (16 + 6 + 16 + 6 = 44 sts)
One stitch per row end and one per stitch keeps the opening flat and firm. Fasten off.
Final Blocking
- Weave in all ends before blocking.
- Spritz the holder with water until damp, not soaking.
- Roll a towel and slide it into the tube so it’s held at 6 in (15.2 cm) wide flat.
- Lay it flat. Ease the lace to 15 in (38.1 cm) tall and gently open each fan.
- Pin the top band straight and shape the opening into a smooth oval.
- Do not wet the oranges. Pat them into domes if they’ve flattened.
- Let it dry completely, about 24 hours.
Final Quality-Control Checklist
- Base is 3.8 in (9.7 cm) across and the Round 9 fold is crisp
- Opening is 4 in (10.2 cm) wide and centered on the front
- Every lace round has 8 shells, all lined up in offset columns
- Top edge is level after Round 38
- Band is 1.5 in (3.8 cm) deep with 48 sts per round
- Strap isn’t twisted and the ends are hidden inside the band
- Oranges are firmly attached and the lace isn’t puckered behind them
- Total size is 6 in x 15 in (15.2 cm x 38.1 cm)
Troubleshooting
Base is ruffled: Your tension is too loose or you’ve added extra increases. Recount each round and use a smaller hook.
Base cups before Round 9: You’re crocheting too tightly. Go up a hook size for the base.
Shells are in the wrong place: You probably missed a dc or sc in the arc round. Check that every arc round has 8 dc and 8 sc.
Lace spirals around the tube: Join each round with a sl st and don’t turn. Check the sl st start of each shell round.
Top edge is wavy: Use tr, not dc, over each sc in Round 38.
Opening stretches out of shape: Work the edging tightly, or add a second round of sc.
Strap stretches: Use cotton rather than acrylic, or add a sixth row.
Care
Hand wash in cool water and lay flat to dry, shaping it back to 6 in x 15 in (15.2 cm x 38.1 cm). Don’t tumble dry, because the heat can shrink the cotton and flatten the oranges.
Final Notes
Everything depends on the 48-stitch count. The base reaches 48 sts at 3.8 in (9.7 cm) across. The sides and opening keep 48 sts for 3.5 in (8.9 cm). The lace holds 8 shells for 9.5 in (24.1 cm). Round 38 levels the top back to 48 sts at 13.5 in (34.3 cm), and the band brings the total to 15 in (38.1 cm). If you check your gauge at each of these points, the holder will come out the right size.
Happy crocheting!