
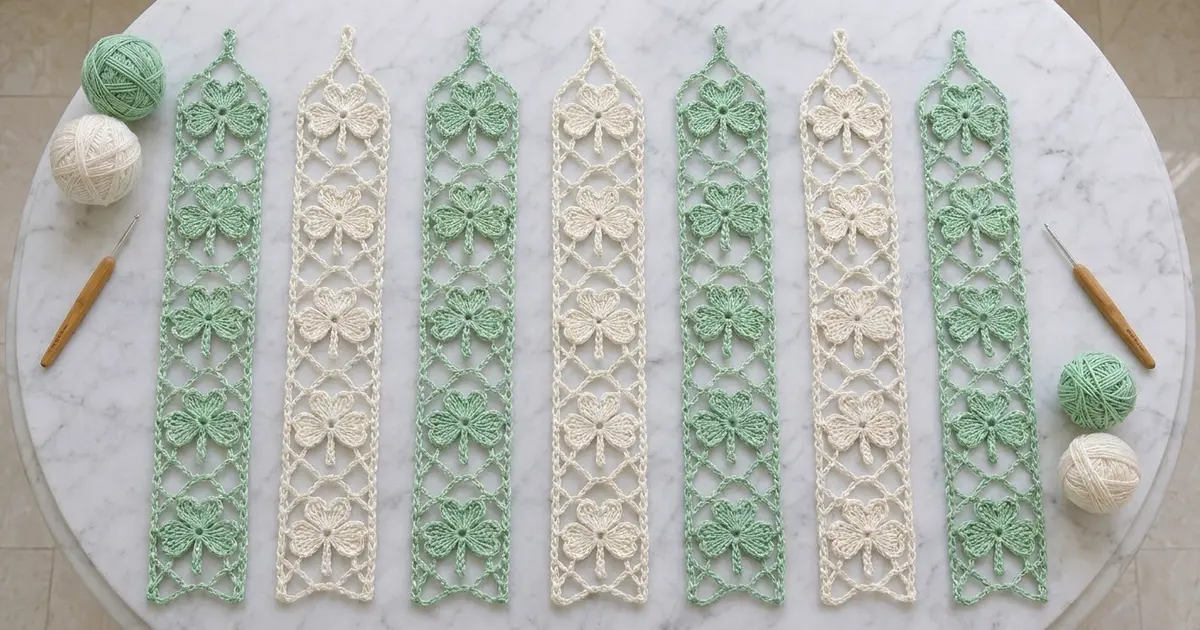
This door curtain is made of seven long lace strips that hang side by side from a rod. Each strip has a column of solid shamrocks set in a light chain lattice. Plain chain rails run down both sides, an X of diagonal chains sits between each pair of shamrocks, and a pointed top ends in a hanging loop.
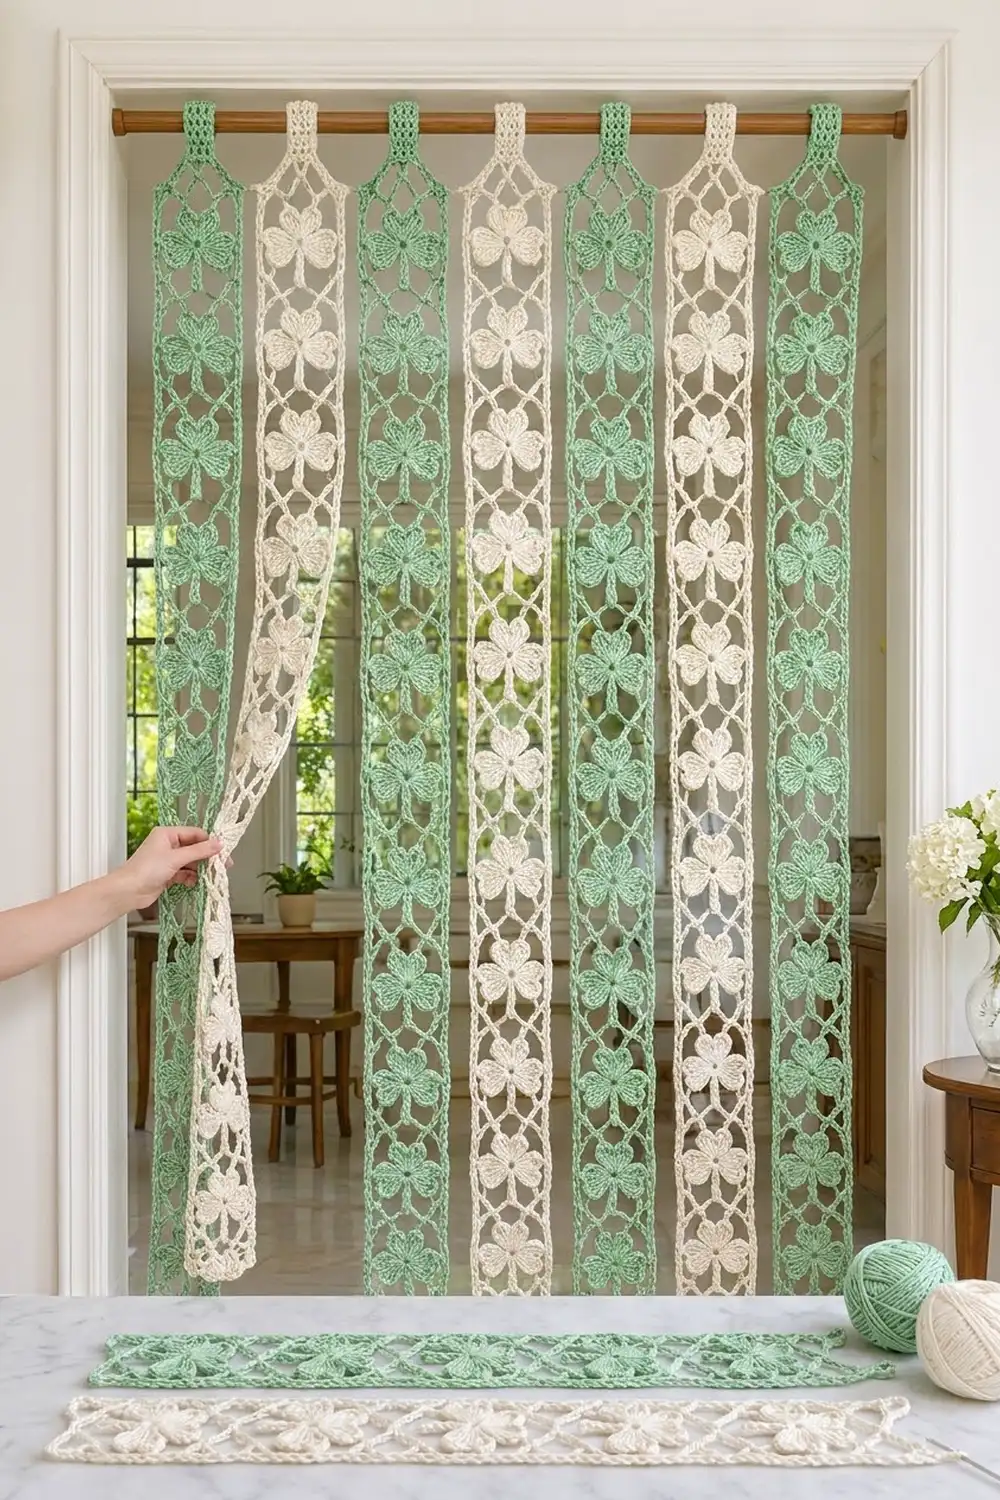
The colors alternate mint green and cream, starting and ending with green. The open lattice lets light through, and the strips part easily when someone walks through.
The pattern uses US crochet terms. Each finished strip measures 4.5 in (11.4 cm) wide and 76 in (193.0 cm) long, including the peak and loop. With seven strips spaced 0.75 in (1.9 cm) apart, the curtain covers 36 in (91.4 cm) of rod.
Every strip is made the same way:
- Make 12 separate shamrocks.
- Work one long chain round to build the frame, attaching each shamrock as you go.
- Work a slip-stitch round to add the X lattice.
- Work a single crochet border round, then a short peak with a hanging loop.
Finished Size and Construction
- Finished size (curtain): 36 in (91.4 cm) of rod width × 76 in (193.0 cm) drop
- Skill level: Intermediate
- Terminology: US crochet terms
- Yarn weight: DK (weight 3) cotton
- Hook: 4 mm (US G-6)
- Number of pieces: 7 strips (4 mint, 3 cream), each with 12 shamrocks
- Layout: the strips hang side by side from one rod and are not stitched to each other
- Strip size: 4.5 in (11.4 cm) × 72.5 in (184.2 cm) body, plus peak and loop
- Size before border: 4 in (10.2 cm) × 72 in (182.9 cm)
- Border depth: 0.25 in (0.6 cm) per edge
- Shamrock size: 3 in (7.6 cm) wide and 4 in (10.2 cm) from the top leaf to the stem tip
Materials
Use a smooth mercerized or combed DK cotton. Cotton hangs straight and doesn’t stretch much over a long drop. Avoid stretchy acrylics, because they can make 72 in (182.9 cm) of chain lattice grow once it hangs.
- Mint green: 250 g (about 550 m), for 4 strips
- Cream: 200 g (about 440 m), for 3 strips
These amounts assume yarn of about 110 m per 50 g. They include a margin of roughly 15% for gauge differences and swatching.
Tools:
– 4 mm (US G-6) crochet hook
– About 30 locking stitch markers
– Tapestry needle and scissors
– Tape measure
– Blocking mats and rust-proof pins
– Curtain rod up to 1.25 in (3.2 cm) in diameter
Abbreviations (US Terms)
- ch – chain
- sl st – slip stitch
- sc – single crochet
- hdc – half double crochet
- dc – double crochet
- tr – treble crochet
- sp – space
- st(s) – stitch(es)
- pm – place marker
- rep – repeat
Special stitch – Spur (n): Ch n, sl st in the given point of the shamrock, then sl st back along each of the n ch to return to the rail. Spur chains never count as rail chains. The rail count picks up where you left it.
Gauge and Checkpoints
Chain gauge: 5 ch = 1 in (2.5 cm). The whole frame is built on this number. Chain 50 evenly and measure without stretching. It should be 10 in (25.4 cm).
Test piece: Make one shamrock first, then check these measurements:
– After Rnd 1, the ring is 0.75 in (1.9 cm) across.
– After Rnd 3, it is 3 in (7.6 cm) across the side leaves.
– With the stem, it is 4 in (10.2 cm) from the top-leaf dip to the stem tip.
Frame checkpoints:
– Each 30-ch rail unit measures 6 in (15.2 cm).
– Before the border, the frame is 4 in (10.2 cm) × 72 in (182.9 cm).
– After the border, it is 4.5 in (11.4 cm) × 72.5 in (184.2 cm).
If your pieces are too big, go down to a 3.75 mm hook. If they are too small, go up to a 4.5 mm hook. Change the hook for both the shamrocks and the frame, because the lattice is sized to fit the shamrocks.
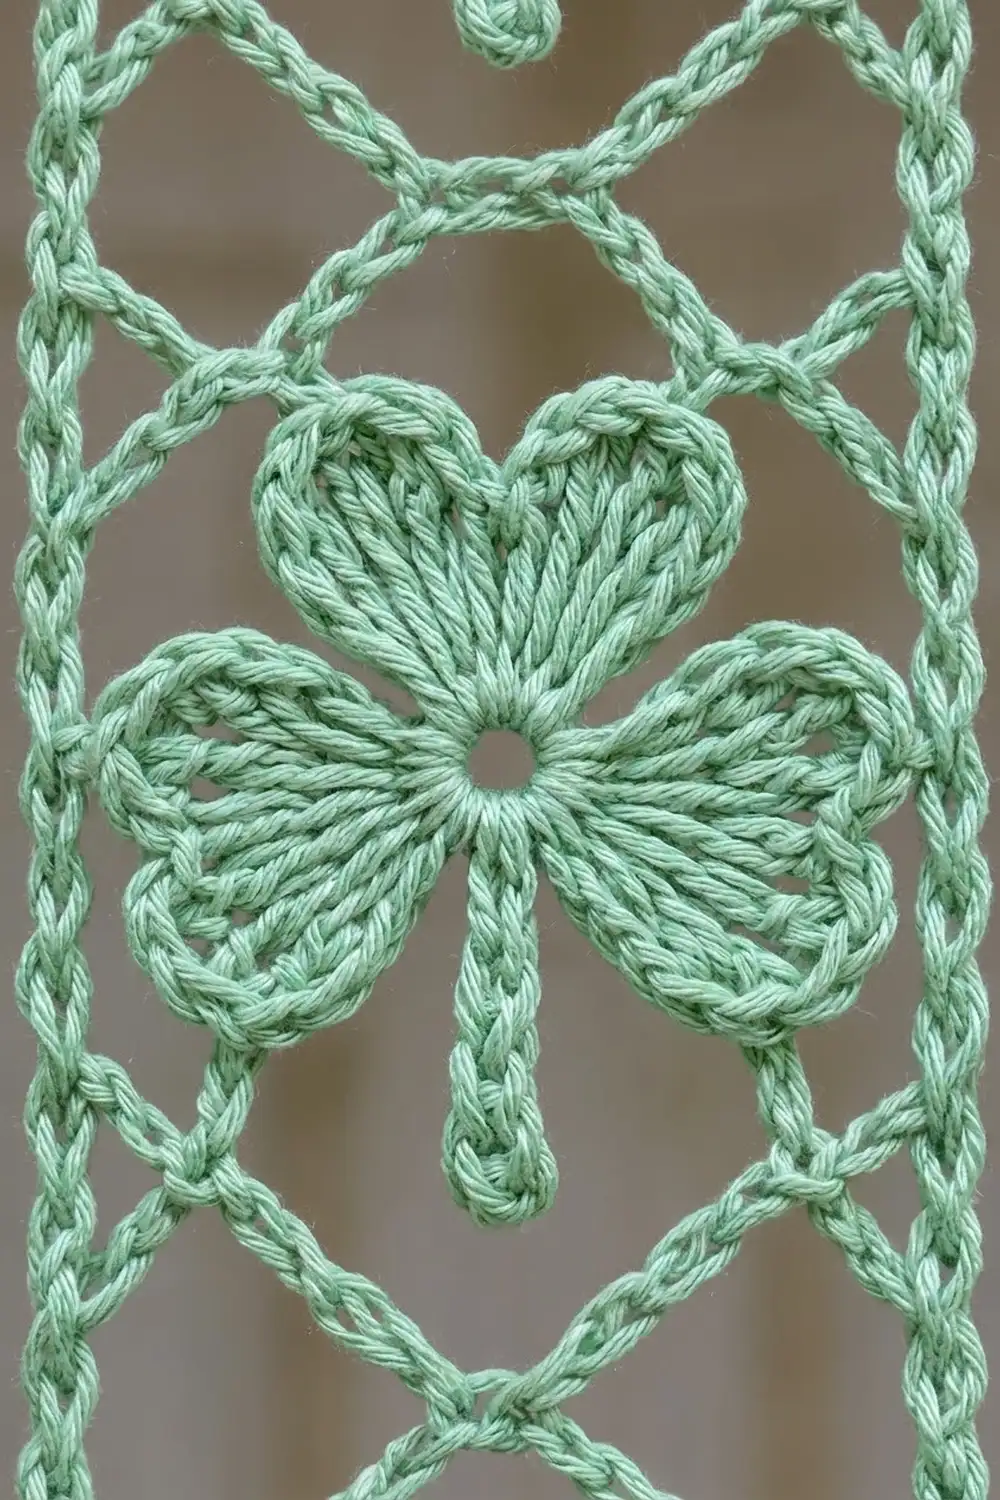
Shamrock Motif (make 12 per strip)
Use the strip color throughout.
Rnd 1: Make a magic ring. Ch 1 (does not count as a st here or in later rounds). Work 12 sc in the ring, pull it closed but leave a small center hole, then sl st in the first sc. (12 sc)
Rnd 2: Ch 1, sc in the same st, ch 4, skip 1 sc, sc in the next sc. Rep from * 4 more times. Ch 4, then sl st in the first sc. (6 sc, 6 ch-4 sps)
Label the six sc of Rnd 2 as A–F, starting with the joining sc (A).
Rnd 3 (leaves): Ch 1, then work this repeat 3 times in total:
– (hdc, 2 dc, 3 tr) in the next ch-4 sp
– sl st in the next sc (leaf dip)
– (3 tr, 2 dc, hdc) in the next ch-4 sp
– sc in the next sc (leaf base)
The last sc lands in A. (42 sts: 36 leaf sts, 3 sl-st dips, 3 sc bases; 14 sts per leaf)
Each pair of fans pulls into a heart, with the notch at the outer edge. The dips are at B, D and F. The bases are at C, E and A.
Stem: From A, ch 11. Sl st in the 2nd ch from the hook and in each of the next 9 ch, then sl st in A. (10 sl sts) The unworked end ch is the stem tip. Fasten off and weave in the ends.
Orientation: Leaf D is opposite the stem, so it is the top leaf. B and F are the side leaves. Place markers in the dips at B, D and F and in the stem tip.
Strip Frame
Round 1 – Rails and Crossbars
Lay the 12 shamrocks in a column, top leaves up, about 2 in (5.1 cm) apart. Work with the right side facing, and keep the chain from twisting.
Left rail (worked downward): Make a slip knot (this is the top-left corner). Ch 12, then Spur (2) to the left side-leaf dip of shamrock 1.
Then ch 8, pm in the last ch (P1). Ch 20, pm in the last ch (P2). Ch 2, then Spur (2) to the left side-leaf dip of the next shamrock. Rep from * 10 more times. You end at shamrock 12. Ch 18 to reach the bottom-left corner.
(Left rail: 12 + 11 × 30 + 18 = 360 ch)
Bottom crossbar: Ch 10, Spur (5) to the stem tip of shamrock 12, ch 10. (20 ch)
Right rail (worked upward): Ch 18, then Spur (2) to the right side-leaf dip of shamrock 12.
Then ch 2, pm (P2). Ch 20, pm (P1). Ch 8, then Spur (2) to the right side-leaf dip of the shamrock above. Rep from * 10 more times. You end at shamrock 1. Ch 12. (Right rail: 18 + 11 × 30 + 12 = 360 ch)
Top crossbar: Ch 10, Spur (5) to the top-leaf dip of shamrock 1, ch 10. Sl st in the first ch of the round. Fasten off.
(Frame: 360 + 20 + 360 + 20 = 760 ch)
Checkpoint: The frame should measure 4 in (10.2 cm) × 72 in (182.9 cm). Check the spacing:
– Each P1 is 8 ch, or 1.6 in (4.1 cm), below its side spur.
– Each P2 is 20 ch, or 4 in (10.2 cm), below P1.
– The 2 ch between a P2 and the next spur make up the rest of each 30-ch unit.
Round 2 – X Lattice
Join the yarn with a sl st in the first left P1, between shamrocks 1 and 2. Each X links the stem tip of the shamrock above to the top-leaf dip of the shamrock below.
First diagonal: Ch 11, sl st in the stem tip above. Ch 10 (center link), sl st in the top-leaf dip below. Ch 11, sl st in the right P2.
Travel up: Sl st in each of the next 20 rail ch, working upward, to reach the right P1.
Second diagonal: Ch 11, sl st in the same stem tip. Sl st in each of the 10 center-link ch, then sl st in the same top-leaf dip. Ch 11, sl st in the left P2.
Travel down: Sl st in each of the next 10 rail ch, working downward, to reach the next left P1.
Repeat for all 11 X zones, but skip the final travel. Fasten off at the last left P2.
(Per X: 54 ch and 36 sl sts, plus 10 travel sl sts between Xs)
The diagonals meet on one reinforced center link, which forms the X. The slip-stitch travel thickens the rails so they look braided.
Make All Pieces
Repeat the shamrocks, Round 1 and Round 2 for each strip:
– Mint green: 4 strips (48 shamrocks)
– Cream: 3 strips (36 shamrocks)
– Total: 7 strips, 84 shamrocks
Layout on the rod, left to right:
| G | C | G | C | G | C | G |
G = mint green   C = cream
Joining
The strips are not stitched together. Only the rod joins them, so they can part when someone walks through. Each strip gets its own border before hanging.
- Method: Thread each hanging loop onto the rod in the layout order.
- Spacing: Leave 0.75 in (1.9 cm) between strips.
- Tension: Let each strip hang under its own weight. Never pull a strip to match the others. Re-block it instead.
- Size checkpoint: 7 × 4.5 in + 6 × 0.75 in = 36 in (91.4 cm) of rod. The hems should line up within 0.5 in (1.3 cm).
Border
Border gauge: 5 sc = 1 in (2.5 cm), which matches the chain gauge.
Border Rnd: With the right side facing, join the yarn in the first ch at the top-left corner and ch 1. Work into the outer loop or back bump of the frame ch, skipping all spurs and Round 2 sl sts.
– Left rail: sc in each ch (360 sc), then ch 1 at the corner.
– Bottom crossbar: sc in each ch (20 sc), then ch 1 at the corner.
– Right rail: sc in each ch (360 sc), then ch 1 at the corner.
– Top crossbar: sc in each ch (20 sc), then ch 1 at the corner.
– Sl st in the first sc to join.
(760 sc and 4 corner ch-1 sps)
Peak Row 1: Sl st into the top-left ch-1 sp.
– Ch 13 for the left diagonal.
– Ch 20, then sl st in the 13th ch of the left diagonal to close the hanging loop.
– Ch 13 for the right diagonal, then sl st in the top-right ch-1 sp.
Peak Row 2: Turn. Ch 1, sc in each of the 13 ch, 30 sc in the loop, then sc in each of the 13 ch. Sl st in the top-left ch-1 sp. (56 sc) Fasten off.
Why the math works: Each rail has exactly 360 ch, and you work 1 sc in each. At 5 sc per inch, that is 72 in (182.9 cm), which matches the rail, so the edge neither ruffles nor pulls in. The corner ch-1 sps give room to turn without adding stitches to any side.
The peak stands about 1.75 in (4.4 cm) tall, and the loop hangs about 1.75 in (4.4 cm) over the rod. Total length: 72.5 + 1.75 + 1.75 = 76 in (193.0 cm).
Final Blocking
- Weave in all ends along the rails, never across the open lattice.
- Soak each strip in cool water for 10 minutes. Press out the water in a towel without wringing.
- Pin each strip flat to 4.5 in (11.4 cm) × 72.5 in (184.2 cm), working in sections if needed.
- Pin each shamrock so the leaves form clear hearts and the center hole is round.
- Pin each X so the diagonals are straight and the center link is vertical.
- Let the strip dry completely before unpinning. Repeat for all seven strips.
Final Quality-Control Checklist
- 12 shamrocks per strip, all with the top leaf up and the stem down
- Every side-leaf dip joined to the rail with a 2-ch spur
- 11 X zones per strip, each with a single reinforced center link
- Rails of 360 ch and a border of 760 sc
- No twisted chains
- Each strip 4.5 in (11.4 cm) × 76 in (193.0 cm) overall
- Colors alternating, with green at both ends
Troubleshooting
- Wavy rail: Your chains are tighter than your shamrocks. Work the frame chains with a 4.5 mm hook.
- Shamrock puckers between the rails: Use Spur (3) instead of Spur (2).
- Sagging X: Check that you worked all 10 center-link sl sts and anchored both ends of each diagonal.
- Leaves look like fans, not hearts: Pull the sl-st dip snug and keep the tr close together.
- Uneven strip lengths: Re-block the long strip, then recount its rails.
- Loop too tight for the rod: Rework the peak with a ch-25 loop and 38 sc.
Care
Hand wash in cool water with mild soap. Dry flat and re-pin if needed. Never machine dry, because cotton can shrink unevenly.
Final Notes
Here is the full measurement chain:
– 5 ch = 1 in (2.5 cm).
– Each 30-ch unit is 6 in (15.2 cm), and 12 units make a 360-ch rail of 72 in (182.9 cm).
– One sc per ch makes a bordered strip of 72.5 in (184.2 cm).
– The peak and loop bring the strip to 76 in (193.0 cm).
– Seven 4.5 in (11.4 cm) strips with 0.75 in (1.9 cm) gaps fill 36 in (91.4 cm) of rod.
If your test shamrock and your 50-ch swatch match the gauge, every piece will fit.
Happy crocheting!