

This little tree is one flat, lacy ornament worked in a single piece of deep forest green cotton. It has four fan-shaped tiers stacked from top to bottom. Each tier gets wider than the one above, so the outline reads as a classic evergreen.
Each tier has a row of small rounded openings at the top, a fan of tall treble “spokes” in the middle, and a firm single crochet band curving along the bottom. That mix of open lace and solid edging gives the ornament its look. It is airy but still holds a clean shape when it hangs.
The pattern uses US crochet terms. The finished ornament measures 4 in (10.2 cm) wide at the bottom and 4 in (10.2 cm) tall, not counting the hanging loop. The loop adds about 1 in (2.5 cm), so the ornament is 5 in (12.7 cm) tall overall.
You start with a chain hanging loop and work the top fan straight from its base. After that you turn rows downward, one tier at a time. Each new tier is worked into the bottom band of the tier above it. A slip-stitch border round tidies the outline at the end. There is no sewing and no joining.
Finished Size and Construction
- Finished size: 4 in (10.2 cm) wide x 4 in (10.2 cm) tall, plus a 1 in (2.5 cm) loop
- Skill level: Easy-intermediate
- Terminology: US crochet terms
- Yarn weight: Fingering / #1 cotton (or size 3 crochet thread)
- Hook: 2.5 mm
- Number of pieces: 1
- Layout: One single piece with 4 stacked tiers worked top-down in turned rows
- Piece size: 4 in (10.2 cm) x 4 in (10.2 cm)
- Size before border: 3.8 in (9.7 cm) wide x 3.9 in (9.9 cm) tall
- Border depth: 0.1 in (0.3 cm) on each edge
Materials
Yarn: Use a smooth, tightly plied mercerized cotton in fingering weight. Mercerized cotton gives crisp stitch definition and keeps the spokes and openings clear after blocking. Avoid fuzzy or very soft yarns, because they blur the lace and make the tiers droop.
- Forest green: 8 g, about 28 m (31 yd)
That is enough for one ornament. The quantity includes a margin for your gauge test, the hanging loop, and weaving in ends.
Tools:
- 2.5 mm crochet hook
- Tapestry needle
- Scissors
- Stitch marker (optional, for the center stitch)
- Rust-proof pins and a foam blocking board
- Spray bottle with water
- Optional: diluted fabric stiffener or spray starch
Abbreviations (US Terms)
- ch – chain
- sl st – slip stitch
- sc – single crochet
- dc – double crochet
- tr – treble crochet (yarn over twice, insert hook, pull up a loop, [yarn over, pull through 2 loops] 3 times)
- sk – skip
- sp – space
- st(s) – stitch(es)
Special note: At the start of a row, ch 4 counts as the first tr. In Row 1 only, ch 4 counts as dc + ch 1.
Gauge and Checkpoints
Gauge: 9 sc = 1 in (2.5 cm) along a band row. Exact gauge matters less here than for a garment, but it does control the final size and how flat the tiers lie.
Test this before you make the whole ornament: work Rows 1–2 (the top tier) and measure them. Measure each checkpoint below with the piece flat and gently patted into shape. Width is straight across the tier at its widest point. Height is measured from the base of the hanging loop down to the center of the lowest band.
- After Row 2 (Tier 1): 1.5 in (3.8 cm) wide, 1 in (2.5 cm) tall
- After Row 5 (Tier 2): 2.25 in (5.7 cm) wide, 2 in (5.1 cm) tall
- After Row 8 (Tier 3): 3 in (7.6 cm) wide, 3 in (7.6 cm) tall
- After Row 11 (Tier 4): 3.8 in (9.7 cm) wide, 3.9 in (9.9 cm) tall
- After border: 4 in (10.2 cm) wide, 4 in (10.2 cm) tall
If Tier 1 is too big (wider than 1.75 in / 4.4 cm), go down to a 2.25 mm hook or switch to finer thread. If it is too small (narrower than 1.25 in / 3.2 cm), go up to a 2.75 mm hook.
If a tier ruffles, your band rows are too loose. If a tier cups, your tr rows are too tight. Fix these early, because every later tier builds on the one above it.
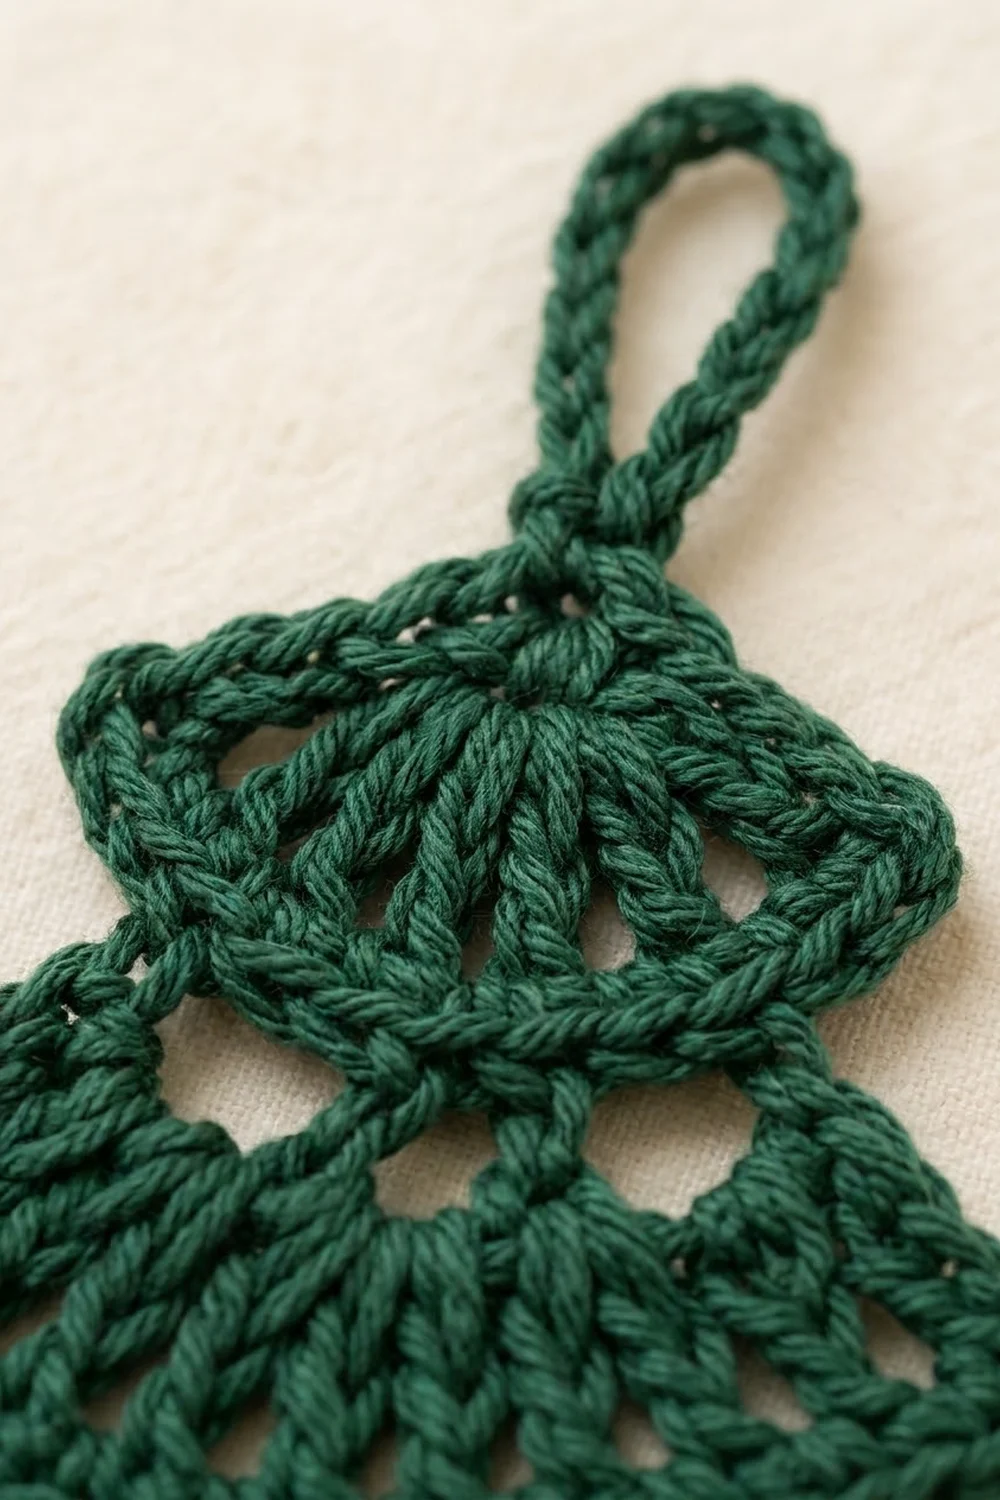
Pattern
Hanging Loop
Ch 20, sl st in the first ch to form a loop. Do not turn. The first ch (the one now holding the sl st) is the base, and Row 1 is worked into it.
Keep the loop chains even and fairly snug. A loose loop stretches over time and lets the ornament tip forward on the branch.
Tier 1 (Top Fan)
Row 1: Ch 4 (counts as dc + ch 1), [dc, ch 1] 5 times in the base, dc in the base. (7 dc, 6 ch-1 sps)
All seven dc come out of one point, so they fan out like a small half-circle under the loop. If the base ch feels crowded, push the earlier stitches to the left on the hook shaft before you insert the hook again.
Row 2 (band): Ch 1, turn. Sc in the first dc, 2 sc in next ch-1 sp, sc in next dc; repeat from * 6 times total. Work the last sc in the 3rd ch of the beginning ch-4. (19 sc)
Check: 1 + (6 x 3) = 19.
Checkpoint: 1.5 in (3.8 cm) wide, 1 in (2.5 cm) tall.
Tier 2
Row 3 (openings): Ch 1, turn. Sc in the first sc, ch 3, sk 2 sc, sc in next sc; repeat from * 6 times total. (7 sc, 6 ch-3 sps)
Check: 1 + (6 x 3) = 19 band stitches used.
Row 4 (spokes): Ch 4 (counts as tr), turn. 3 tr in next ch-3 sp, tr in next sc; repeat from * 6 times total. (25 tr)
Check: 1 + (6 x 4) = 25. Each group of tr fans out from its chain space. That fanning stretches the ch-3 spaces above into the small rounded openings across the top of the tier.
Row 5 (band): Ch 1, turn. 2 sc in the first tr, sc in each of the next 11 tr, 2 sc in the next tr (the 13th, center tr), sc in each of the next 11 tr, 2 sc in the last tr (top of the ch-4). (28 sc)
This is a conversion row: 25 sc (1 per tr) + 3 extra = 28. Each extra sc is added at one end or in the center, which keeps the tier symmetrical and lets it curve.
Checkpoint: 2.25 in (5.7 cm) wide, 2 in (5.1 cm) tall.
Tier 3
Row 6 (openings): Ch 1, turn. Sc in the first sc, ch 3, sk 2 sc, sc in next sc; repeat from * 9 times total. (10 sc, 9 ch-3 sps)
Check: 1 + (9 x 3) = 28.
Row 7 (spokes): Ch 4 (counts as tr), turn. 3 tr in next ch-3 sp, tr in next sc; repeat from * 9 times total. (37 tr)
Check: 1 + (9 x 4) = 37.
Row 8 (band): Ch 1, turn. 2 sc in the first tr, sc in each of the next 17 tr, 2 sc in the next tr (the 19th, center tr), sc in each of the next 17 tr, 2 sc in the last tr. (40 sc)
Conversion: 37 + 3 = 40.
Checkpoint: 3 in (7.6 cm) wide, 3 in (7.6 cm) tall.
Tier 4 (Bottom)
Row 9 (openings): Ch 1, turn. Sc in the first sc, ch 3, sk 2 sc, sc in next sc; repeat from * 13 times total. (14 sc, 13 ch-3 sps)
Check: 1 + (13 x 3) = 40.
Row 10 (spokes): Ch 4 (counts as tr), turn. 3 tr in next ch-3 sp, tr in next sc; repeat from * 13 times total. (53 tr)
Check: 1 + (13 x 4) = 53.
Row 11 (band): Ch 1, turn. 2 sc in the first tr, sc in each of the next 25 tr, 2 sc in the next tr (the 27th, center tr), sc in each of the next 25 tr, 2 sc in the last tr. (56 sc)
Conversion: 53 + 3 = 56.
Checkpoint: 3.8 in (9.7 cm) wide, 3.9 in (9.9 cm) tall. Do not fasten off.
Border
The border is one round of sl st around the whole outline. It firms up the row-end edges so the side “steps” of each tier look as neat as the curved bands.
Border gauge: Work sl sts to match the height of each row end:
- 1 sl st per sc row end
- 2 sl sts per dc row end
- 3 sl sts per tr row end
- 1 sl st per sc along the bottom band
Border Round: Do not turn. Ch 1, then work along the side edge toward the loop.
- First side: Tier 4 = Row 11 (1) + Row 10 (3) + Row 9 (1) = 5 sl st. Tier 3 = 5 sl st. Tier 2 = 5 sl st. Tier 1 = Row 2 (1) + Row 1 (2) = 3 sl st. (18 sl st)
- Top: 1 sl st in the base of the hanging loop. (1 sl st)
- Second side: Work the same sequence in reverse: 3 + 5 + 5 + 5. (18 sl st)
- Bottom: 1 sl st in each sc of Row 11. (56 sl st)
Join with a sl st to the first sl st. (93 sl st total: 18 + 1 + 18 + 56)
Why the math works: Each side has 1 tier with 2 rows (dc + sc) and 3 tiers with 3 rows each (sc + tr + sc), so both sides come out to exactly 18. Matching sl sts to row height means the edge neither stretches nor gathers. Along the bottom, 1 sl st per sc keeps the band at 56 stitches, so the arc keeps its curve and does not flare. The border adds about 0.1 in (0.3 cm) on each side and along the bottom. That takes the piece from 3.8 in (9.7 cm) to 4 in (10.2 cm) wide and from 3.9 in (9.9 cm) to 4 in (10.2 cm) tall.
Fasten off and weave in both ends. Hide the ends inside the band rows, not in the lace spokes.
Final Blocking
- Wet the ornament fully with cool water. Squeeze it gently in a towel until it is just damp.
- Lay it flat on a blocking board, right side up, with the loop at the top.
- Pin the center of the loop base and the center of the bottom band so the tree is 4 in (10.2 cm) tall.
- Pin the two bottom corners so the width is 4 in (10.2 cm).
- Pin the tip of each tier on both sides so the tiers line up evenly left and right.
- Push a pin through each opening along the top of every tier to round it out.
- Shape the bottom band of each tier into a smooth, even curve.
- If you want a stiffer ornament, mist it with diluted stiffener or spray starch.
- Let it dry completely, which usually takes 6–12 hours, before you unpin it.
Final Quality-Control Checklist
- Band rows have 19, 28, 40, and 56 sc
- Spoke rows have 25, 37, and 53 tr
- All openings are open and evenly sized across each tier
- Both sides of the tree mirror each other
- The border has 18 sl st on each side and 56 along the bottom
- The finished size is 4 in (10.2 cm) x 4 in (10.2 cm), and the loop is about 1 in (2.5 cm)
- The ornament hangs straight from the loop without twisting
- All ends are woven securely into the solid bands
Troubleshooting
Tiers ruffle at the bottom edge: Your band rows are too loose. Go down half a hook size for the sc rows only.
Tiers cup or curl upward: Your tr are too tight. Pull up each tr loop a little taller.
Openings close up: You probably worked into the sc you should have skipped. In Rows 3, 6, and 9, skip 2 sc under each ch-3. Recount and check that the rows have exactly 6, 9, and 13 chain spaces.
Ornament is lopsided: The center increase is in the wrong place. Mark the center tr (13th, 19th, or 27th) before you work each band row.
Hanging loop twists: Steam the loop flat, then pin it during blocking.
Edges look ragged: Check the border sl st count per row end, and keep the sl sts as loose as the bands.
Care
Hand wash in cool water with mild soap, then reshape and dry flat. Store flat or hanging, away from crushing, so the tiers keep their curves.
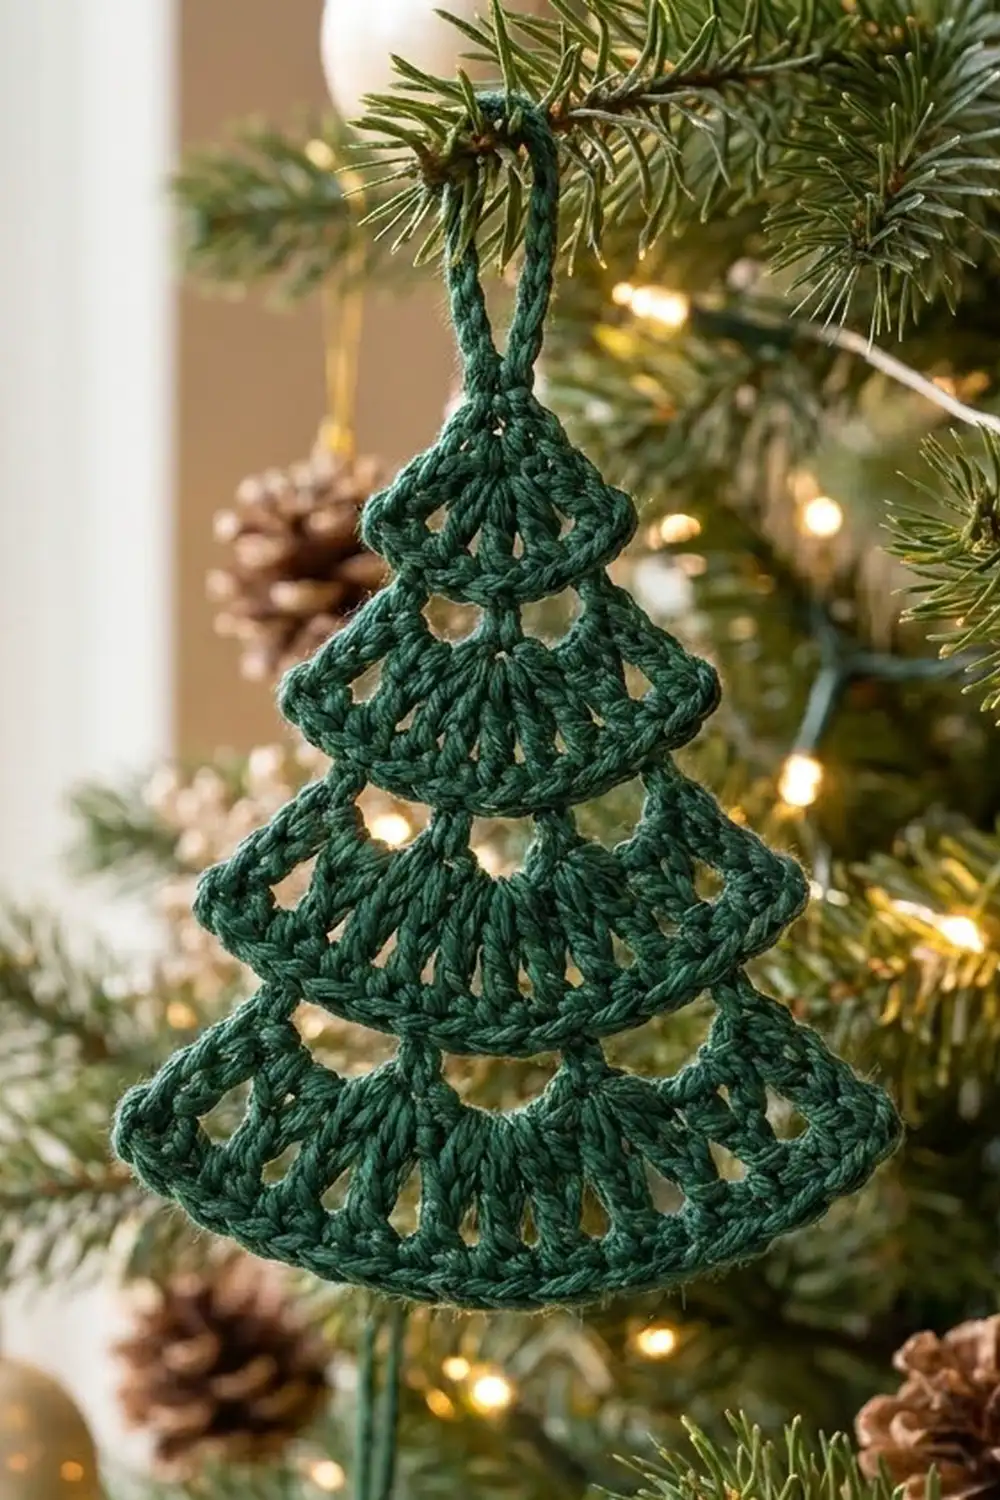
Final Notes
The measurement chain is simple. Tier 1 should be 1.5 in (3.8 cm) wide. Each tier after it grows wider: 2.25 in (5.7 cm), then 3 in (7.6 cm), then 3.8 in (9.7 cm). The slip-stitch border brings the tree to 4 in (10.2 cm) wide by 4 in (10.2 cm) tall, and the loop adds 1 in (2.5 cm). If you check each checkpoint as you go, the finished ornament will match the stated size.
Once you have made the first one, the rest go quickly. Hang them on the tree or tie them onto gifts.
Happy crocheting!