

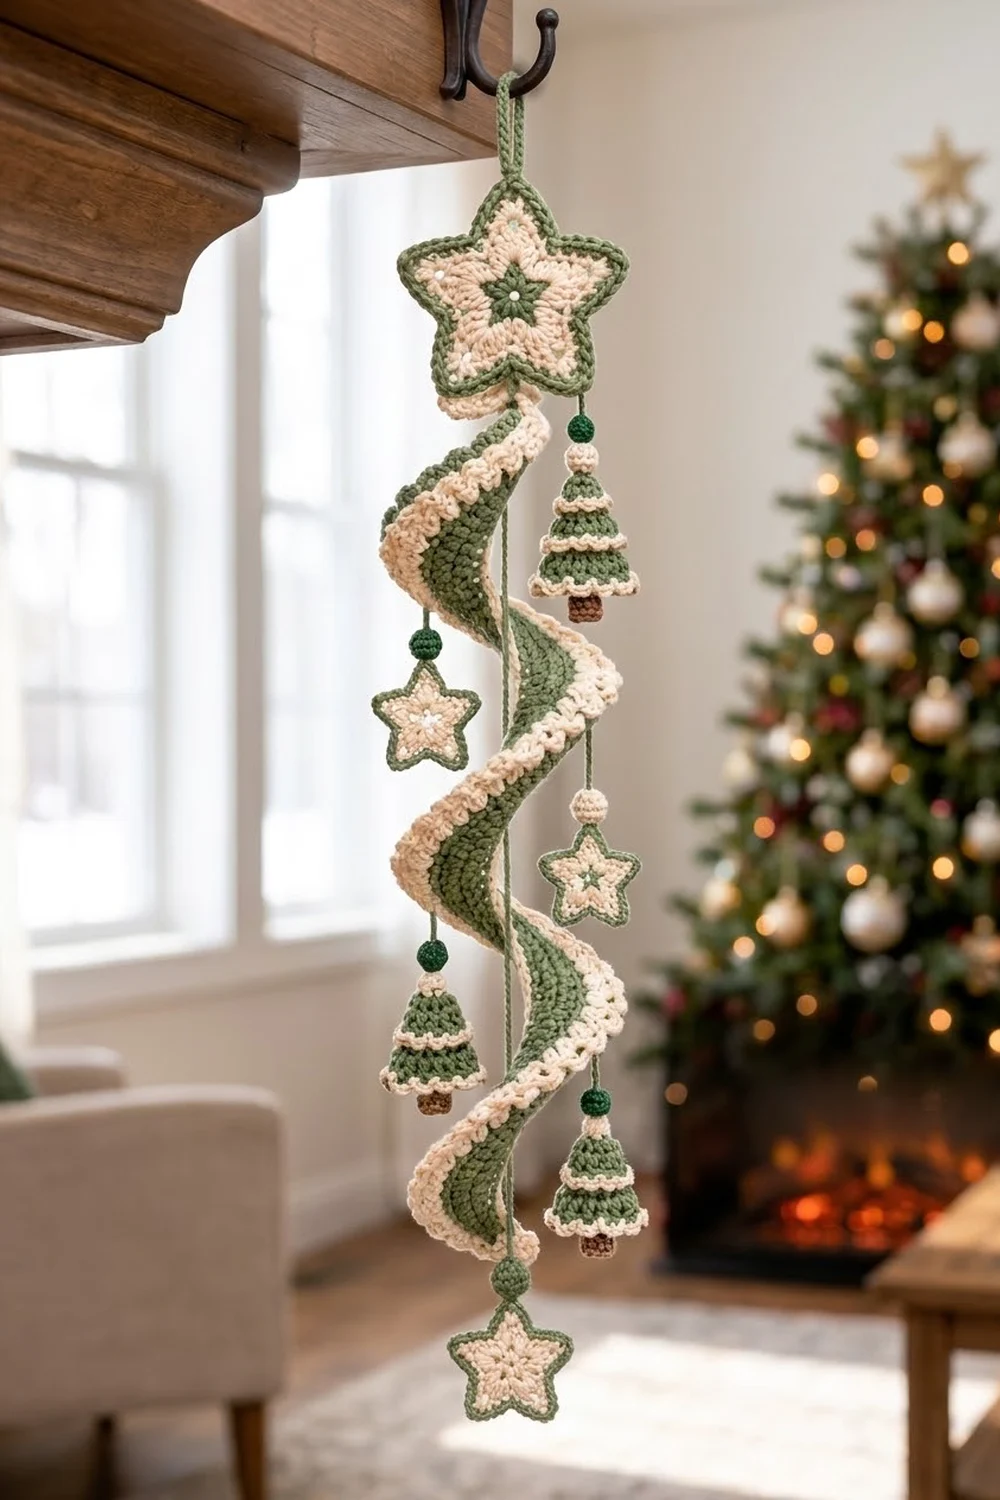
The Evergreen Twirl is a vertical holiday hanging in sage green and cream. A large star sits at the top. Below it, a band with scalloped edges twists down in three turns, and small trees and stars hang beside it on fine green cords. A smaller star finishes the bottom.
The colors are soft and calm: sage green, warm cream and a little brown for the tree trunks. It works on a front door, a window frame or a mantel corner. Every piece is flat and stiffened, so the hanging keeps its shape.
This pattern uses US crochet terms. The finished hanging is about 24 in (61.0 cm) long and 5 in (12.7 cm) wide, including the drops.
You will crochet one long band, add a scalloped border, and stiffen it around a tube to set the spiral. Then you make three sizes of star, four trees and eight small balls, and attach everything with chain cords.
Finished Size and Construction
- Finished size: about 24 in (61.0 cm) long, 5 in (12.7 cm) wide
- Skill level: Intermediate
- Terminology: US
- Yarn weight: Worsted (#4), cotton or cotton blend
- Hook: 4.0 mm (G-6)
- Number of pieces: 1 band, 1 large star, 1 medium star, 3 small stars, 4 trees (3 tiers and 1 trunk each), 8 balls
- Layout: top star, spiral band, bottom star; 7 drops along one edge of the band
- Band before border: 22.4 in (56.9 cm) × 1.2 in (3.0 cm)
- Border depth: 0.7 in (1.8 cm) per long edge
- Band after border: 23.2 in (58.9 cm) × 2.6 in (6.6 cm)
- Spiral: 3 turns, 13.5 in (34.3 cm) tall
Materials
Use a smooth worsted-weight cotton or cotton blend. Cotton holds a stiffened shape better than acrylic, and it shows the scallops clearly. These amounts assume a yarn of about 183 m per 100 g.
- Sage green: 30 g, 55 m
- Cream: 25 g, 45 m
- Brown: 3 g, 5 m
All quantities include about 20 percent extra for swatching and cords.
Tools:
– 4.0 mm (G-6) crochet hook
– Tapestry needle and stitch markers
– Small amount of fiberfill
– Fabric stiffener, or white glue mixed 1:1 with water
– A tube 2 in (5.1 cm) across and at least 16 in (40.6 cm) long, wrapped in plastic film
– Blocking mat, rust-proof pins, masking tape and a ruler
Abbreviations (US Terms)
- ch – chain
- sl st – slip stitch
- sc – single crochet
- hdc – half double crochet
- dc – double crochet
- tr – treble crochet
- sc2tog / sc3tog – single crochet 2 / 3 together
- MR – magic ring
- st(s) – stitch(es); sp – space; Rnd – round
Special stitches:
– Scallop: sk 1 st, 5 dc in next st, sk 1 st, sc in next st. Uses 4 sts.
– Mini shell: 3 dc in next st, sc in next st. Uses 2 sts.
Gauge and Checkpoints
Gauge: 18 sc and 20 rows = 4 in (10.2 cm). That is 4.5 sts and 5 rows per inch. Crochet firmly, because dense fabric stiffens best.
Test one piece first: make one bottom tree tier. Row 1 should measure 2.0 in (5.1 cm) across, and the tier should be 1.0 in (2.5 cm) tall after Row 5.
Checkpoints:
– Band Row 1: 101 sts = 22.4 in (56.9 cm)
– Band after Row 6: 1.2 in (3.0 cm) wide
– After border Rnd 1: 1.6 in (4.1 cm) wide
– After border Rnd 2: 2.6 in (6.6 cm) × 23.2 in (58.9 cm)
– Large star: 3.75 in (9.5 cm) tip to tip; medium: 2.75 in (7.0 cm); small: 2 in (5.1 cm)
– Ball: 0.75 in (1.9 cm) across
If your pieces come out too big, go down one hook size. If they are too small, go up one size. A difference of 0.2 in (0.5 cm) on the band is fine. A bigger difference will change the spiral.
The Spiral Band
Work in sage green rows along the length of the band.
Foundation: With green, ch 102.
Row 1: Sc in 2nd ch from hook and in each ch across. (101 sc) Checkpoint: 22.4 in (56.9 cm).
Rows 2–6: Ch 1, turn, sc in each st across. (101 sc per row)
Fasten off. The band should measure 22.4 in (56.9 cm) × 1.2 in (3.0 cm).
Large Star (Top)
Rnd 1 (green): MR, ch 1, 5 sc in ring, sl st to first sc. (5) Fasten off.
Rnd 2 (cream): Join cream in any st, ch 1, 2 sc in each st, sl st to join. (10)
Rnd 3: Ch 1, sc in next st, 2 sc in next st 5 times, join. (15)
Rnd 4: Ch 1, sc in next 2 sts, 2 sc in next st 5 times, join. (20) The circle should measure 1.4 in (3.6 cm).
Rnd 5 (points): Ch 6, sl st in 2nd ch from hook, sc in next ch, hdc in next ch, dc in next ch, tr in next ch, sk 3 sts, sl st in next st 5 times. (5 points, 4 sts used per point, 20 total) Fasten off.
Rnd 6 (green outline): Join green in any valley sl st. 4 sc evenly up the point, (sc, ch 2, sc) in tip, 4 sc evenly down, sl st in valley 5 times. (50 sc, 5 ch-2 tips)
Hanging loop: In one ch-2 tip: sl st, ch 16, sl st in same sp. Fasten off.
Medium Star (Bottom)
Work Rnds 1–3 as for the large star. (15)
Rnd 4 (points): Ch 5, sl st in 2nd ch from hook, sc in next ch, hdc in next ch, dc in next ch, sk 2 sts, sl st in next st 5 times. (3 sts used per point, 15 total)
Rnd 5 (green): 3 sc up, (sc, ch 2, sc) in tip, 3 sc down, sl st in valley 5 times. (40 sc)
Small Star (Make 3)
Work Rnds 1–2 as for the large star. (10)
Rnd 3 (points): Ch 4, sl st in 2nd ch from hook, sc in next ch, hdc in next ch, sk 1 st, sl st in next st 5 times. (2 sts used per point, 10 total)
Rnd 4 (green): 2 sc up, (sc, ch 1, sc) in tip, 2 sc down, sl st in valley 5 times. (30 sc)
Tree (Make 4)
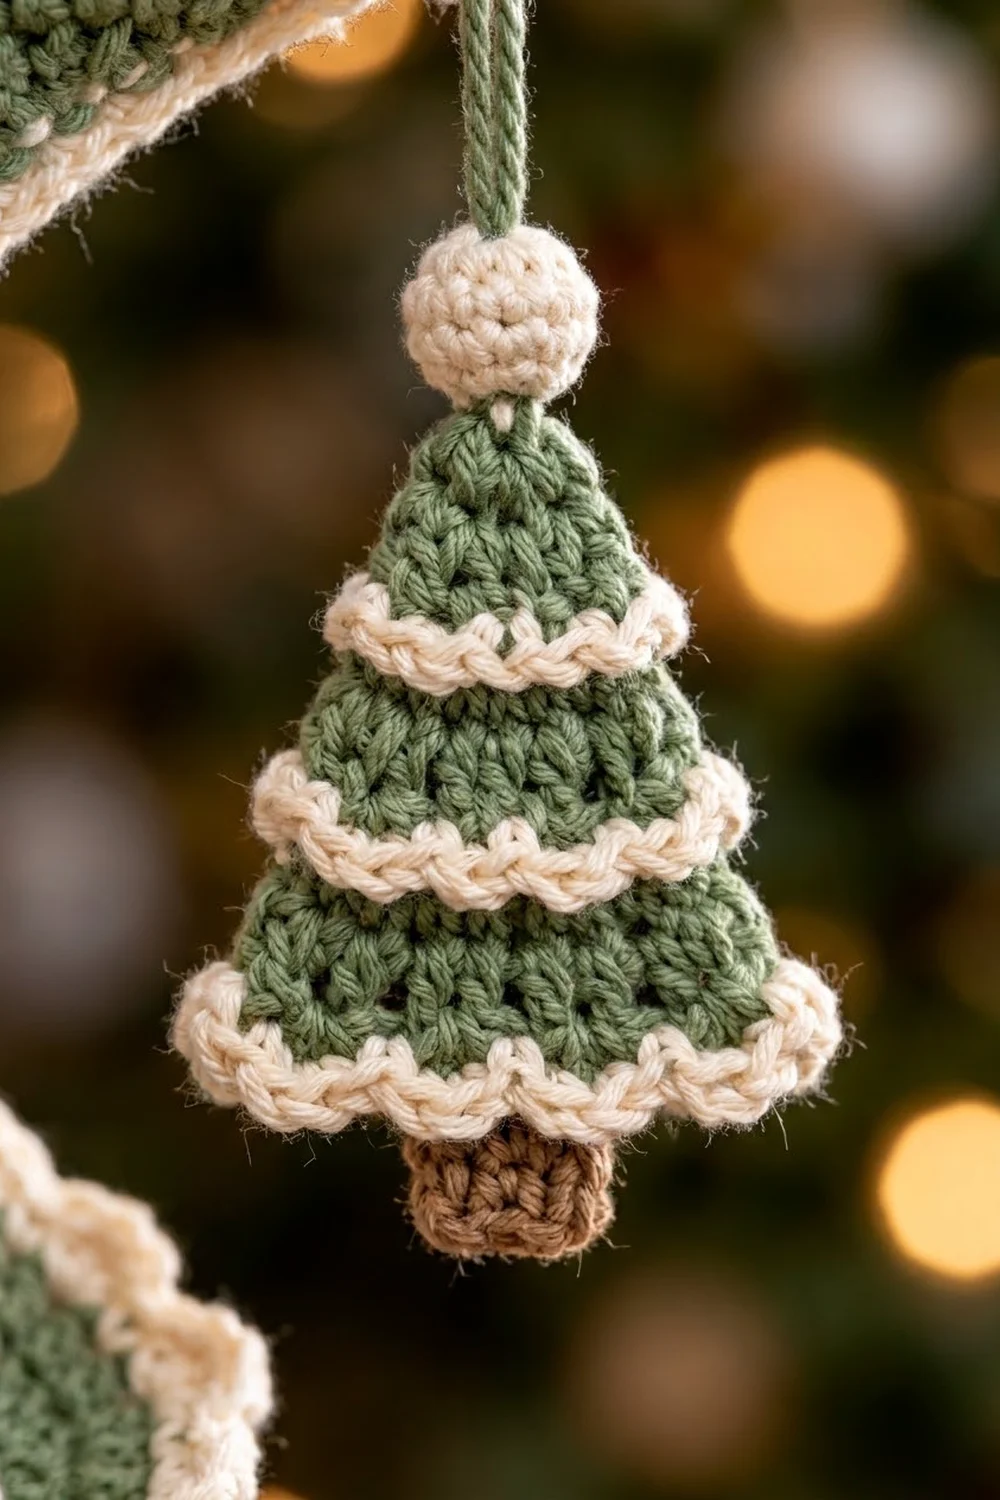
Each tree has three green tiers with cream mini-shell trim along the bottom edge. The tiers are stacked so each trim overlaps the tier below it.
Bottom tier: With green, ch 10.
– Row 1: Sc in 2nd ch from hook and across. (9)
– Row 2: Ch 1, turn, sc2tog, sc in next 5, sc2tog. (7)
– Row 3: Ch 1, turn, sc2tog, sc in next 3, sc2tog. (5)
– Row 4: Ch 1, turn, sc2tog, sc in next st, sc2tog. (3)
– Row 5: Ch 1, turn, sc3tog. (1) Fasten off.
– Trim: Join cream in the first free loop of the foundation ch. Sc in the same st, then work Mini shell 4 times. (9 sts used: 5 sc, 12 dc)
Middle tier: With green, ch 8. Work rows of 7, 5, 3 and 1 sts, decreasing as above. Trim: sc in first st, Mini shell 3 times. (7 sts used)
Top tier: With green, ch 6. Work rows of 5, 3 and 1 sts. Trim: sc in first st, Mini shell 2 times. (5 sts used)
Trunk: With brown, ch 4. Row 1: sc in 2nd ch from hook and across. (3) Rows 2–3: ch 1, turn, 3 sc. Fasten off.
Assembly: Sew the middle tier over the bottom tier so its trim sits 0.7 in (1.8 cm) above the bottom tier’s base. Attach the top tier to the middle tier the same way. Sew the trunk behind the bottom tier so 0.4 in (1.0 cm) shows. The finished tree is about 2 in (5.1 cm) wide and 2.75 in (7.0 cm) tall.
Ball (Make 8: 4 Cream, 4 Green)
Rnd 1: MR, 6 sc in ring. (6)
Rnd 2: 2 sc in each st. (12)
Rnd 3: Sc in each st. (12)
Rnd 4: Stuff firmly, then sc2tog 6 times. (6) Fasten off, close the hole and leave a 6 in (15.2 cm) tail.
Make All Pieces
| Piece | Qty | Colors |
|---|---|---|
| Band | 1 | Green rows, cream border |
| Large star | 1 | Green dot, cream body, green outline |
| Medium star | 1 | Same as large star |
| Small stars | 3 | Same as large star |
| Trees | 4 | Green tiers, cream trim, brown trunk |
| Balls | 8 | 4 cream (trees), 4 green (stars) |
Layout (top to bottom). The numbers are the sc between scallops (“valleys”) along one long edge, counted from the top:
           [ hanging loop ]
           [ LARGE STAR ]
           [ band top end ]
 valley 4  -> cream ball + TREE  (ch 10)
 valley 7  -> green ball + STAR  (ch 8)
 valley 10 -> cream ball + TREE  (ch 10)
 valley 13 -> green ball + STAR  (ch 8)
 valley 16 -> cream ball + TREE  (ch 10)
 valley 19 -> green ball + STAR  (ch 8)
 valley 22 -> cream ball + TREE  (ch 10)
           [ band bottom end ]
           [ ch 8 + green ball ]
           [ MEDIUM STAR ]
Joining
Join the pieces only after the band is bordered and stiffened (see Final Blocking).
Balls: Sew a cream ball to the top tip of each tree and a green ball to one tip of each small star. Pass twice through the tip so the drop hangs straight.
Cords: Join green at the top of each ball. Ch 10 for trees, about 2 in (5.1 cm), or ch 8 for stars, about 1.5 in (3.8 cm). Fasten off and leave an 8 in (20.3 cm) tail.
To the band: Each long edge has 26 valley sc. Sew each cord tail through the valley shown in the layout. The valleys are 3 scallops (12 sts) apart, which is about 2.7 in (6.9 cm). Sew through the sc only, so the dc scallops stay round. Keep each cord straight but not stretched, and weave the tail into the cream edge.
Top and bottom: Overlap the band’s top short end 0.5 in (1.3 cm) behind the large star, centered between its two lower points, and whipstitch it in place. At the bottom end, join green at the center of the short edge and ch 8. Sew the last green ball below the chain, then sew the medium star’s tip to the ball.
Size checkpoint: Hung from its loop, the piece should measure about 24 in (61.0 cm) from the top of the loop to the tip of the bottom star.
Border (Spiral Band)
Work the border in cream, all the way around the band.
Border gauge: 4.5 sc per inch, the same as the band. A 5-dc scallop is about 0.5 in (1.3 cm) tall.
Rnd 1: With the right side facing, join cream in the first st of Row 6.
– Long side 1: sc in each st. (101 sc)
– Corner: ch 2.
– Short end: 1 sc in each row end. (6 sc)
– Corner: ch 2.
– Long side 2: sc in each free loop of the foundation ch. (101 sc)
– Corner: ch 2. Short end: 6 sc. Corner: ch 2, sl st to first sc.
Total: 214 sc and 4 ch-2 corners. Width: 1.6 in (4.1 cm).
Rnd 2:
– Long side 1: sc in first sc, Scallop 25 times. (26 sc, 125 dc, 101 sts used)
– Corner: 3 sc in ch-2 sp. Short end: sc in each of 6 sc. Corner: 3 sc in ch-2 sp.
– Long side 2: work as long side 1. (25 scallops)
– Work the last corner, short end and corner as before. Sl st to first sc.
Total: 50 scallops, 76 sc, 250 dc. Fasten off.
Why the math works: Each scallop uses 4 sts and ends with a sc. One starting sc plus 25 scallops uses 1 + (4 × 25) = 101 sts, which is exactly the count on each long side. The short ends only get sc, which adds 0.4 in (1.0 cm) to each end: 22.4 + 0.8 = 23.2 in (58.9 cm). Each long edge gains 0.7 in (1.8 cm): 1.2 + 1.4 = 2.6 in (6.6 cm).
Final Blocking
- Wet-block the stars and trees. Pin the star points straight and the trims flat.
- Wrap the tube in plastic film. Put a piece of tape every 4.5 in (11.4 cm) along it.
- Soak the band in stiffener, squeeze out the excess, and open each scallop with your fingers.
- Pin the top end at the first tape mark. Wind the band around the tube so each turn rises 4.5 in (11.4 cm). Three turns use the full 23.2 in (58.9 cm). Keep the valley-numbered edge facing down.
- Brush a light coat of stiffener on the stars and trees.
- Let everything dry for about 24 hours, then slide the band off the tube. The spiral should stand 13.5 in (34.3 cm) tall.
Final Quality-Control Checklist
- Band Row 1: 101 sc, 22.4 in (56.9 cm)
- Exactly 25 scallops on each long edge
- 3 sc at each corner in Rnd 2
- Five even, outlined points on every star
- Trees have 4, 3 and 2 mini shells
- Drops at valleys 4, 7, 10, 13, 16, 19 and 22
- Spiral 13.5 in (34.3 cm), total length about 24 in (61.0 cm)
- All tails hidden
Troubleshooting
The band waves. The dc are too loose. Use a smaller hook for Rnd 2.
The spiral sags. The stiffener did not soak all the way through. Soak the band again, rewind it on the tube and let it dry.
The scallops don’t fit. Recount Row 1. It must have 101 sts.
A drop spins. Sew the cord through its valley twice.
Star points curl. Pin the tips more firmly and stiffen the outline round.
Care
This is a decorative piece. Dust it gently and spot clean with a damp cloth only, because soaking will soften the stiffener.
Final Notes
Here is the measurement chain. Row 1 is 101 sts and 22.4 in (56.9 cm) long. Six rows make the band 1.2 in (3.0 cm) wide. The border brings it to 2.6 in (6.6 cm) × 23.2 in (58.9 cm). Three turns on a 2 in (5.1 cm) tube, 4.5 in (11.4 cm) apart, use that full length and give a 13.5 in (34.3 cm) spiral. With the stars, loop and cords added, the hanging is about 24 in (61.0 cm) long.
Check your gauge on the band first, and the rest of the measurements will follow. Happy crocheting!