
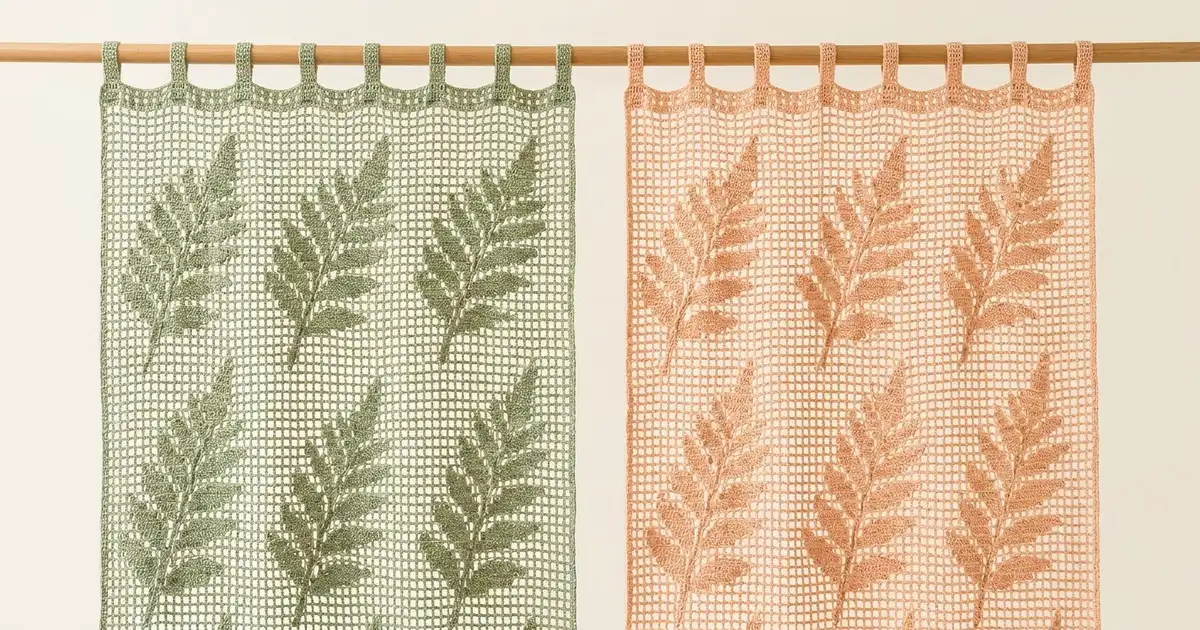
This pair of filet curtain panels puts fern fronds on a light, open mesh. When the panels hang in a sunny window, the solid blocks of the leaves stand out clearly and the mesh lets the light through. The panels shown are sage green and peach, but any two colors will work, and so will two panels in the same color.
The style is classic filet crochet with a modern botanical look. Each panel has seven fern fronds in two staggered columns: four on one side and three on the other, offset by half a frond. The edges are a plain single-crochet border, and simple tab loops at the top slide straight onto a curtain rod.
The pattern uses US crochet terms. Each finished panel measures 23 in (58.4 cm) wide by 80.5 in (204.5 cm) long, not counting the tabs. With the tabs it hangs 83.5 in (212.1 cm) from the top of the rod.
Each panel is worked flat in one piece from the bottom up. You start with a solid base row, work 158 rows of charted filet mesh and finish with a solid top row. Then you add a two-round border and seven hanging tabs. You make two panels, one in each color, and they are not joined to each other.
Finished Size and Construction
- Finished size per panel: 23 in (58.4 cm) wide x 80.5 in (204.5 cm) long, plus 3 in (7.6 cm) tabs
- Skill level: Intermediate
- Terminology: US crochet terms
- Yarn weight: Sport-weight cotton (#2 fine)
- Hook: 3.25 mm (US D-3)
- Number of pieces: 2 separate panels
- Layout: Two panels hung side by side, not seamed together
- Piece size before border: 22.5 in (57.2 cm) x 80 in (203.2 cm)
- Grid: 45 squares wide x 160 rows tall
- Border depth: 0.25 in (0.6 cm) on each side
Materials
Choose a smooth mercerized cotton or cotton blend in sport weight. Mercerized cotton gives crisp mesh, sharp leaf blocks and drape that holds its shape. Avoid fuzzy or very stretchy fibers, because a long, heavy panel can stretch under its own weight.
Yarn (based on 50 g / 155 m balls):
– Sage green: 450 g (approx. 1,395 m), enough for 1 panel
– Peach: 450 g (approx. 1,395 m), enough for 1 panel
These amounts include a margin of about 10% for the gauge swatch, small differences in tension and the tabs.
Tools:
– 3.25 mm (US D-3) crochet hook
– Tapestry needle
– Stitch markers (at least 10)
– Measuring tape
– Rust-proof pins and a large blocking surface (or a clean floor with towels)
– Spray bottle
Abbreviations (US Terms)
- ch – chain
- sc – single crochet
- dc – double crochet
- sl st – slip stitch
- sp – space
- st(s) – stitch(es)
- RS / WS – right side / wrong side
Special stitches (filet squares):
– Open square (OS): ch 2, skip 2 sts (or the ch-2 sp), dc in the next dc.
– Block (B): dc in the next 2 sts (or 2 dc in the ch-2 sp), then dc in the next dc.
– Each square uses 3 sts plus the dc it shares with the square before it. So 45 squares always equal 136 sts (3 x 45 + 1).
Gauge and Checkpoints
Gauge: 4 squares and 4 rows of filet mesh = 2 in (5.1 cm). One square is 0.5 in (1.3 cm) wide and tall.
Make a test swatch first. Ch 33. Row 1: dc in the 4th ch from the hook and in each ch across (31 sts). Rows 2–10: work all open squares (10 squares per row). Block the swatch lightly. It should measure 5 in (12.7 cm) square.
- If it measures more than 5.25 in (13.3 cm), go down one hook size.
- If it measures less than 4.75 in (12.1 cm), go up one hook size.
Checkpoints for the panel (measure flat, without stretching):
– After Row 1: 22.5 in (57.2 cm) wide
– After Row 40: 20 in (50.8 cm) long
– After Row 80: 40 in (101.6 cm) long
– After Row 120: 60 in (152.4 cm) long
– After Row 160: 80 in (203.2 cm) long
If the panel comes out short, change your hook size or tension rather than adding rows. Extra rows would shift where the ferns fall.

Panel (Make 2)
Reading the Grid
The panel is 45 squares wide. The columns stay fixed on the fabric: column 1 is at the edge where Row 1 begins. Odd-numbered rows run from column 1 to column 45. Even-numbered rows run from column 45 back to column 1. Every row has exactly 45 squares and 136 sts.
Column layout:
– Columns 1–3: open margin, 1.5 in (3.8 cm)
– Columns 4–20: fern column A, 8.5 in (21.6 cm) wide, stem in column 12
– Columns 21–25: open gap, 2.5 in (6.4 cm)
– Columns 26–42: fern column B, 8.5 in (21.6 cm) wide, stem in column 34
– Columns 43–45: open margin, 1.5 in (3.8 cm)
Fern Motif (17 squares wide x 32 rows tall)
Each frond has a stem one block wide in its stem column, and the stem is a block on all 32 rows of the frond. The leaflets are diagonal bars two blocks thick. Each bar starts beside the stem and moves out one square per row, which gives the upward slant. Every leaflet appears on both sides of the stem as a mirror image.
The table gives the blocks to add on each side of the stem, counted as offsets from the stem column. For example, offsets 1, 2 from a stem in column 12 mean columns 10, 11, 13 and 14.
| Frond row | Blocks at offsets (both sides, plus stem) |
|---|---|
| 1–4 | stem only |
| 5 | 1, 2 |
| 6 | 2, 3 |
| 7 | 3, 4 |
| 8 | 4, 5 |
| 9 | 1, 2 and 5, 6 |
| 10 | 2, 3 and 6, 7 |
| 11 | 3, 4 and 7, 8 |
| 12 | 4, 5 |
| 13 | 1, 2 and 5, 6 |
| 14 | 2, 3 and 6, 7 |
| 15 | 3, 4 and 7, 8 |
| 16 | 4, 5 |
| 17 | 1, 2 and 5, 6 |
| 18 | 2, 3 and 6, 7 |
| 19 | 3, 4 |
| 20 | 4, 5 |
| 21 | 1, 2 and 5, 6 |
| 22 | 2, 3 |
| 23 | 3, 4 |
| 24 | 4, 5 |
| 25 | 1, 2 |
| 26 | 2, 3 |
| 27 | 3, 4 |
| 28 | stem only |
| 29 | 1, 2 |
| 30 | 2, 3 |
| 31–32 | stem only |
Neighboring leaflets always have 2 open squares between them, so they show as separate slanted bars. The leaflets get shorter toward the tip: 7, 7, 6, 5, 4, 3 and 2 steps.
Frond Placement
- Column A (stem in column 12), 4 fronds: panel Rows 5–36, 45–76, 85–116 and 125–156
- Column B (stem in column 34), 3 fronds: panel Rows 25–56, 65–96 and 105–136
Frond row 1 sits on the first row listed. For example, panel Row 13 is frond row 9 of the first column A frond.
Instructions
Foundation: Ch 138.
Row 1 (RS, solid base): Dc in the 4th ch from the hook (the skipped 3 ch count as the first dc) and in each ch across. Turn. (136 sts)
Row 2 (all open): Ch 5 (counts as dc + ch 2), skip the next 2 dc, dc in the next dc. Ch 2, skip 2 dc, dc in the next dc. Repeat from * to * across, working the last dc in the top of the turning ch. Turn. (45 OS; 136 sts)
Rows 3–159 (filet chart): Work the 45 squares of each row as open squares or blocks. Follow the column layout, the frond placement and the frond table. Squares outside the fronds are open.
- Start a row with a block: ch 3 (counts as dc), then work the rest of the first block.
- Start a row with an open square: ch 5 (counts as dc + ch 2).
- Always end with a dc in the top of the turning ch.
- Every row: 45 squares; 136 sts
Worked example, Row 13 (odd row, columns 1 to 45): OS in columns 1–5, B in 6–7, OS in 8–9, B in 10–14, OS in 15–16, B in 17–18, OS in 19–45. Check: 5 + 2 + 2 + 5 + 2 + 2 + 27 = 45 squares.
Row 160 (solid top): Ch 3 (counts as dc). Dc in each dc and 2 dc in each ch-2 sp across, ending with dc in the top of the turning ch. (136 sts) Do not fasten off.
Checkpoint: The panel should measure 22.5 in (57.2 cm) x 80 in (203.2 cm).
Make All Pieces
- Sage green: 1 panel
- Peach: 1 panel
Each panel is complete in itself. Layout as hung (seen from the room side):
[ rod ===================================== ]
| SAGE GREEN PANEL |  | PEACH PANEL       |
| 23 in x 80.5 in  |  | 23 in x 80.5 in   |
Joining
The panels are not sewn to each other. Each one hangs from the rod on its own tabs, so you can open or close them separately.
Keep the tension the same on both panels so they hang at the same length. If one panel comes out longer, check its gauge before blocking. Don’t try to stretch the shorter panel to match.
Size checkpoint: With the panels hanging edge to edge, together they cover 46 in (116.8 cm) of width.
Border and Tabs
Border gauge: 6 sc = 1 in (2.5 cm), both along the stitches and along the row ends.
Round 1: Continuing from Row 160, ch 1 and turn the work to go down the side.
– Side: work 3 sc in each row end of all 160 rows. (480 sc)
– Corner: ch 2.
– Bottom: sc in each foundation ch. (136 sc)
– Corner: ch 2.
– Side: 3 sc in each row end. (480 sc)
– Corner: ch 2.
– Top: sc in each st of Row 160. (136 sc)
– Corner: ch 2. Sl st to the first sc to join.
– Total: 1,232 sc + 4 corner ch-2 sps
Why the math works: A dc row is 0.5 in tall, so 3 sc per row end gives 6 sc per inch, which matches the border gauge: 480 sc = 80 in (203.2 cm). Along the top and bottom, 136 sc over 22.5 in (57.2 cm) is also about 6 per inch. With the same density all around, the edges stay flat. They won’t ruffle or pull in. The corners are separate ch-2 sps, so they are not part of any side’s count.
Round 2: Ch 1. Sc in each sc. Work (sc, ch 2, sc) in each corner ch-2 sp. Sl st to join.
– Each side: 480 worked 1 per existing st + 2 added at the corners = 482 sc
– Top and bottom: 136 + 2 = 138 sc each
– Total: 1,240 sc + 4 corner ch-2 sps
Fasten off. The border is now 0.25 in (0.6 cm) deep on every side.
Tabs (7): Work these along the 138 sc of the top edge with the RS facing you. Space them like this: skip 3 sc, [tab over 6 sc, skip 15 sc] 6 times, tab over 6 sc, skip 3 sc. Check: 3 + (7 x 6) + (6 x 15) + 3 = 138.
For each tab:
– Join yarn in the first sc of the 6-st section.
– Rows 1–36: Ch 1, sc in each of the 6 sts, turn. (6 sc)
– The strip should measure 1 in (2.5 cm) wide and 6 in (15.2 cm) long.
– Fasten off, leaving a long tail. Fold the strip to the WS and whipstitch the last row to the back of the border at the base of the tab. This makes a loop 3 in (7.6 cm) tall.
Final Blocking
- Weave in all ends along solid blocks or the border, never across open mesh.
- Soak each panel in cool water for 15 minutes, then press out the water. Don’t wring.
- Roll the panel in towels to remove more moisture.
- Lay it flat and pin it to 23 in (58.4 cm) x 80.5 in (204.5 cm). Pin the four corners first, then the midpoints of the sides, then every 4 in (10.2 cm).
- Line up the grid by eye so every column runs straight.
- Gently push each leaflet bar into a clean diagonal.
- Let it dry completely before unpinning. Pin the tabs flat while they dry.
Final Quality-Control Checklist
- Every row has 45 squares and 136 sts.
- Each panel has 7 complete fronds: 4 in column A and 3 in column B.
- Each stem is one block wide and runs straight.
- Each leaflet is two blocks thick, with 2 open squares between leaflets.
- The border is flat, and the corners are square.
- There are 7 tabs, evenly spaced, each 3 in (7.6 cm) tall.
- Both panels measure 23 in (58.4 cm) x 80.5 in (204.5 cm).
Troubleshooting
- Mesh slants to one side: You probably skipped the turning-chain dc. End every row in the top of the turning ch.
- Leaf blocks look puffy: Work the 2 dc into the ch-2 sp, not into the chains themselves, and keep your tension even.
- Squares are taller than they are wide: Pull up a shorter loop on your dc, or try a hook 0.25 mm smaller for the chains only.
- Side border ruffles: You are working more than 3 sc per row end. Count each 20-row section: it should have 60 sc.
- Side border pulls in: Make sure each row end gets 3 sc, including Rows 1 and 160.
- Fern lands in the wrong column: Remember that even rows read from column 45 back to column 1. Place markers in columns 12 and 34.
- Panels hang at different lengths: Re-block the longer panel to the target size. Next time, check the gauge at Row 40.
Care
Hand wash in cool water with a mild detergent, then dry flat, pinned to the blocked measurements. Don’t hang the panels wet, because the weight of the water will stretch the mesh.

Final Notes
The measurements build on each other at every stage:
– One square is 0.5 in (1.3 cm).
– 45 squares make 22.5 in (57.2 cm) of width, and 160 rows make 80 in (203.2 cm) of length.
– Two border rounds bring each panel to 23 in (58.4 cm) x 80.5 in (204.5 cm).
– Seven 3 in (7.6 cm) tabs hang it from the rod.
If your swatch matches the gauge and the panel measures right at each checkpoint, the ferns will land in the right squares.
Happy crocheting!