

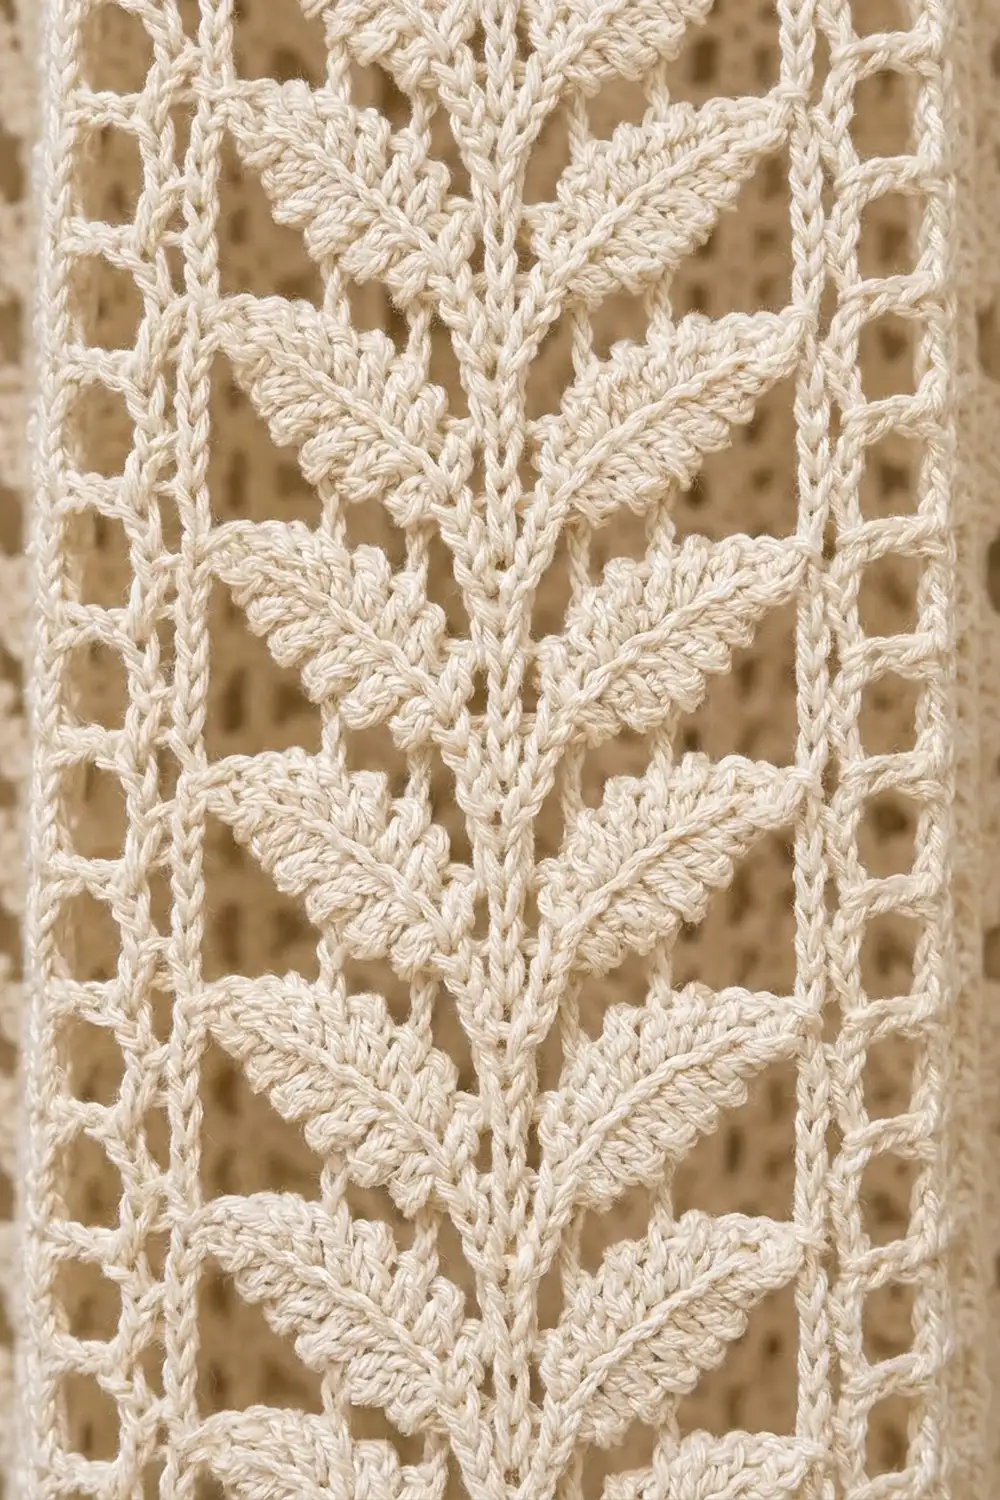
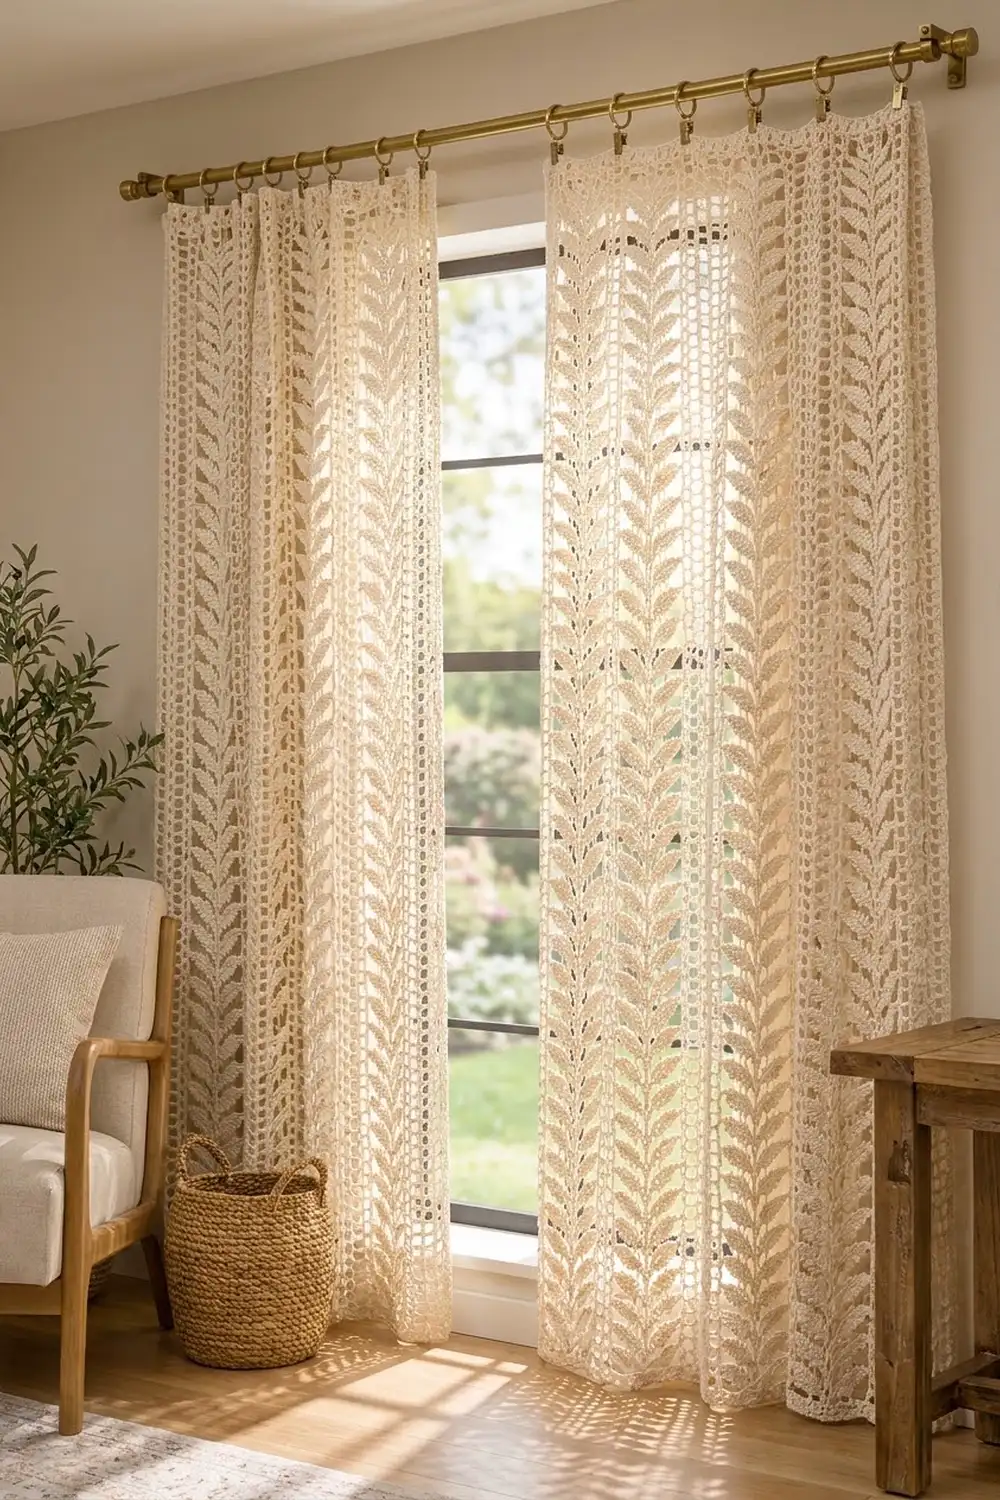
The Fernlight Lace Curtain Panel is a tall, airy curtain in one cream color. Five fern columns run from hem to header. Each fern is a stack of fan-shaped leaves on both sides of a narrow central spine. Narrow mesh ladders, two holes wide, sit between the ferns and along both side edges. Light comes through the ladders and the gaps between the leaves, so the window behind still glows.
The style is soft farmhouse with a touch of modern boho. A warm ivory or natural cotton works best because it shows the texture without looking heavy. The pair in the photo hangs from a brass rod on clip rings, so you don’t need to sew a rod pocket.
This pattern uses US crochet terms. After blocking, one finished panel measures 31 in wide x 81 in long (78.7 cm x 205.7 cm), border included. The set is two identical panels.
Each panel is one single piece, worked flat in rows from the bottom hem up. You make a dc foundation row, repeat one pattern row until the panel is long enough, and finish with a flat dc row. Then you add a 2-round sc border. The two panels are never joined to each other.
Finished Size and Construction
- Finished size (each panel): 31 in x 81 in (78.7 cm x 205.7 cm)
- Skill level: Intermediate
- Terminology: US crochet terms
- Yarn weight: Worsted weight (#4) cotton
- Hook: 5.5 mm (I-9)
- Number of pieces: 2 separate panels, not joined
- Layout: One panel on each side of the window
- Piece size before border: 30 in x 80 in (76.2 cm x 203.2 cm)
- Border depth: 0.5 in (1.3 cm) on every side
- Stitches per row: 100
Materials
Choose a smooth worsted cotton, mercerized or matte, or a cotton blend with a little linen. Cotton gives crisp leaf shells and hangs straight. Avoid fuzzy or very stretchy yarn. It blurs the lace, and the panel will grow longer as it hangs.
Yarn (one color):
– Cream / natural ivory: 1,250 g (about 2,063 m) per panel
– Total for the pair: 2,500 g (about 4,125 m)
These amounts assume about 165 m per 100 g. They include a margin of about 10 percent for gauge swatches and tension differences. Buy all skeins from one dye lot.
Tools:
– 5.5 mm (I-9) crochet hook
– Tapestry needle
– Scissors
– Stitch markers (at least 10)
– Measuring tape
– Blocking mats or a clean floor area with towels, plus rust-proof pins
– Spray bottle
– Curtain rod with 7 clip rings per panel (14 total) for hanging
Abbreviations (US Terms)
- ch: chain
- sk: skip
- st(s): stitch(es)
- sp: space
- sc: single crochet
- dc: double crochet
- RS / WS: right side / wrong side
Special stitches:
- Shell (leaf): 5 dc in the same stitch.
- V-st (spine): (dc, ch 1, dc) in the same stitch or space.
- Fern block (15 sts): dc in next st, sk 2 sts, shell in next st, sk 3 sts, V-st in next st, sk 3 sts, shell in next st, sk 2 sts, dc in next st. Stitches made: 1 + 5 + 3 + 5 + 1 = 15. Stitches used: 15.
- Mesh block (4 sts): ch 1, sk 1 st, dc in next st, ch 1, sk 1 st, dc in next st. Each ch counts as a stitch, so the block is 4 sts wide and uses 4 sts.
Every block makes exactly as many stitches as it uses, so every row has 100 sts.
Gauge and Checkpoints
Pattern gauge: 10 sts = 3 in (7.6 cm) and 8 rows = 5 in (12.7 cm) in pattern, after blocking. One row is 0.625 in (1.6 cm) tall.
Block widths: A fern block is 4.5 in (11.4 cm) wide. A mesh block is 1.2 in (3.0 cm) wide.
Test one piece first. Make a swatch with 1 edge st, a mesh block, a fern block, and a mesh block. Ch 26, then work 16 rows over 24 sts as in the main pattern: Row 1, then 14 pattern rows, then one dc row. Block it. It should measure 7.2 in x 10 in (18.3 cm x 25.4 cm).
- Swatch too big: Go down to a 5 mm (H-8) hook.
- Swatch too small: Go up to a 6 mm (J-10) hook.
- Width right but rows too tall: Pull each loop snug before you yarn over. Don’t change hook size.
Measurement checkpoints (relaxed, unstretched, on a flat surface):
- After Row 1: 30 in (76.2 cm) wide.
- After Row 16: 10 in (25.4 cm) tall.
- After Row 64: 40 in (101.6 cm) tall.
- After Row 128: 30 in x 80 in (76.2 cm x 203.2 cm).
Lace drops a little when it hangs. If you are between sizes, aim for the shorter length.
Panel Pattern
Make two panels, each following these instructions.
Foundation
Ch 102.
Row 1 (RS): Dc in 4th ch from hook (sk 3 ch count as first dc) and in each ch across, turn. (100 dc)
Check: 99 dc worked into the chains plus the turning ch = 100 sts. Measure now. The row should be 30 in (76.2 cm) wide.
Setting Up the Columns
The 100 sts divide as:
1 edge st + mesh + fern + mesh + fern + mesh + fern + mesh + fern + mesh + fern + mesh
That is 1 + (6 x 4) + (5 x 15) = 1 + 24 + 75 = 100 sts.
Counting from the start of the row, the fern blocks fall on sts 6–20, 25–39, 44–58, 63–77, and 82–96. Place a marker in the first and last stitch of each fern block on Row 1. This keeps your first few rows lined up.
Pattern Row
Row 2: Ch 3 (counts as dc throughout), mesh block, fern block; rep from * 4 more times, mesh block, working the final dc of that block in top of the turning ch, turn. (100 sts: 10 shells, 5 V-sts, 12 mesh ch-1 sps)*
In Row 2 the fern blocks work into plain dc. On every later row, each block lines up with the one below it:
- The first dc of each fern block goes into the first dc of the block below.
- Each shell goes into the center (3rd) dc of the shell below.
- Each V-st goes into the ch-1 sp of the V-st below.
- The last dc goes into the last dc of the block below.
In the mesh blocks, each ch 1 skips the stitch below it and each dc sits on a dc. This builds a ladder two holes wide.
Rows 3–127: Rep Row 2. (100 sts each row)
The shells stack one on top of the next. Because their bases are spaced apart, each shell fans up and out from the V-st spine. Row by row, they form a fern with leaves on both sides of a central stem. Where a fern block meets a mesh block, the two dc side by side form the solid rail along each ladder.
Checkpoints: After Row 16 the panel is 10 in (25.4 cm) tall. After Row 64 it is 40 in (101.6 cm) tall.
To change the length, add or remove pattern rows in sets of 8. Each 8 rows equals 5 in (12.7 cm).
Top Row
Row 128: Ch 3, dc in each dc and each ch-1 sp across, ending with dc in top of turning ch. Do not fasten off. Turn the corner and go straight into the border. (100 dc)
Each shell gives 5 dc. Each V-st gives 3 (2 dc plus the dc in its ch-1 sp). Each mesh block gives 4. The count stays at 100.
The panel now measures 30 in x 80 in (76.2 cm x 203.2 cm).
Make Both Panels
Make 2 panels in cream, using 1,250 g (about 2,063 m) each. Weave in the ends on the first panel, but wait to block it until the second one is finished. That way you can block both to the same measurements together.
Layout as hung, viewed from the room:
[ rod with 7 clips ]          [ rod with 7 clips ]
+------------------------+   +------------------------+
|  Panel A  (31 x 81 in) |   |  Panel B  (31 x 81 in) |
|   5 fern columns       |   |   5 fern columns       |
+------------------------+   +------------------------+
          left      [ window ]      right
The panels hang separately and are not joined.
Border
Border gauge: 13 sc = 4 in (10.2 cm). Two rounds of sc are 0.5 in (1.3 cm) deep.
Each side count below runs from corner center sc to corner center sc, with both corners included. Neighboring sides share their corner sc.
Round 1 (RS): Ch 1, 3 sc in first dc of Row 128 (corner), sc in each of next 98 dc, 3 sc in last dc (corner). Working down the side, work 2 sc around each row-end post for all 128 rows (256 sc). Working along the foundation chain, 3 sc in first ch (corner), sc in each of next 98 ch, 3 sc in last ch (corner). Work 2 sc in each row end up the second side (256 sc). Join with sl st to first sc. (720 sc)
- Top and bottom: 102 sc each (corner + 1 + 98 + 1 + corner).
- Each long side: 260 sc (corner + 1 + 256 + 1 + corner).
- Check: 102 + 102 + 260 + 260 = 724, minus 4 shared corners = 720.
Round 2: Ch 1, sc in each sc around, working 3 sc in each corner center sc, join. (728 sc)
- Top and bottom: 104 sc each.
- Each long side: 262 sc.
- Check: 104 + 104 + 262 + 262 = 732, minus 4 shared corners = 728.
Fasten off and weave in ends.
Why the math works: Along the top and bottom you work 1 sc per stitch, which is 100 sc over 30 in, or 3.3 sc per inch. Along the sides you work 2 sc per 0.625 in row, which is 3.2 sc per inch. Both rates match the border gauge of 13 sc per 4 in, so no edge ruffles or pulls in. The 3-sc corners add the extra stitches each turn needs.
The border adds 0.5 in (1.3 cm) to every side. The panel grows from 30 in x 80 in (76.2 cm x 203.2 cm) to 31 in x 81 in (78.7 cm x 205.7 cm).
Final Blocking
- Weave in all ends along the dc rails, not through the mesh holes, where they would show.
- Lay each panel flat on mats or towels, RS up. You may need to block one half at a time.
- Pin the four corners to 31 in x 81 in (78.7 cm x 205.7 cm).
- Pin along every side about every 4 in (10.2 cm), keeping the edges straight.
- Lay a measuring tape along each mesh ladder and nudge it straight. The ladders show any lean.
- Gently open each shell with your fingertips so the leaves fan out evenly on both sides of the spine.
- Spray until damp but not dripping.
- Let the panel dry fully, at least 24 hours, before you unpin it.
- Block the second panel to the exact same pin marks.
Final Quality-Control Checklist
- Every row has 100 sts. Spot-check a few rows by counting fern and mesh blocks.
- Each panel has 5 fern columns and 6 mesh ladders, all running straight.
- Every shell sits centered over the shell below it.
- Every V-st sits in the ch-1 sp below, forming a continuous spine.
- After Round 2, the border has 104 sc on the top and bottom and 262 sc on each long side.
- Each panel measures 31 in x 81 in (78.7 cm x 205.7 cm) after blocking.
- Both panels match in length to within 0.5 in (1.3 cm).
- All ends are hidden in solid stitches.
Troubleshooting
The panel is getting narrower or wider. Count the row. The usual cause is a shell worked as 4 or 6 dc, or a missed ch 1 in the mesh. Frog back to the last correct row.
The fern spine wanders sideways. The V-st went into a dc instead of the ch-1 sp below. Always work the V-st into the space.
The leaves look flat instead of fanned. You are skipping too few stitches beside the shells. Recount: skip 2 on the outer side and 3 between the shell and the V-st.
The mesh holes are uneven. Keep each ch 1 the same size as the top of a dc. Loose chains make tall, sloppy ladders.
The border ripples. You are working too many sc. Check for extra sc at the corners or along the row ends.
The border pulls in. Your sc are tighter than gauge. Use a hook one size larger for the border only.
One panel is longer than the other. Re-block the longer panel and ease the damp fabric slightly toward the width. If it’s still longer, remove 8 rows before finishing.
Care
Hand wash, or machine wash cold on a gentle cycle in a mesh laundry bag. Lay flat to dry and reshape to the blocked size. Don’t hang the panels wet, because the weight of wet cotton will stretch them.
Final Notes
The measurement chain is simple. Ten stitches make 3 in (7.6 cm), so 100 stitches make a panel 30 in (76.2 cm) wide. Eight rows make 5 in (12.7 cm), so 128 rows make 80 in (203.2 cm) of lace. The two-round sc border adds 0.5 in (1.3 cm) to every side, for a finished panel of 31 in x 81 in (78.7 cm x 205.7 cm). Make two, block them together, and clip them to the rod.
Happy crocheting!