

This little stocking is pure winter lace. It is worked in fine cream cotton thread. Three six-petal flowers run down the leg inside an open chain mesh, and a radiating fan fills both the heel and the toe. A dense cuff with a scalloped top finishes the leg, and a slim chain loop lets it hang from a branch.
The look is classic and quiet: one color, plenty of texture, and a crisp outline that holds its shape after starching. It suits a vintage tree, a gift tag, or a card topper.
The pattern uses US crochet terms. The finished stocking is about 2.5 in (6.4 cm) wide across the leg and 3.5 in (8.9 cm) from heel to toe. It is 5.25 in (13.3 cm) tall without the loop and 6.5 in (16.5 cm) tall including it.
Construction in brief: first you make three flowers, joining them as you go into a vertical strip. Then you work four rounds of mesh around the strip to add the foot shaping and the two fans. Next comes a four-row cuff across the top, followed by a two-row corded border and the hanging loop. Nothing is sewn, and the result is one single flat ornament.
Finished Size and Construction
- Finished size: 2.5 in (6.4 cm) wide x 5.25 in (13.3 cm) tall; 6.5 in (16.5 cm) with the loop
- Foot length: 3.5 in (8.9 cm) heel to toe
- Skill level: Intermediate (clusters, join-as-you-go, reverse sc)
- Terminology: US
- Yarn weight: Size 10 crochet thread (Lace, 0)
- Hook: 1.5 mm (US steel size 8)
- Number of pieces: 1 finished stocking (three flowers joined as you go, then built into one piece)
- Layout: 3 flowers stacked vertically in the leg and upper foot
- Flower size: 1.25 in (3.2 cm) across
- Size before cuff and border: 2.3 in (5.8 cm) wide x 4.4 in (11.2 cm) tall
- Cuff depth: 0.75 in (1.9 cm)
- Border depth: 0.1 in (0.3 cm)
Materials
Choose a mercerized cotton thread in size 10. It has a soft sheen, shows the petals clearly, and takes starch well. Avoid fuzzy or acrylic threads, because the mesh will lose definition.
- Cream (one color): 10 g, about 32 m (35 yd)
Tools:
- 1.5 mm (US steel size 8) crochet hook
- Fine tapestry needle and small sharp scissors
- 2-3 stitch markers
- Liquid starch or a sugar-water stiffener
- Blocking board and rust-proof pins
- Ruler or tape measure
The thread quantity includes a margin of about 30% for your test flower and for weaving in ends.
Abbreviations (US Terms)
- ch = chain
- sl st = slip stitch
- sc = single crochet
- hdc = half double crochet
- dc = double crochet
- tr = treble crochet
- sk = skip
- sp(s) = space(s)
- st(s) = stitch(es)
- rev sc = reverse single crochet (crab stitch)
- RS = right side
Special stitches
- 3-tr cluster (CL): [Yarn over twice, insert hook in st, pull up a loop, (yarn over, pull through 2 loops) twice] 3 times in the same st. Yarn over and pull through all 4 loops on the hook.
- Beginning cluster (beg CL): Ch 4, then work the bracketed steps 2 times in the same st. Yarn over and pull through all 3 loops on the hook.
- Fan: Work tr, (ch 2, tr) 8 times, all in the same sp. That makes 9 tr and 8 ch-2 sps.
- Rev sc: Working from left to right, insert the hook in the next st to the right, pull up a loop, then yarn over and pull through both loops.
Gauge and Checkpoints
Gauge: 13 sc = 1 in (2.5 cm) with size 10 thread and a 1.5 mm hook.
Make one flower first and use it as your swatch. Then check these measurements as you go:
- Flower Round 1: 0.4 in (1.0 cm) across
- Flower Round 2: 0.9 in (2.3 cm) across, measured from petal tip to petal tip
- Flower Round 3: 1.25 in (3.2 cm) across
- Strip of 3 flowers: 3.5 in (8.9 cm) tall
- After Body Round 4: 2.3 in (5.8 cm) across the top edge, 4.4 in (11.2 cm) tall, and 3.3 in (8.4 cm) from heel to toe
- After the cuff: 5.15 in (13.1 cm) tall
- Finished: 5.25 in (13.3 cm) x 2.5 in (6.4 cm)
If your flower is too big, change to a 1.4 mm hook. If it is too small, change to a 1.65 mm hook. Differences of 0.1 in (0.3 cm) or less will even out when you block the piece.
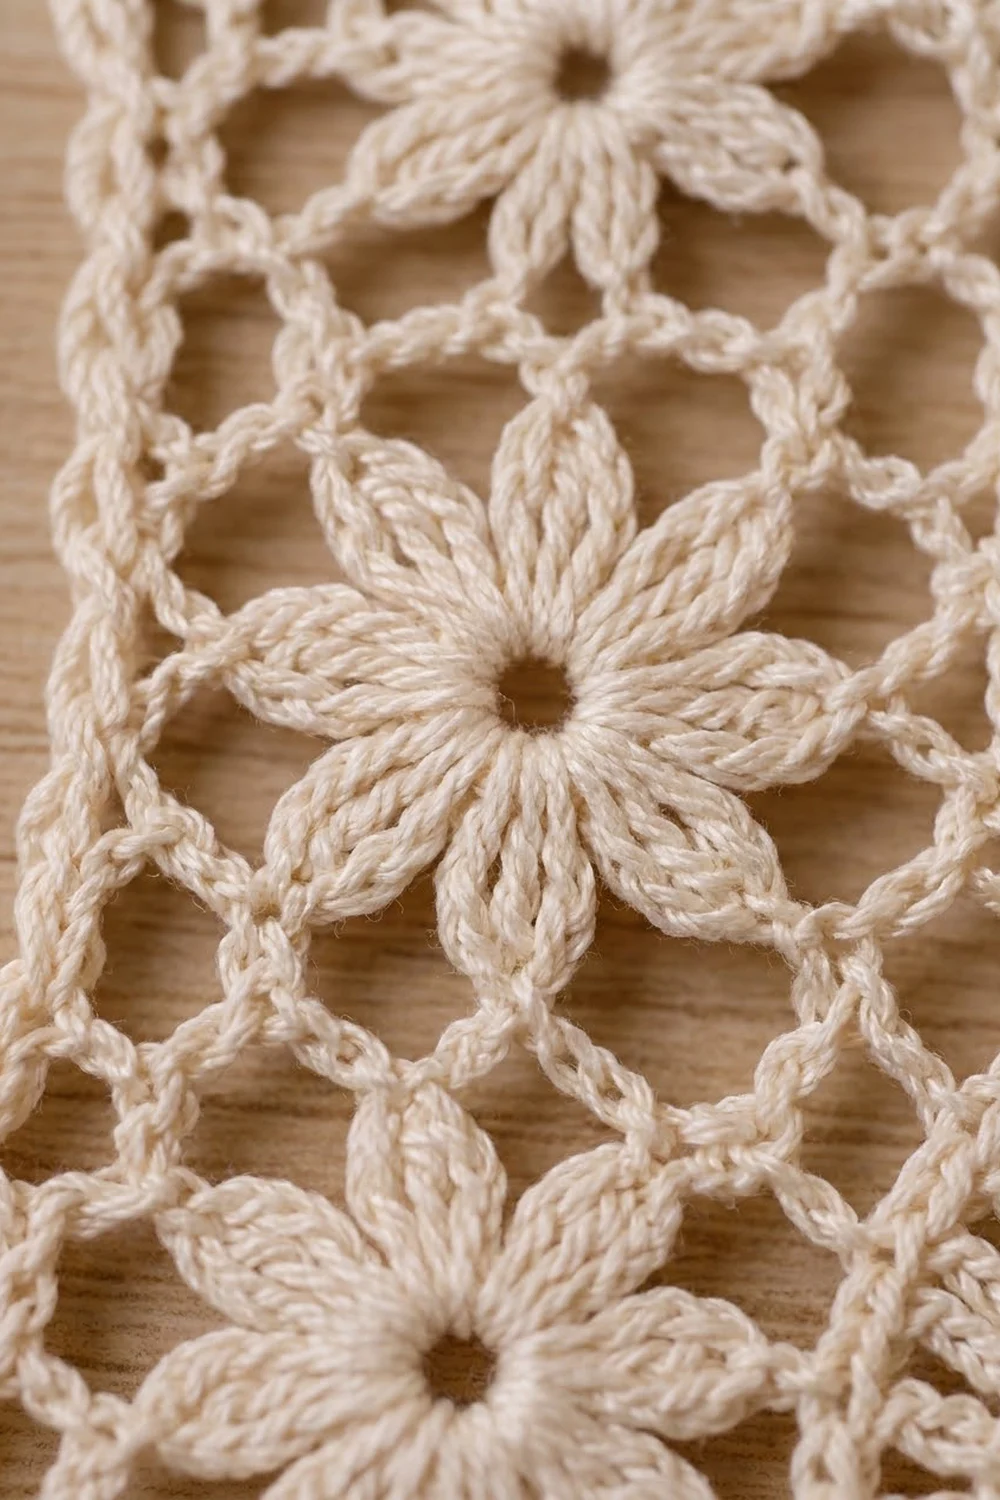
Flower Strip
Flower 1
Ch 6, then sl st in the first ch to form a ring.
Round 1: Ch 1, 12 sc in ring, sl st in first sc. (12 sc)
Round 2: Beg CL in same st, ch 5, sk 1 sc. CL in next sc, ch 5, sk 1 sc; repeat from * 4 more times. Sl st in top of beg CL. (6 CL, 6 ch-5 sps)
Round 3: Ch 1, sc in top of same CL. Ch 7, sc in top of next CL; repeat from * 4 more times. Ch 7, sl st in first sc. (6 sc, 6 ch-7 loops)
Fasten off. Number the ch-7 loops from 1 to 6 in the order you made them. Loop 1 is the top of the flower, and loop 4 is directly opposite it at the bottom.
Flower 2 (join as you go)
Work Rounds 1-2 as for Flower 1.
Round 3: Ch 1, sc in top of same CL. Ch 3, sl st in the 4th ch of loop 4 on Flower 1, ch 3, sc in top of next CL. This makes the joined loop 1. Ch 7, sc in top of next CL; repeat from * 3 more times. Ch 7, sl st in first sc. (6 sc, 5 free ch-7 loops, 1 joined loop)
Fasten off.
Flower 3
Work as for Flower 2, but join loop 1 of Flower 3 to loop 4 of Flower 2. Fasten off.
The strip should measure 3.5 in (8.9 cm) tall. Flower 1 is at the top of the leg, and Flower 3 sits in the upper foot.
Body
The strip has 14 free loops: 5 on Flower 1, 4 on Flower 2, and 5 on Flower 3.
Round 1 (mesh): With RS facing, join the thread with a sc in the 4th ch of loop 1 on Flower 1. Ch 5, sc in the 4th ch of the next free loop; repeat from * around the strip in this order:
- down one side: 2 loops each on Flower 1, Flower 2, and Flower 3
- the bottom loop of Flower 3
- up the other side: 2 loops each on Flower 3, Flower 2, and Flower 1
Ch 5, sl st in first sc. (14 sc, 14 ch-5 loops)
The first side you worked down becomes the front (toe side), and the second side becomes the back (heel side). Number the ch-5 loops from 1 to 14, starting with the loop right after the first sc. Loops 6-9 wrap around the lower half of Flower 3.
Round 2 (foot shaping, growth round): Sl st in next 3 ch, ch 1, sc in same loop (loop 1). [Ch 5, sc in next loop] 4 times, for loops 2-5. [Ch 5, (sc, ch 5, sc) in next loop] 4 times, for loops 6-9. [Ch 5, sc in next loop] 5 times, for loops 10-14. Ch 5, sl st in first sc. (18 sc, 18 ch-5 loops)
Number these loops from 1 to 18 the same way. Loop 8 is the toe fan loop, loop 12 is the heel fan loop, and loop 18 sits at the top center.
Round 3 (fans): Sl st in next 3 ch, ch 1, sc in same loop (loop 1). [Ch 5, sc in next loop] 6 times, for loops 2-7. Ch 2, Fan in loop 8, ch 2, sc in loop 9. [Ch 5, sc in next loop] 2 times, for loops 10-11. Ch 2, Fan in loop 12, ch 2, sc in loop 13. [Ch 5, sc in next loop] 5 times, for loops 14-18. Ch 5, sl st in first sc.
Round 3 count: 16 sc, 14 ch-5 loops, 4 ch-2 connectors, and 2 Fans of 9 tr each.
Round 4 (outline): Ch 1. Skip every sc of Round 3 as you go around. Work 5 sc in each ch-5 loop and 2 sc in each ch-2 connector. Over each Fan, work sc in each tr and 3 sc in each ch-2 sp. Sl st in first sc and fasten off.
Round 4 count:
- 14 loops x 5 sc = 70 sc
- 4 connectors x 2 sc = 8 sc
- 2 Fans x (9 + 24) = 66 sc
- Total = 144 sc
The 144 sc break down by section, in working order:
- Top edge: 6 loops (3 on each side of the top center) = 30 sc
- Front: 4 loops = 20 sc
- Toe: 2 + 33 + 2 = 37 sc
- Sole: 2 loops = 10 sc
- Heel: 2 + 33 + 2 = 37 sc
- Back: 2 loops = 10 sc
Check: 30 + 20 + 37 + 10 + 37 + 10 = 144.
Cuff
The cuff is worked in rows across the 30 top-edge sc. The mesh arches up at the center, so Row 1 uses shorter stitches in the middle and taller ones at the corners to level the edge.
Row 1 (RS, leveling): Join the thread in the first top-edge st at the back corner. Ch 4 (counts as tr), tr in next 4 sts, dc in next 5 sts, hdc in next 10 sts, dc in next 5 sts, tr in last 5 sts. Turn. (30 sts)
Row 2: Ch 3 (counts as dc), dc in each st across. Turn. (30 dc)
Row 3 (conversion): Ch 1, sc in first 15 sts, 2 sc in next st, sc in last 14 sts. Turn. (30 sts worked 1 per stitch + 1 extra = 31 sc)
Row 4 (scallops): Ch 1, sc in first st. Sk 2 sts, 7 dc in next st, sk 2 sts, sc in next st; repeat from * 4 more times. (5 scallops; 35 dc + 6 sc = 41 sts)
Each scallop uses 6 sts, so the row covers 5 x 6 = 30 sts plus the first sc, for 31 sts. Fasten off. The cuff is 0.75 in (1.9 cm) deep.
Border and Hanging Loop
The border is worked at the same gauge as Round 4 (13 sc = 1 in / 2.5 cm), so one sc per edge stitch lies flat.
Border Row A (RS): Join the thread at the top front corner. Work 6 sc down the front edge of the cuff: 1 sc in the end of Row 4, 1 in Row 3, 2 in Row 2, and 2 in Row 1. Then work 1 sc in each Round 4 st as follows:
- Front: 20 sc
- Toe: 37 sc
- Sole: 10 sc
- Heel: 37 sc
- Back: 10 sc
Finish with 6 sc up the back edge of the cuff. Do not turn. (6 + 114 + 6 = 126 sc)
Border Row B (corded edge): Ch 1, then rev sc in each sc of Row A. (126 rev sc) Fasten off.
Hanging loop: Join the thread at the top back corner. Ch 36, then sl st in the same st to form a loop. Sl st in each of the 36 ch, then sl st at the base. Fasten off.
Why the math works: the body edge has 144 – 30 = 114 sts, and the border puts exactly 1 sc in each of them. You don’t need extra stitches at the curves, because the 33-sc Fan sections already ease the heel and toe. Each cuff edge gets 6 sc to match its 0.75 in (1.9 cm) depth. The scallops are left unbordered so they stay open.
Final Blocking
- Weave in all ends through the Round 4 sts or the flower centers, then trim them closely.
- Soak the stocking in starch, diluted for a medium-firm finish, and blot it with a towel. Do not wring it.
- Lay it RS up on the board. Pin the cuff edge straight at 2.5 in (6.4 cm) wide.
- Pin the sole straight, setting the heel-to-toe length at 3.5 in (8.9 cm).
- Pin each Round 3 ch-5 loop outward to open the mesh evenly.
- Pin each Fan so its spokes radiate evenly.
- Shape each scallop into a round arch, and space the six petals of each flower evenly.
- Check that the height is 5.25 in (13.3 cm) without the loop, then let the piece dry completely before you unpin it.
Final Quality-Control Checklist
- Three flowers, each with 6 petals and an open center
- Strip joined at 2 points, with no twists
- 144 sc in Round 4, with 30 sc across the top edge
- Two 9-spoke Fans, one at the heel and one at the toe
- 5 even scallops (41 sts in Row 4)
- 126 border sts lying flat
- Hanging loop on the back (heel) side
- Finished size: 2.5 in x 5.25 in (6.4 cm x 13.3 cm)
Troubleshooting
Petals are lopsided: Keep the clusters relaxed and the ch-5 sps even in size.
Strip twists: Make sure both flowers are RS up, and join to loop 4 of the previous flower.
Mesh ruffles: Your chains are too loose. Chain more tightly, or work ch 4 instead of ch 5 in Round 3.
Fans cup: Loosen the ch-2 sps slightly and block the Fans firmly.
Cuff slants: Recount Row 1. The tr belong at both corners and the hdc in the center.
Border ruffles: Work exactly 1 sc per Round 4 st.
Scallops are uneven: Row 3 must have 31 sc.
Care
Hand wash in cool water with mild soap, then re-starch and pin to shape. Store flat in tissue paper between seasons.

Final Notes
Each stage builds on the measurement before it. A 1.25 in (3.2 cm) flower makes a 3.5 in (8.9 cm) strip. Four body rounds grow the stocking to 2.3 in x 4.4 in (5.8 cm x 11.2 cm), with a 144-stitch outline. The 0.75 in (1.9 cm) cuff and the 0.1 in (0.3 cm) border finish it at 2.5 in x 5.25 in (6.4 cm x 13.3 cm). Check each stage as you go, and the final shape will follow.
Happy crocheting!