
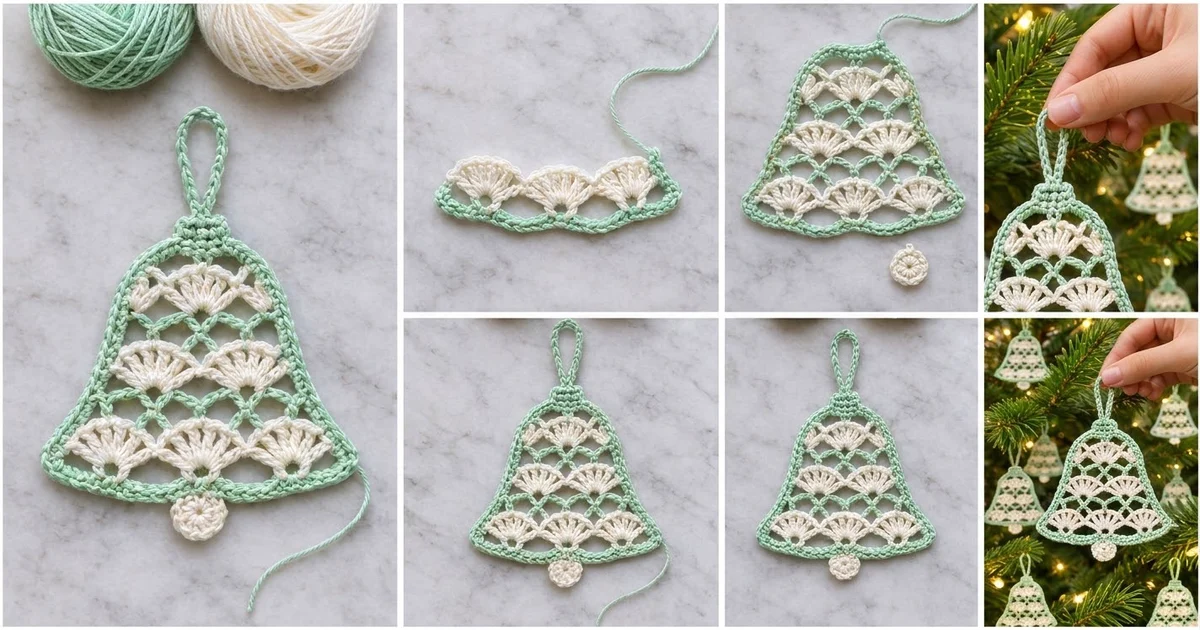
The Frosted Mint Bell is a lacy Christmas ornament with a vintage feel. Cream fan shells sit in three tiers inside a crisp mint outline. Between the tiers, a mint chain lattice crosses into small diamonds that let the tree lights shine through.
The palette has just two colors: soft mint green and warm cream. Mint gives the bell its shape, with the border, lattice, cap and hanging loop. Cream brings the fans and the round clapper to life. The result looks delicate and a little old-fashioned, like a paper-lace bell from a grandmother’s box of decorations.
This pattern uses US crochet terms. The bell body measures 5 in (12.7 cm) wide by 5 in (12.7 cm) tall. With the cap, loop and clapper, the ornament is 7.25 in (18.4 cm) tall overall.
The bell is worked flat from the bottom up in rows, changing color for each shell tier. A two-round single crochet border then outlines the whole shape. Finally, you work a small cap and a covered hanging loop at the top, and sew a tiny cream clapper to the bottom center.
Finished Size and Construction
- Finished bell body: 5 in x 5 in (12.7 cm x 12.7 cm)
- Total height with loop and clapper: 7.25 in (18.4 cm)
- Skill level: Easy-intermediate
- Terminology: US crochet terms
- Yarn weight: Sport (#2) mercerized cotton
- Hook: 3.25 mm (US D-3)
- Number of pieces: 1 bell body (cap and loop worked on) + 1 small clapper disc sewn on
- Layout: Single ornament, with the clapper centered on the bottom edge
- Bell size before border: 4.5 in x 4.5 in (11.4 cm x 11.4 cm)
- Border depth: 2 rounds of sc, about 0.25 in (0.6 cm) per side
Materials
Use a smooth mercerized cotton in sport weight. Mercerized cotton shows the stitch detail clearly and holds its shape well after blocking. A matte cotton also works, but the fans will look a little softer.
- Mint green: 10 g, about 31 m
- Cream: 5 g, about 16 m
These amounts include a margin of roughly 25% for gauge swatching and weaving in ends. One standard ball of each color will make several bells.
Tools:
- 3.25 mm (US D-3) crochet hook
- Tapestry needle
- Scissors
- Rustproof pins and a blocking board or foam mat
- Spray bottle of water (optional: light spray starch)
Abbreviations (US Terms)
- ch – chain
- sl st – slip stitch
- sc – single crochet
- dc – double crochet
- st(s) – stitch(es)
- sp – space
- sk – skip
- RS – right side
Special stitch:
- Shell: 7 dc worked into the same stitch or space. The center (4th) dc of a shell is where the lattice above it attaches.
Gauge and Checkpoints
Gauge: 22 sc and 24 sc rows = 4 in (10.2 cm) with a 3.25 mm hook.
There is only one piece, so treat Rows 1 and 2 as your test. Crochet them and measure before you go on. Check at each stage below:
- Row 1: 25 sc = 4.5 in (11.4 cm) wide.
- After Row 2: 4.5 in (11.4 cm) wide, about 0.75 in (1.9 cm) tall.
- After Row 5: about 2.25 in (5.7 cm) tall.
- After Row 8: about 3.75 in (9.5 cm) tall.
- After Row 10: 4.5 in (11.4 cm) tall. The top edge is about 2.375 in (6.0 cm) wide.
- After the border: 5 in x 5 in (12.7 cm x 12.7 cm).
Too big? If Row 1 is wider than 4.75 in (12.1 cm), go down to a 3.0 mm hook.
Too small? If Row 1 is narrower than 4.25 in (10.8 cm), go up to a 3.5 mm (US E-4) hook.
Small differences won’t matter much because blocking will even them out. Bigger differences will change both the final size and how much yarn you need.

Bell Body
Work in rows. Fasten off at every color change and leave 4 in (10.2 cm) tails. Tails along the side edges can be worked over during the border.
Row 1 (mint, foundation): Ch 26. Sc in 2nd ch from hook and in each ch across, turn. (25 sc)
This is the flat bottom edge of the bell.
Row 2 (cream, bottom shell tier): Join cream in first sc. Ch 1, sc in same st, sk 3 sts, shell in next st, sk 3 sts, sc in next st. Repeat from * to * 2 more times. Fasten off. (3 shells, 4 sc; 25 sts)
Each repeat uses 8 stitches. Three repeats plus the first sc takes up all 25 stitches of Row 1.
Row 3 (mint, lattice): With the RS facing, join mint in the first sc of Row 2. Ch 1, sc in same st, ch 5, sc in center dc of next shell. Then work [ch 5, sc in next sc, ch 5, sc in center dc of next shell] 2 times, ch 5, sc in last sc. Turn. (7 sc, 6 ch-5 loops)
Row 4 (mint, lattice): Sl st in first 3 ch of the first loop. Ch 1, sc in same loop, [ch 5, sc in next loop] 4 times. Fasten off. (6 sc, 5 ch-5 loops)
Starting in the middle of the first loop moves the edge in by half a loop on each side. This is where the bell starts to narrow. The Row 4 loops sit offset from the Row 3 loops, so they cross into the diamond lattice.
Row 5 (cream, middle shell tier): Join cream in the first ch-5 loop. Ch 3 (counts as dc), 6 dc in same loop. Then work [sc in next loop, shell in next loop] 2 times. (3 shells, 2 sc; 21 dc + 2 sc = 23 sts)
The two outer shells sit in the end loops, so they tuck against the sloping sides. Fasten off.
Row 6 (mint, lattice): Join mint in the top of the beginning ch-3. Ch 1, sc in same st, ch 4, sc in center dc of the first shell. Then work [ch 4, sc in next sc, ch 4, sc in center dc of next shell] 2 times, ch 4, sc in last dc. Turn. (7 sc, 6 ch-4 loops)
Row 7 (mint, lattice): Sl st in first 2 ch of the first loop. Ch 1, sc in same loop, [ch 4, sc in next loop] 4 times. Fasten off. (6 sc, 5 ch-4 loops)
The shorter ch-4 loops pull this tier in further than the ch-5 loops did.
Row 8 (cream, top shell tier): Join cream in the first ch-4 loop. Ch 1, sc in same loop, [shell in next loop, sc in next loop] 2 times. Fasten off. (2 shells, 3 sc; 14 dc + 3 sc = 17 sts)
Row 9 (mint, lattice): Join mint in the first sc. Ch 1, sc in same st, [ch 3, sc in center dc of next shell, ch 3, sc in next sc] 2 times. Turn. (5 sc, 4 ch-3 loops)
Row 10 (mint, crown): Ch 1, sc in first sc, [2 sc in next ch-3 sp, sc in next sc] 4 times. Fasten off. (1 + 4 x 3 = 13 sc)
This solid row closes the top of the bell. It should measure about 2.375 in (6.0 cm) across, and the bell should be 4.5 in (11.4 cm) tall at this point.
Border
Border gauge: The border uses the same sc gauge as Row 1, 22 sc = 4 in (10.2 cm).
You’ll work 3 sc along the end of each of Rows 2–9. These row ends include the slanted lattice rows, so the stitches follow the slope.
Round 1 (mint): With the RS facing, join mint in the first sc of Row 10 and work as follows:
- Top: 2 sc in first st, sc in next 11 sts, 2 sc in last st. (15 sc)
- Left side: Work 3 sc evenly into each row end of Rows 9 down to 2. (8 rows x 3 = 24 sc)
- Bottom: Working into the free loops of the foundation chain, 2 sc in first ch, sc in next 23 ch, 2 sc in last ch. (27 sc)
- Right side: Work 3 sc evenly into each row end of Rows 2 up to 9. (24 sc)
Sl st in the first sc to join. (15 + 24 + 27 + 24 = 90 sc)
The 2-sc increases at the four corners are already counted in the top and bottom totals. Don’t add them again.
Round 2 (mint): Ch 1. Sc in each st around, working 2 sc in the second sc of each corner pair. Sl st to join. Do not fasten off.
- Top: 17 sc
- Each side: 24 sc
- Bottom: 29 sc
- Total: 17 + 24 + 29 + 24 = 94 sc (90 + 4 corner increases)
Why the math works:
- Bottom: The bottom has 25 straight stitches, matching the 25 foundation stitches exactly, so the base stays flat.
- Sides: Each sloping side is about 4.25 in (10.8 cm) long. At 5.5 sc per inch, it needs about 23–24 sc, which is what 3 sc per row end gives you. Fewer stitches would make the sides cup, and more would make them ruffle.
- Corners: One increase at each corner per round lets the outline turn the corner without pulling.
Together, the two rounds add 0.25 in (0.6 cm) on every side. That takes the bell from 4.5 in (11.4 cm) to 5 in x 5 in (12.7 cm x 12.7 cm).
Cap and Hanging Loop
Cap Row 1 (mint): Fasten off from Round 2. Count the 17 top sc and join mint in the 7th one. Ch 1, sc in same st and next 4 sts, turn. (5 sc, centered over sts 7–11)
Cap Rows 2–3: Ch 1, sc in each st across, turn. (5 sc)
The cap should be about 0.5 in (1.3 cm) tall and about 1 in (2.5 cm) wide.
Loop: Ch 1, sl st in the first 3 sts so you are on the center (3rd) sc. Ch 18, then sl st in the same center sc to form a ring. Work 18 sc into the ring, covering the chain completely. Sl st in the center sc and fasten off.
The covered loop is thick and sturdy, about 1.5 in (3.8 cm) tall when it hangs.
Clapper
Round 1 (cream): Make a magic ring. Ch 3 (counts as dc), 11 dc in ring, sl st in top of ch-3. Pull the ring closed. (12 dc)
Round 2: Ch 1, [sc in next st, 2 sc in next st] 6 times. Sl st to join. (18 sc)
Fasten off and leave a 6 in (15.2 cm) tail. The disc measures 0.75 in (1.9 cm) across.
Attach: Find the center stitch of the 29-stitch bottom border, which is the 15th. Position the clapper over it so that 0.25 in (0.6 cm) hangs below the edge. Whipstitch the top half of the disc to the back of the border.
Final Blocking
- Weave in all remaining ends along the mint border so they don’t show through the lace.
- Lightly spray the bell with water until it is damp but not soaked.
- Pin the base straight at 5 in (12.7 cm) wide.
- Pin the top edge centered, with the bell body 5 in (12.7 cm) tall.
- Pin each fan shell so it opens into an even half-circle.
- Pin the lattice loops open into diamonds.
- Pin the clapper flat.
- If you want a stiffer ornament, mist lightly with spray starch.
- Let it dry completely, at least 12 hours, before you unpin it.
Final Quality-Control Checklist
- The bell body measures 5 in x 5 in (12.7 cm x 12.7 cm).
- Total height is 7.25 in (18.4 cm) from the clapper to the top of the loop.
- There are 3 fans in the bottom tier, 3 in the middle tier and 2 in the top tier.
- All lattice loops cross into clear diamonds.
- The border has 94 sc, both sides match, and there are no ripples.
- The cap is centered over the top.
- The loop is fully covered.
- The clapper hangs at the exact center.
- No tails are visible from the front.
Troubleshooting
- The bell flares at the bottom: Your foundation chain is too loose. Redo it with a smaller hook, or make sure you have exactly 25 sc.
- The fans curl forward: Your dc tension is tight. Relax your tension or block more firmly.
- The lattice loops sag: Your chains are loose. Try ch 4 in place of ch 5 in Row 3 only, but keep the stitch counts the same.
- The sides ripple in the border: You have too many stitches. Work 2 sc into the shorter lattice row ends.
- The sides pull inward: You have too few stitches. Make sure every row end in Rows 2–9 gets 3 sc.
- The cap is off-center: Recount the 17 top sc and restart in the 7th stitch.
- The clapper tilts: Sew it at two points, at both sides of its top half.
Care
Hand wash in cool water, press out the water in a towel, and re-block flat to dry. Store the ornament flat or hanging, not crushed in a box.

Final Notes
Here is the measurement chain to keep in mind:
- Row 1: 25 sc = 4.5 in (11.4 cm)
- After Row 10: the body is 4.5 in (11.4 cm) tall
- After the border: 5 in x 5 in (12.7 cm x 12.7 cm)
- Cap: adds 0.5 in (1.3 cm)
- Loop: adds 1.5 in (3.8 cm)
- Clapper: hangs 0.25 in (0.6 cm) below the base
- Total height: 7.25 in (18.4 cm)
If your gauge holds at Row 1, every later checkpoint should fall into place. Make one bell in an evening, then stitch a few more in matching colors for the tree.
Happy crocheting!