

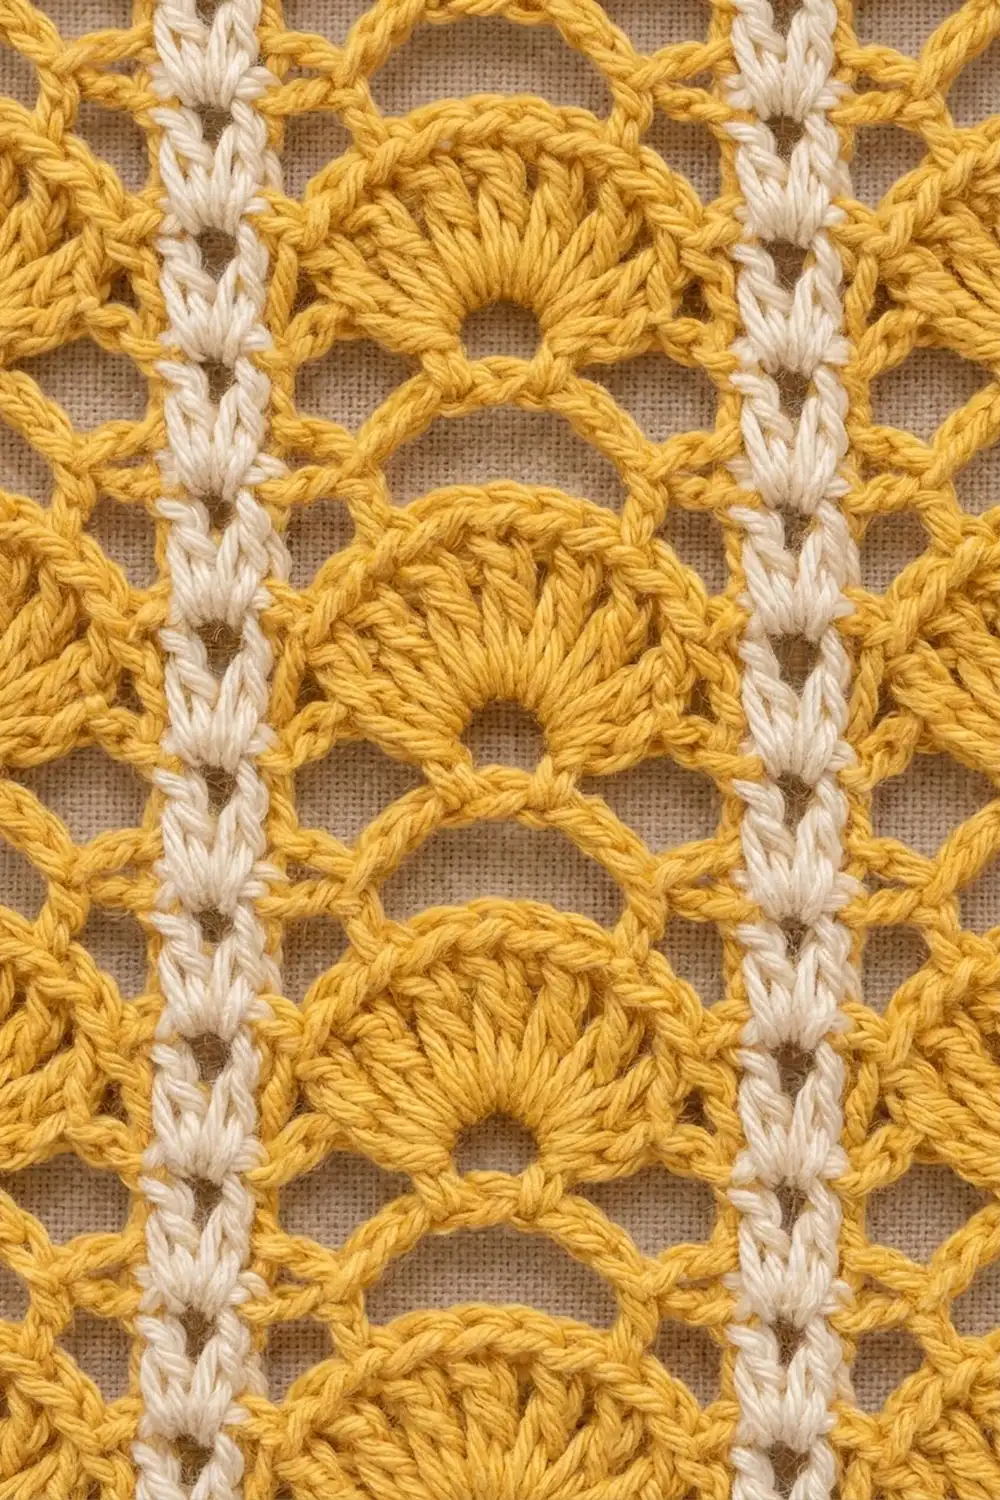
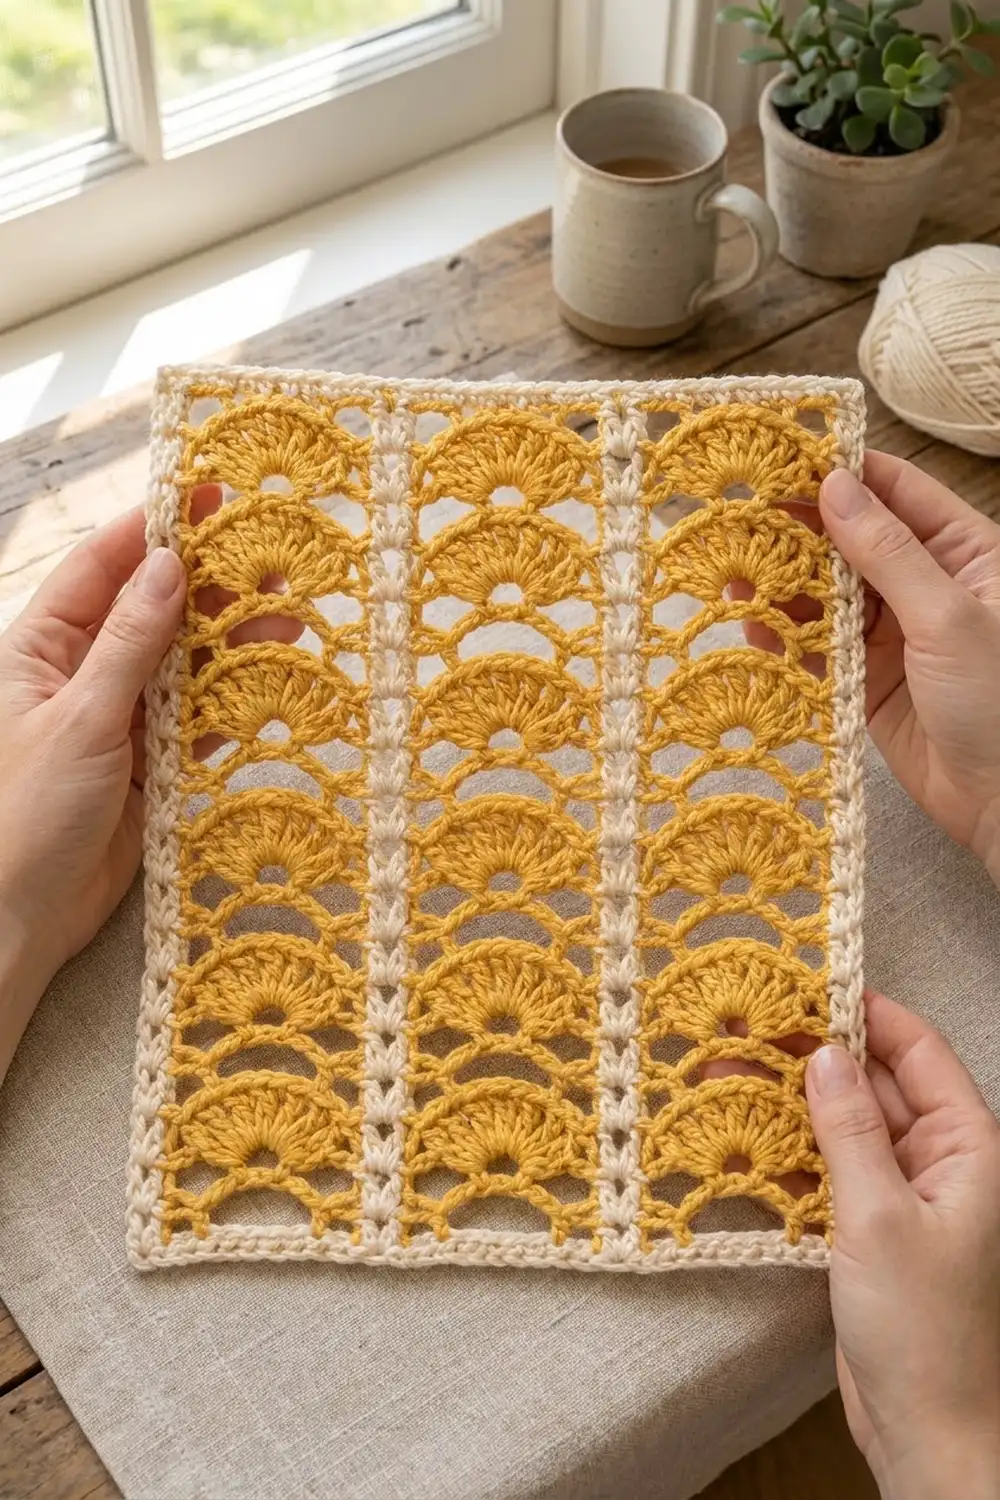
The Golden Fanlight Lace Panel is a small rectangle of openwork fans in mustard yellow, framed in cream. Three columns of half-circle fans stack up the panel, and each fan rises from a small round hole with an open arch below it. Two narrow cream stripes divide the columns, and a cream border with a rope-like crab-stitch edge finishes the piece.
The look is warm and a little vintage, like sunlight through a lace window. The mustard yellow brings the energy and the cream keeps it soft. It works as a table mat, a decorative panel, a pillow front, or a stitch sampler to keep in your swatch library.
This pattern uses US crochet terms. The finished panel measures 11 x 8.5 in (27.9 x 21.6 cm) after blocking.
You work the panel flat in rows, starting with one cream row of single crochet. The fans are a 2-row yellow repeat: an arch row, then a fan row. A trim row brings the top edge back to a straight line of stitches. Next you add the cream stripes as surface slip stitches, and you finish with three cream border rounds.
Finished Size and Construction
- Finished size: 11 x 8.5 in (27.9 x 21.6 cm)
- Skill level: Easy-intermediate
- Terminology: US
- Yarn weight: Worsted (#4), cotton or cotton blend
- Hook: 5.0 mm (H-8)
- Number of pieces: 1 (single panel)
- Layout: 3 fan columns side by side, 4 full fan tiers tall, divided by 2 cream stripes
- Body width: 39 sts
- Size before border: 10 x 7.5 in (25.4 x 19.1 cm)
- Border depth: 0.5 in (1.3 cm) on every side, 3 rounds
Materials
Yarn: Use a smooth worsted-weight cotton or cotton blend so the fans stay crisp and block well. Splitty or very fuzzy yarn hides the open arches. These amounts assume about 186 yd (170 m) per 100 g.
- Color A, Mustard Yellow: 55 g, about 94 m (103 yd)
- Color B, Cream: 20 g, about 34 m (37 yd)
Both amounts include a safety margin of roughly 15–20%.
Tools:
– 5.0 mm (H-8) crochet hook
– Tapestry needle
– Scissors
– Rust-proof pins and a blocking mat
– Spray bottle
– Ruler or tape measure
Abbreviations (US Terms)
- ch – chain
- sc – single crochet
- dc – double crochet
- sl st – slip stitch
- sk – skip
- sp – space
- st(s) – stitch(es)
- RS / WS – right side / wrong side
- rev sc – reverse single crochet (crab stitch)
Special stitch – Reverse single crochet (rev sc): Work from left to right (right to left if you crochet left-handed). Insert the hook into the next stitch to the right, yarn over, pull up a loop, then yarn over and pull through both loops. This makes the twisted, rope-like edge on the border.
Surface slip stitch: With the yarn held behind the work and the RS facing, insert the hook through the fabric from front to back, pull up a loop, and pull it through the loop on the hook. Each stitch makes a “V” on the surface.
Gauge and Checkpoints
The panel is a single piece, so treat its first three rows as your gauge test. Work Rows 1–3, lay the piece flat without stretching, and measure.
Base gauge: 39 sts = 10 in (25.4 cm), or about 3.9 sts per inch. One fan column (11 sts) measures about 2.8 in (7.1 cm). One 2-row repeat (Row A + Row B) measures about 1.5 in (3.8 cm) tall.
Checkpoints:
– After Row 1: 10 in (25.4 cm) wide
– After Row 3: 10 in (25.4 cm) wide x 1.75 in (4.4 cm) tall
– After Row 9: 10 in (25.4 cm) wide x 6.25 in (15.9 cm) tall
– After Row 11 (before border): 10 x 7.5 in (25.4 x 19.1 cm)
– After border: 11 x 8.5 in (27.9 x 21.6 cm)
If your piece is too big: Rip back and go down to a 4.5 mm hook. Also check that your ch-5 arches are not loose.
If your piece is too small: Go up to a 5.5 mm hook. Tight chains are the most common cause, so try making the chains slightly looser on your current hook first.
A width error of 0.25 in (0.6 cm) or less is fine, because blocking will correct it.
The Panel Body
Layout of every row (39 sts): 1 edge st, column 1 (11 sts), spine (2 sts), column 2 (11 sts), spine (2 sts), column 3 (11 sts), 1 edge st.
The 2-st “spines” sit under the cream stripes. The beginning ch-3 counts as a dc throughout.
Foundation
With Color B (Cream), ch 40.
Row 1 (RS): Sc in 2nd ch from hook and in each ch across. (39 sc) Fasten off Cream, leaving a 6 in (15.2 cm) tail.
Fan Pattern
Join Color A (Mustard) in the first st, ready to work a WS row.
Row 2 (Row A – arch row): Ch 3 (counts as edge dc).
Column sequence: dc in next st, ch 2, sk 2 sts, sc in next st, ch 5, sk 3 sts, sc in next st, ch 2, sk 2 sts, dc in next st. (This works across 11 sts.)
Dc in each of next 2 sts (spine), work the column sequence; repeat from ** once more. Dc in last st (edge).
Count: 18 sts (4 per column x 3 = 12, + 4 spine dc, + 2 edge sts), plus 9 ch-sps (2 ch-2 sps and 1 ch-5 sp per column). Turn.
Row 3 (Row B – fan row): Ch 3 (edge dc).
Fan sequence: dc in next dc, ch 1, sk next ch-2 sp and sc, 7 dc in ch-5 sp, ch 1, sk next sc and ch-2 sp, dc in next dc. (Gives 11 sts: 1 + 1 + 7 + 1 + 1.)
Dc in each of next 2 spine dc, work the fan sequence; repeat from ** once more. Dc in top of turning ch.
Count: 39 sts (each ch-1 counts as a st): 11 per column x 3 = 33, + 4 spine dc, + 2 edge sts. Turn.
The 7-dc fan sits over the ch-5 arch. The sc at each end of the arch pulls the base in, so the fan spreads upward from a small round hole. The skipped ch-2 spaces leave open windows on both sides of each fan.
Row 4 (Row A): Ch 3. Work into the Row B stitches as follows.
Column sequence: dc in the first dc of the column, ch 2, sk the ch-1 and 1st fan dc, sc in 2nd fan dc, ch 5, sk 3rd, 4th and 5th fan dc, sc in 6th fan dc, ch 2, sk 7th fan dc and ch-1, dc in last dc of the column.
Work the spines and the last edge st as in Row 2.
Count: 18 sts + 9 ch-sps. Turn.
Each new ch-5 arch is centered over the middle 3 dc of the fan below, so the next fan stacks directly above.
Row 5 (Row B): Repeat Row 3. (39 sts)
Rows 6–9: Repeat Rows 4–5 twice. You now have 4 fan tiers in each column.
Checkpoint: 6.25 in (15.9 cm) tall, 10 in (25.4 cm) wide.
Row 10 (Row A): Repeat Row 4. (18 sts + 9 ch-sps) This row makes the open arches across the top of the last fans.
Row 11 (trim/conversion row): Ch 1 (does not count as a st).
– Sc in edge dc.
– Column: sc in dc, 2 sc in ch-2 sp, sc in sc, 3 sc in ch-5 sp, sc in sc, 2 sc in ch-2 sp, sc in dc (11 sc).
– Sc in each of the 2 spine dc.
– Work the column sequence again, the 2 spine sts again, and the column sequence a third time.
– Sc in the top of the turning ch.
Count: 18 sc worked one per existing stitch + 21 sc worked into ch-sps (7 per column x 3) = 39 sc.
Checkpoint: 10 x 7.5 in (25.4 x 19.1 cm). Fasten off and weave in the ends.
Cream Stripes (Surface Slip Stitch)
With the RS facing and Row 1 at the bottom, make a slip knot in Color B and hold it behind the work.
- Insert the hook between the 2 spine sts of the first spine in Row 1 and pull up a loop.
- Sl st once more in Row 1, between the same 2 sts.
- Work 2 surface sl sts in each dc row (Rows 2–10), always between the 2 spine dc.
- Work 1 surface sl st in Row 11.
- Count: 1 (Row 1) + 18 (Rows 2–10) + 1 (Row 11) = 20 surface sl sts.
- Pull the yarn to the front through the top of Row 11, fasten off, and weave the ends in on the WS.
Repeat for the second spine. Keep the stitches the same height as the fabric underneath. If the panel puckers vertically, your sl sts are too tight. The finished stripes are about 0.5 in (1.3 cm) wide, including the spine dc showing on either side.
Border
All three border rounds use Color B (Cream). The corners are ch-sps and are not counted in the per-side counts below.
Border gauge: About 3.9 sc per inch, the same as the body. Along the top and bottom you work 39 sc over 10 in (25.4 cm). Along the sides you work 29 sc over 7.5 in (19.1 cm), which is 3.87 sts per inch. Both match the body, so the edges neither ruffle nor pull in.
Round 1: With the RS facing, join Cream in the first st of Row 11. Ch 1.
| Edge | Worked into | Count |
|---|---|---|
| Top | each of the 39 sts of Row 11 | 39 sc |
| Corner | ch 2 | |
| Left side (row ends) | 1 sc in Row 11, 3 sc in each dc row end (Rows 10 to 2), 1 sc in Row 1 | 1 + 27 + 1 = 29 sc |
| Corner | ch 2 | |
| Bottom | each of the 39 foundation ch loops | 39 sc |
| Corner | ch 2 | |
| Right side | same as left side | 29 sc |
| Corner | ch 2 |
Sl st to the first sc to join.
Count: 39 + 29 + 39 + 29 = 136 sc + 4 ch-2 corners.
Round 2: Ch 1. Sc in each sc around. Work (sc, ch 2, sc) in each corner ch-2 sp. Sl st to join.
Count: Top and bottom 39 + 2 = 41 sc each. Sides 29 + 2 = 31 sc each. Total 144 sc + 4 ch-2 corners.
Round 3: Ch 1. Rev sc in each sc around. Work (rev sc, ch 1, rev sc) in each corner sp. Sl st to join.
Count: Top and bottom 41 + 2 = 43 rev sc each. Sides 31 + 2 = 33 rev sc each. Total 152 rev sc + 4 ch-1 corners. Fasten off.
Why the math works: Round 1 picks up exactly one stitch per body stitch along the top and bottom (39 = 39). The 3 sc per dc row end along the sides keeps the same stitch density as the width. Each later round adds 1 stitch at each end of each side. That matches the extra length a round adds at each corner, so the corners stay square and flat. Three rounds add 0.5 in (1.3 cm) per side, which takes the panel from 10 x 7.5 in (25.4 x 19.1 cm) to 11 x 8.5 in (27.9 x 21.6 cm).
Final Blocking
- Weave in all ends before blocking. Hide the ends along the spines or inside the border.
- Soak the panel in cool water for 10 minutes, then gently press out the water. Do not wring it.
- Roll it in a towel to remove more moisture.
- Lay it RS up on a blocking mat and ease it to 11 x 8.5 in (27.9 x 21.6 cm).
- Pin each corner first, then pin along each side every 1 in (2.5 cm), keeping the edges straight.
- Use your fingers to open each ch-5 arch into a round hole and spread each fan into an even half-circle.
- Straighten the cream stripes so they run exactly vertical.
- Let the panel dry completely, usually 12–24 hours, before unpinning.
Final Quality-Control Checklist
- Body is 39 sts wide and 11 rows tall.
- Each column has 4 complete fans with 7 dc each, plus a top row of arches.
- The fans stack directly above each other, centered.
- Both cream stripes have 20 surface sl sts and are straight and evenly tensioned.
- Border Round 1 has 39 / 29 / 39 / 29 sc.
- Border Round 3 has 43 / 33 / 43 / 33 rev sc.
- Corners are square, and the crab-stitch edge is even all the way around.
- Blocked size is 11 x 8.5 in (27.9 x 21.6 cm).
- No ends show on the RS.
Troubleshooting
Fans lean left or right: You probably skipped the wrong number of stitches in Row A. Count: sk 2, sc, sk 3, sc, sk 2.
Fans look flat instead of rounded: Your ch-5 arches are too short or too tight. Loosen the chains or add a little more height when you block.
Panel is too narrow at the top: You missed ch-sp stitches in Row 11. Each column needs exactly 11 sc.
Sides ruffle in the border: Work 2 sc instead of 3 in a few dc row ends, but keep the side total even on both sides.
Sides pull in: Your sc tension is tighter than your body tension. Go up half a hook size for Round 1.
Stripes pucker the fabric: Pull out the stripe and redo it with a looser hand, or with a hook one size larger.
Crab stitch twists unevenly: Keep each loop the same height and don’t pull the final yarn-over tight.
Care
Hand wash in cool water with mild soap, press out the water gently, and dry flat, reshaping to size. Avoid tumble drying, which can distort the fans and shrink the cotton.
Final Notes
The measurement chain is simple:
– 39 sts make 10 in (25.4 cm) of width.
– Each Row A + Row B repeat adds about 1.5 in (3.8 cm) of height.
– After Row 11, the panel measures 10 x 7.5 in (25.4 x 19.1 cm).
– The 0.5 in (1.3 cm) cream border brings it to 11 x 8.5 in (27.9 x 21.6 cm).
If you check your width after Row 3 and your height after Row 9, the border counts will fall into place.
Happy crocheting!