

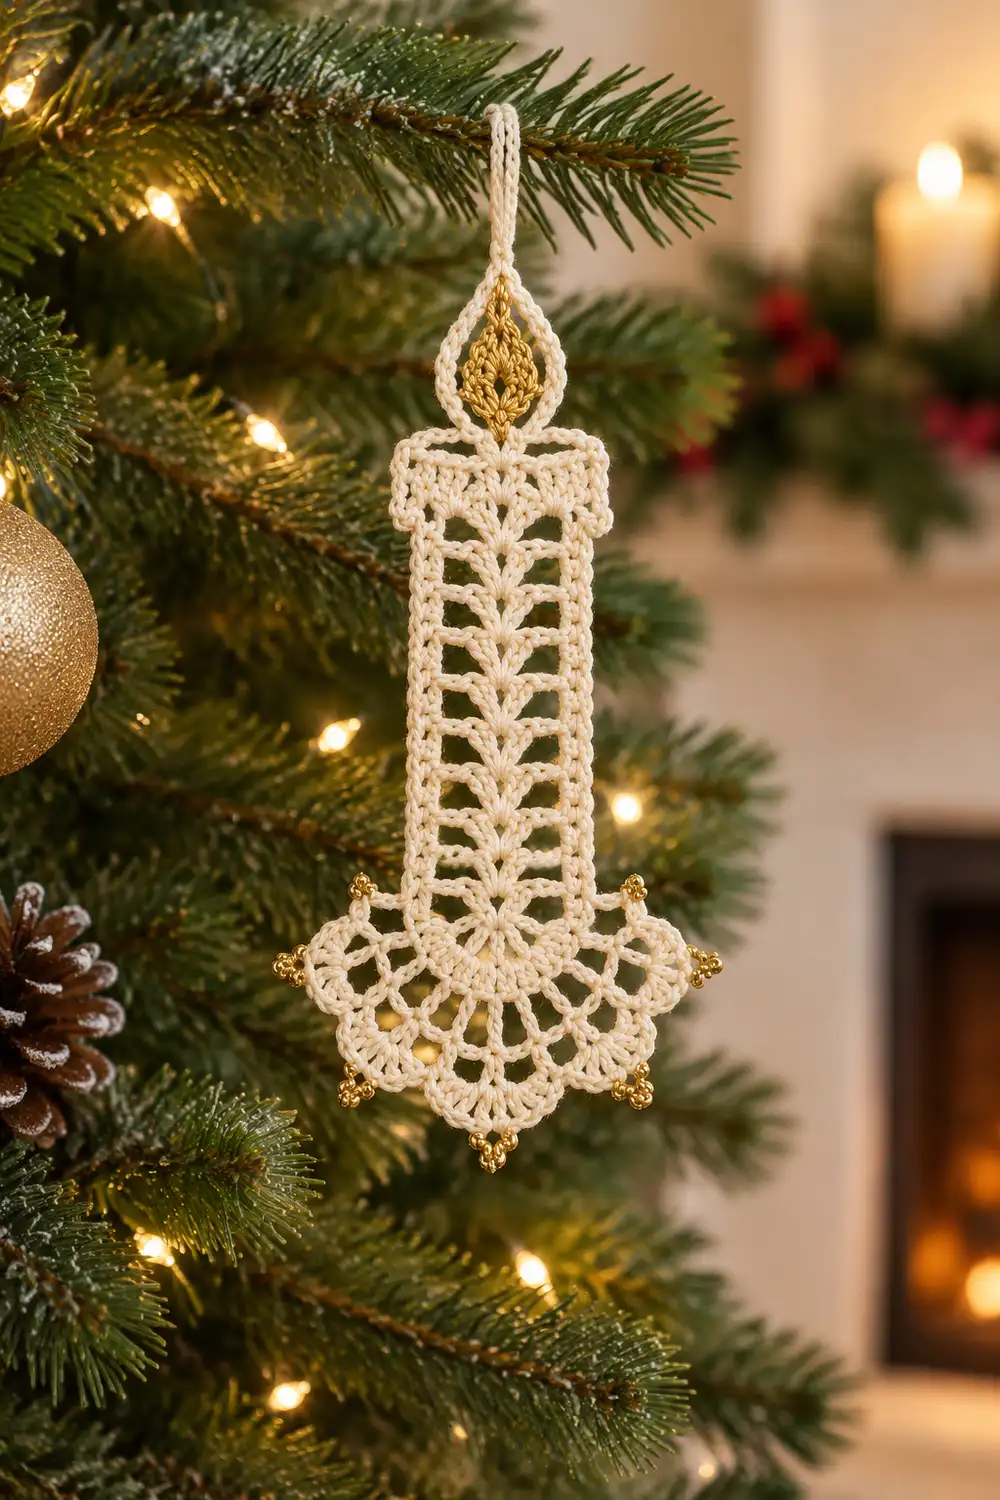
This little candle ornament has a soft vintage feel. A cream body of lacy shells stands on a wide scalloped base, and a small teardrop flame in metallic gold thread sits on top. Four gold beads at the scallop points finish the look.
The palette is two colors: cream for the candle body and base, and metallic gold for the flame and beads. The style is classic thread lace, similar to doily work, sized as a small flat ornament.
This pattern uses US crochet terms. The finished ornament measures 4.0 in (10.2 cm) tall and 2.4 in (6.1 cm) wide at the base.
You make three pieces: a gold flame worked in rounds, a cream rectangular body panel worked in rows of shells, and a cream half-circle base worked in rows that ends in four fan scallops. The body gets a single-crochet border, then the three pieces are stacked and sewn together. The beads are sewn on last.
Finished Size and Construction
- Finished size: 4.0 in (10.2 cm) tall x 2.4 in (6.1 cm) wide
- Skill level: Intermediate (thread crochet, shells, working into row-ends)
- Terminology: US
- Yarn weight: Size 10 crochet thread (Lace, weight 0)
- Hook: 1.5 mm steel hook (US steel size 8)
- Number of pieces: 3 (flame, body, base)
- Layout: Stacked vertically: flame on top, body in the middle, base at the bottom
- Piece sizes: Flame 0.8 in (2.0 cm) tall x 0.6 in (1.5 cm) wide; body 1.3 in (3.3 cm) x 2.0 in (5.1 cm) after border; base 2.4 in (6.1 cm) x 1.2 in (3.0 cm)
- Body size before border: 1.1 in (2.8 cm) wide x 1.8 in (4.6 cm) tall
- Border depth: 0.1 in (0.3 cm) on each edge of the body
Materials
Use mercerized cotton thread for crisp stitch definition and clean blocking. Choose a metallic gold thread of similar thickness for the flame so it sits flat beside the cream.
- Cream size 10 cotton thread: 5 g / 16 m (body and base)
- Metallic gold size 10 thread: 1 g / 5 m (flame and sewing on beads)
Tools:
– 1.5 mm steel hook (US steel size 8)
– Tapestry needle (small eye)
– Beading needle or very fine sewing needle
– 4 gold metal beads or bead caps, about 4 mm
– Stitch markers (2)
– Blocking mat, rustproof pins, spray starch
– Scissors and a ruler
Quantities include a margin for a gauge test and tails.
Abbreviations (US Terms)
- ch: chain
- sl st: slip stitch
- sc: single crochet
- hdc: half double crochet
- dc: double crochet
- tr: treble crochet
- sk: skip
- sp: space
- st(s): stitch(es)
- RS: right side
Special stitch: Shell = (2 dc, ch 1, 2 dc) in the same stitch or space.
Gauge and Checkpoints
Gauge: 10 sc = 1 in (2.5 cm); 10 sc rows = 1 in (2.5 cm); 5 dc rows = 1 in (2.5 cm).
Make the body panel first. It is your gauge test.
Checkpoints:
– Body Row 1: 11 sc = 1.1 in (2.8 cm) wide.
– Body after Row 9: 1.7 in (4.3 cm) tall.
– Body after Row 10: 1.1 in x 1.8 in (2.8 cm x 4.6 cm).
– Body after border: 1.3 in x 2.0 in (3.3 cm x 5.1 cm).
– Flame after Rnd 2: 0.8 in (2.0 cm) tall x 0.6 in (1.5 cm) wide.
– Base after Row 4: 1.7 in (4.3 cm) across the straight edge, 0.85 in (2.2 cm) tall.
– Base after Row 5 and blocking: 2.4 in x 1.2 in (6.1 cm x 3.0 cm).
If your piece is too big, go down to a 1.25 mm hook. If it is too small, go up to a 1.75 mm hook. Height matters more than width, because the three pieces stack into the 4.0 in (10.2 cm) total.
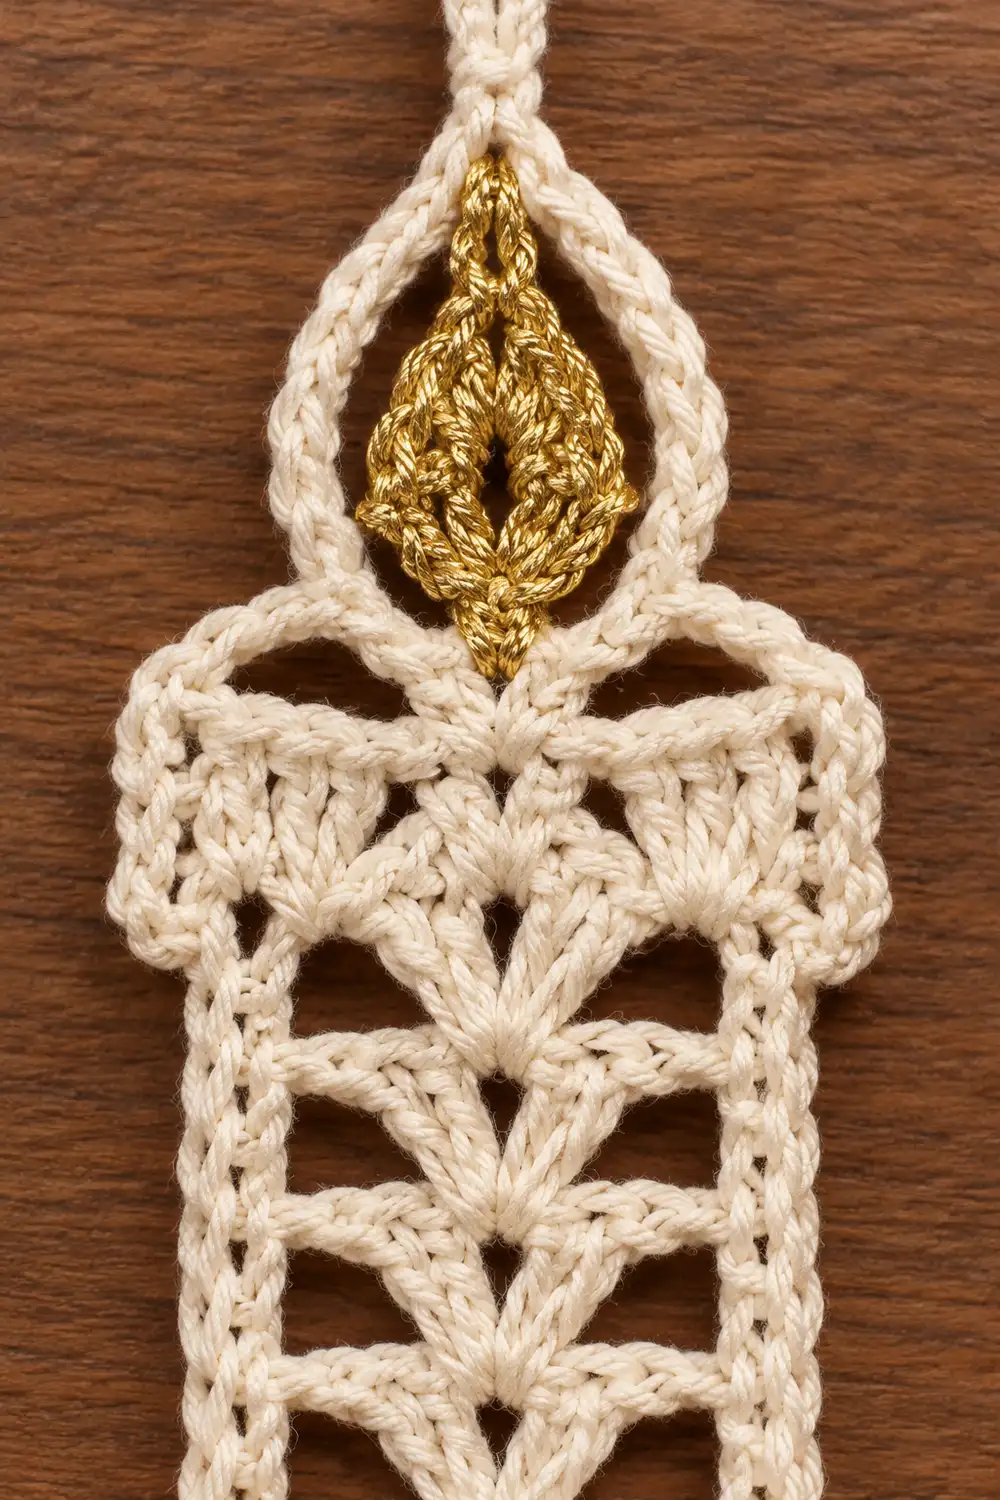
Piece 1: Flame (Gold)
The flame is a teardrop: a rounded bottom and a pointed top.
Ch 6.
Rnd 1: Sc in 2nd ch from hook, hdc in next ch, hdc in next ch, dc in next ch, 5 dc in last ch (rounded bottom). Working along the other side of the chain: dc in next ch, hdc in next ch, hdc in next ch, sc in last ch. Ch 2 for the tip, sl st in first sc. (13 sts + ch-2 tip sp)
The 5 dc in the last chain fan around the end to form the rounded bottom. The ch-2 forms the point.
Rnd 2: Ch 1, sc in each of next 4 sts, 2 sc in each of next 5 dc, sc in each of next 4 sts, (sc, ch 2, sc) in ch-2 tip sp, sl st to first sc.
Count: 13 sts worked 1-per-stitch + 5 extra at the bottom = 18 sc, plus 2 sc in the tip = 20 sc and 1 ch-2 sp.
Fasten off, leaving a 6 in (15.2 cm) tail for sewing.
Piece 2: Candle Body (Cream)
This open panel has two vertical columns of shells divided by a center dc spine.
Ch 12.
Row 1 (RS): Sc in 2nd ch from hook and in each ch across. Turn. (11 sc)
Row 2: Ch 3 (counts as dc), sk next 2 sc, shell in next sc, sk next sc, dc in next sc, sk next sc, shell in next sc, sk next 2 sc, dc in last sc. Turn. (3 dc + 2 shells)
Stitch map for Row 2: dc in st 1, shell in st 4, dc in st 6, shell in st 8, dc in st 11. The layout is symmetrical.
Row 3: Ch 3 (counts as dc), shell in ch-1 sp of next shell, dc in center dc, shell in ch-1 sp of next shell, dc in top of turning ch. Turn. (3 dc + 2 shells)
Rows 4–9: Repeat Row 3. (8 shell rows total, Rows 2–9)
Each new shell sits directly on the shell below, so the fans stack into straight columns.
Row 10: Ch 1, sc in first dc, sc in next 2 dc, sk ch-1 sp, sc in next 2 dc, sc in center dc, sc in next 2 dc, sk ch-1 sp, sc in next 2 dc, sc in top of turning ch. (11 sc)
Check: 1 + 4 + 1 + 4 + 1 = 11. The top edge now matches the 11-st bottom edge.
Do not fasten off. Continue with the Border (see the Border section) before joining.
Piece 3: Scalloped Base (Cream)
The base is a half circle worked in turned rows. The row-ends form the straight top edge, and Row 5 forms the fan scallops.
Row 1: Make a magic ring. Ch 3 (counts as dc), 8 dc in ring. Do not join. Pull the ring closed. Turn. (9 dc)
Row 2: Ch 4 (counts as dc + ch 1), dc in next dc, ch 1, dc in next dc; rep from * across, working the last dc in top of turning ch. Turn. (9 dc, 8 ch-1 sps)*
Row 3: Ch 3 (counts as dc), 2 dc in next ch-1 sp, dc in next dc; rep from * 8 times, working the last dc in 3rd ch of turning ch. Turn. (25 dc)*
Count: 1 + (8 x 3) = 25. This is a growth row, and 25 is its own complete count.
Row 4: Ch 5 (counts as dc + ch 2), sk next 2 dc, dc in next dc, ch 2, sk next 2 dc; rep from * 6 more times, dc in top of turning ch. Turn. (9 dc, 8 ch-2 sps)*
Stitch map: dc lands on sts 1, 4, 7, 10, 13, 16, 19, 22, 25.
Row 5 (scallops): Ch 1, sc in first dc, *sk ch-2 sp, 7 tr in next dc, sk ch-2 sp, sc in next dc; rep from * 3 more times, working the last sc in 3rd ch of turning ch.
Count: 4 fans x 7 tr = 28 tr + 5 sc = 33 sts.
Fans sit on dc 2, 4, 6 and 8. Sc anchors sit on dc 1, 3, 5, 7 and 9. This gives four evenly spaced scallops. The 4th tr of each fan is a scallop point.
Fasten off and weave in the ends.
Make All Pieces
- Gold: 1 flame
- Cream: 1 body (with border), 1 base
- Gold beads: 4, one at each scallop point
Layout (top to bottom):
ROW 1: GOLD (flame)
ROW 2: CREAM (body panel)
ROW 3: CREAM (base) + 4 GOLD beads at fan tips
Joining
Work the body Border (next section) before joining, because the joins use its sc.
Method: Whipstitch with a tapestry needle, through both loops of the body’s border sc and through the matching point on the other piece. Work with the RS facing.
Body to base: The bottom border run has 15 sc. Sc 1 and 15 face the sides, so leave them free. Sew sc 2–14 (13 sts, 1.3 in / 3.3 cm) to the base’s straight edge:
- Center sc (sc 8) goes over the magic ring.
- Six sc on each side go into the row-ends: 2 sc into each of Rows 1, 2 and 3.
That is 1 + 6 + 6 = 13. Each dc row-end is 0.2 in (0.5 cm) and takes 2 sc, which matches the 10 sc/in gauge. The body ends at the edge of Row 3, 0.65 in (1.7 cm) from center on each side. This leaves Rows 4–5 of the base extending outward.
Flame to body: Center the flame’s rounded bottom on the body’s top run. Sew the 5 bottom-center sc of the flame (the middle of its 10 increase sc) to body top sc 6–10. That span is 0.5 in (1.3 cm).
Tension: Pull each stitch snug but not tight. The seam should lie flat without puckering or gapping.
Size checkpoint: The joined piece measures 0.8 + 2.0 + 1.2 = 4.0 in (10.2 cm) tall, and 2.4 in (6.1 cm) wide at the base.
Border
The border is a smooth single round of sc around the body panel only.
Border gauge: Work 10 sc per inch (2.5 cm), the same as the panel.
Continue from the end of Row 10, with the RS facing.
Border Rnd:
– Top run: Ch 1, 3 sc in first st, sc in next 9 sts, 3 sc in last st. (15 sc)
– Side 1: Working down the row-ends: 1 sc in the Row 10 row-end, 2 sc in each dc row-end (Rows 9 to 2) = 16, then 1 sc in the Row 1 row-end. (18 sc)
– Bottom run: Working in the free loops of the foundation chain: 3 sc in first ch, sc in next 9 ch, 3 sc in last ch. (15 sc)
– Side 2: Same as Side 1. (18 sc)
– Sl st to first sc. Fasten off, leaving an 8 in (20.3 cm) tail.
Here the top and bottom runs include their 3-sc corner groups. The side counts do not include corners.
Total: 66 sc. Count: 22 sts worked 1-per-stitch (11 top + 11 bottom) + 8 extra corner sc (2 extra at each of 4 corners) + 36 row-end sc (18 per side) = 66.
Why the math works:
– The sides span 1.8 in (4.6 cm): two sc rows at 0.1 in (0.3 cm) each plus eight dc rows at 0.2 in (0.5 cm) each.
– 18 sc over 1.8 in is 10 sc/in, which matches gauge.
– The top and bottom have 11 sts over 1.1 in (2.8 cm), also 10 sc/in.
– One sc added on each edge gives 0.1 in (0.3 cm) depth. The body grows to 1.3 in x 2.0 in (3.3 cm x 5.1 cm).
Final Blocking
- Weave in all ends except the beading thread.
- Lightly mist the ornament with water.
- Pin it RS up on the mat, starting with the body’s straight sides.
- Pin the base straight edge level, then pin each of the 4 fan tips outward to 2.4 in (6.1 cm) total width.
- Pin the flame tip straight up so the ornament is 4.0 in (10.2 cm) tall.
- Open each shell’s ch-1 space with a pin tip.
- Spray with starch and let it dry completely before unpinning.
- After drying, sew one gold bead to the 4th tr of each fan using gold thread. Knot securely on the WS.
Final Quality-Control Checklist
- Flame: 20 sc and a ch-2 tip, 0.8 in x 0.6 in (2.0 cm x 1.5 cm).
- Body: 11 sts across, 10 rows, 2 straight shell columns.
- Body border: 66 sc, 1.3 in x 2.0 in (3.3 cm x 5.1 cm).
- Base: 33 sts in Row 5, 4 equal scallops.
- Body centered on the base. Sc 2–14 joined, and sc 1 and 15 free.
- Total size: 4.0 in x 2.4 in (10.2 cm x 6.1 cm).
- 4 beads secure at the fan tips.
- No loose ends visible on the RS.
Troubleshooting
- Shell columns lean: You missed the ch-1 sp. Work each shell into the space, not into a dc.
- Body too wide: Tight turning chains pull the edges in, while loose shells widen the middle. Check your tension, or go down a hook size.
- Base cups: Row 3 is short of stitches. Recount for 25 dc.
- Base ruffles: Your tension is too loose. Use a smaller hook.
- Scallops uneven: Recheck the Row 4 stitch map so the dc land on sts 1, 4, 7 and so on.
- Flame not pointed: Keep the tip at ch 2 and pin it sharply during blocking.
- Seams pucker: Loosen your whipstitches and confirm 2 sc per row-end.
Care
Hand wash in cool water, press out the water in a towel, and re-block flat. Re-starch if needed, and store flat away from humidity.
Final Notes
The measurement chain is simple:
- Body: 11 sc = 1.1 in (2.8 cm) wide and 10 rows = 1.8 in (4.6 cm) tall. The border brings it to 1.3 in x 2.0 in (3.3 cm x 5.1 cm).
- Flame: 0.8 in (2.0 cm) on top.
- Base: 1.2 in (3.0 cm) below and 2.4 in (6.1 cm) wide.
- Total: 4.0 in (10.2 cm) tall.
Check your gauge on the body first, and the rest falls into place. Optional: make several candles at once for a matching set of tree ornaments.
Happy crocheting!