

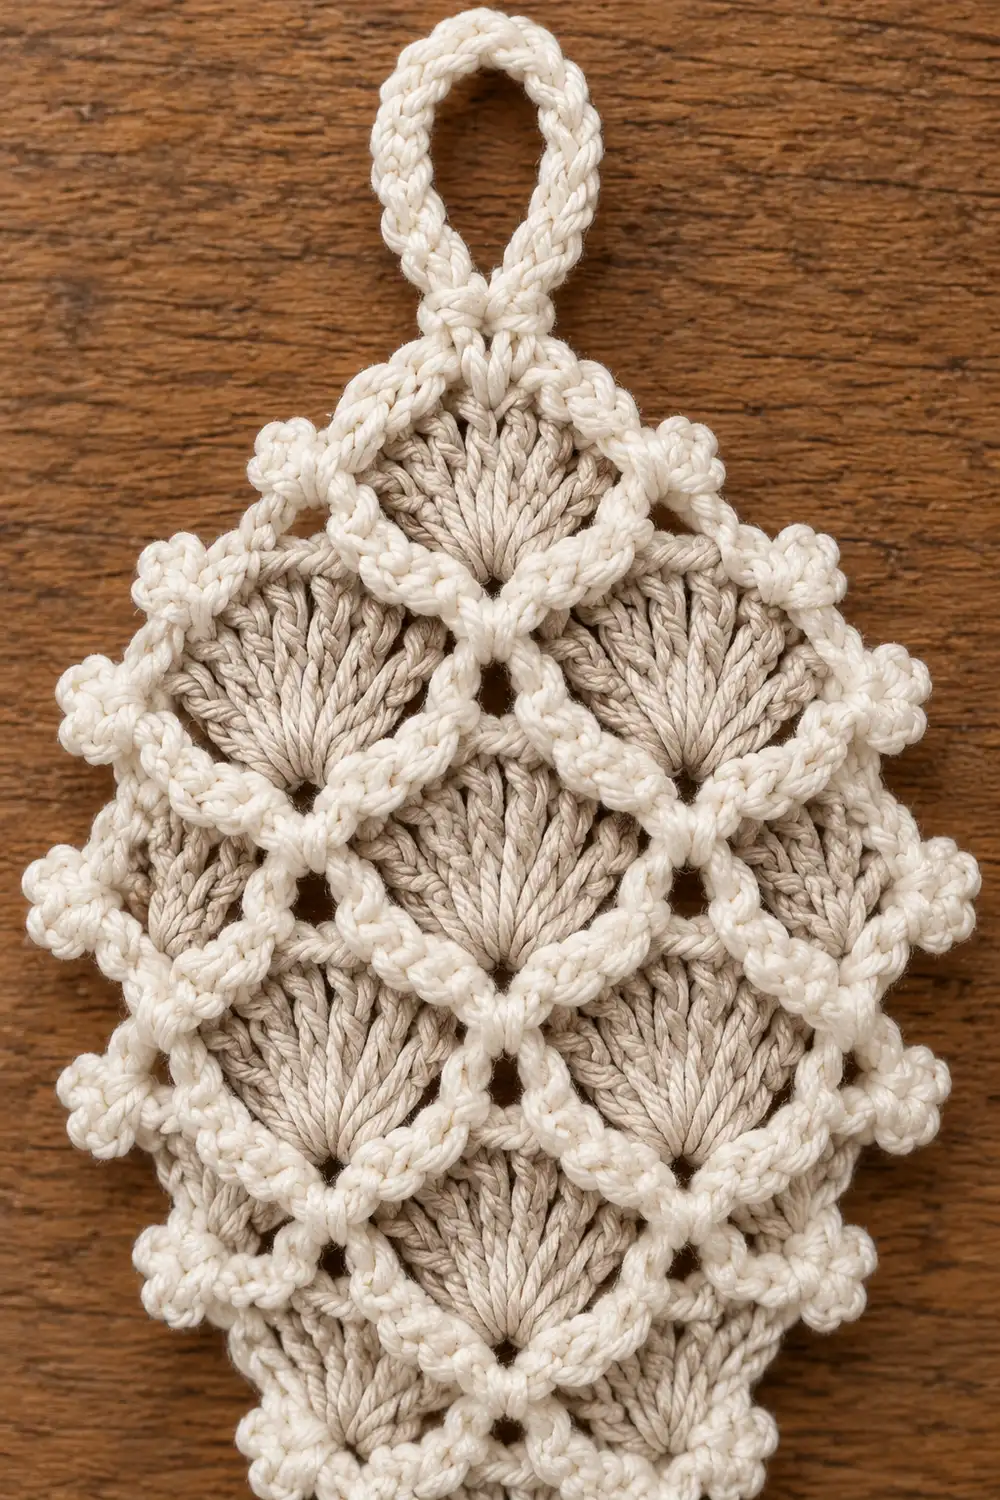
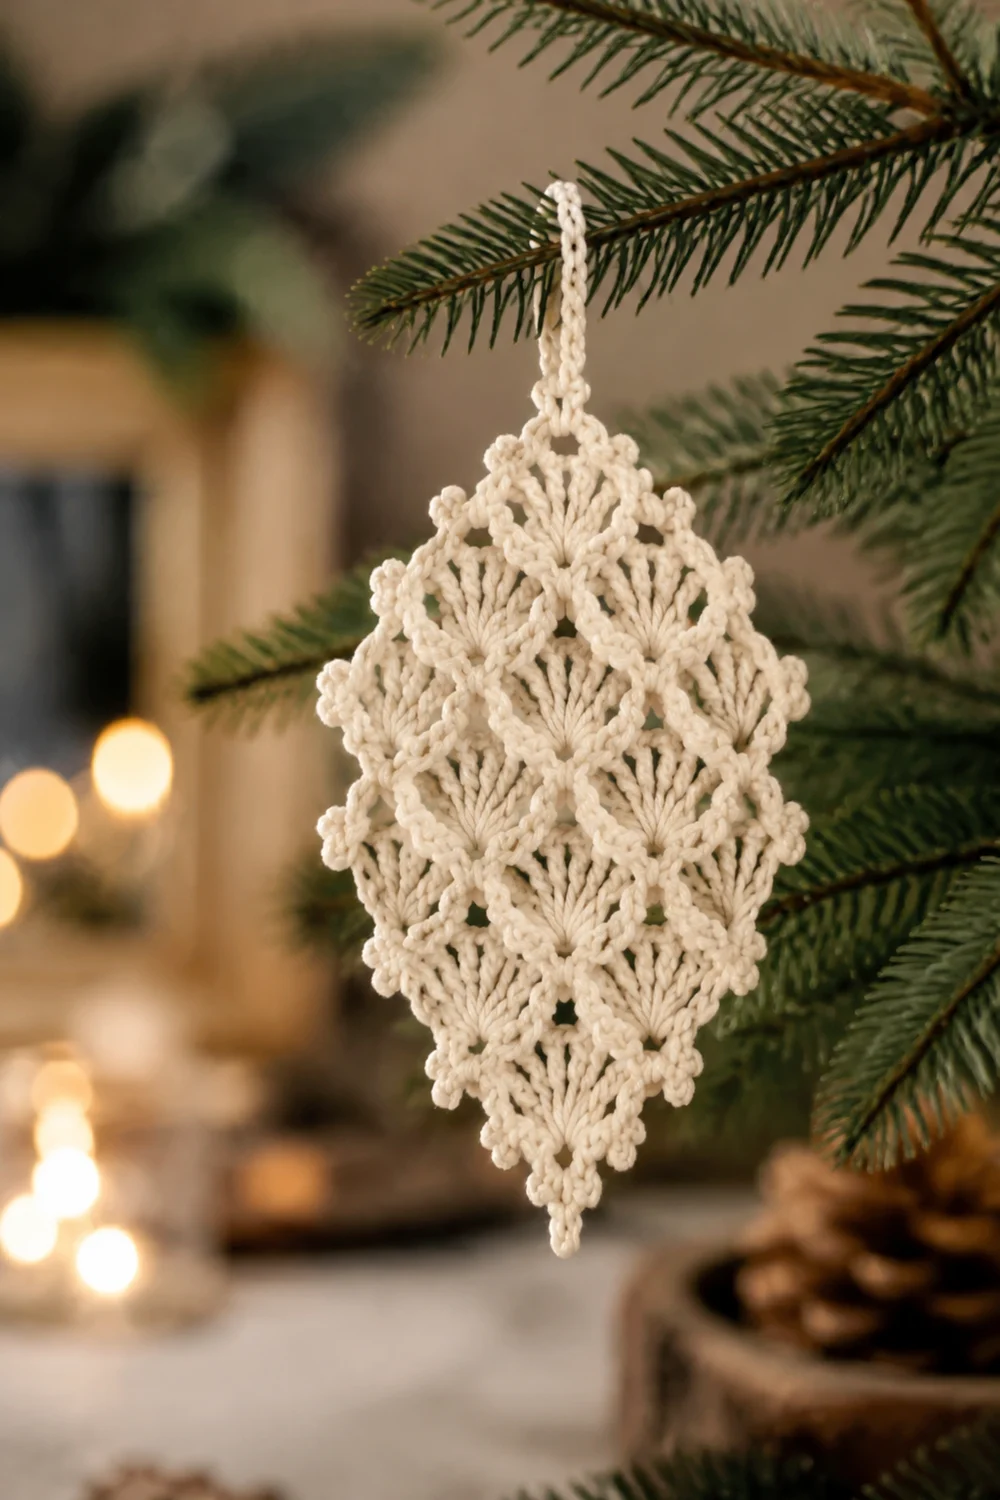
This delicate diamond motif is built from stacked fans that open into a light, lacy lattice. Each fan radiates from a single gathered base stitch, and the open spaces between fans give the piece its airy, lace-like look. A small chain loop at the top makes it ready to hang.
The motif is worked entirely in one cream or off-white yarn. The single color lets the texture carry the design: the fans stand slightly forward from the chain lattice, so the finished piece has a gentle, dimensional quality. Small picots along the outer edge add a scalloped finish where the fans meet.
The pattern uses US crochet terms. The finished motif measures 3.75 in (9.5 cm) wide and 4.25 in (10.8 cm) tall, or 5 in (12.7 cm) tall including the hanging loop.
The motif is a single piece worked flat in 9 rows, starting at the bottom point. Fan rows alternate with chain-lattice rows. The tiers grow from 1 fan to 3 fans, then decrease back to 1 fan. Two border rounds then smooth the outline and add the picots and hanging loop.
Finished Size and Construction
- Finished size: 3.75 in (9.5 cm) wide x 4.25 in (10.8 cm) tall; 5 in (12.7 cm) tall with loop
- Skill level: Easy-Intermediate
- Terminology: US crochet terms
- Yarn weight: Sport weight (#2) mercerized cotton
- Hook: 2.75 mm (US C/2)
- Number of pieces: 1
- Layout: One diamond (lozenge) motif with a fan arrangement of 1-2-3-2-1
- Piece size before border: 3.25 in (8.3 cm) wide x 3.75 in (9.5 cm) tall
- Border depth: 0.25 in (0.6 cm) on each edge, 2 rounds
Materials
Choose a smooth, mercerized cotton. Mercerized cotton holds the fan shapes crisply, takes starch well, and makes the picots show clearly. Fuzzy or very soft yarns blur the open spaces.
Yarn
– Cream / off-white: 8 g, about 25 m
Tools
– 2.75 mm (US C/2) crochet hook
– Tapestry needle
– Scissors
– Blocking mat and rustproof pins
– Spray starch or fabric stiffener diluted 1:1 with water
– Optional: ribbon or twine for hanging
The yarn quantity includes a margin of about 50%. The motif itself uses roughly 5 g (16 m).
Abbreviations (US Terms)
- ch – chain
- sl st – slip stitch
- sc – single crochet
- dc – double crochet
- st(s) – stitch(es)
- sp(s) – space(s)
- tch – turning chain
Special stitches
- Fan: Work 7 dc in the indicated space. All 7 stitches share one base and spread outward. The 4th dc is the center dc of the fan. The dc tips are counted from the outer edge inward, so the outermost dc is dc 1.
- Picot: Ch 3, sl st in 3rd ch from hook.
Gauge and Checkpoints
Gauge is measured with checkpoints rather than a traditional swatch. Work Rows 1–3 as your test, then measure before you continue.
- After Row 1: one fan measures 1 in (2.5 cm) wide across the tips and 0.5 in (1.3 cm) tall.
- After Row 3: 2.25 in (5.7 cm) wide across the outer fan tips.
- After Row 5: 3.25 in (8.3 cm) wide and 2 in (5.1 cm) tall.
- After Row 9: 3.25 in (8.3 cm) wide and 3.75 in (9.5 cm) tall.
- Border gauge: 6 sc = 1 in (2.5 cm) along the edge in Border Round 2.
If your piece is too big: change to a 2.5 mm hook. Also check that your chain arches are not loose.
If your piece is too small: change to a 3.0 mm hook. Also relax your tension on the dc so each fan can open fully.
Fix any sizing problem after Row 3. Do not wait until the end.
Pattern
Every row is worked flat. Turn at the end of each row.
Row 1 (1 fan): Ch 4. Work 6 dc in the 4th ch from hook. The skipped 3 ch count as the first dc. (7 dc = 1 fan)
The first ch you made is now the base of the fan, where all 7 stitches meet. This point becomes the bottom corner of the motif.
Row 2 (increase lattice): Ch 6 (counts as dc + ch 3). Sc in the center dc. Ch 3, dc in the top of tch. (2 dc, 1 sc, 2 ch-3 sps)
Row 3 (2 fans): Ch 1, sc in the first dc. Work a Fan in the first ch-3 sp. Sc in the sc. Work a Fan in the next ch-3 sp. Sc in the 3rd ch of tch. (2 fans = 14 dc, plus 3 sc = 17 sts)
Row 4 (increase lattice): Ch 6 (counts as dc + ch 3). Sc in the center dc of the first fan. Ch 5, sc in the center dc of the next fan. Ch 3, dc in the last sc. (2 dc, 2 sc, 2 ch-3 sps, 1 ch-5 arch = 3 sps)
Row 5 (3 fans): Ch 1, sc in the first dc. Work a Fan in the ch-3 sp. Sc in the sc. Work a Fan in the ch-5 arch. Sc in the sc. Work a Fan in the ch-3 sp. Sc in the 3rd ch of tch. (3 fans = 21 dc, plus 4 sc = 25 sts)
The middle fan sits between the two Row 3 fans. The outer fans sit beyond them. This staggered placement is what creates the lattice effect. Check the Row 5 measurement now.
Row 6 (decrease lattice): Sl st in the first sc and in each of the next 4 dc (5 sl sts). The last sl st lands on the center dc of the first fan. Ch 1, sc in the same st. Ch 5, sc in the center dc of the next fan. Ch 5, sc in the center dc of the last fan. (3 sc, 2 ch-5 arches)
Leave the outer halves of the two edge fans unworked.
Row 7 (2 fans): Ch 1, sc in the first sc. Work a Fan in the ch-5 arch. Sc in the next sc. Work a Fan in the next ch-5 arch. Sc in the last sc. (2 fans = 14 dc, plus 3 sc = 17 sts)
Row 8 (decrease lattice): Sl st in the first sc and in each of the next 4 dc (5 sl sts). Ch 1, sc in the same st. Ch 5, sc in the center dc of the next fan. (2 sc, 1 ch-5 arch)
Row 9 (1 fan): Ch 1, sc in the first sc. Work a Fan in the ch-5 arch. Sc in the last sc. (7 dc + 2 sc = 9 sts)
Fasten off. Weave in the starting tail.
Why the fans look dimensional: Each lattice sc pulls the center of the fan below it slightly backward. The fan tips stay free, so they cup forward a little. This is intentional. Do not try to flatten it out.
Border
The border is worked in rounds around the entire diamond, with the right side facing.
There are 4 corners:
– Top corner: the center dc of the Row 9 fan
– Left and right corners: the outermost dc (dc 1) of each outer Row 5 fan
– Bottom corner: the base of the Row 1 fan
The sides are counted between corners. Corner stitches are listed separately and are not included in any side count.
In some places, the slip stitches from Rows 6 and 8 sit on top of the dc tips. Work into the dc tips beneath these slip stitches.
Round 1 (anchor round): Join yarn with a sc in the top corner st. Ch 2, sc in the same st (top corner made). Then work the following sections in order:
- Upper side A: Sc in dc 3, dc 2, and dc 1 of the Row 9 fan. Ch 2. Sc in dc 3, dc 2, and dc 1 of the outer Row 7 fan. Ch 2. Sc in dc 3 and dc 2 of the outer Row 5 fan. (8 sc, 2 ch-2 sps)
- Side corner: (Sc, ch 2, sc) in dc 1 of the same fan.
- Lower side A: Ch 2, sc in the Row 4 row-end dc. Ch 2, sc in the Row 3 end sc. Ch 2, sc in the Row 2 row-end dc. Ch 2, sc around the post of the outer dc of Row 1. Ch 2. (4 sc, 5 ch-2 sps)
- Bottom corner: (Sc, ch 2, sc) in the base of the Row 1 fan.
- Lower side B: Work Lower side A in reverse, moving upward. (4 sc, 5 ch-2 sps)
- Side corner: (Sc, ch 2, sc) in dc 1 of the other outer Row 5 fan.
- Upper side B: Work Upper side A in reverse, finishing with dc 1, dc 2, and dc 3 of the Row 9 fan. (8 sc, 2 ch-2 sps)
Sl st to the first sc to join.
Round 1 total: (2 x 8) + (2 x 4) + (4 corners x 2) = 32 sc. There are 4 + 10 + 4 = 18 ch-2 sps.
The ch-2 arches on the upper sides bridge the gaps where fans connect. On the lower sides, they span the row-ends.
Round 2 (picot round): Ch 1, sc in the same st as the join. Then:
- Top corner: (Sc, ch 12, sc) in the ch-2 sp. Sc in the next sc. (4 sc in the corner group, counting the first sc, plus the hanging loop)
- Upper side A: Sc in each of the 3 sc. (Sc, picot, sc) in the ch-2 sp. Sc in each of the 3 sc. (Sc, picot, sc) in the ch-2 sp. Sc in each of the 2 sc. (12 sc, 2 picots)
- Side corner: Sc in the sc, (sc, picot, sc) in the ch-2 sp, sc in the sc. (4 sc, 1 picot)
- Lower side A: (Sc, picot, sc) in the ch-2 sp. Then work [sc in the sc, (sc, picot, sc) in the next ch-2 sp] 4 times. (2 + 12 = 14 sc, 5 picots)
- Bottom corner: Work as for the side corner. (4 sc, 1 picot)
- Lower side B: Work as for Lower side A. (14 sc, 5 picots)
- Side corner: (4 sc, 1 picot)
- Upper side B: Work as for Upper side A in reverse. (12 sc, 2 picots)
Sl st to the first sc to join. Fasten off.
Round 2 total: 32 sc (1 in each Round 1 sc) + 36 sc (2 in each of the 18 ch-2 sps) = 68 sc. There are 17 picots plus 1 hanging loop.
Why the math works: At 6 sc per 1 in (2.5 cm), 68 sc cover about 11.3 in (28.7 cm). That matches the outline of a 3.75 x 4.25 in (9.5 x 10.8 cm) diamond.
The picots fold outward and add no length to the edge. Each corner holds 4 sc around a ch-2 sp, which gives the outline room to turn without cupping.
The upper sides carry 4 fewer sc than the lower sides because the top fan rounds the shoulders. Even so, the totals mirror exactly from left to right, so the motif stays symmetrical.
Size checkpoint: The piece should measure 3.5 x 4 in (8.9 x 10.2 cm) after Round 1 and 3.75 x 4.25 in (9.5 x 10.8 cm) after Round 2. The ch-12 loop stands about 0.75 in (1.9 cm) tall.
Final Blocking
- Weave in all ends along the lattice chains. Never weave them through the fans, where they would show.
- Soak the motif in cool water for 5 minutes. Press out the water in a towel without wringing.
- On your mat, mark a diamond 3.75 in (9.5 cm) wide and 4.25 in (10.8 cm) tall.
- Pin all 4 corners first: top, bottom, then both sides.
- Pin each picot outward so the scalloped edge lies evenly.
- Pinch each fan gently so its tips cup slightly forward. This keeps the dimensional look.
- Spray with starch, or brush on diluted stiffener. Let the piece dry completely, at least 12 hours.
- Unpin. Shape the hanging loop with your fingers so it stands upright.
Final Quality-Control Checklist
- The fan arrangement reads 1-2-3-2-1 from bottom to top.
- Every fan has exactly 7 dc, and each fan’s center dc is anchored by a lattice sc.
- The fans in each tier sit staggered between the fans of the tier below.
- Round 1 has 32 sc and 18 ch-2 sps.
- Round 2 has 68 sc, 17 picots, and 1 loop.
- The left and right sides mirror each other.
- The motif measures 3.75 x 4.25 in (9.5 x 10.8 cm), or 5 in (12.7 cm) tall with the loop.
- The fans cup slightly. The lattice spaces are open, not puckered.
Troubleshooting
The fans ruffle or overlap: Your dc are too loose, or there are extra dc in a fan. Recount to 7 per fan, or go down a hook size.
The fans look squeezed: Your lattice chains are too tight. Loosen the ch-5 arches, or chain with a hook one size larger.
The motif is lopsided: You most likely skipped or added a slip stitch in Row 6 or Row 8. There should be exactly 5 sl sts, ending on the center dc.
The border cups: Your Round 2 tension is too tight. Rework it slightly looser, keeping the same count.
The border ruffles: You may have worked 3 sc into a ch-2 sp. Each ch-2 sp takes exactly 2 sc plus a picot.
The hanging loop flops over: Stiffen the loop separately while blocking, or work a round of sl sts along the chain.
Care
Hand wash cool and dry flat. Re-starch and re-block as needed to restore the fan shape.
Optional: For a set, make several motifs and hang them individually on ribbons of different lengths.
Final Notes
The measurement chain is straightforward:
- One fan measures 1 in (2.5 cm) wide.
- Row 5 measures 3.25 in (8.3 cm) wide.
- After Row 9, the piece measures 3.25 x 3.75 in (8.3 x 9.5 cm).
- Two border rounds add 0.25 in (0.6 cm) to each edge, for a finished size of 3.75 x 4.25 in (9.5 x 10.8 cm).
- The hanging loop brings the total height to 5 in (12.7 cm).
If you hit each checkpoint, the counts and the final size will line up.
Happy crocheting!