

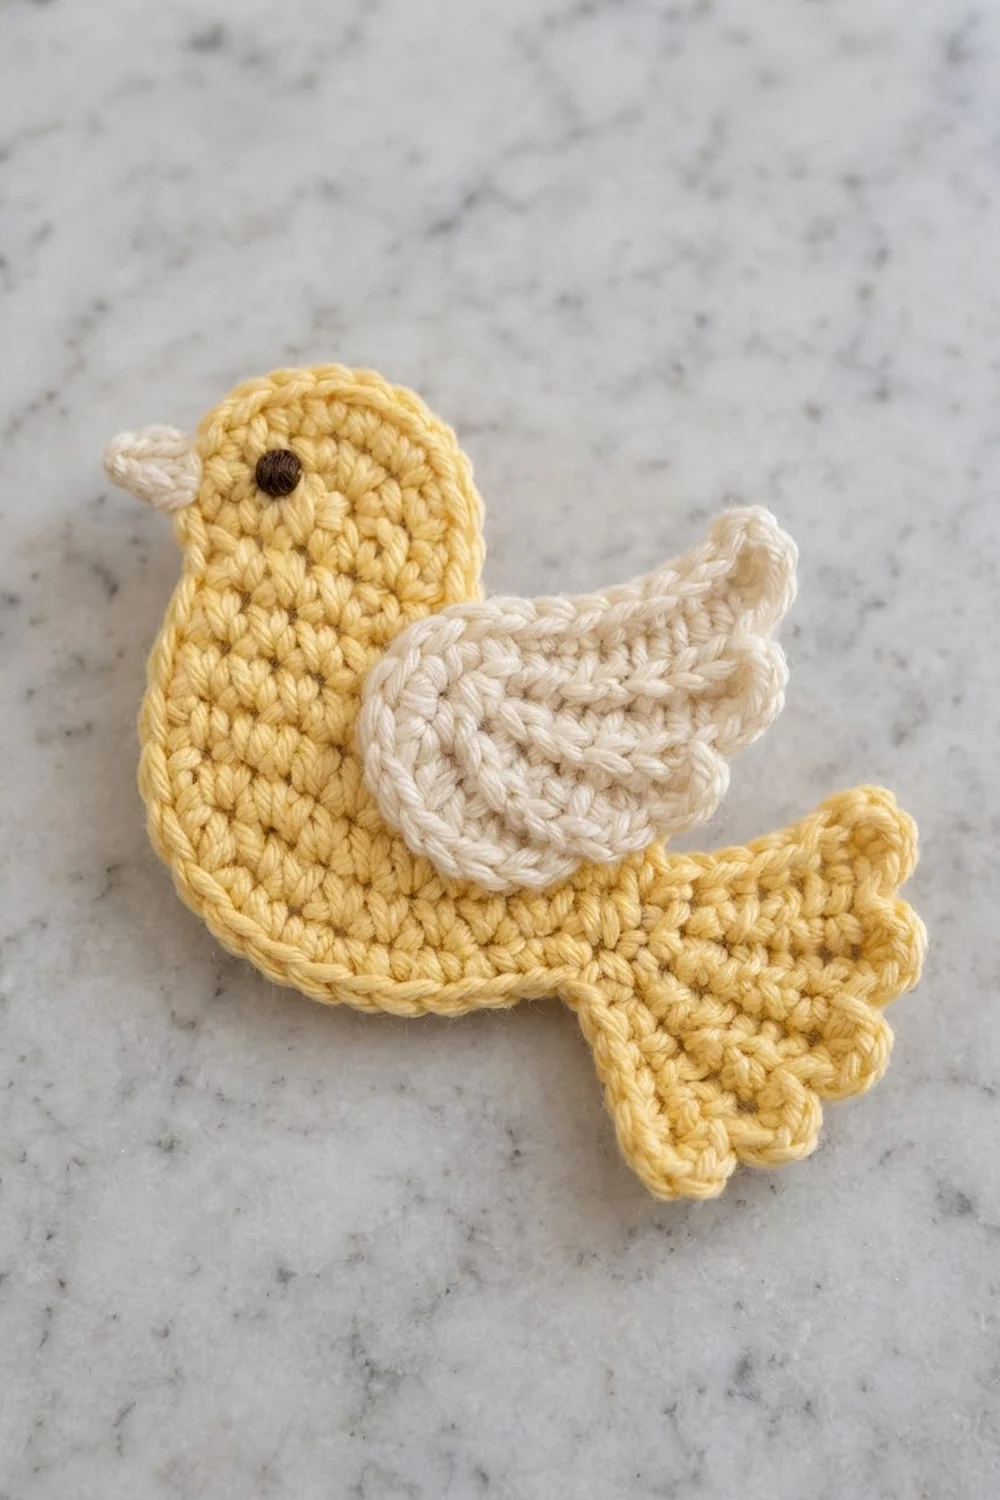
The Golden Hope Dove is a small, flat crochet dove with a soft, classic look. The body is a warm buttery yellow, and a cream wing sits on top of it like a layered appliqué. The round head, sloping back, and fanned five-lobed tail give it a clear dove shape that reads well from across a room.
The style is simple and tidy. The body is dense single crochet, the tail uses half double crochet for a gently ribbed texture, and one round of single crochet frames the whole silhouette. A tiny cream beak and an embroidered dark brown eye finish the face.
This pattern uses US crochet terms throughout. The finished dove measures about 5.5 in (14.0 cm) from beak to tail tip and 3.3 in (8.4 cm) tall.
Construction is straightforward. You work the body flat in rows, then work the tail directly off the side of the body, so there is nothing to sew there. One border round goes around the body and tail together. Then you make the wing and beak separately, sew them on, and embroider the eye.
Finished Size and Construction
- Finished size: 5.5 in (14.0 cm) long including the beak, 3.3 in (8.4 cm) tall
- Skill level: Advanced beginner
- Terminology: US crochet terms
- Yarn weight: DK (light #3)
- Hook: 3.5 mm (E-4)
- Number of pieces: 3 crocheted parts (body with tail worked in, wing, beak), assembled into 1 dove
- Layout: Single motif; wing and beak layered on the body
- Piece size (body only, after border): 3.6 in (9.1 cm) wide x 3.3 in (8.4 cm) tall
- Size before border: 4.8 in (12.2 cm) long body plus tail x 2.9 in (7.4 cm) tall
- Border depth: 1 round of sc, about 0.2 in (0.5 cm) on every edge
Materials
Use a smooth DK yarn so the stitches stay clear and the edges stay crisp. A cotton or cotton blend gives the firmest, flattest result. Soft acrylic also works if you prefer a gentler drape. Avoid fuzzy or textured yarns, because the feathers and tail lobes will lose their definition.
Yarn (for one dove):
- Pale butter yellow (body, tail, border): 10 g, about 24 m
- Cream (wing and beak): 5 g, about 12 m
- Dark brown embroidery floss or yarn (eye): a 12 in (30.5 cm) length
These quantities include a margin for your gauge swatch and sewing tails.
Tools:
- 3.5 mm (E-4) crochet hook
- Tapestry needle
- Scissors
- Stitch markers (2 to 3)
- Ruler or tape measure
- Blocking mat and rust-proof pins
- Spray bottle with water
Abbreviations (US Terms)
- ch – chain
- sl st – slip stitch
- sc – single crochet
- hdc – half double crochet
- dc – double crochet
- tr – treble crochet
- sc2tog – single crochet 2 together (decrease)
- st(s) – stitch(es)
- RS / WS – right side / wrong side
- [ ] x n – repeat the bracketed steps n times
Special stitches:
- sc2tog: Insert hook in next st, yarn over, pull up a loop. Insert hook in following st, yarn over, pull up a loop (3 loops on hook). Yarn over and pull through all 3 loops.
- Tail lobe: (hdc, dc, hdc) all in the same st.
Gauge and Checkpoints
Gauge: 20 sc and 22 rows = 4 in (10.2 cm) with a 3.5 mm hook. That works out to 5 sc and 5.5 rows per inch (2.5 cm).
Make one complete body first and treat it as your gauge test. Measure at each checkpoint below before you go on.
- After Row 1: 8 sc measure 1.6 in (4.1 cm) wide.
- After Row 5: 16 sc measure 3.2 in (8.1 cm) wide.
- After Row 8: the body is about 1.5 in (3.8 cm) tall.
- After Row 16: the body is 2.9 in (7.4 cm) tall.
- After Tail Row 5: the tail extends about 1.2 in (3.0 cm) from the body edge.
- After Tail Row 6: the tail extends 1.6 in (4.1 cm), so body plus tail is 4.8 in (12.2 cm) long.
- After the border: 5.2 in (13.2 cm) long without the beak, 3.3 in (8.4 cm) tall.
Too big? Go down to a 3.25 mm hook, or crochet a little more firmly.
Too small? Go up to a 3.75 mm hook.
A small size difference is fine for a single dove. If you plan to make several doves, keep them all at the same gauge so they match.
Body
Work in rows. The ch 1 at the start of each row does not count as a stitch.
Picture the dove facing left with its RS toward you. RS rows start at the tail side (right) and end at the head side (left). WS rows start at the head side.
With yellow, ch 9.
Row 1 (RS): Sc in 2nd ch from hook and in each ch across. (8 sc)
Row 2 (WS): Ch 1, turn. 2 sc in first st, sc in next 6 sts, 2 sc in last st. (10 sc)
Row 3: Ch 1, turn. 2 sc in first st, sc in next 8 sts, 2 sc in last st. (12 sc)
Row 4: Ch 1, turn. 2 sc in first st, sc in next 10 sts, 2 sc in last st. (14 sc)
Row 5: Ch 1, turn. 2 sc in first st, sc in next 12 sts, 2 sc in last st. (16 sc)
Rows 1 to 5 make the rounded belly.
Rows 6–8: Ch 1, turn. Sc in each st across. (16 sc)
Now shape the sloping back on the tail side. The head side stays straight.
Row 9 (RS): Ch 1, turn. Sc2tog, sc in next 14 sts. (15 sc)
Row 10 (WS): Ch 1, turn. Sc in next 13 sts, sc2tog. (14 sc)
Row 11: Ch 1, turn. Sc2tog, sc in next 12 sts. (13 sc)
Row 12: Ch 1, turn. Sc in next 11 sts, sc2tog. (12 sc)
Row 13: Ch 1, turn. [Sc2tog] x 2, sc in next 8 sts. (10 sc)
Row 14: Ch 1, turn. Sc in next 8 sts, sc2tog. (9 sc)
Round off the top of the head on both sides.
Row 15: Ch 1, turn. Sc2tog, sc in next 5 sts, sc2tog. (7 sc)
Row 16: Ch 1, turn. Sc2tog, sc in next 3 sts, sc2tog. (5 sc)
Fasten off and weave in the ends. The body is now 3.2 in (8.1 cm) wide at its widest point and 2.9 in (7.4 cm) tall.
Tail
The tail is worked off the row-ends on the tail side of the body. Its taller hdc stitches lie along the length of the tail, which creates the ribbed look.
Tail Row 1 (RS): With RS facing, join yellow to the tail-side row-end of Row 4. Ch 1. Working upward, sc once into each row-end of Rows 4 through 9. (6 sc)
Tail Row 2 (WS): Ch 1, turn. Sc in each st. (6 sc)
Tail Row 3: Ch 2 (does not count as a stitch), turn. [Hdc in next st, 2 hdc in next st, hdc in next st] x 2. (8 hdc)
Tail Row 4: Ch 2, turn. [Hdc in next 3 sts, 2 hdc in next st] x 2. (10 hdc)
Tail Row 5: Ch 2, turn. Hdc in each st. (10 hdc)
Tail Row 6 (lobe row): Ch 1, turn. [Tail lobe (hdc, dc, hdc) in next st, sl st in next st] x 5. (5 lobes: 15 lobe sts + 5 sl sts)
Fasten off and weave in the ends.
The lobe row is worked on the WS, but lobes look the same from both sides. The sl sts sitting between the lobes create the grooves that separate the five scallops.
Wing
The wing is worked in joined rounds around a foundation chain, so it starts as an oval. Then three feathers are worked along one long side.
With cream, ch 9.
Rnd 1: Sc in 2nd ch from hook and in next 6 ch. Work 3 sc in last ch. Rotate and work along the underside of the chain: sc in next 6 ch, then 2 sc in the last ch (the same ch that holds the first sc). Join with sl st to first sc. (7 + 3 + 6 + 2 = 18 sc)
Rnd 2: Ch 1. 2 sc in first st, sc in next 6 sts, 2 sc in each of next 3 sts, sc in next 6 sts, 2 sc in each of last 2 sts. Join. (24 sc)
In Rnd 2, sts 9–14 form the rounded “root” end, sts 15–20 are the upper long side, and sts 21–24 plus 1–2 form the “tip” end.
Rnd 3 (feather round): Ch 1. Sc in first 14 sts. Then make the feathers:
– Feather 1: (hdc, 2 dc, hdc) in st 15, sl st in st 16.
– Feather 2: (dc, 2 tr, dc) in st 17, sl st in st 18.
– Feather 3: (dc, 3 tr, dc) in st 19, sl st in st 20.
Sc in last 4 sts. Join with sl st to first sc. (18 sc + 13 feather sts + 3 sl sts = 34 sts)
Fasten off and leave a 12 in (30.5 cm) tail for sewing. The wing measures about 2 in (5.1 cm) long and 1.5 in (3.8 cm) tall including the feathers. The feathers get bigger toward the tip end, which is the end that will point back toward the dove’s tail.
Beak
With cream, ch 4.
Row 1: Sl st in 2nd ch from hook, sc in next ch, hdc in last ch. (3 sts)
Fasten off and leave an 8 in (20.3 cm) tail. The beak is a small wedge about 0.3 in (0.8 cm) long. The hdc end is the wide base.
Border
The border is one round of sc in yellow. It goes around the body and tail together and gives the dove its smooth outline.
Border gauge: The same 5 sc per inch (2.5 cm). Along row-ends, work 1 sc per sc row and 2 sc per hdc row.
With RS facing, join yellow in the last (tail-side) st at the top of Row 16. Ch 1, then work counterclockwise:
- Head top (across Row 16): 2 sc in first st, sc in next 3 sts, 2 sc in last st. (7 sc)
- Head side (row-ends of Rows 15 down to 1): 1 sc in each row-end. (15 sc)
- Belly (underside of the foundation chain, 8 sts): 2 sc in first st, sc in next 6 sts, 2 sc in last st. (10 sc)
- Lower tail side of body (row-ends of Rows 1–3): 1 sc in each. (3 sc)
- Lower tail edge (row-ends of Tail Rows 1–5): 1 sc in each sc row-end and 2 sc in each hdc row-end. (1 + 1 + 2 + 2 + 2 = 8 sc)
- Lobes (across Tail Row 6, working upward): [Sl st in next sl st, sc in next hdc, 2 sc in next dc, sc in next hdc] x 5. (20 sc + 5 sl sts)
- Upper tail edge (row-ends of Tail Rows 5–1): 2 sc in each hdc row-end and 1 sc in each sc row-end. (2 + 2 + 2 + 1 + 1 = 8 sc)
- Back (row-ends of body Rows 10–16): 1 sc in each. (7 sc)
Join with sl st to the first sc. Total: 7 + 15 + 10 + 3 + 8 + 20 + 8 + 7 = 78 sc, plus 5 sl sts. Fasten off and weave in the ends.
Why the math works: At this gauge, one sc row is about as tall as one sc stitch is wide, so 1 sc per sc row-end lies flat. An hdc row is roughly twice as tall, so it needs 2 sc. The increases are placed only at tight curves: the two head-top corners, the two belly corners, and the dc tip of each lobe. These are the spots where a plain sc edge would pull in and cup. The sl sts between the lobes keep the grooves crisp instead of filling them in.
Attach the Wing, Beak, and Eye
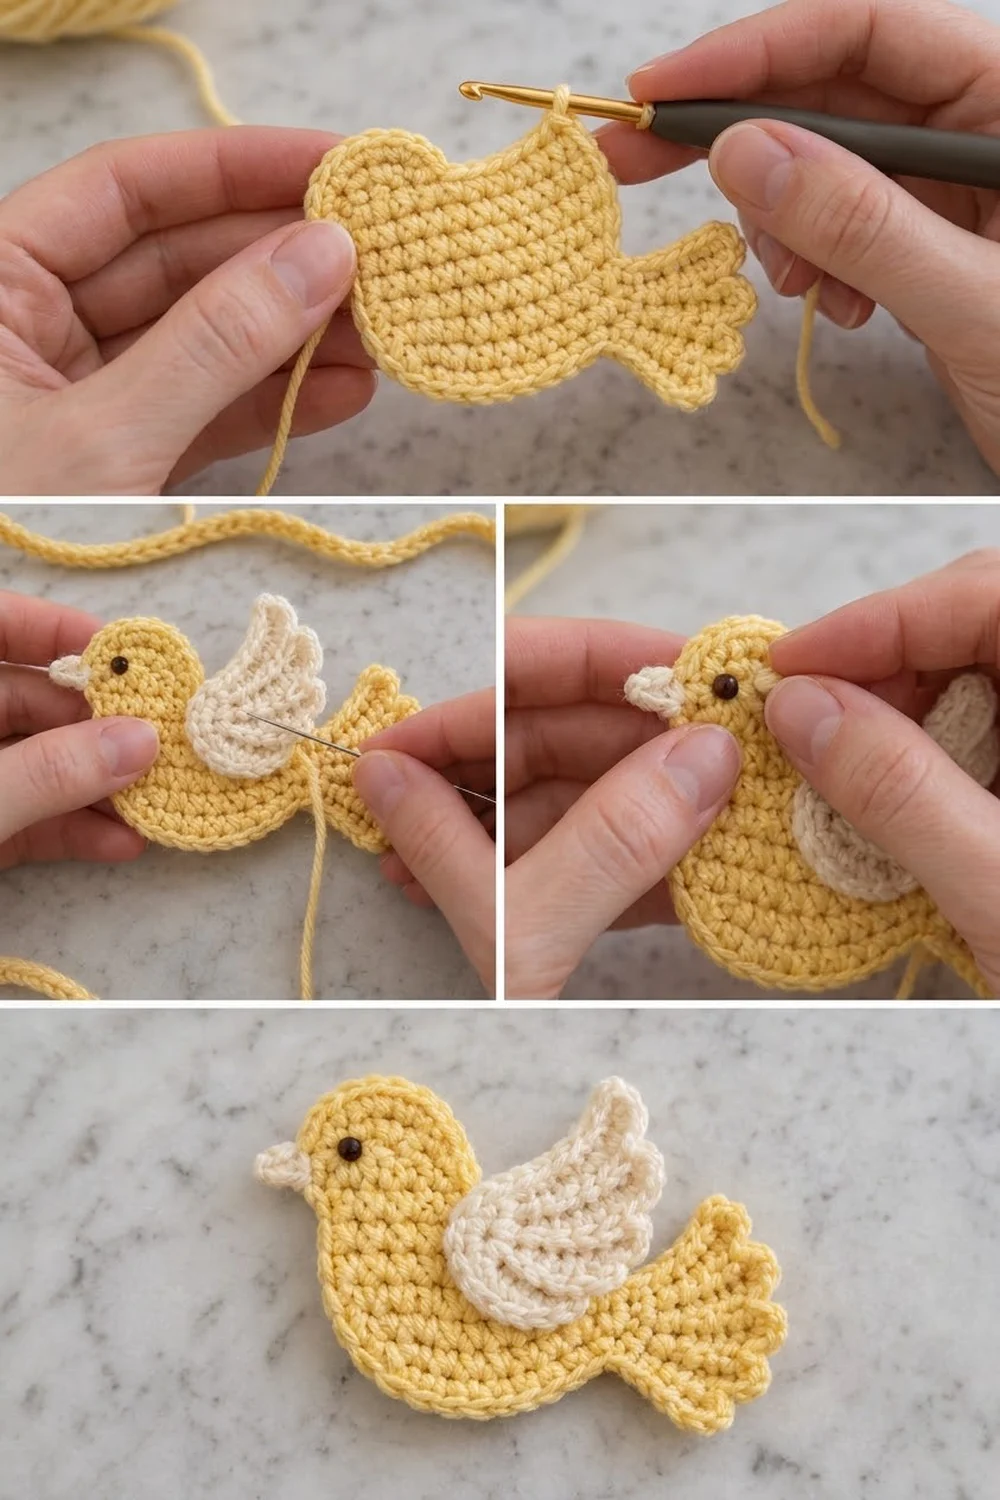
- Wing: Lay the wing on the RS of the body with the rounded root end over Rows 6–8, roughly at the center of the body. Angle it so the feathers point up and back toward the tail. Feather 3 should rise about 0.4 in (1.0 cm) above the back line. Pin it in place. With the cream tail, whipstitch through the back loops of the Rnd 3 sc all the way around the root and lower edge. Tack each feather once at its base and leave the tips free.
- Beak: Place the wide hdc end against the head-side border at the level of Rows 13–14 so the point faces forward. Sew it with 3 to 4 small stitches.
- Eye: With dark brown floss, make a French knot on Row 14, 3 sts in from the head-side edge, wrapping 2 to 3 times. Secure it on the WS.
Final Blocking
- Lightly spray the dove with water until it is damp but not soaked.
- Lay it RS up on the blocking mat.
- Pin the body to 3.6 in (9.1 cm) wide and 3.3 in (8.4 cm) tall.
- Pin the full length from the beak base to the tail tip at 5.2 in (13.2 cm).
- Fan the tail evenly and pin into each groove between the lobes so all five scallops spread equally.
- Pin each feather tip on the wing so it lies flat and points outward.
- Let it dry completely, usually 6 to 12 hours, before removing the pins.
Final Quality-Control Checklist
- Body has 16 rows, with 5 sts at the head top.
- Tail has 6 rows ending in 5 even, separated lobes.
- Border total is 78 sc plus 5 sl sts.
- Finished size is 5.5 in (14.0 cm) long including the beak and 3.3 in (8.4 cm) tall.
- Wing has 3 feathers that get bigger toward the tail, and the tips lift above the back line.
- Beak points forward and sits level with the eye.
- Eye knot is firm and secured on the WS.
- All ends are woven in, and nothing shows on the RS.
- Dove lies flat with no cupping or ruffling.
Troubleshooting
- Body cups like a bowl: Your increases are too tight, or your gauge is tight. Go up a hook size or loosen your tension on Rows 2–5.
- Edges ruffle after the border: You added extra sc along the row-ends. Go back to exactly 1 sc per sc row and 2 per hdc row.
- Tail lobes blend together: Make sure each sl st goes into its own stitch between lobes, and work a sl st into each of those sl sts during the border.
- Tail curls toward one side: Count Tail Rows 3 and 4 again. Uneven increases pull the fan off center. Steam-block it straight.
- Wing feathers flop: Use tighter tr stitches or a smaller hook for the wing, and block the tips firmly.
- Wing looks lumpy when sewn: Sew only through the back loops of Rnd 3, and don’t pull the sewing yarn tight.
- Beak twists: Anchor both corners of the hdc end before sewing the middle.
Care
Hand wash in cool water with mild soap, press out the water in a towel, and dry flat. Reshape the tail lobes and feathers while the dove is still damp.
Final Notes
The measurement chain is simple. The body is 3.2 in (8.1 cm) wide and 2.9 in (7.4 cm) tall. The tail adds 1.6 in (4.1 cm), for 4.8 in (12.2 cm) in length before the border. The border adds 0.2 in (0.5 cm) on every edge, bringing the dove to 5.2 in (13.2 cm) by 3.3 in (8.4 cm). The beak adds 0.3 in (0.8 cm), for a finished length of 5.5 in (14.0 cm).
If you check each stage against these numbers, your dove will come out flat, balanced, and true to shape. You can use it as an ornament, a gift topper, or an appliqué on a bag or sweater. In the photo, several of these doves hang from a simple yellow chain cord.
Happy crocheting!